Monday, October 12, 2020

Frilly Frame Quatrefoil Die Focused Cards by Ashley and Mayra

Hello friends! It's Ashley with a sparkly, monochrome Christmas card featuring the newest in the Frilly Frames series - Frilly Frames Quatrefoil!

Sunny Studio Stamps: Frilly Frame Dies Classy Christmas Inside Greetings Winter Card by Ashley Ebben

I started with a kraft card base and splattered it with a bit of white acrylic paint. I added a white die cut I made with the combination of Frilly Frames Quatrefoil and Frilly Frames Retro Petals. The mixing and matching options with the Frilly Frames series is just incredible!

I set the card base aside and stamped several poinsettias and pinecones from Classy Christmas onto white, cold press watercolor paper in VersaMark ink. I embossed with metallic gold and then again with glitter gold embossing powders for a super sparkly gold outline. I used the Pinkfresh Studio Wild Truffles ink cubes as watercolors for the images. I splattered them with white and gold acrylic inks, then die cut them with the matching dies.

Sunny Studio Stamps: Frilly Frame Dies Classy Christmas Inside Greetings Winter Card by Ashley Ebben

I stamped the sentiment from Inside Greetings Holiday with VersaMark ink on vellum then embossed with gold. Make sure to use anti-static powder on the vellum first for a clean image! I added the vellum strip to the card, tucking the edges under the white die cut to hide the adhesive. I then added my colored images, popping a few up with foam tape for dimension. I finished with a scattering of clear confetti for extra shine.

Thank you so much for stopping by! Have a wonderful day!

-----------------------------------------------

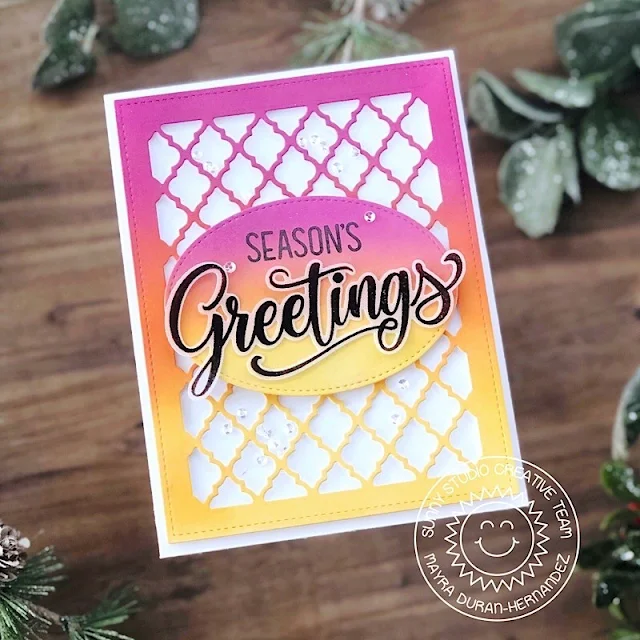
Hello and happy Monday everyone!! Mayra here with you today, I am so happy and thankful to be here!! I have a fun card to share with you. I used the lovely Frilly Frames Quatrefoil dies. I kept the design simple as I wanted to dies to be the focus. 

Sunny Studio Stamps: Frilly Frame Dies Season's Greetings Christmas Card by Mayra Duran-Hernandez

I began my card by die cutting two pieces of cardstock using the stitched rectangle panel from the set. One was die cut using plain white cardstock and the other from Bristol Smooth Cardstock. I used Distress Oxide Inks to add color to the panel that was die cut from the Bristol Smooth cardstock. I used Scattered Straw, Spiced Marmalade, and Seedless Preserves. 

Sunny Studio Stamps: Frilly Frame Dies Season's Greetings Christmas Card by Mayra Duran-Hernandez

After allowing the panel with the Distress Oxide colors to dry up for a bit, I used the quatrefoil pattern layer die to add the design to the panel. I then die cut an oval from the Stitched Oval Dies set using Bristol Smooth Cardstock once again. I then added the same colors in the same order to the oval as well. The sentiment is from the Season's Greetings stamp set. I heat embossed the sentiment onto vellum then used the coordinating dies to die cut the word. 

I hope you enjoy the card I created to share with you. Thank you very much for stopping by. I hope you each have a wonderful and blessed day! 

Sunny Studio Supplies Used:

Stitched Oval Dies
Stitched Oval Dies
Shop at:
Sunny Studio
Frilly Frames Retro Petals Dies
Shop at:
Sunny Studio
Season's Greetings Stamps
Shop at:
Sunny Studio
Season's Greetings Dies
Shop at:
Sunny Studio
Frilly Frames Quatrefoil
Shop at:
Sunny Studio
Classy Christmas Stamps
Shop at:
Sunny Studio
Classy Christmas Dies
Shop at:
Sunny Studio
Inside Greetings-Holidays
Shop at:
Sunny Studio

Saturday, October 10, 2020

Guest Designer Spotlight: Cards with Caly Person

Hi, Friends! It’s Caly Person with you today! I’m sharing two holiday cards with you today with two different themes. One is cute and the other is more traditional and regal.

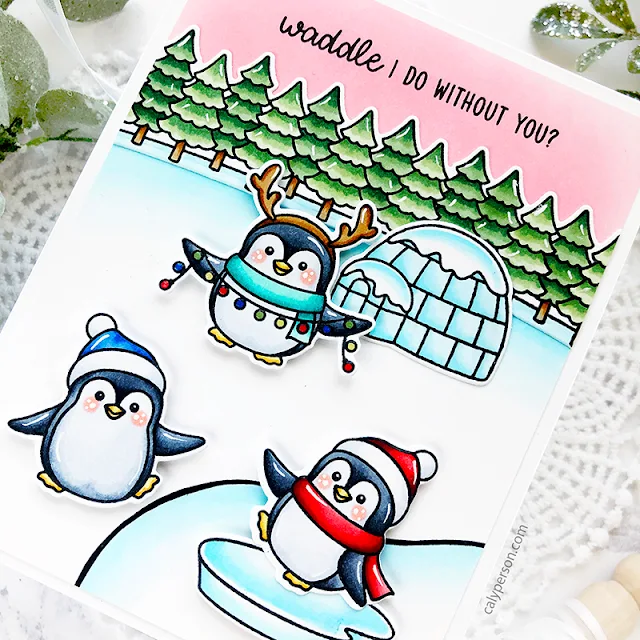
Sunny Studio Stamps: Penguin Pals Winter Scene Winter Card by Caly Person

My first card uses the Penguin Pals set. I paired it with the Winter Scene set and used the treeline to build my scene. I began by stamping and coloring my images my Copic markers. After die-cutting, I planned where I wanted my tree line to sit and ink-blended the sky with some Spun Sugar Distress Oxide ink.

Sunny Studio Stamps: Penguin Pals Winter Scene Winter Card by Caly Person

I faded some blue from the tree line into the white snow. Using a drawing pen, I hand-drew a border for a pond for one of my penguins. After attaching everything, I stamped my sentiment at the top of my card and finished with some white gel highlights.

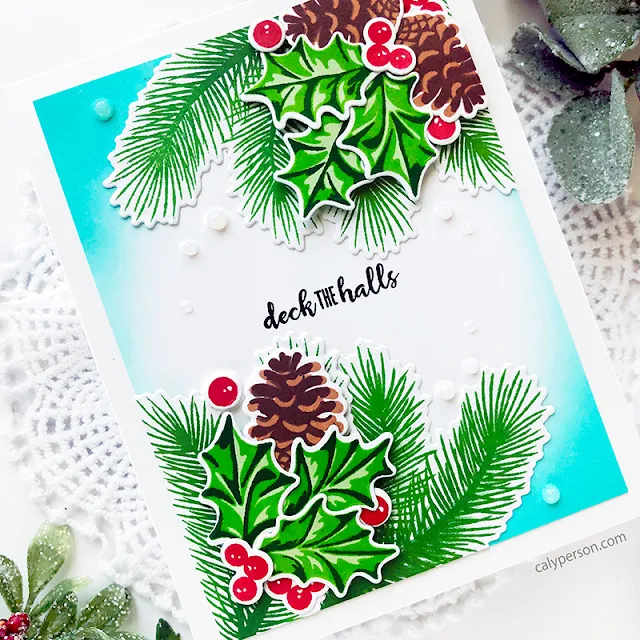
Sunny Studio Stamps: Christmas Trimmings Holiday Style Christmas Card by Caly Person

My second card features the Christmas Trimmings set. I love this set- I’m definitely a fan of pine springs, holly, and berries! I stamped all the images with various inks and die cut them out before playing with the layout.

Sunny Studio Stamps: Christmas Trimmings Holiday Style Christmas Card by Caly Person

To create a border, I ink-blended Peacock Feathers Distress Oxide ink around the edges of a white panel. I adhered my images and finished by stamping my sentiment from the Holiday Style stamp set. I finished off buy adding a few glitter drops using Nuvo Glitter in White Blizzard.

Sunny Studio Stamps: Christmas Trimmings Holiday Style Christmas Card by Caly Person

Thanks so much for stopping by today! I hope you enjoyed today’s winter cards!

Sunny Studio Supplies Used:

Holiday Style Stamps
Shop at:
Sunny Studio
Christmas Trimmings Stamps
Shop at:
Sunny Studio
Christmas Trimmings Dies
Shop at:
Sunny Studio
Penguin Pals Stamps
Penguin Pals Stamps
Shop at:
Sunny Studio
Penguin Pals Dies
Penguin Pals Dies
Shop at:
Sunny Studio
Winter Scenes Stamps
Shop at:
Sunny Studio
Winter Scenes Dies
Winter Scenes Dies
Shop at:
Sunny Studio

Friday, October 9, 2020

Winter Scenes Cards with Rachel and Candice

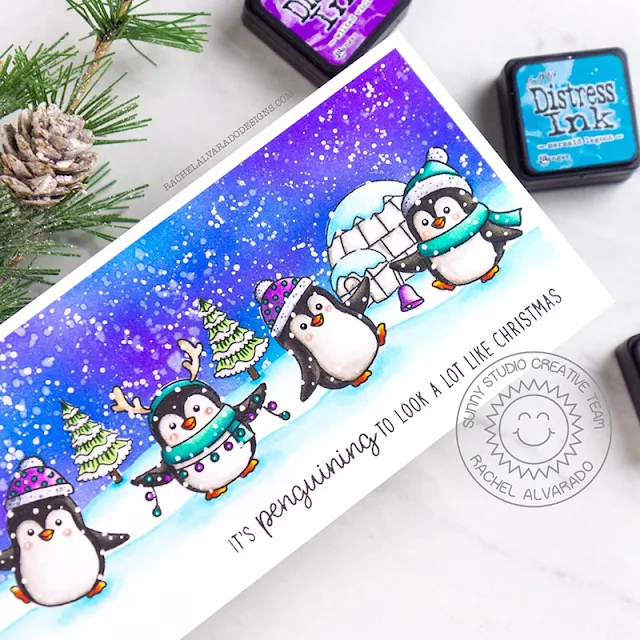
Hello friends! It's Rachel here with a fun Christmas card featuring the new Winter Scenes Stamp Set combined with the new Penguin Pals Stamp. I created a single-layer wintry scene using some masking. 

Sunny Studio Stamps: Winter Scenes Penguin Pals Christmas Card by Rachel Alvarado

To start, I trimmed a piece of Neenah Solar White 110lb Cardstock to 3.5" x 8.5" and stamped all of my images with Memento Tuxedo Black Ink. I used some Gina K. Designs Magic Masking paper and masked everything so that I could blend my background with a combo of Distress Inks. I blended Wilted Violet, Mermaid Lagoon, and Blueprint Sketch to create my sky and splattered it with some diluted Opaque White Paint to resemble snow.

Copic Color Combos Used: Snow: B0000, B000, B01 Tree: G43, G28 Teals: G000, BG11, BG13, B49 Purples: V01, V04, V17 Browns: E42, E43 Orange: Y35, YR07, YR18

Sunny Studio Stamps: Winter Scenes Penguin Pals Christmas Card by Rachel Alvarado

I then removed my masking paper and colored all of my images with Copic Markers. Once finished I trimmed my piece once again so that it was now 3.25" x 8.25". I adhered it to a 3.5" x 8.5" card base, stamped my sentiment, and used a white gel pen to add some "snow" to my penguins.

Thanks so much for taking the time to drop by! Wishing you all a safe and happy weekend!

-----------------------------------------------------

Hi! It's Candice with you this Friday sharing a wonderful Christmas themed card!


Sunny Studio Stamps: Winter Scenes Holy Night Slimline Dies Scenic Route Christmas Card by Candice Fisher
 

For my Christmas card I used these Sunny Studio products:

I began with an 8 1/2 x 3 1/2 slimline card base. For my background, I first die cut the scalloped frame from Bristol Smooth and inked with chipped sapphire, peacock feathers and evergreen bough. I heat embossed the North Star in gold and splattered the frame with gold and white using a damp paint brush.


Sunny Studio Stamps: Winter Scenes Holy Night Slimline Dies Scenic Route Christmas Card by Candice Fisher
 

Next, I created my extended hillside by first stamping the full village hillside on copic friendly paper and then stamped the tree hillside at the end of the first one and connected with a black pen. I then cut the tree side with scissors and the rest with the coordinating dies. I heat embossed the sentiment along the bottom in gold and then colored all the images with copic markers.


To put the card together, I glued the village background to the sky panel, used foam tape on the 3 wise men and finished with a few pearls!


Thank you so much!


Sunny Studio Supplies Used:

Scenic Route Stamps
Scenic Route Stamps
Shop at:
Sunny Studio
Scenic Route Dies
Scenic Route Dies
Shop at:
Sunny Studio
Slimline Scalloped Frame
Shop at:
Sunny Studio
Holy Night Stamps
Holy Night Stamps
Shop at:
Sunny Studio
Holy Night Dies
Holy Night Dies
Shop at:
Sunny Studio
Inside Greetings-Christmas
Shop at:
Sunny Studio
Penguin Pals Stamps
Penguin Pals Stamps
Shop at:
Sunny Studio
Penguin Pals Dies
Penguin Pals Dies
Shop at:
Sunny Studio
Winter Scenes Stamps
Shop at:
Sunny Studio
Winter Scenes Dies
Winter Scenes Dies
Shop at:
Sunny Studio

Thursday, October 8, 2020

Holy Night Cards with Vanessa and Anja

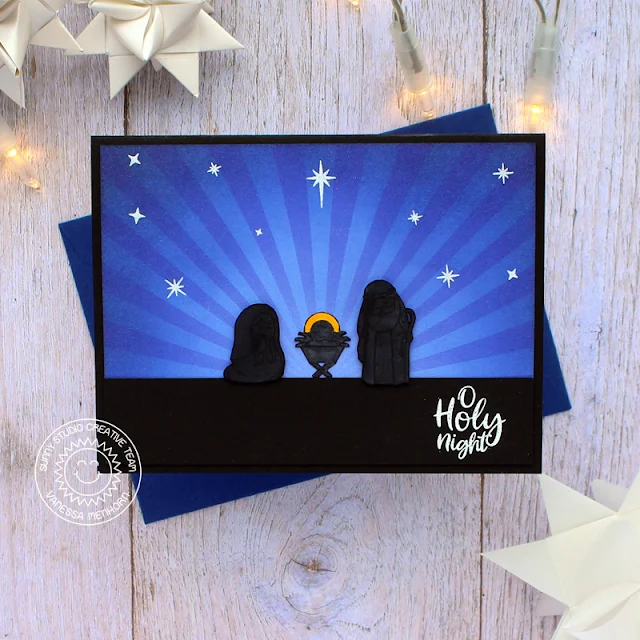
Hello to you! Vanessa here with a Christmas card using the Holy Night Stamps set. Although the images of this set are so cute, I wanted to try something different and created a silhouette scene:

Sunny Studio Stamps: Holy Night Religious Holiday Card by Vanessa Menhorn

I trimmed a panel from a blue patterned paper from the Classic Sunburst Paper Pad slightly smaller than my black card base and inked the edges of the panel with Chipped Sapphire Distress Oxide ink. Then I stamped the stars with Versamark ink and heat-embossed them with white embossing powder. Now I trimmed a strip from black cardstock, stamped and heat-embossed the sentiment, added the strip to the panel and adhered the panel to the card.

Sunny Studio Stamps: Holy Night Religious Holiday Card by Vanessa Menhorn

I stamped the images onto white cardstock, colored them with black/grey/yellow Copic markers, fussy-cut the elements and adhered everything to the card.

Less than three months before Christmas, time to get those cards done! I hope to have inspired you today, thanks for stopping by!

--------------------------------------------------------------

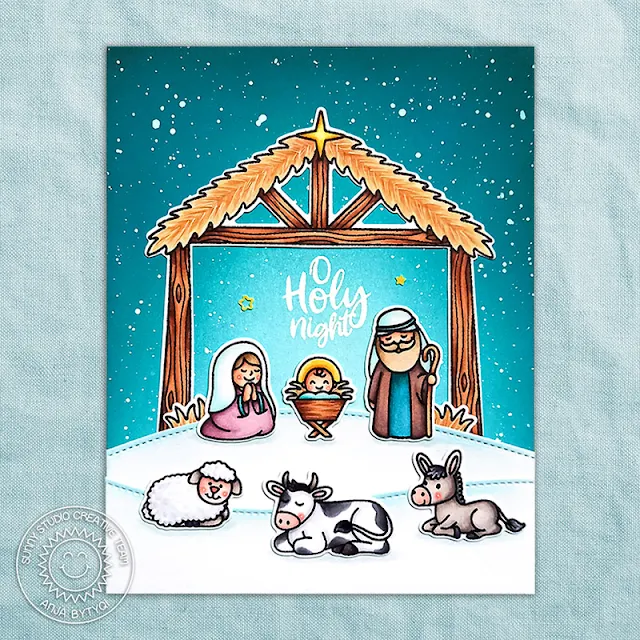
Hi everyone, Anja here and today I'm sharing a card made with the sweet nativity stamp set called Holy Night. I especially adore the little baby Jesus and the cute animals!

Sunny Studio Stamps: Holy Night Slimline Dies Religious Holiday Card by Anja Bytyqi

I started with creating the snowy night sky background by blending together the Distress Oxide Inks Tumbled Glass, Broken China, Peacock Feathers, Pine Needles and a tiny bit of Black Soot. I let it dry and added white paint splatters with a brush.

Next, I die cut two snow hills using the stitched border dies from the Slimline Nature Borders Dies set. I inked the edges with Tumbled Glass ink and trimmed them down to layer on top of each other.

Sunny Studio Stamps: Holy Night Slimline Dies Religious Holiday Card by Anja Bytyqi

I stamped the images in Memento Tuxedo Black Ink and colored them with Copic Markers. I used the coordinating dies to cut everything out. The sentiment was stamped in VersaMark Ink and I heat embossed it with white embossing powder. Finally, I assembled my nativity scene by adhering the images and adding two small star sequins (Rainbow Star Confetti).

Thank you so much for stopping by! Hope you're having a wonderful day!

Sunny Studio Supplies Used:

Slimline Nature Borders
Shop at:
Sunny Studio
Holy Night Stamps
Holy Night Stamps
Shop at:
Sunny Studio
Holy Night Dies
Holy Night Dies
Shop at:
Sunny Studio
Classic Sunburst Paper
Shop at:
Sunny Studio

Wednesday, October 7, 2020

Retro Ornaments Cards with Ana and Christy

Hi crafties and welcome back! It’s Ana with a rustic Christmas card showcasing Retro Ornaments stamps and coordinating dies. I really wanted to create a vintage Christmas card using these gorgeous ornaments so I opted for rustic/vintage colors and design.

Sunny Studio Stamps: Retro Ornaments Fancy Frames Christmas Cards by Ana Anderson

I started with stamping the ornaments in pink and blue colors, specifically choosing lighter shades so they would really stand out on the dark, woodgrain background. Once I was done stamping, I cut them with coordinating dies.

On a piece of woodgrain paper, I white heat embossed hanging strings and the sentiment, then added white splatter to mimic snowfall. I adhered the ornaments directly to the background then added a stitched scalloped frame (Fancy Frames Rectangles dies) which I backed with foam tape.

Sunny Studio Stamps: Retro Ornaments Fancy Frames Christmas Cards by Ana Anderson

I just love how this card turned out! I can’t wait to play with different color combinations and create a completely different look! Thank you so much for stopping by today, I hope you got inspired and love this card as much as I do!

---------------------------------------------------------

Hello friends, it's Christy here with a holiday card using Retro Ornaments. I started by stamping three of the ornaments' first layer in red, hot pink, and turquoise inks. Then I stamped the second layer in Versamark ink and coated them with Silver Pearl embossing powder. I added the tops using Liquid Platinum embossing powder and trimmed them out with the matching dies.

Then on a separate sheet of white cardstock, I stamped the fir branches from Classy Christmas in two shades of green, and heat embossed a few more with the Silver Pearl powder. I stamped the ornament strings in the Versamark as well, along with a sentiment from Inside Greetings - Holiday and heat embossed with the Liquid Platinum. This card has so much shine when you tip it in the light!

I trimmed down the right side of the panel with one of the Slimline Basic Borders and adhered it to a red card base. Then I popped up the ornaments with some foam tape.

If you'd like to see how this card came together, you can find the video tutorial on my YouTube channel, Christy Gets Crafty.

Sunny Studio Supplies Used:

Fancy Frames- Rectangles
Shop at:
Sunny Studio
Slimline Basic Borders
Shop at:
Sunny Studio
Classy Christmas Stamps
Shop at:
Sunny Studio
Classy Christmas Dies
Shop at:
Sunny Studio
Inside Greetings-Holidays
Shop at:
Sunny Studio
Retro Ornaments Stamps
Shop at:
Sunny Studio
Retro Ornaments Dies
Shop at:
Sunny Studio