Friday, April 3, 2020

Eyelet Lace Border Die Focused Cards with Juliana and Candice

Hello Sunny Studio friends! It's Juliana here and today I'm here to share a card I created using the Eyelet Lace Border Dies. I combined it with the Pink Peonies Stamp Set to create a Confirmation Card for my niece.

Sunny Studio Stamps: Eyelet Lace Border Dies Pink Peonies Phoebe Alphabet Stamps Everyday Card by Juliana Michaels

I began by stamping the images from the Pink Peonies Stamp Set with embossing ink onto watercolor paper. I then heat embossed them with white embossing powder. I then colored them Zig Clean Color Real Brush Markers and used a water brush to blend the color. Once all of the coloring was completed, I used the coordinating Pink Peonies Dies to die cut the images.

Next, I stamped the word “blessings” with embossing ink using the Phoebe Alphabet Stamps onto Bristol Cardstock. I heat embossed the letters with white embossing powder. I then began working on the background by ink blending the center of the paper with Peacock Feather Distress Oxide Ink. I then splattered the area with water and dabbed it dry to reveal the splatters. I also wiped over the embossed sentiment to remove the ink.

Sunny Studio Stamps: Eyelet Lace Border Dies Pink Peonies Phoebe Alphabet Stamps Everyday Card by Juliana Michaels

Once the background was finished, I added a border of white cardstock below the sentiment that was die cut using the Eyelet Lace Border Dies. I then adhered the flowers and leaves using double sided foam adhesive. For the final touch, I added some Clear Drops Mix 2.

I love the beautiful detail that the Eyelet Lace Border Die adds to the card. It was the perfect touch to bring this card together. Thanks so much for stopping by today!

------------------------------------------------------------

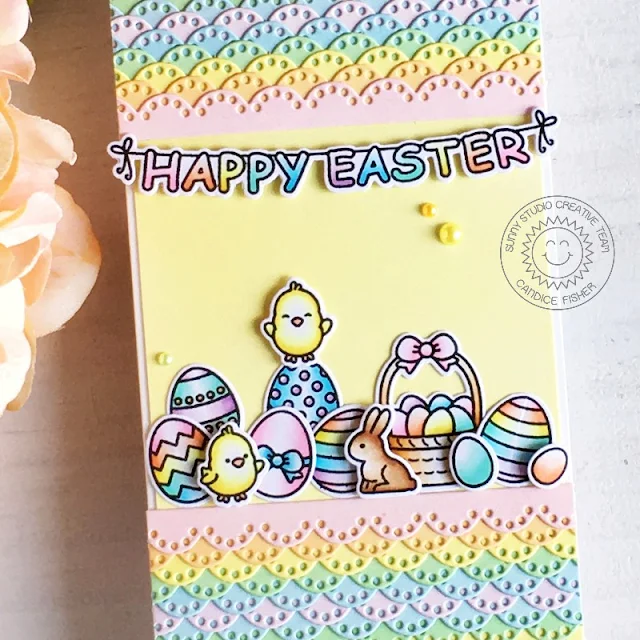
Hello! Candice with you today and I have a sweet pastel Easter card for you highlighting the gorgeous Eyelet Lace Border dies! I love the delicate cut of these dies and knew they would go perfect with pastel colors!

Sunny Studio Stamps: Eyelet Lace Border Dies Chubby Bunnies Chickie Baby Easter Card by Candice Fisher

I used a few Sunny Studio Stamps products for my card:

I began my card by creating an 8 1/2 x 3 1/2 card base which is just the right size for your standard envelopes. For the background, I first trimmed a piece of Bristol smooth to fit a little smaller than my card base and inked with squeezed lemonade.

I then die cut a whole bunch of the eyelet strips, inked 4 of each in spun sugar, dried marigold, squeezed lemonade, cracked pistachio & tumbled glass and just 2 in milled lavender. I layered them in rainbow color and then backwards to create my pattern.

Sunny Studio Stamps: Eyelet Lace Border Dies Chubby Bunnies Chickie Baby Easter Card by Candice Fisher

Next, I stamped the images from the sets listed above, colored them in light Copic markers and cut out using their coordinating dies. I glued the background images and used foam tape on the front to add contrast. For a few embellishments, I added the gorgeous rainbow pearls.

I want to thank you for the time you stopped by!

Sunny Studio Supplies Used:

Chubby Bunny Stamps
Chubby Bunny Stamps
Shop at:
Sunny Studio
Chubby Bunny Dies
Chubby Bunny Dies
Shop at:
Sunny Studio
Chickie Baby Stamps
Chickie Baby Stamps
Shop at:
Sunny Studio
Chickie Baby Dies
Chickie Baby Dies
Shop at:
Sunny Studio
Phoebe Alphabet Stamps
Shop at:
Sunny Studio
Pink Peonies Stamps
Pink Peonies Stamps
Shop at:
Sunny Studio
Pink Peonies Dies
Pink Peonies Dies
Shop at:
Sunny Studio
Eyelet Lace Borders
Eyelet Lace Borders
Shop at:
Sunny Studio

Thursday, April 2, 2020

Alphabet Stamp Focused Cards with Vanessa and Anja

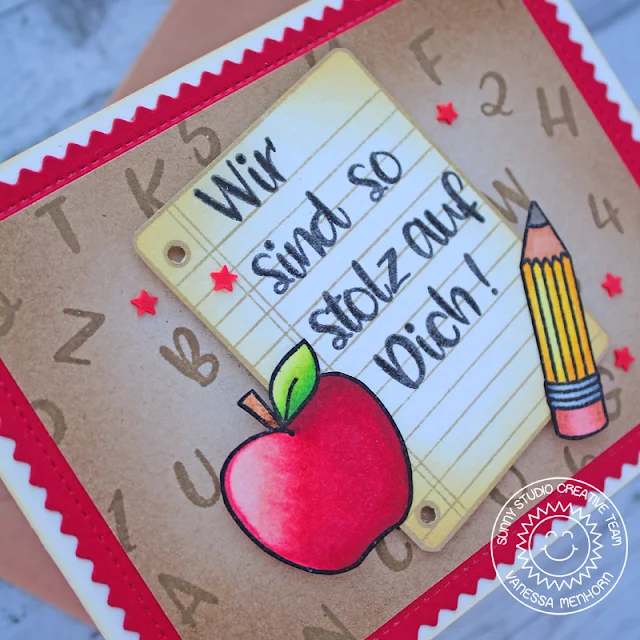
Hello to you! Vanessa here with a personalized card using the Phoebe Alphabet Stamps.

Sunny Studio Stamps: Phoebe Alphabet Stamps School Time Frilly Frame Dies School Themed Card by Vanessa Menhorn

Currently, all German schools are closed and the children have to work from home. It is not like school holidays at all - in fact, my girl is sitting at her desk or in front of the computer doing her schoolwork almost the whole day. She is doing pretty well and we are so proud of her. So I wanted to make her a card telling her exactly this - and it was easily done with the Phoebe Alphabet!

Sunny Studio Stamps: Phoebe Alphabet Stamps School Time Frilly Frame Dies School Themed Card by Vanessa Menhorn

I first inked the edges of a cream card base slightly with light brown ink. Now I die-cut the Frilly Frames Chevron Die from red cardstock and adhered it. I trimmed a panel of Kraft cardstock slightly smaller than the frame, stamped the letters, inked the edges with brown ink and adhered the panel to the card. Then I stamped the images from School Time onto white cardstock, colored them with Copics and fussy-cut them.

Using the Round Acrylic Block, I spelled the sentiment "We are so proud of you" letter by letter and adhered all the images to the card with foam tape. Finally, I added red stars from the Primary Star Confetti.

Have a wonderful day everybody and thanks for visiting today! Sending big virtual hugs.

----------------------------------------------------

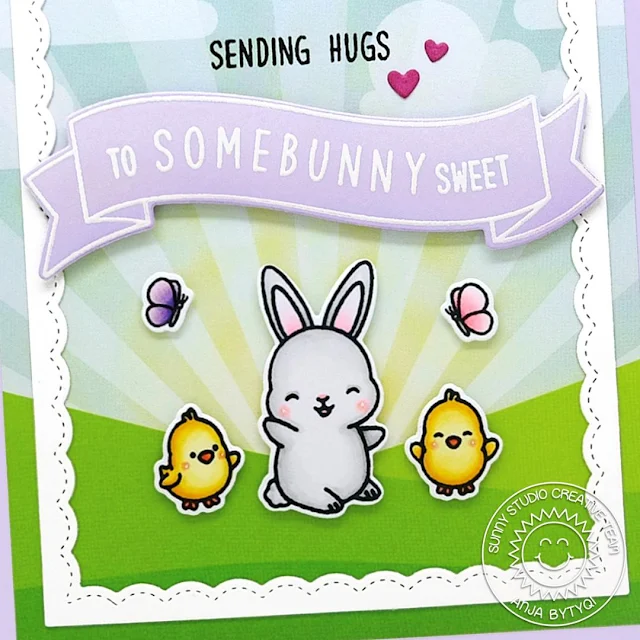
Hi everyone, Anja here and on today's Spring card, I created my own custom sentiment with the Kinsley Alphabet Stamps.

Sunny Studio Stamps: Kinsley Alphabet Stamps Fancy Frame Dies Chubby Bunny School Everyday Card by Anja Bytyqi

I started off with a lilac card base and adhered the pretty scene paper from the Spring Fling 6x6 Paper pack. I die cut one of the Fancy Frames Rectangles from white cardstock and put it on top of the patterned paper.

Next, I stamped my favorite cute bunny and the two little chicks from the Chubby Bunny set in Memento Tuxedo Black Ink. I colored the images with Copic Markers and cut them out with the coordinating dies. I also stamped and colored two butterflies (included in the sets Spring Scenes and Spring Showers).

Sunny Studio Stamps: Kinsley Alphabet Stamps Fancy Frame Dies Chubby Bunny School Everyday Card by Anja Bytyqi

For the custom sentiment, I picked one of the Banner Basics Stamps. I arranged the individual Kinsley Alphabet Stamps to spell out the word 'somebunny' following the curve of the banner. I also added the words 'to' and 'sweet' from the Home Sweet Gnome set and stamped everything in VersaMark Ink onto lilac cardstock. I heat embossed it with white embossing powder and used the matching die to cut out the banner. I carefully blended on a bit of Wilted Violet Distress Oxide Ink to darken the bottom half of the banner.

I popped up the banner and images with foam tape and stamped an additional sentiment (Sending Sunshine Stamps) above the banner in VersaFine Onyx Black Ink. Finally, I adhered two small pink die-cut hearts.

Thank you so much for stopping by! Sending hugs!

Sunny Studio Supplies Used:

School Time Stamps
School Time Stamps
Shop at:
Sunny Studio
Fancy Frames- Rectangles
Shop at:
Sunny Studio
Home Sweet Gnome Stamps
Shop at:
Sunny Studio
Chubby Bunny Stamps
Chubby Bunny Stamps
Shop at:
Sunny Studio
Chubby Bunny Dies
Chubby Bunny Dies
Shop at:
Sunny Studio
Frilly Frames Chevron Die
Shop at:
Sunny Studio
Sending Sunshine Stamps
Shop at:
Sunny Studio
Banner Basics Stamps
Shop at:
Sunny Studio
Banner Basics Dies
Banner Basics Dies
Shop at:
Sunny Studio
Kinsley Alphabet Stamps
Shop at:
Sunny Studio
Phoebe Alphabet Stamps
Shop at:
Sunny Studio
Spring Scenes Stamps
Shop at:
Sunny Studio
Spring Scenes Dies
Spring Scenes Dies
Shop at:
Sunny Studio
Spring Showers Stamps
Shop at:
Sunny Studio
Spring Showers Dies
Spring Showers Dies
Shop at:
Sunny Studio
Spring Fling Paper
Spring Fling Paper
Shop at:
Sunny Studio

Wednesday, April 1, 2020

Cheerful Daisies Cards with Franci and Ana

Hi there! Franci here with you, with a spring card featuring the Cheerful Daisies set.

Sunny Studio Stamps: Cheerful Daisies Frilly Frame Dies Spring Themed Cards by Franci Vignoli

First of all I made my card out of white cardstock and I inked the front with Distress ink to turn it into this bright red. Then I stamped my flowers using Lawn Fawn inks Sunflower and Carrots + some Memento Drops inks for the center and leaves (Toffee Crunch, Rich Cocoa, Pear Tart and Bamboo Leaves), and I die cut them with their coordinated dies.

Sunny Studio Stamps: Cheerful Daisies Frilly Frame Dies Spring Themed Cards by Franci Vignoli

I die cut my scalloped panel out of white cardstock using the Frilly Frames Eyelet Lace set, stamped my sentiment at the bottom and glued my flowers at the top with foam adhesive.

I added a little heart and glued my decorated panel on to the front of my card. Hope you like it and thank you so much for stopping by today!

-------------------------------------------------------

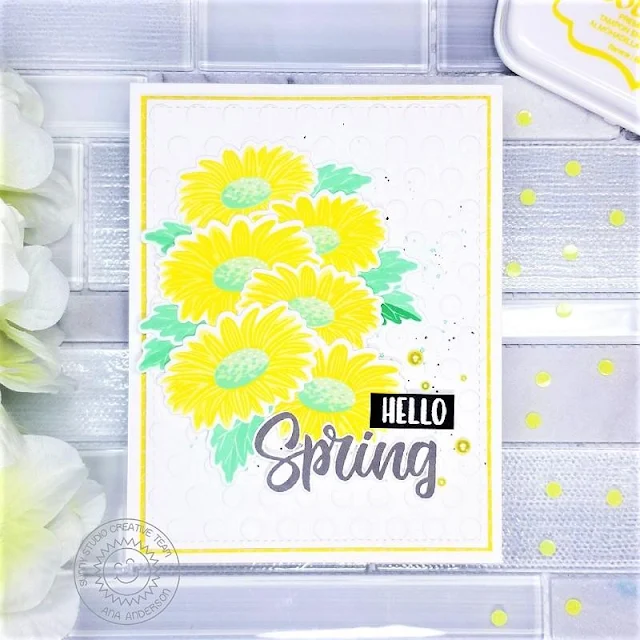
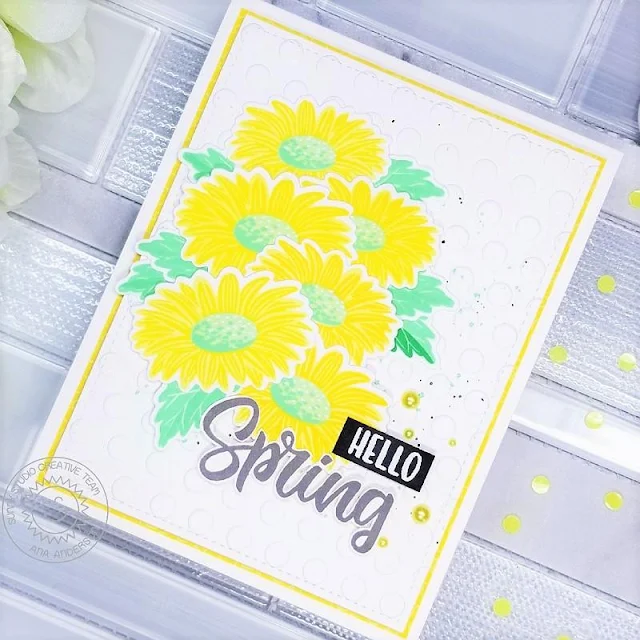
Hello crafty friends! Ana here today with a daisy card showcasing Cheerful Daisies stamps and coordinating dies.

Sunny Studio Stamps: Cheerful Daisies Frilly Frame Dies Spring Themed Cards by Ana Anderson

For my card today I decided to make yellow daisies! Yellow is such a happy, cheerful color and after looking up colors of daisies, I realized they come in so many colors but yellow ones just stood out like a ray of sunshine!

I stamped the daisies with two shades of yellow ink. I used light green inks for both the leaves and daisy centers. Once the images were stamped, I cut them out with coordinating dies.

Sunny Studio Stamps: Cheerful Daisies Frilly Frame Dies Spring Themed Cards by Ana Anderson

I stamped spring sentiment in dark gray and fussy cut it out, and white heat embossed the word Hello on a piece of black cardstock. Sentiments are from Cheerful Daisies set.
For my background, I embossed a piece of white cardstock with Lots of Dots embossing folder and added light splatter. I backed the embossed panel with yellow patterned paper from Spring Fling paper pack.

I adhered the daisies, leaves and the sentiment with liquid glue and foam tape and embellished with yellow pearls from Rainbow Pearl pack.

I love how this card turned out – it just screams spring to me! Thank you so much for stopping by today! I will see you next week, and until then I wish you happy crafting!

Sunny Studio Supplies Used:

Lots of Dots Embossing
Shop at:
Sunny Studio
Cheerful Daisies Stamps
Shop at:
Sunny Studio
Cheerful Daisies Dies
Shop at:
Sunny Studio
Frilly Frames-Eyelet Lace
Shop at:
Sunny Studio
Spring Fling Paper
Spring Fling Paper
Shop at:
Sunny Studio

Tuesday, March 31, 2020

Floating By Cards with Angelica and Mindy

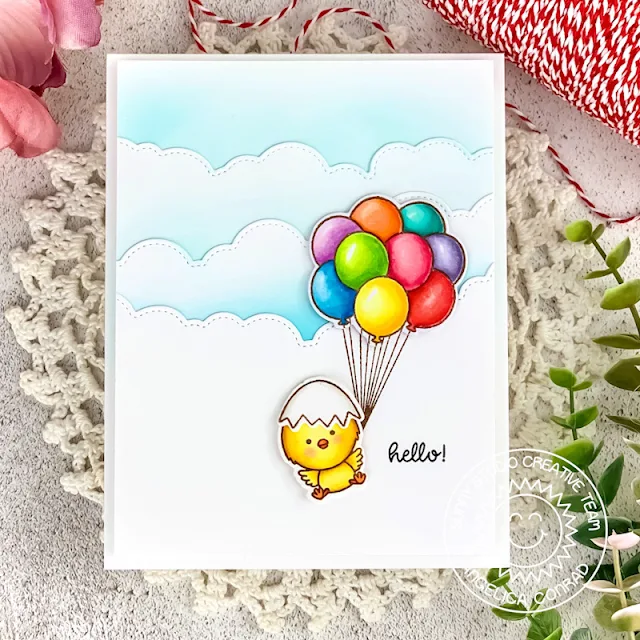
Hello friends! This is Angelica, and I have a sweet Hello card to share with you today. Dropping a quick card in the mail right now can really bring a smile to a loved one's face, and lift their spirits. This card is one I made for a dear friend.

Sunny Studio Stamps: Floating By Chickie Baby Fluffy Cloud Border Dies Everyday Card by Angelica Conrad

I used the balloons from Floating By stamp set to lift this cute chick up into the sky. The chick is from Chickie Babies stamp set. I colored the images with Comic markers. The background I made with Fluffy Clouds Border Dies

Sunny Studio Stamps: Floating By Chickie Baby Fluffy Cloud Border Dies Everyday Card by Angelica Conrad

I blended Sno Cone ink onto the clouds before adhering them together. I stamped Hello from Floating by onto the panel, and attached it to card base. I attached the die-cut Balloons and Chick to the card with thin foam squares.

That's all that I have for today! I hope you all are staying safe. Happy Crafting!

------------------------------------------------------------

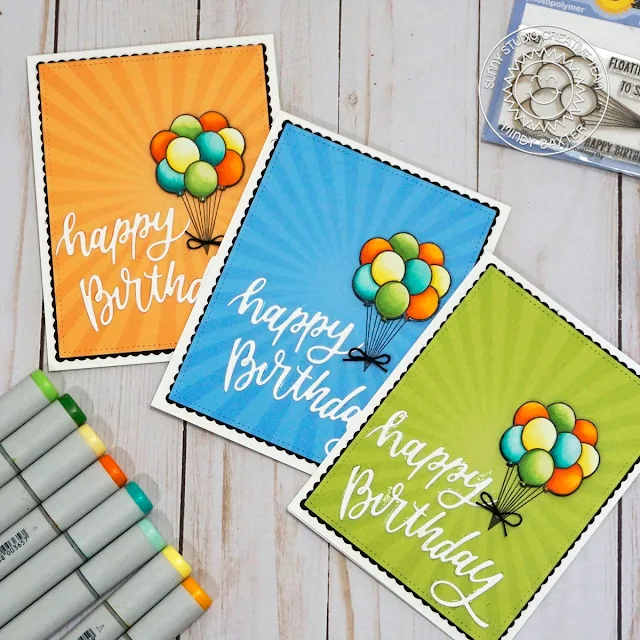
Hello! It’s Mindy from My Creative Scoop. Today I have a masculine Happy Birthday card to share. I really struggle with making masculine cards so I wanted to show you all how simple one can be to make.

Sunny Studio Stamps: Floating By Blooming Frame Die Frilly Frame Dies Birthday Card by Mindy Baxter

All you need is some patterned paper – this Spring Sunburst paper pad is perfect, a "Happy Birthday sentiment from the from the Blooming Frame Die and this Floating By stamp set. Since this card is a simple one I decided to break out the border dies and add a little extra detail. I used the Frilly Frame Striped Die (just the scalloped border) for the black border – which really makes it pop! I also used the Frilly Frame Retro Petal Die Border to cut out my patterned paper.

Sunny Studio Stamps: Floating By Blooming Frame Die Frilly Frame Dies Birthday Card by Mindy Baxter

I stamped my balloon image in Memento Black ink onto my Copic Xpress it Blending Card.
Here’s a list of Copics I used: Orange Balloon – YR09, YR07, YR04, Y17; Yellow Balloon – Y02, Y11, Y000, Y17; Teal Balloon – BG18, BG13, BG11, BG10; Green Balloon – YG17, YG13, G20

I stamped my balloons on the patterned paper and then fussy cut the colored balloons and then attached them to my patterned paper using some foam dots for some extra dimension.

Check out the video below on how I created my card.


Sunny Studio Supplies Used:

Spring Sunburst 6x6 Paper
Shop at:
Sunny Studio
Frilly Frames Stripes Die
Shop at:
Sunny Studio
Fluffy Clouds Border Dies
Shop at:
Sunny Studio
Frilly Frames Retro Petals Dies
Shop at:
Sunny Studio
Chickie Baby Stamps
Chickie Baby Stamps
Shop at:
Sunny Studio
Chickie Baby Dies
Chickie Baby Dies
Shop at:
Sunny Studio
Floating By Stamps
Floating By Stamps
Shop at:
Sunny Studio
Floating By Dies
Floating By Dies
Shop at:
Sunny Studio
Blooming Frame Die
Blooming Frame Die
Shop at:
Sunny Studio