Tuesday, January 29, 2019

Make A Wish Cards with Angelica and Juliana

Hello friends! Angelica here with a quick birthday card idea to share. It's my son's birthday in a few days, and he's always asking for money. I made this slim card that's perfect to slip some cash into. 


Sunny Studio Stamps: Make A Wish Birthday Balloon Birthday Card by Angelica Conrad

I stamped and colored the birthday cake and stars from the Make a Wish stamp set, and used the coordinating dies to cut them out. Next I used the Birthday Balloons Stamp Set to stamp five 2-layered balloons, and die-cut the balloons with the coordinating die. With a large dauber, I blended Mermaid Lagoon Distress Oxide ink onto white card front panel cut to 8.25 x 4. 


Sunny Studio Stamps: Make A Wish Birthday Balloon Birthday Card by Angelica Conrad

I then figured out where I wanted the balloons and cake to be on the card front. I used a T-ruler and multi liner pen to draw balloon strings down to the cake.


Sunny Studio Stamps: Make A Wish Birthday Balloon Birthday Card by Angelica Conrad

I stamped the birthday sentiment from the Birthday Balloons Stamp Set with Verasmark embossing ink, and heat embossed with white embossing powder. I then attached the card front to craft foam. I used double-sided adhesive to add the card front to an 8.5 x 4.25 card base. I added the balloons and cake with thin foam adhesive squares. My final touch was gluing stars around the balloons.

I know my son is going to love this card, and the money inside! That's all I have for today. Thanks for stopping by!

------------------------------------------------------

Hello Sunny Studio Friends! It's Juliana here with you today to share a birthday card featuring the Make A Wish Stamp Set. I've combined it with the adorable Love Monkey's Stamp Set to create an adorably appeeling card!


Sunny Studio Stamps: Make A Wish Love Monkey Frilly Frames Birthday Card by Juliana Michaels

For the background, I die cut a piece of white cardstock using the Frilly Frames Polka Dot Die Set. I then applied Tumbled Glass and Salty Ocean Distress Ink to the center of the card.

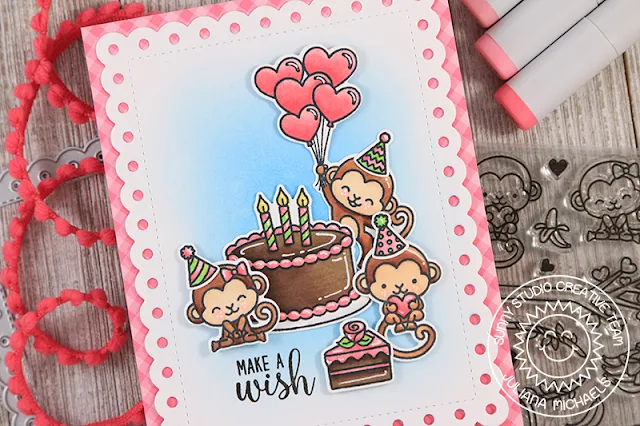
Next, I stamped and colored images from the Make A Wish and Love Monkey's Stamp Set using Copic Markers. To add to the birthday theme, I gave the monkey's birthday hats using stamps from the Party Pups Stamp Set.


Sunny Studio Stamps: Make A Wish Love Monkey Frilly Frames Birthday Card by Juliana Michaels

Once all of the coloring was complete, I die cut the images using the coordinating die sets. Then I went about creating a little party scene . I used double sided foam adhesive to adhere some of the images and to add some dimension. I finished off the card with the sentiment from the Make A Wish Stamp Set.

(Copic Colors used: RV11,RV13, RV14, R20, E30, E42, E21, E23, E25, E29, E44, E47, E49, YG03, YG06, N0, N01, 0)

Sunny Studio Stamps: Make A Wish Love Monkey Frilly Frames Birthday Card by Juliana Michaels

Thanks so much for joining me today. How would you use the Make A Wish Stamp Set? Would you use it alone of combine it with other Sunny Studio Stamp Sets? Make sure to share it with us and tag us on social media. We can't wait to see it!

Sunny Studio Supplies Used:

Birthday Balloon Stamps
Shop at:
Sunny Studio
Party Pups Stamps
Party Pups Stamps
Shop at:
Sunny Studio
Party Pups Dies
Party Pups Dies
Shop at:
Sunny Studio
Love Monkey Stamps
Love Monkey Stamps
Shop at:
Sunny Studio
Love Monkey Dies
Love Monkey Dies
Shop at:
Sunny Studio
Make A Wish Stamps
Make A Wish Stamps
Shop at:
Sunny Studio
Make A Wish Dies
Make A Wish Dies
Shop at:
Sunny Studio
Frilly Frames Polka-Dot
Shop at:
Sunny Studio

Monday, January 28, 2019

Botanical Backdrop Cards with Leanne and Eloise

Hi everyone! Leanne here and I have a birthday card to share today. My card features a collage of die cut flowers against a dry embossed background. I thought it would be fun to die cut all the floral pieces out of pattern paper so I pulled out the new Gingham Pastel paper pack. I chose 4 different colors and cut out a bunch of petals, centers, and leaves. All these fun floral dies come from the Botanical Backdrop die set. I used small glue dots to adhere all the pieces of the flowers together then set them aside and prepared the background.

Sunny Studio Stamps: Botanical Backdrop Everyday Greetings Happy Birthday Card by Leanne West

I started with a white A2 sized card stock panel. I added embossed detail using the Quilted Hearts embossing folder. I wrapped some baker’s twine around the panel towards the left side. I die cut a tag to stamp “happy birthday” which is from Everyday Greetings stamps. The tag comes from the Sliding Window die set. I lightly inked the edges of the tag with some Seedless Preserves Distress Oxide Ink. I strung the tag on the twine and tied a bow. I secured the tag to the background at a slight angle with foam tape. 


Sunny Studio Stamps: Botanical Backdrop Everyday Greetings Happy Birthday Card by Leanne West

I then added the flowers all along the left side of the card. I grouped them fairly close together with some of the petals overlapping. I used glue dots again for this job. For a little extra embellishment, I added a scattering of clear sequins. I then adhered the completed panel to an A2 card base with foam tape. 

--------------------------------------------------------

Hello everyone, Eloise here and today I have a card to share with you all using the Botanical Backdrop die set, I also pulled in the Frilly Frames Lattice dies for an extra layer. 


Sunny Studio Stamps: Botanical Backdrop Frilly Frames Hello Card by Eloise Blue

To start off I die cut all my layers from coloured cardstock. I used green and a pink for the frame and flowers and then a blue for the background. I also used the Frilly Frames Lattice dies to die cut out of white as well. I then also added some additional colour to each of them using Distress Inks just to give the plain pieces a little bit of dimension. 

(Distress Inks Used: Twisted Citron, Picked Raspberry, Tumbled Glass and Mustard Seed)


Sunny Studio Stamps: Botanical Backdrop Frilly Frames Hello Card by Eloise Blue

Now all my pieces are die cut out, I created a blue card base which I ink blended some Tumbled Glass onto as well to give the same effect. I then added foam tape to my lattice background and adhered it onto the card base. I also adhered my green frame as well. For my flowers I curled the edges a little and adhered them down and added yellow enamel dots inside each of them. The flowers in this die set are originally meant to be layered, but I wanted to make them simpler this time. 

For my sentiment I took the Hello Word die and die cut it from white foam and yellow cardstock. I then ink blended some Mustard Seed Distress Ink onto the yellow piece and adhered it to my white foam. I then adhered the sentiment onto my card and my card is complete. 

Thanks so much for stopping by today, I hope you enjoyed and I'll see you next time. 

Sunny Studio Supplies Used:

Hello Word Die
Hello Word Die
Shop at:
Sunny Studio
Sliding Window Dies
Sliding Window Dies
Shop at:
Sunny Studio
Gingham Pastels 6x6 Paper
Shop at:
Sunny Studio
Quilted Hearts Embossing
Shop at:
Sunny Studio
Botanical Backdrop Die
Shop at:
Sunny Studio
Frilly Frames Lattice Dies
Shop at:
Sunny Studio
Everyday Greetings Stamps
Shop at:
Sunny Studio