Friday, January 25, 2019

Everything's Rosy Cards with Lexa and Rachel

Hi everyone! Lexa here today with a greeting card featuring Everything's Rosy Stamps and the coordinating dies. This layering stamps from Sunny Studio always become hits, and I no wonder why. Just take a look at the results, they are so pretty and realistic. This roses stamp is a perfect addition to your flower layering stamps collection. It also goes really well with older stamp sets too. Let's get started because I'm excited!

Sunny Studio Stamps: Everything's Rosy Frilly Frames Vintage Jar Greetings Card by Lexa Levana

First I stamped the roses and other elements with the help of stamping tools. It makes the work so much easier especially when I need to double stamp one layer to get the color I wanted. I used Lawn Fawn Dye Inks because they are so crisp and have subtle colors. I'm so obsessed with them!

Ink colors for roses (in order from the lightest to the darkest): MFT Hybrid Ink Pad Cotton Candy, Lawn Fawn Dye Ink Wild Rose, MFT Hybrid Ink Pad Razzle Berry, Lawn Fawn Dye Ink Cranberry, Lawn Fawn Dye Ink Walnut 

Ink colors for leaves (in order from the lightest to the darkest): MFT Hybrid Ink Pad Sour Apple, Lawn Fawn Dye Ink Jalapeno, Lawn Fawn Dye Ink Noble Fir

Sunny Studio Stamps: Everything's Rosy Frilly Frames Vintage Jar Greetings Card by Lexa Levana

As for the background, I use the brand new Frilly Frame Polka-Dots and Frilly Frames Lattice dies. Add a layer of vellum behind the lattice to soften the purple patterned paper from Flirty Flowers Paper Pad. The flower's stem is from the older stamps called Timeless Tulips and the Vintage Jar Stamps for the vase. I blend Tumbled Glass Distress Ink to create water illusion on the bottom part of the jar.

Thank you so much for stopping by today. I hope you like today's card as much as I do.
Have a wonderful day!

----------------------------------------------------------

Hello everyone! It's Rachel Alvarado here and I am showcasing the Everything's Rosy Stamp Set today. This is one of the most gorgeous rose layering stamp sets that I have ever seen. And the fun part is that they are super easy to use!

Sunny Studio Stamps: Everything's Rosy Fancy Frames Frilly Frames Thank You Card by Rachel Alvarado

I have two cards to share with you today. I used both the Everything's Rosy Stamp Set and Frilly Frames Lattice Die Set on both of my cards. For my first card (shown above), I decided to create a shaker card beneath the lattice. I simply added a clear sheet of acetate behind the lattice with a light amount of liquid adhesive. I then added small strips of foam tape around the sides before adding some Studio Katia Crystal Clear Mini Sequins.

Sunny Studio Stamps: Everything's Rosy Fancy Frames Frilly Frames Thank You Card by Rachel Alvarado

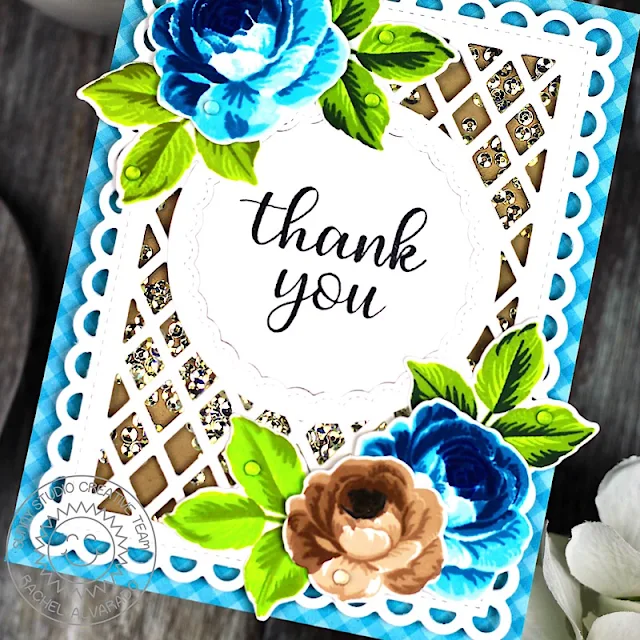
Altenew ink colors for the roses: Blue Roses: Sea Glass, Ocean Waves, Dusk, and Desert Night; Sepia Rose: Sand Dunes, Rocky Shore, Mocha, and Espresso; Leaves: Bamboo, Parrot, Olive, and Moss

Sunny Studio Stamps: Everything's Rosy Fancy Frames Frilly Frames Thank You Card by Rachel Alvarado

Lastly, I added a sheet from the Classic 6"x6" Gingham Paper Pad and some Tiny Dew Drops.

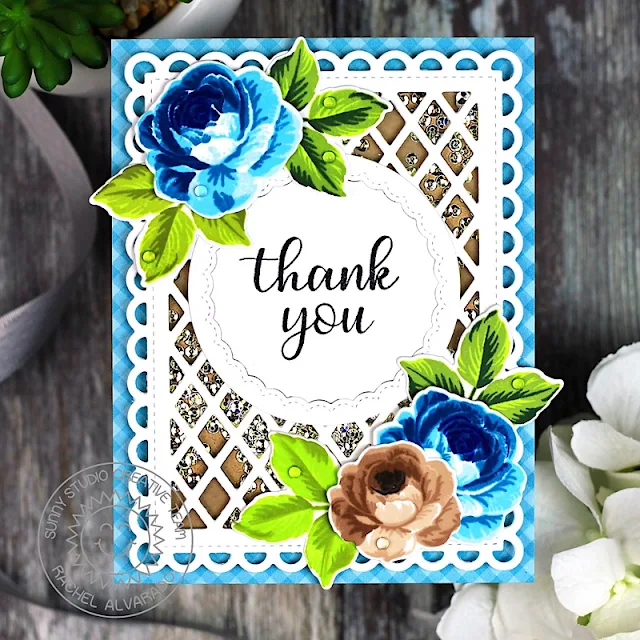
For my second card, I used the same sets but different colors. It's amazing how switching up the colors helps to change up the look of your card completely. I first die cut the Frilly Frames Lattice Die Set three times from white card stock and glued them together. I wanted to get bolder look with the lattice and accentuate it by giving it some more depth.

Sunny Studio Stamps: Everything's Rosy Frilly Frames Hello Card by Rachel Alvarado

Once again, I used the Altenew Ink Mini Cubes for my roses and leaves. In addition, I also two Mini Ink Cubes from My Favorite Things. I added a beautiful blue sheet of patterned paper from the Gingham Jewel Tones 6"x6" Patterned Paper.

Sunny Studio Stamps: Everything's Rosy Frilly Frames Hello Card by Rachel Alvarado

Colors Used: Yellow roses: MFT Lemon Chiffon, MFT Sunshine, Altenew Buttercream, Altenew Caramel Toffee, and Altenew Paper Bag; Leaves: (Altenew) Bamboo, Parrot, Olive, and Moss 

I hope you enjoyed my cards today! If you like flowers, don't hesitate to check out these gorgeous rose layering stamps! You won't be disappointed. See you next week!

Sunny Studio Supplies Used:

Timeless Tulips Dies
Shop at:
Sunny Studio
Timeless Tulips Stamps
Shop at:
Sunny Studio
Vintage Jar Dies
Vintage Jar Dies
Shop at:
Sunny Studio
Classic Gingham 6x6 Paper
Shop at:
Sunny Studio
Flirty Flowers 6x6 Paper
Shop at:
Sunny Studio
Everything's Rosy Stamps
Shop at:
Sunny Studio
Everything's Rosy Dies
Shop at:
Sunny Studio
Frilly Frames Lattice Dies
Shop at:
Sunny Studio
Frilly Frames Polka-Dot
Shop at:
Sunny Studio

Thursday, January 24, 2019

Chubby Bunny Cards with Vanessa and Anja

Hello everybody! Vanessa here today with a z-fold card using the cute Chubby Bunny set. These little bunnies are adorable, I wanted to put a lot of them onto my card. A z-fold card offers plenty of space to do so.

Sunny Studio Stamps: Chubby Bunny Rustic Winter Dies Easter Themed Interactive Card by Vanessa Menhorn

For the base, I trimmed my cardstock pieces like this:

Sunny Studio Stamps: Chubby Bunny Rustic Winter Dies Easter Themed Interactive Card by Vanessa Menhorn

As you can see, I trimmed the upper panel 5 1/2 x 8 1/2 and scored it at 2 1/8 and 4 1/4. For the grass layer, I scored the panel at 4 1/4 and 2 1/8 from the other side. To assemble the card, I put on the adhesive as shown in the pic. 

Sunny Studio Stamps: Chubby Bunny Rustic Winter Dies Easter Themed Interactive Card by Vanessa Menhorn

But before assembling, I used a cloud stencil on the base to create the sky, then I die-cut the birch trees and leaves from Rustic Winter, colored them with Copics and adhered them. 

Sunny Studio Stamps: Chubby Bunny Rustic Winter Dies Easter Themed Interactive Card by Vanessa Menhorn

Now I trimmed a strip of cardstock, inked it with green Distress Oxide ink, die-cut a grass edge and adhered it.

Sunny Studio Stamps: Chubby Bunny Rustic Winter Dies Easter Themed Interactive Card by Vanessa Menhorn

I stamped all the images onto white cardstock, colored them with Copics and adhered them, raising some with foam tape.

Sunny Studio Stamps: Chubby Bunny Rustic Winter Dies Easter Themed Interactive Card by Vanessa Menhorn

As you can see, I added two more strips of grass into the square to add more dimension here. And when folded, the card fits into an envelope easily.

I'll be trying to provide you with a video of this card in action, so you might like to check my Instagram account for it! Thanks for stopping by today!

-------------------------------------------------------------

Hello everyone, Anja here and I'm happy to be back again with a new card showcasing the adorable Chubby Bunny Stamps. I just love their cute little faces!


Sunny Studio Stamps: Chubby Bunny Window Trio Square Dies Easter Themed Card by Anja Bytyqi

At first, I created an A2 landscape top-folding card base from white cardstock. I used the Window Trio Square Dies to cut three openings into a panel of lilac cardstock. I also chose a stitched scalloped die to create a decorative border.

Next, I took a piece of Strathmore Bristol Smooth Cardstock and marked where the windows would be with a pencil. I did some light handed ink blended with Distress Oxide Inks (Spun Sugar, Milled Lavender, Tumbled Glass). I picked one of the purple Gingham Pastels 6x6 Papers, cut it to size and adhered it at the bottom of my card base and popped up the window panel with foam tape.

Sunny Studio Stamps: Chubby Bunny Window Trio Square Dies Easter Themed Card by Anja Bytyqi

I stamped the bunnies, sentiment banner and a little flower in Memento Tuxedo Black Ink and colored them with Copic Markers (colors listed below). I used the coordinating dies to cut the images out and adhered them with foam squares.

(Copic colors used - Aqua: BG10, BG11, BG32, BG45; Green: G40, YG11, YG13; Grey: C00, C0, C1, C3; Pink: RV10, RV02, RV55; Purple: V000, V01, V12, V15)

Thank you so much for stopping by! Have a fabulous day!

Sunny Studio Supplies Used:

Window Trio- Square Die
Shop at:
Sunny Studio
Rustic Winter Dies
Rustic Winter Dies
Shop at:
Sunny Studio
Gingham Pastels 6x6 Paper
Shop at:
Sunny Studio
Chubby Bunny Stamps
Chubby Bunny Stamps
Shop at:
Sunny Studio
Chubby Bunny Dies
Chubby Bunny Dies
Shop at:
Sunny Studio

Wednesday, January 23, 2019

Love Monkey Cards with Franci and Mona

Hello there! Franci here with you today with a love themed card feat the new adorable Love Monkey set.

Sunny Studio Stamps: Love Monkey Staggered Circle Dies Monkey Themed Love Card and Franci Vignoli

First, I created a standard card base out of white cardstock. Then I cut out a coordinating panel from white cardstock as well and I die cut some circles out of it using the new Staggered Circles die.

I used the partial die cutting technique, leaving out of my Big Shot sandwich the circles I didn't want to cut out. I position my die how I want it on my card and adjust the last clear plate on top to leave out the parts that I don't want to be cut out. I put some washi tape to keep everything in place and pass through the die cutting machine.

Sunny Studio Stamps: Love Monkey Staggered Circle Dies Monkey Themed Love Card and Franci Vignoli

I backed all the windows up with some lovely papers from the new paper sets and I stamped, colored and die cut all the images with the coordinating dies.

I glued them all down with liquid glue and foam tape, stamped the sentiment and the little hearts all around. Finally I added some details with a white gel pen and this clean and simple love themed card is complete! 

Hope you like this and thank you so much for stopping by today :)

--------------------------------------------------------

Hi crafty friends! It's Mona here and today I am going to show you an interactive card with the gorgeous Love Monkey Stamp Set!

Sunny Studio Stamps: Love Monkey Sliding Window Dies Rustic Winter Monkey Themed Hello Card and Mona Toth

I started the card making with die-cutting. I picked a beautiful pink patterned paper from the Flirty Flowers 6x6 Cardstock and run it through my Die-Cut machine with the Sliding Window Dies. You can find a video tutorial at Sunny Studio Stamps Youtube Channel on how to use this amazing die. 

Sunny Studio Stamps: Love Monkey Sliding Window Dies Rustic Winter Monkey Themed Hello Card and Mona Toth

When it was done I built up the scene. I made tree Die-cuts with the Rustic Winter Dies and fresh grass with Comic Strip Everyday Dies.

Sunny Studio Stamps: Love Monkey Sliding Window Dies Rustic Winter Monkey Themed Hello Card and Mona Toth

After this I made the backgrounds of my scene with ink blending. For outside I cut a 3x4" size cardstock and blended with Blueprint Sketch, Mermaid Lagoon and Tumbled Glass Distress Oxide Inks. I also blended the Die-cut grasses with Twisted Citron and Lucky Clover Distress Oxides. I blended the inside "secret" background with Spun Sugar and Picked Raspberry Distress Oxide Inks. 

Sunny Studio Stamps: Love Monkey Sliding Window Dies Rustic Winter Monkey Themed Hello Card and Mona Toth

After heat embossing the sentiments I started the stamping and coloring. I stamped the images from the Love Monkey Stamp Set and cute tulips from Spring Greetings stamp set. These monkeys are absolutely super cute! 


Sunny Studio Stamps: Love Monkey Sliding Window Dies Rustic Winter Monkey Themed Hello Card and Mona Toth

I stamped monkeys and lots of bananas to my hidden panel. I colored them with Copic Markers. After the coloring I used the coordinating dies to cut the images and added highlights with Signo Uniball white pen.

(Used Copic Markers: Y11, Y15, Y19, E0000, E000, E30, E33, E35, E42, E47, YG01, YG03, YG17, YG67, B000, B05, B18, R20, R32)

Sunny Studio Stamps: Love Monkey Sliding Window Dies Rustic Winter Monkey Themed Hello Card and Mona Toth

In the end I styled my card and adhered everything together. Thank you very much for reading through my post, I hope that you have enjoyed it and I have inspired you! If you like my creations let's be friends on Instagram. :)

Sunny Studio Supplies Used:

Comic Strip Everyday Dies
Shop at:
Sunny Studio
Sliding Window Dies
Sliding Window Dies
Shop at:
Sunny Studio
Rustic Winter Dies
Rustic Winter Dies
Shop at:
Sunny Studio
Flirty Flowers 6x6 Paper
Shop at:
Sunny Studio
Love Monkey Stamps
Love Monkey Stamps
Shop at:
Sunny Studio
Love Monkey Dies
Love Monkey Dies
Shop at:
Sunny Studio
Spring Greetings Stamps
Shop at:
Sunny Studio
Spring Greetings Dies
Shop at:
Sunny Studio
Staggered Circles Die
Shop at:
Sunny Studio

Tuesday, January 22, 2019

Spring Greetings Cards with Juliana and Angelica

Hello Sunny Studio Friends! It's Juliana here with you today to share a card I created featuring the brand new Spring Greetings stamp set. For today's card, I thought it would be fun to try a nontraditional size. After looking around for ideas, I decided to go with a 3.5 x 8 inch card and I think I've found a new favorite size. You can fit so many things on it!

Sunny Studio Stamps: Spring Greetings Chubby Bunny Fancy Frames Spring Themed Card by Juliana Michaels

I began by stamping and coloring three bunnies from the Spring Greetings stamp set. I then added the tulip from the same set and a couple of Easter baskets from the Chubby Bunny stamp set.


Sunny Studio Stamps: Spring Greetings Chubby Bunny Fancy Frames Spring Themed Card by Juliana Michaels

After all of the coloring was complete, I took the smallest die from the Fancy Frames Square die and cut three squares from 3 three different colors of the 6x6 Flirty Flowers paper pad. I then backed each of these frames with a piece of white cardstock. Next, I adhered the stamped images to create a small scene on each frame and used double sided foam tape to give the bunnies a little bit of dimension.


Sunny Studio Stamps: Spring Greetings Chubby Bunny Fancy Frames Spring Themed Card by Juliana Michaels

For the card front, I trimmed a piece of pink cardstock to 3.5 x 8 inches and then layered a 3 x 8 inch piece of white cardstock on top. After positioning the bunny frames down the center of the card front, I stamped the sentiment from the Spring Greetings stamp set with black ink. I then finished off the card with a piece of pink and white baker's twine.


Thanks so much for joining me today. I hope you enjoyed this nontraditional sized card using the Spring Greetings stamp set.  

--------------------------------------------------

Hello Friends! Angelica here sharing a sweet Spring Greetings card, featuring the Spring Greetings stamp set and coordinating dies. I also used a few products from the new release. Let me show you how I made this card.

Sunny Studio Stamps: Spring Greetings Chubby Bunny Fancy Frames Frilly Frames Spring Themed Card by Angelica Conrad

I stamped the tulips and hearts from the Spring Greetings stamp set, and daisies from the Chubby Bunnies stamp set onto white card stock. I colored the images with Copic Markers, then trimmed the panel down. 

Sunny Studio Stamps: Spring Greetings Chubby Bunny Fancy Frames Frilly Frames Spring Themed Card by Angelica Conrad

Out of pink card stock, I die-cut a circle frame using the middle-sized Fancy Frames Circle Die, and a scalloped mat with Frilly Frames Lattice. I die-cut a circle out of the middle of my colored panel to make a window, and glued on the pink frame. With a large dauber, I blended Tumbled Glass Distress Oxide ink onto white card stock. I stamped the sentiment with Versafine Clair Nocturne ink onto the same panel, then attached the window.

Sunny Studio Stamps: Spring Greetings Chubby Bunny Fancy Frames Frilly Frames Spring Themed Card by Angelica Conrad

I added the panel to the scalloped mat with double sided adhesive, then attached it to an A2 size card base. I used thin foam adhesive squares to add the bunnies and tulips.

That's all that I have for today. Thanks so much for stopping by!

Sunny Studio Supplies Used:

Fancy Frames-Circle Dies
Shop at:
Sunny Studio
Fancy Frames-Square Dies
Shop at:
Sunny Studio
Flirty Flowers 6x6 Paper
Shop at:
Sunny Studio
Chubby Bunny Stamps
Chubby Bunny Stamps
Shop at:
Sunny Studio
Chubby Bunny Dies
Chubby Bunny Dies
Shop at:
Sunny Studio
Spring Greetings Stamps
Shop at:
Sunny Studio
Spring Greetings Dies
Shop at:
Sunny Studio
Frilly Frames Lattice Dies
Shop at:
Sunny Studio