Friday, January 12, 2018

Inspiration Week: Introducing Team Player & Rain Showers Stamps

Today's the big day!  Yay!  But before you rush off to shop, we have one last set of sneak peeks, a special discount code and another giveaway...  Today I'm showcasing our new Team Player Stamps & Dies and a fun little 2x3 background stamp set called Rain Showers.

Card No. 1: For my first card I wanted to showcase all the different sports and balls from the set.  The baseball can double as a tennis ball depending on how you color it and whether you chose to include the separate stitching.  I kept everything really simple with some light inking on my background using tumbled glass distress ink, followed by a handful of stars from the set.  The black and white striped patterned paper felt like the perfect finishing touch.  :)

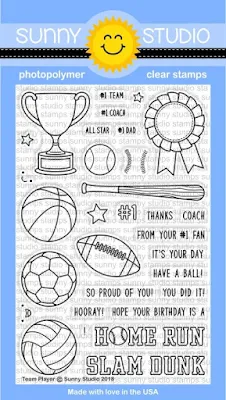
This set comes with 9 unique sentiments and has been designed for ultimate flexibility.  I wanted it to work for thank you cards for coaches, cards to encourage your favorite athletes, father's day cards and even birthday cards for the sports enthusiast.  I have kept the two little faces separate so you can chose whether you want to add the personality to your projects or keep them more plain.
Sunny Studio Stamps: Team Player Have A Ball Sports Themed Card by Mendi Yoshikawa

Card No. 2:  Up next is a birthday card for the baseball lover in your life.  I inked up my background with Colorbox Sky Dye Ink after masking it off using dies from our Rain or Shine and Sunny Sentiments sets. I love that by having the baseball stitches separate that you can not only expand the versatility of the ball, but that you can also stamp the stitches in red for a extra touch of realism. I couldn't resist the urge of adding a "manly" scalloped edge with the baseballs.  ;)
Sunny Studio Stamps: Team Player Home Run Birthday Baseball Card by Mendi Yoshikawa


Card No. 3:  For my next card I used that same birthday sentiment, this time switching out the words "home run" for "slam dunk".  To create the look of the basketball bouncing, I used the stamp from our Froggy Friends stamps.  For the bottom half of my card I stamped the largest star using VersaMark ink which I heat embossed with white embossing powder.  I then stamp the smaller star in orange to fill in the space around them.  I like the subtle pattern and how it matches the orange of my basketball.
Sunny Studio Stamps: Team Player Slam Dunk Basketball Birthday Card by Mendi Yoshikawa

Card No. 4:  Up next is a grid style card that I thought would make a great Father's Day card pairing the ribbon with the football images and a sentiment borrowed from our Stars & Stripes stamps.  The award ribbon and trophy have both been designed so you can stamp the smaller companion words on them so that you can interchange what they say.
Sunny Studio Stamps: Team Player You're My Hero #1 Dad Football Card by Mendi Yoshikawa

Card No. 5:  Up next is a card that is perfect for a coach.  I think you could easily switch out the ball to make this design work for football or baseball.  I cut the grass using the border from our Sunny Sentiments stamps and then added texture by flicking on large strokes of color using my Copic markers.  To create my sentiment I paired some of the words from this set with the word "thank you" from our Autumn Splendor stamps.

The rainy background uses our new 2x3 Rain Showers background stamps which I stamped using a pale blue pigment ink and then heat embossed with Stampendous Kaleidoscope  embossing powder for a glittery shimmer.  When I was done, I used my Fiskars SureCut paper trimmer to cut a square from the center of my panel, which I framed using our Fancy Frame square dies.  I then popped up the entire piece with a piece of craft foam which gives the scene a fun sense of dimension in person.
Sunny Studio Stamps: Team Player Soccer Coach Thank You Card by Mendi Yoshikawa

Card No. 6: For my next card showcasing our new Rain Showers stamps, I wanted to give the look that the umbrella is stopping the rain beneath it, so I masked off a portion of my card panel which was the same width as the umbrella and then repeatedly stamped my raindrops in VersaMark ink which was then heat embossed with powder blue pearl embossing powder.  It creates such a fun shine in person!

To embellish my card I stamped the clouds from Sunny Sentiments and Rain or Shine using Colorbox Mermaid Dye Ink and then stamped the dog from Rain or Shine in a pale tan ink before trying my hand at "no line" coloring with my Copic Markers.  At the advice of Kristina Werner, I stamped an extra dog to have on the side to refer to and then started by coloring in reverse so to speak.  I first colored my shadows and then filled in my image with the lighter colors so I still had a bit of an outline to keep things straight.  I really enjoyed it and I love the results so I'm hoping to try it again soon.  As I final finishing touch, I used a Sharpie White Paint Marker to add shine to the dog's eyes, nose and boots, as well as a polka-dot pattern for my umbrella.

Card No. 7: For my last card of the day I wanted to try a third look for the Rain Shower background stamps so I started by blending distress inks for my background and then when it was completely dry, I heat embossed the raindrop using VersaMark ink with white embossing powder.  I embellished my card with another no line image using that same umbrella from the Rain or Shine set and a sentiment from Color Me Happy.  As a final finishing touch I inked up scraps of cardstock in those same distress ink colors and die-cut small hearts from them using one of the smaller hearts from our Stitched Hearts dies to form my little border.

I'm so happy you've joined me this week for all the sneak peeks and I'd love to give one last $25 gift code to a lucky winner.  If you're just joining us, there's still time to enter the giveaways from earlier in the week.  The contests run through Saturday at Midnight PST with winners announced here on Sunday, January 14th. :)

a Rafflecopter giveawayWe also have a special discount code for you! Use the code SPRINGTIME to save 15% off your entire purchase. Hurry!  The sale ends on Monday, September 15th at 11:59 pm PST. (Sorry... This discount is limited to retail orders only).

Here's a full look at the new 4x6 Team Player Stamps & Dies and the Rain Showers 2x3 Background Stamps featured today.
Sunny Studio Stamps: Introducing Team Players 4x6 Clear Stamps   Sunny Studio Stamps: Introducing Team Players Dies   Sunny Studio Stamps: Introducing Rain Showers 2x3 Clear Background Stamps

Other Sunny Studio Supplies Used:
Basic Mini Shape Dies
Shop at:
Sunny Studio
Color Me Happy Stamps
Shop at:
Sunny Studio
Rain or Shine Dies
Rain or Shine Dies
Shop at:
Sunny Studio
Rain or Shine Stamps
Shop at:
Sunny Studio
Sunny Sentiments Dies
Shop at:
Sunny Studio

Stars & Stripes Stamps
Shop at:
Sunny Studio
Sunny Sentiments Stamps
Shop at:
Sunny Studio
Memento Tuxedo Black Ink Pad
Shop at:
Sunny Studio
Memento Tuxedo Black Marker
Shop at:
Sunny Studio
Tsukineko Jumbo Dauber
Shop at:
Sunny Studio
Autumn Splendor Stamps
Shop at:
Sunny Studio
Froggy Friends Stamps
Shop at:
Sunny Studio
Versafine Onyx Black Ink
Shop at:
Sunny Studio
Fancy Frames-Square Dies
Shop at:
Sunny Studio
VersaMark Watermark Ink
Shop at:
Sunny Studio

Thursday, January 11, 2018

Inspiration Week: Introducing Tiny Dancers & Born To Sparkle

Hello!  Welcome to day 4 of our sneak peeks!  Only one more day until the big release... Today I'm sharing ideas using our new Tiny Dancers Stamps & Dies and a 3x4 sentiment stamp set called Born To Sparkle and the coordinating Sparkle Word Die.

Card No. 1: For my first card today I created a girly ballerina card that was inspired by this darling card HERE. I used our Fancy Frames circles to ground each of the dancers which I colored in sweet pastel tones using my Copic Markers.  These girls are so much fun to personalize with different skin tones and hair colors and the card uses one of my favorite Audrey Hepburn quotes.
Sunny Studio Stamps: Tiny Dancers Ballerina Card by Mendi Yoshikawa


Card No. 2: Up next is another soft and sweet card repeating a rosebud motif from a couple of the smaller companion images from the set. For my background, I layered a PTI cover plate die cut from white and layered on a white card base.  I then used the diamond corners to lay my rosette pattern.  I colored the other rose from the set and placed it in my ballerina's hands (she can also hold the star wand).  I finished by framing her with the Circle Fancy Frames and stamped my sentiment from the set on a banner from the Sunny Borders set.
Sunny Studio Stamps: Tiny Dancers Rosette Girl's Birthday Card by Mendi Yoshikawa

Card No. 3: Next is a card using a fun teal and lavender color scheme.  I wanted to create the look that the little bow from the set is creating for the tucks in the scallop using our Stitched Scallop dies.  To stamp my sentiment to match the curve of my fancy frame die-cut, I place a clear block down over the top of my girl and circle die-cut and then curved the sentiment onto my block to visually match.
Sunny Studio Stamps: Tiny Dancers Proud of You Princess Card by Mendi Yoshikawa

Card No. 4: For this card, I started by applying water in a loose rectangle on a piece of watercolor paper cut down to 5.5" x 4.25" which I temporarily taped on all four sides to a board.  I then dropped in color using Daniel Smith Watercolors in the colors Wisteria & Opera Pink and allowed it to dry before adding a second layer to give it more of the watercolor look.  I wanted it to frame a row of my little dancers without being too busy so I tried to apply less color as it fades towards the center.  After that, I simply adhered my images in a row, stamped my sentiment using my Mini MISTI (which is really helpful with the texture of watercolor paper), and added a sprinkling of clear iridescent sequins with some liquid adhesive.
Sunny Studio Stamps: Tiny Dancers Ballerina Dance Card by Mendi Yoshikawa

Card No. 5: For this card, I thought I would focus on all the companion images from the set.  It reminds me of my two girls when they were young.  There was a period of about two years for each of them when they lived in their princess "dress-up" clothes. For my card background, I inked up some white cardstock with Spun Sugar distress ink and then repeatedly stamped the rosebud, and then filled in with the tiny stars in a random pattern using the same ink.

After I had my focal point images laid out, it felt a little stark and bare so I used my ink dauber to apply some tumbled glass distress ink behind each image and then used a BG000 Copic Marker to fill in the spaces on my images to match. To tie in the blue, I decided to ink up some spare cardstock with that same tumbled glass distress ink and then heat-embossed the banner shape using our Little Angels stamps.
Sunny Studio Stamps: Tiny Dancers Ballet Slippers Ballerina Card by Mendi Yoshikawa

Card No. 6:  Up next is a card mixing both the Tiny Dancer set with a new 3x4 sentiment set called Born To Sparkle.  This set is all about words that mix and match with the word sparkle.  The set comes with the word sparkle, but there is also a Sparkle Word Die in a different font that can also coordinate for additional design possibilities.

To create my background, I inked up a piece of white cardstock using my jumbo dauber with Colorbox Pixie Dye Ink and then cut masks using our Sun Ray Dies that I laid out on the background, before inking it up again with Colorbox Lilac Dye Ink.  I then covered the entire surface with VersaMark Ink by pressing the pad directly to the card panel and covered it with a clear iridescent sparkle embossing powder before heating it with my heat gun.  I am in love with the results!  As a final finishing touch I cut the ends of my sentiment strip using our Fishtail Banner dies.
Sunny Studio Stamps: Born To Sparkle & Tiny Dancers Sunburst Glitter Ballerina Card by Mendi Yoshikawa

Card No. 7: For my last card of the day I used some of the companion images from our Born To Sparkle stamps to create a sparkly bokeh-inspired background.  I was trying to channel my inner Barbie girl for this one.  I heat embossed some of the circles while stamping some of the others in white pigment ink only--I think this creates the illusion of depth.  When they were nearly dry, I inked on spun sugar distress ink which was applied heavier around the edges.  I followed up by stamping some of the diamond shapes in different sizes in a random pattern using different shades of pink ink.  

I finished my card by coloring some silver glitter cardstock I had on hand with a hot pink Copic Marker which I then die-cut my "sparkle" word from (and stacked with layers of standard white cardstock behind it for extra dimension).  For the second part of my sentiment, I stamped it onto the vellum with dye ink and heat embossed it with clear powder to set it and keep it from smearing.  It resulted in a really cool, sheer look.  As a final touch, I again cut the ends of my vellum strip using our Fishtail Banner dies and added a few simple clear sequins.
Sunny Studio Stamps: Born To Sparkle Never Let Anyone Dull Your Sparkle Pink Glitter Card

I'm so excited you've joined me for today's sneak peek and I'd love to give a $25 gift code to one lucky winner.  Make sure to check back tomorrow for the last of the sneak peeks and for one last chance to win.  The contests run through Saturday at Midnight PST with winners announced here on Sunday, January 14th. :)

a Rafflecopter giveaway Here's a full look at the new 4x6 Tiny Dancers Stamps & Dies, the 3x4 Born To Sparkle Stamps & Sparkle Word Die featured today.  New sets will all be available in our store early tomorrow morning!!! 


Sunny Studio Stamps: Tiny Dancers Ballet Ballerina Clear Photopolmer 4x6 Stamp set    Sunny Studio Stamps: Tiny Dancers Ballerina Ballet Steel Rule Dies

Sunny Studio Stamps: Born To Sparkle Sentiment 3x4 Clear Photopolymer Stamp Set    Sunny Studio Stamps: Sparkle Word Steel Rule Die

Other Sunny Studio Supplies Used:
Stitched Scallop Dies
Shop at:
Sunny Studio
Sunny Borders Dies
Sunny Borders Dies
Shop at:
Sunny Studio
Sunny Borders Stamps
Shop at:
Sunny Studio
Ric Rac Border Dies
Ric Rac Border Dies
Shop at:
Sunny Studio
Fancy Frames-Circle Dies
Shop at:
Sunny Studio
Fishtail Banner Dies
Shop at:
Sunny Studio
Little Angels Dies
Little Angels Dies
Shop at:
Sunny Studio
Little Angels Stamps
Shop at:
Sunny Studio
Sun Ray Dies
Sun Ray Dies
Shop at:
Sunny Studio
Memento Tuxedo Black Marker
Shop at:
Sunny Studio

Memento Tuxedo Black Ink Pad
Shop at:
Sunny Studio
Tsukineko Jumbo Dauber
Shop at:
Sunny Studio
Versafine Onyx Black Ink
Shop at:
Sunny Studio
VersaMark Watermark Ink
Shop at:
Sunny Studio

Wednesday, January 10, 2018

Inspiration Week: Birthday Balloon, Bold Balloons & Ric Rac Borders

Hello there!  I am super happy to finally share this season's newest layering sets called Bold Balloons Stamps & DiesBirthday Balloons Stamps & Die and a new border set called Ric Rac Borders!  All of them will be available for purchase in our online store this Friday morning (yay)!  In the meantime, I hope you will kick back and enjoy this look at all the fun ways you can use them...

Card No. 1: I will admit that I immediately turned to Pinterest to jumpstart my creative juices for many of my cards today and I will do my best to give credit to each as I go along. ;)  For my first card I was inspired by THIS wonderful ombre card. I inked up my mylar heart balloons from our new Bold Balloons set in four separate color combos (linked below), popping up one on the middle right with foam tape for a little extra dimension. I then used a paper piercer to poke a hole in each balloon to string black thread through. I finished my card by heat embossing my sentiment with white embossing powder using a sentiment from our Sending My Love stamps.Sunny Studio Stamps: Bold Balloons Color Layering Ombre Valentine's Day Card by Mendi Yoshikawa

Card No. 2:  For my next card I used my MISTI tool together with the MISTI creative corners to repeatedly stamp the word "love" at an angle from our Sending My Love stamps.  I then stamped my balloons in a variety of pink shades (colors linked below) and taped a coordinating color of baker's twine to the back of each for my balloon strings.  

To add a little interest to my center white panel I used the small zig-zag edge from our new Ric Rac border dies--They are quickly becoming a new favorite of mine.  ;) I finished off my balloon bouquet with a bow from our Holiday Style stamp set in the same colors used for my darkest balloon.
Sunny Studio Stamps: Bold Balloons Color Layering Valentine's Day Pink Love Card by Mendi Yoshikawa

Card No. 3:  Up next is a card set perfect for gift giving (inspired by this card set HERE) that uses the star balloon from our new Bold Balloons set, together with the banner from our Sunny Borders set and a sentiment from Heartfelt Wishes.  For my background, I die-cut white ric rac border and adhered them to white cardstock to give them subtle texture that almost appears that they have been embossed.  I finished them off with a white scalloped frame from our new Fancy Frame Square dies shared yesterday.
Sunny Studio Stamps: Bold Balloons Color Layering Start Birthday Card Set by Mendi Yoshikawa

Card No. 4: For this next card I was inspired by a card shared HERE that has the colors of the balloons match the sentiment down below.  Our Bold Balloons set comes with two different pieces of layering curling ribbon that add a really fun touch!  

For the bottom edge of my card, I die-cut the edge with the ricrac border die and then I inked up a piece of white cardstock with a jumbo dauber, blending together Festive Berries, Carved Pumpkin, Mustard Seed, Mowed Lawn, and Salty Ocean.  I then took the trio of confetti images from the set and repeatedly stamped it to create a continuous pattern in those same colors.
Sunny Studio Stamps: Bold Balloons Color Layering Rainbow Star Birthday Card by Mendi Yoshikawa

Card No. 5: Up next are some ideas using the new smaller 3x4 Birthday Balloon companion stamps and die.  I just adore the look of these balloons when they are all stamped up with the three layers!  I was inspired by THIS card and put my own spin on it by inking up the bottom edge with distress inks that fade into the white background.  I then stamped it with some of the confetti from the set to match.  For my die-cut "happy" letters I used Lawn Fawn's Cole's ABC's dies.
Sunny Studio Stamps: Birthday Balloon Color Layering Rainbow HAPPY Birthday Card by Mendi Yoshikawa

Card No. 6: Up next is a clean and simple card that was inspired by this card HERE.  I created an overall white-on-white pattern like the inspiration card using a plain die-cut of the balloon with no stamping and then stamped a single red balloon using the Birthday balloon stamp set.  I then tied it with a red twine bow, heat-embossed a simple sentiment in white using our Heartfelt Wishes set, and popped it up with foam tape.  To add a bit more interest and color to my card I added a little border of red polka-dot paper along the bottom and a straight stitch with my sewing machine.  This would be a great card for mass-producing in different colors too!  :)
Sunny Studio Stamps: Birthday Balloon Color Layering Red Polka-dot Sweet Wishes Card by Mendi Yoshikawa

Card No. 7:  I wanted to create a card that truly showed off all that this small stamp can do by stamping it in a rainbow of fun colors.  I masked off the clouds for my background using the cloud dies from our Rain or Shine and Sunny Sentiments sets, before inking up my background with Colorbox Sky Dye Ink.  


I stamped my sentiment in the bottom left-hand corner and masked it off before moving on.  I then arranged by balloons loosely where I wanted them to go without adhering them and gently moved them aside as I took turns stamping the strings using a couple different stamps from the set that I adhered to my acrylic block in a wavy pattern.  When I was done, I added my balloons with foam tape onto my card panel and trimmed off approximately 1/2" from the length of my card front to allow room for my stitched zig-zag edge using the new Ric Rac Border dies.
Sunny Studio Stamps: Birthday Balloon Color Layering Rainbow Balloons with Clouds Born To Sparkle Card by Mendi Yoshikawa

Card No. 8:  For my last card I wanted to show how you can achieve a completely different look by using only the solid image from the Birthday Balloon set.  I was inspired by Laura Bassen's beautiful card HERE.  Instead of using a stencil like she did, I used my Mini MISTI to stamp the balloon image first in a light color and then to stamp it a second (and sometimes a third time) in a darker ink color that I applied to my stamp with a foam dauber.  It gave it a really nice and soft shadow to one side of each balloon.

When I was done, I stamped my sentiment in VersaFine Black Onyx ink and then masked it off to stamp and heat emboss my balloon strings with white embossing powder.  My strings weren't showing up quite as well as I would have liked so when I was certain my black ink was good and dry, I sponged on some Tumbled Glass distress ink over the top.  You could also reverse the order and start by inking up the bottom with the distress ink to begin with. As a final step, I added a strip of black and white polka-dot paper and rounded the corners with my We R Memory Keepers Corner Chomper.
Sunny Studio Stamps: Birthday Balloon Layered Rainbow Sweet Birthday Wishes Card by Mendi Yoshikawa

Stamping Trick: Before I go, I wanted to share a little secret I learned about stamping balloon strings.  I was really struggling to get them to stand up in a straight line and adhere them to my clear block until I realized I could use a clear grid ruler or T-style ruler to push them up against before adhering them to my block.  It worked like a charm and once I discovered it, it saved me a ton of frustration and heartache.  ;)

I frequently am asked which ink colors I used for my layered images.  While I think there are so many great options out there that can provide good results, these are the colors I used today for my stamped images (in the order shared from lightest to darkest)...

Pale Pink Heart Balloon (ombre card)
Stamps of Life Bubblegum
Hero Arts Cotton Candy
Hero Arts Pale Tomato

Dark Pink Heart Balloon (ombre card)
Hero Arts Cotton Candy
Hero Arts Pale Tomato
Stamps of Life Strawberry

Red Heart Balloon (ombre card)
Hero Arts Cotton Candy
Stamps of Life Strawberry
Colorbox Candy Red


Dark Red Heart Balloon (ombre card)
Hero Arts Pale Tomato
Colorbox Candy Red
Stamps of Life Cranberry

Pale Pink Heart Balloon (love card)
Stamps of Life Bubblegum
Stamps of Life Candy
Colorbox Pinkolicious


Hot Pink Heart Balloon & Bow (love card)
Stamps of Life Candy
Colorbox Pinkolicious
Colorbox Raspberry


Red Star
Hero Arts Pale Tomato
Colorbox Candy Red
Stamps of Life Cranberry

Orange Star

Papertrey Ink Summer Sunrise
Stamps of Life Tangerine
Colorbox Coral

Yellow Star
Stamps of Life Lemonade
Stamps of Life Banana
Colorbox Dandelion

Green Star

Colorbox Tree Frog
Colorbox Grasshopper
Colorbox Golf Course


Blue Star
Stamps of Life Sky
Colorbox Moody Blue
Colorbox Atlantic Blue

Lavender Star

Stamps of Life Pixie
Colorbox Lilac
Colorbox Frosted Plum


Magenta Balloon (Born To Sparkle card)
Colorbox Candy
Stamps of Life Raspberry
Colorbox Burgundy


Blue Balloon (Born To Sparkle card)
Colorbox Poolside
Colorbox Bahama

Colorbox Moody Blue

Teal Balloon (Born To Sparkle card)
Stamps of Life Seaglass
Stamps of Life Ocean
Colorbox Jade


Hot Pink Balloon (Born To Sparkle card)

Stamps of Life Candy
Colorbox Pinkolicious 

Colorbox Raspberry

Lime Green Balloon (Born To Sparkle card)

Stamps of Life Kiwi
Colorbox Tree Frog
Hero Arts Grass Chalk Ink


Purple Balloon (last card)
Stamps of Life Grape
Colorbox Grape Slushy
Colorbox Imperial


*All other balloons, used colors shared above for star balloons.

I'm so excited you've joined me for today's sneak peek and I'd love to give a $25 gift code to one lucky winner.  Make sure to keep checking back all this week for more peeks & prizes for up to five chances to win.  The contests run through Saturday at Midnight PST with winners announced here on Sunday, January 14th. :)

a Rafflecopter giveaway Here's a full look at the new Ric Rac Border Dies, 4x6 Bold Balloons Stamps & Dies, the 3x4 Birthday Balloons Stamps & Die featured today.

     Sunny Studio Stamps: Bold Balloons 4x6 Celebrate Clear Stamps  

Sunny Studio Stamps: Introducing Bold Balloons Coordinating Dies     Sunny Studio Stamps: Introducing Birthday Balloon 3x4 Clear Layering Stamps     Sunny Studio Stamps: Birthday Balloon Coordinating Die

Other Sunny Studio Supplies Used:

Heartfelt Wishes Stamps
Shop at:
Sunny Studio
Holiday Style Dies
Holiday Style Dies
Shop at:
Sunny Studio
Holiday Style Stamps
Shop at:
Sunny Studio
Sending My Love Stamps
Shop at:
Sunny Studio


Sunny Borders Dies
Sunny Borders Dies
Shop at:
Sunny Studio
Sunny Borders Stamps
Shop at:
Sunny Studio
Sunny Sentiments Dies
Shop at:
Sunny Studio
Colorbox Archival Dye Ink- Grape Slushy
Shop at:
Sunny Studio


Rain or Shine Dies
Rain or Shine Dies
Shop at:
Sunny Studio


Tsukineko Jumbo Dauber
Shop at:
Sunny Studio
Versafine Onyx Black Ink
Shop at:
Sunny Studio
VersaMark Watermark Ink
Shop at:
Sunny Studio