Monday, May 16, 2016

Comfy Creatures Island Retirement Card with Eloise

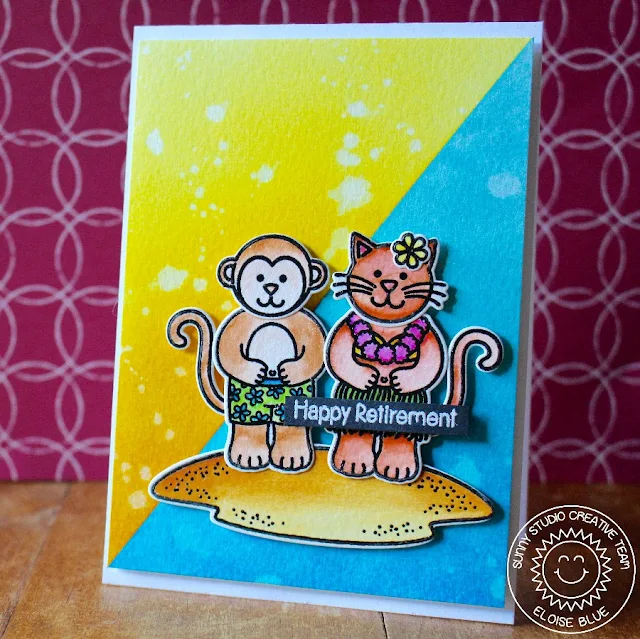
Hi everyone, Eloise here and I’m going to be creating a fun retirement card that would be perfect for someone going to retire on a island somewhere, or I guess someone that’s dreaming about it would work too! I’m going to be using the new Comfy Creatures stamp set as my focal point, but I’m also going to be pulling in the kitty head from the Sending My Love set (a previously released set) and the island from the new Island Getaway stamp set too, since it works perfectly with the two little summery bodies in their bathers from the Comfy Creatures set.

Sunny Studio Stamps: Comfy Creatures and Island Getaway Summer Card by Eloise Blue.

To begin my card I chose the two summery looking bodies, the monkey’s head, flower and the two tails from the Comfy Creatures stamp set. I also took the little island from the Island Getaway set and the cat head from Sending My Love to stamp and colour too. To colour these in, I’m going to be using watercolours. I’ve been completely obsessed with water colouring everything lately!  I stamped out my images in black ink and clear embossed over them and then coloured in my images with Zig Clean Colour markers. To cut out all my images I used the coordinating dies from all three sets.

Sunny Studio Stamps: Comfy Creatures and Island Getaway Summer Card by Eloise Blue.

For a little bit of a different background I decided to cut down a piece of watercolour cardstock and then cut it at a diagonal to create two different angled panels. I thought it would be fun and a little bit of a different look. I used some Distress Inks on both pieces using various yellows on the top panel and blues on the bottom panel. I sort of figured it looked like sand and water I guess. I the splattered some water on to give a splotchy look – I love doing this! I adhered the two angled pieces together with some washi tape on the back side to make sure they don’t shift and then I added some fun foam at the back to permanently adhere them together and then adhered it onto my card base. I then took my images and mounted them all on foam adhesive and placed them down into the bottom right corner of my card. To finish off my card I stamped out the ‘Happy Retirement’ sentiment from the Comfy Creatures set and white heat embossed it on a strip of black cardstock. I also adhered this using foam adhesive.

I hope you enjoyed my project today. I just love creating island scenes and I think those little bodies from the Comfy Creatures set is just perfect and I also love how it works so well with other stamp sets and you can mix and match from previously released sets – just makes it that much more versatile!

Make sure you check back tomorrow and the rest of the week to see what the other design team ladies have designed! I’m sure they’re going to be fantastic. 

- Eloise 


Sunny Studio Products Used:


Saturday, May 14, 2016

Guest Designer Spotlight: Tropical Paradise Card with Chari Moss


I am so thrilled to welcome the talented Chari Moss to the blog today with an incredible card using our Tropical Paradise set!  Take it away Chari...

Sunny Studio Stamps: Tropical Paradise Plumeria Floral Wreath & Flamingo card by Chari Moss.

For this card I used masking to create a one layer plumeria heart with leaves.  I then colored it with my colored pencils blending with a blender pencil then carefully fussy cut the outside and inside of the heart.  I used the same technique to color the flamingos then layered them over top using foam adhesive to pop them up off the card a bit to make them stand out from the flowers better. Since the coloring is focal point of the card I kept it simple with a kraft card base and a simple sentiment banner at the bottom.  

Sunny Studio Stamps: Tropical Paradise Plumeria Floral Wreath & Flamingo card by Chari Moss.

Didn't this incredible?! I am so in love with this idea!  Thank you Chari for sharing your wonderful idea with us.  :)

Friday, May 13, 2016

Stars & Stripes Reach For The Stars Card with Lexa

Hi there crafty friends.  It's Lexa here with a happy card to celebrate your Friday! :)

When I saw the Stars & Stripes stamp set for the first time I kept thinking what other possibilities I could use it for rather than for a 4th of July card. You may know that I'm not an American so today I'm going to show you that this set absolutely can make through the whole year.

Sunny Studio Stamps: Reach For The Stars Monkey Card by Lexa Levana (using Stars & Stripes and Comfy Creatures)

First, I cut a 4.25" x 5.5" white cardstock panel as a card base, then I embossed it with an arrow pattern. The texture will elevate your plain white background. All the images are stamped with Versafine Black Onyx and I use Distress Markers to watercolor them. I also added some smiley faces to the bigger stars.  Don't they look so cute? The monkey is from Comfy Creatures and I added googly eyes for extra fun.

You can pick some bright colors for this set to make other occasion cards, just like I did. I tied up a white string and tied a bow in the left corner, giving the scalloped banners a place to hang. For the sentiment, I stamp it on a piece fish tail banner which I decided to keep white so it wouldn't overpower the other images.

Sunny Studio Stamps: Reach For The Stars Monkey Card by Lexa Levana (using Stars & Stripes and Comfy Creatures)

I hope you like today's card. Thanks for stopping by.


Thursday, May 12, 2016

Stars & Stripes Let's Celebrate Pinwheel Card with Vanessa

Hey everybody!  Vanessa here with a fun window card using the Stars & Stripes set. I am not from the U.S., so I didn't create a patriotic card with it, but a cute birthday card instead.

Sunny Studio Stamps: Let's Celebrate Koala Bear Card by Vanessa Menhorn (using Stars & Stripes and Comfy Creatures)

I softly inked the bottom portion of a white card base. Then I trimmed a panel from white cardstock slightly smaller than the card and die-cut a square from it. Now I stamped the sentiment and adhered the panel to the card with foam tape. I stamped, colored and die-cut the stars and the pinwheel from Stars & Stripes and the head and hand from Comfy Creatures and adhered everything to the card.  Then I finished it off with matching sequins.

Sunny Studio Stamps: Let's Celebrate Koala Bear Card by Vanessa Menhorn (using Stars & Stripes and Comfy Creatures)

I love to combine the various sets, they go together so well! And this cute Koala Bear face just makes me smile :)

I hope you liked today's card! Thanks so much for stopping by!

Vanessa

Sunny Studio Supplies:

Wednesday, May 11, 2016

Stars & Stripes Fourth of July Cards with Lindsey

Hi! Lindsey here again sharing several cards using the Stars and Stripes stamp set. This set is perfect for Fourth of July cards, but also has images and sentiments that would work great for birthday cards or even a card for your favorite hero! I also incorporated the new Star Border die, the Wavy Border dies and the cute koalas from the Comfy Creatures stamp set. Let's get started.

Sunny Studio Stamps: Fourth of July Flag Card by Lindsey Bailey (using Stars & Stripes, Comfy Creatures, Wavy Borders & Star Border die)

I started with an A2 size card base. I used the Wavy Border dies to create red and white strips of cardstock which became the stripes on my American flag. A simple rectangle out of blue cardstock created the background for the Star Border. I cut the Star Border from white cardstock and trimmed it down to six stars, so it would fit in my rectangle. Once I had the background done, it was time to stamp and color the adorable little boy and girl koala. I colored the koalas using Copic markers and fussy cut them out. I added a star and hat on top of their heads from the Stars and Stripes stamp set


Sunny Studio Stamps: Fourth of July Flag Card by Lindsey Bailey (using Stars & Stripes, Comfy Creatures, Wavy Borders & Star Border die)

Finally, I stamped my sentiment under the blue rectangle on one of the white stripes. Since my sentiment said "reach for the stars", I decided to add a few more larger stars above the little koalas. These stars also came from the Stars and Stripes stamp set. I added a little Wink of Stella to all the stars for a little extra sparkle and that completes my card.

For my second card, I used almost all the images in the Stars and Stripes stamp set to create another fun Fourth of July card. I just arranged the different stamps on my white rectangle, which was slightly smaller than an A2 size card, to see what layout I preferred. Once I had them where I wanted them, I stamped them down. I colored all the images with Copic markers. I also outlined each image with a light blue marker. Then I used my glitter pen to add a little sparkle to all the stars on my card.


Sunny Studio Stamps: Stars & Stripes Fourth of July Card by Lindsey Bailey

After everything was colored, I backed my white rectangle on a piece of red cardstock to really make the white panel pop. Finally, I attached the red panel to a gray polka dot piece of cardstock that was cut to four and a quarter by five and half.


Sunny Studio Stamps: Stars & Stripes Fourth of July Card by Lindsey Bailey

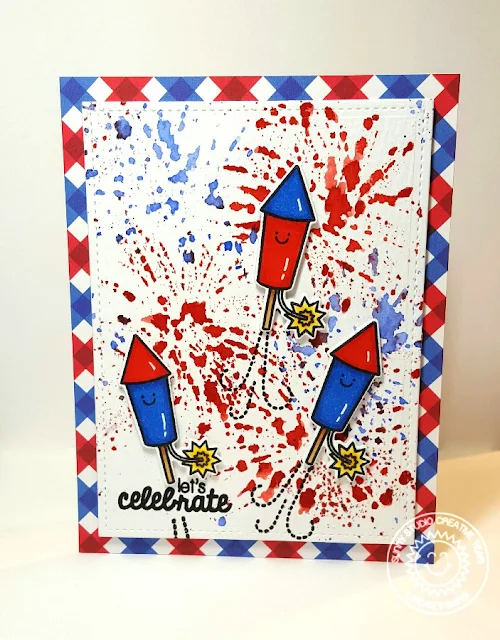
For my last card I decided to focus on the little firecracker image in the set. I wanted to create a background sky full of exploding fireworks with the little firecrackers in the foreground.

Sunny Studio Stamps: Stars & Stripes Red, White & Blue Fourth of July Rocket Card by Lindsey Bailey.

The first thing I did, was create the background using a piece of watercolor cardstock. I used some distress ink on an acrylic block to create the "fireworks." I simply put a dab of ink on the block and then used my water brush to spread the ink around in the shape of a firework. Then, I placed the paper on top of the ink. Ta-da.....watercolor fireworks! I think this technique worked well for the look I was going for. 

Next I stamped and colored three little fire crackers. I also stamped a little face from the set onto each firecracker to give them some personality. Once the watercolor panel was dry, I stamped the sentiment in the bottom left corner where I had a left a little white space. Then, I decided where to place the firecrackers and stamped the little firecracker trail in black. I used foam tape to pop up each of the firecrackers and added a little Wink of Stella to make them sparkle. Finally, I backed my watercolor panel on a gingham blue and red cardstock. 

Sunny Studio Stamps: Stars & Stripes Red, White & Blue Fourth of July Rocket Card by Lindsey Bailey.

I hope you'll check out this fun set, and stay tuned to the blog for more inspiration! I can't wait to see what everyone comes up with! Thanks for reading and have a great day!

Tuesday, May 10, 2016

Stars & Stripes Let's Celebrate Card with Anni

Hey stampers, Anni here! How are you today?

Today's card is featuring the new set called Stars and Stripes. What a fantastic set to celebrate all the good things in our lives!

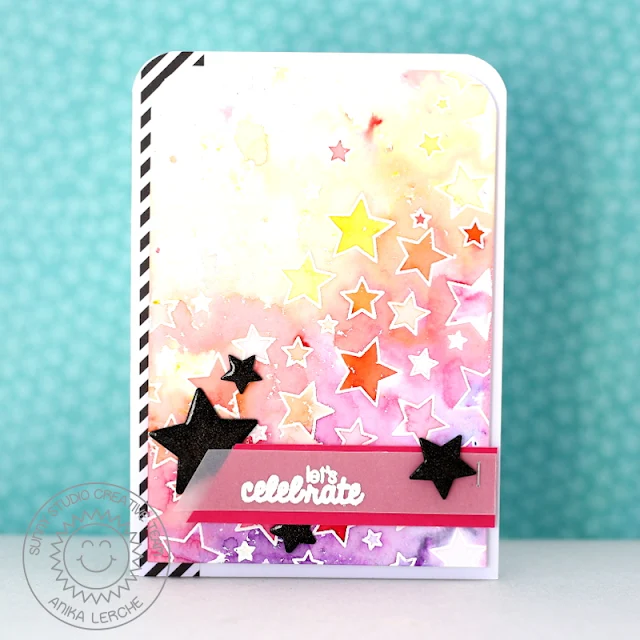
There are five different sizes of stars in this set. Oh my, how I love this! These are great to create backgrounds and that's what I did.

I stamped the stars on watercolor paper and heat embossed them in white. Then I added some pigment powders in yellow, orange, pink and violet, sprayed on some water and whoooo - what an effect!

Sunny Studio Stamps:  Stars & Stripes Let's Celebrate Watercolor Star card by Anni.

I used the matching Stars & Stripes dies to cut out some stars from black cardstock. It is always so much fun to see how black cardstock makes the colors pop. For the sentiment I stamped on a stripe of vellum and heat embossed in white and stapled it to some pink cardstock.

As a last detail I added some black and white striped patterned paper and some Wink of Stella and Glossy Accents to the stars.

Sunny Studio Stamps:  Stars & Stripes Let's Celebrate Watercolor Star card by Anni.

Hope you like my bright and colorful card!
Thanks for stopping by and have a sunny week!

Anni

Monday, May 9, 2016

Everyday Stars & Stripes Encouragement & Celebration Cards with Eloise

Hello everyone! Eloise here and today I’m back today to show you my creations for the new Stars and Stripes stamp set. This set is based around 4th of July but it is so super versatile, that you can use it for many other uses besides 4th of July. There’s a ton of different images and sentiments in here to make lots of different projects for different occasions, which is what I’m going to be doing today. So for today’s cards I made two different simple cards from this stamp set, just using the banner image that has the curvy stripes in it (or it could be a rainbow as well) and for the second card, I’m going to be using the star images.

Sunny Studio Stamps: Everyday Stars & Stripes Encouragement and Celebration Cards by Eloise Blue.

So for my first card, I stamped out a ton of the banner images from the Stars and Stripes stamp set on some watercolour cardstock. I coloured them all in with my peerless watercolours in rainbow colours and then die cut them all out using the coordinating dies.

I then took a piece of white cardstock and started arranging them. I started at the bottom first, so I grabbed my purple and first adhered the first banner down in the middle and then adhered the other two on each side with some foam adhesive. Because I didn’t want any gaps between the images, I used four blue banners for the next time to butt them up in between the purple banners to make sure there are no white spots showing. To adhere these ones I just added runner adhesive on the bottoms of the banner and a little foam strip on the top to make it flush. I continued up the panel going 3 banners, 4 banners, 3 banners etc to create a fun pattern. To make it more full also I added in a few more shades of the same colour as well so it would go higher up on my card. Once I finished at my pink layer, I used a black strip of cardstock. I white heat embossed the sentiment – ‘Let’s Celebrate’ from the same Stars and Stripes set also and then adhered that black strip a little over top of the banners to not show the edges of them. To finish up the first card I added some Wink of Stella to the banners and then adhered the panel onto a white card base.

Sunny Studio Stamps: Everyday Stars & Stripes Encouragement and Celebration Cards by Eloise Blue.

For my second card, I wanted to use all these different sized stars. So I created a small panel out of some watercolour cardstock and distress ink blended some blacks, blues and purples to create a dark night sky. I flicked on some water and shimmer to finish off the night sky look. I then stamped out the stars from the Stars and Stripes stamp set on some more of the same watercolour cardstock, and then clear embossed over it. I then used some Zig Clean Colour Real Brush Markers to watercolour in the stars yellow. I die cut them out using the coordinating dies . I adhered them down to the background and then moved onto my sentiment. I cut a strip of black cardstock and white heat embossed the ‘Reach For The Stars’ from the same stamp set on it and then foam mounted it on the panel. I then took some fun foam and adhered it to the back of my panel and then the panel onto my card base. For a finishing touch I took my Wink of Stella and coated the stars with it for some more sparkle and shine.

Thanks for stopping by the blog today, make sure you check out the blog everyday for some more inspiration using this stamp set!

- Eloise

Sunny Studio Stamps Products Used: