Showing posts with label Eyelet Lace Borders. Show all posts

Saturday, February 8, 2020

Guest Designer Spotlight: Chickie Baby Cards with Nicky Meek

Hello! I'm Nicky Meek and I'm delighted to be guest designing for Sunny Studio Stamps again today and have had so much fun creating with the unapologetic ally adorable Chickie Baby stamp set. I have two cards for you today that feature the stamp set in completely different ways!

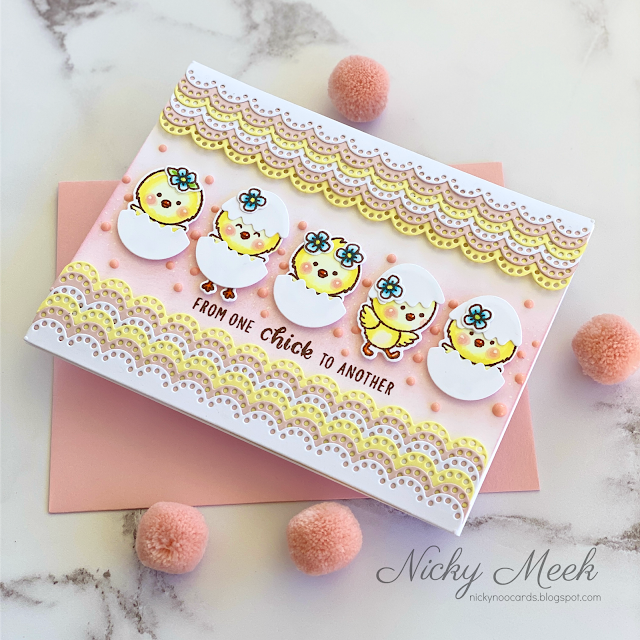
Sunny Studio Stamps: Chickie Baby Eyelet Lace Border Dies Girlfriend Card by Nicky Meek

My first card also uses one of the dies from the Eyelet Lace Borders die setTo make this card I die cut one of the Eyelet Lace Border dies 12 times over from 3 different coloured card stocks. I adhered them to one another in layers then set them aside to dry. I took a panel of cardstock and ink blended the focal point using Distress Ink in Spun Sugar. I added in a few dots of white gel pen just to break it up a little.

I adhered the lace borders to the panel by backing them with foam tape, then popped it in my Misti and stamped the sentiment. This background was then applied to a 110lb white cardstock base.

Sunny Studio Stamps: Chickie Baby Eyelet Lace Border Dies Girlfriend Card by Nicky Meek

Now for my Chickie Baby images. I stamped them all with Memento Ink in Rich Cocoa and coloured them with Copic markers, highlighted some points with a white gel pen then die cut. Each was backed with foam tape and applied. To make it just a little more girly and playful I added some Nuvo Crystal Drops amongst the chickies. Card complete!

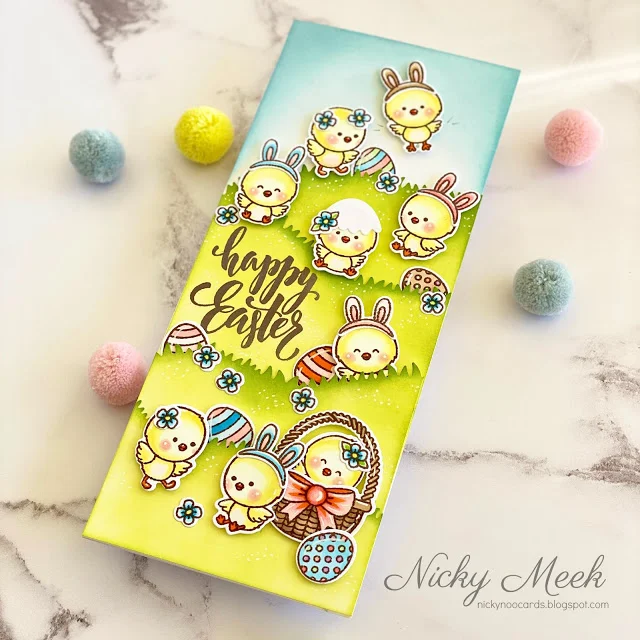
Sunny Studio Stamps: Chickie Baby Eyelet Lace Border Dies Easter Card by Nicky Meek

My second card using Chickie Baby is a slimline card with finished dimensions of 8 1/2in x 3 1/2in and this allowed me more space to create a big scene.

I grabbed a panel of smooth white cardstock and ink blended the sky using Distress Oxide in Tumbled Glass. I applied the panel to the prepared cardstock base. I took a couple of other slimline panels and used a grass edge die from my stash to create 4 undulating hills. They were ink blended with Distress Oxide in Twisted Citron and areas darkened using Mowed Lawn (seemed appropriate!). The sentiment was stamped. These sections were all adhered down to the background panel which in turn was adhered to the 110lb white cardstock base.

Sunny Studio Stamps: Chickie Baby Eyelet Lace Border Dies Easter Card by Nicky Meek

The Chickie Baby images were again stamped with the Memento Ink in Rich Cocoa and coloured with Copic markers, highlighted with a white gel pen, die cut and adhered either directly or with foam tape to build depth. I dotted in patches of daises with a white gel pen and with that this card was also complete.

I hope you have been enjoying your purchases from the most recent Sunny Studio release and that I've provided you with some fun inspiration.

Sunny Studio Supplies Used:

Chickie Baby Stamps
Chickie Baby Stamps
Shop at:
Sunny Studio
Chickie Baby Dies
Chickie Baby Dies
Shop at:
Sunny Studio
Eyelet Lace Borders
Eyelet Lace Borders
Shop at:
Sunny Studio

Tuesday, January 28, 2020

Border Dies Focused Cards by Leanne and Mindy

Hello everyone! Leanne here today. I live in Iowa where the winter days can often be overcast and gloomy. I find myself wanting to add lots of color to my cards to compensate for the lack of outside this time of year. So I have a very colorful rainbow card to share today. I've combined two new Sunny Studio products to create the rainbow which covers the length of my slimline card. 

Sunny Studio Stamps: Eyelet Lace Border Dies Heartstring Border Dies Love Monkey Floating By Everyday Card by Leanne West

I used two different border dies. The scallop is from Eyelet Lace Borders and the hearts are from Heartstrings Borders. Now you could create your own rainbow ink blended card stock to die cut these borders out of, but you don't have to. It's already been done for you! I used a piece of patterned paper from the Spring Fling Paper Pad. It works out perfectly to die cut enough border strips to fill the front of the card. I alternated adhering the two border styles onto a separate panel and then trimmed narrower than the slimline card base which measures 8.5" tall by 3.5" wide.  

Sunny Studio Stamps: Eyelet Lace Border Dies Heartstring Border Dies Love Monkey Floating By Everyday Card by Leanne West

For the focal images on this card, I've used the balloon bouquet from Floating By and a monkey from Love Monkey. The monkey image is originally hanging from a vine.  After I die cut the monkey out, I simply fussy cut the vine part off. When I adhered the balloon bouquet to the monkey tail, it covers any odd lines left from the vine. I stamped the greeting, also from Floating By, in one of border gaps just below the monkey. For a bit of embellishment, I added some tiny clay heart confetti.

-----------------------------------------------------------

Hello! It’s Mindy from My Creative Scoop. Today I’m sharing a Valentine’s card set using the new Spring Showers Stamp set and the coordinating die set. I’m also using the new Heartstrings Border Die and created this Ombre effect, which I’ll share how in the video below.

Sunny Studio Stamps: Eyelet Lace Border Dies Heartstring Border Dies Spring Showers Sweet Word Die Everyday Card by Mindy Baxter

I’ve stamped all my images onto my Copic Xpress it Blending card using Memento Black Ink. Copic colors used: Skin – E13, E11, E00, R32, R30; Hair – E43, E42, E41, E74; Dress and Shoes – R85, R81, RV10


I die cut 3 of the Sweet Word Die which and layered them all together so my sentiment is thicker and stands up off the card a little, the with love is also from the Spring Showers Stamp set – I just trimmed off the ‘you’. 

Sunny Studio Stamps: Eyelet Lace Border Dies Heartstring Border Dies Spring Showers Sweet Word Die Everyday Card by Mindy Baxter

These cards were so much fun and simple to create. I can’t wait to make more and change the ombre cardstock to rainbow! Thank you so much stopping by. Have a great day!

Sunny Studio Supplies Used:

Sweet Word Die
Sweet Word Die
Shop at:
Sunny Studio
Love Monkey Stamps
Love Monkey Stamps
Shop at:
Sunny Studio
Love Monkey Dies
Love Monkey Dies
Shop at:
Sunny Studio
Floating By Stamps
Floating By Stamps
Shop at:
Sunny Studio
Floating By Dies
Floating By Dies
Shop at:
Sunny Studio
Spring Showers Stamps
Shop at:
Sunny Studio
Spring Showers Dies
Spring Showers Dies
Shop at:
Sunny Studio
Eyelet Lace Borders
Eyelet Lace Borders
Shop at:
Sunny Studio
Heartstrings Border Dies
Shop at:
Sunny Studio
Spring Fling Paper
Spring Fling Paper
Shop at:
Sunny Studio

Tuesday, January 14, 2020

Spring Showers Cards with Leanne and Mindy

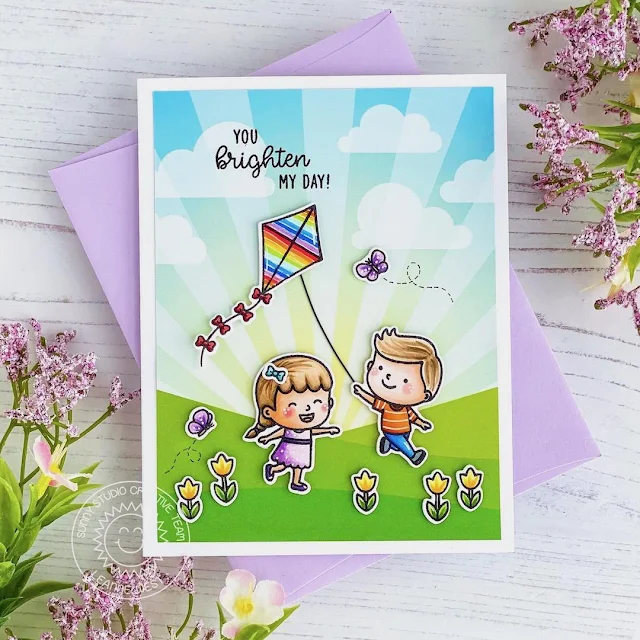
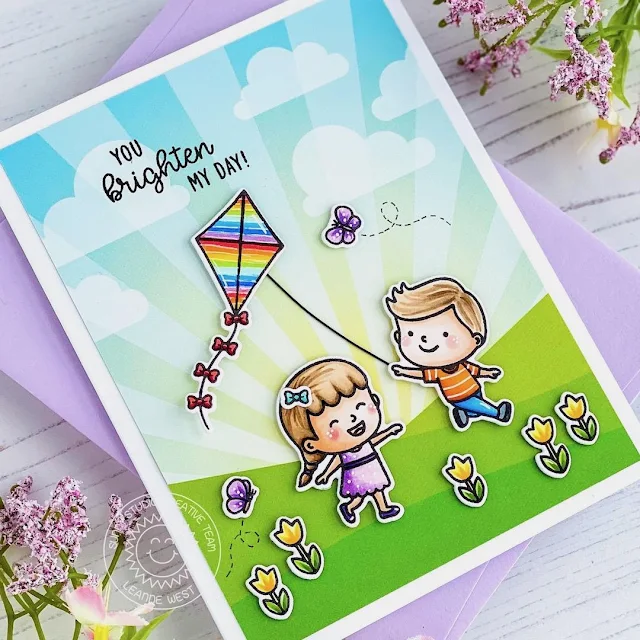
Hello friends, Leanne here! I'm happy to be sharing my first Sunny Studio blog post of 2020 by showcasing one of the cutest stamp sets from the new release. The Spring Showers set is right up my alley and I've used it to create a playful spring scene.  

Sunny Studio Stamps: Spring Showers Everyday Card by Leanne West

I started with the background which was already done for me. It's a pattern from the new Spring Fling Paper Pad. I trimmed it down about a quarter inch smaller than A2 size and adhered it flat to the card base. So quick and easy! I knew where I wanted to place the greeting from the Spring Showers set so I went ahead and stamped it in black ink directly onto the background.  

Sunny Studio Stamps: Spring Showers Everyday Card by Leanne West

I picked out two of the adorable kids and several supporting images from the Spring Showers set to Copic color. I adhered them onto the background with dimensional foam squares. For the kite string that the little boy is holding, I cut a very skinny strip of black card stock. I felt this was much easier to do and add than hand drawing a line. I hand drew in the butterfly trails to complete the scene. 

--------------------------------------------------------

Hello! It’s Mindy from My Creative Scoop. Today I’m sharing a fun card using the umbrellas from the new stamp set, Spring Showers along with the Spring Showers Coordinating Die Set. I’m also using the new Eyelet Lace Borders which I cut out in black, which really makes this card pop. The Fluffy Cloud Border Dies are from a previous release which goes perfect with this Spring Showers Stamp Set.

Sunny Studio Stamps: Spring Showers Eyelet Lace Border Dies Fluffy Clouds Border Dies Everyday Card by Mindy Baxter

I sponged my background using Chipped Sapphire, Salty Ocean and Shaded Lilac Distress Oxide inks. The rain is down freehand using a white gel pen.

Sunny Studio Stamps: Spring Showers Eyelet Lace Border Dies Fluffy Clouds Border Dies Everyday Card by Mindy Baxter

I’ve stamped my images in Memento Black Ink and stamped onto my Copic Xpress it Blending Card – which is my favorite paper to use when coloring with Copic Markers.

Panda – N0, N1, N3, N5, N7, R30, R32; Chick – Y21, Y26, Y28, YR04; Cow - N0, N1, N3, N5, N7, R30, R32, E11, E000, B00

I hope you feel inspired to create some new cards – this stamp set is perfect for Spring. Thank you so much stopping by. Have a great day!

Sunny Studio Supplies Used:

Fluffy Clouds Border Dies
Shop at:
Sunny Studio
Spring Showers Stamps
Shop at:
Sunny Studio
Spring Showers Dies
Spring Showers Dies
Shop at:
Sunny Studio
Eyelet Lace Borders
Eyelet Lace Borders
Shop at:
Sunny Studio
Spring Fling Paper
Spring Fling Paper
Shop at:
Sunny Studio

Tuesday, January 7, 2020

Sneak Peek Week: Cheerful Daisies, Frilly Frames & Eyelet Lace Borders

Hello and welcome to day 2 of our Spring Sneak Peek Week!  All this week I am showcasing cards using our newest collection which will begin shipping on Friday, January 10th

Today's sneak peeks include a new 4x6 layering stamp set for Spring, matching dies and two new standalone die sets. Let's jump right in!

Card No. 1:  Our newest layering set is a gerber daisy called Cheerful Daisies.  Everytime I see them I can't help but think of the Meg Ryan line in You've Got Mail where she says, "Don't you think daisies are the friendliest flower?"  

For all my cards today I stamped them assembly line style using the two corners of my MISTI stamping tool and going through all the layers color by color at the same time to save time with lining things up.  The good news though is that this daisy only has two layers for the petal portion so it's fairly easy to line up and easy to find two colors that compliment each other. I have still made sure to include my ink colors used for this card and all the cards at the bottom of my post just in case though.  :)

To create this particular card, I inked up my background with distress inks and then spritzed on water to create the speckled look. I then set to work randomly arranging my flowers and leaves making sure to run some off the edge that I then clipped off with my scissors.  For my sentiment, I heat embossed my "happy spring" greeting onto vellum using white embossing powder and then framed it with our Fancy Frames Circle Dies.  This is one of my favorite ways to adhere vellum because I can hide my adhesive on the outer ring and there's no messy glue showing behind my sentiment.  As a final little touch, I used one of the scalloped borders from our new Eyelet Lace Border dies.
Sunny Studio Blog: Colorful Daisy Flower Hello Spring Card with Flower Background (using Cheerful Daisies Stamps, Fancy Frames Circle & Eyelet Lace Border Dies)

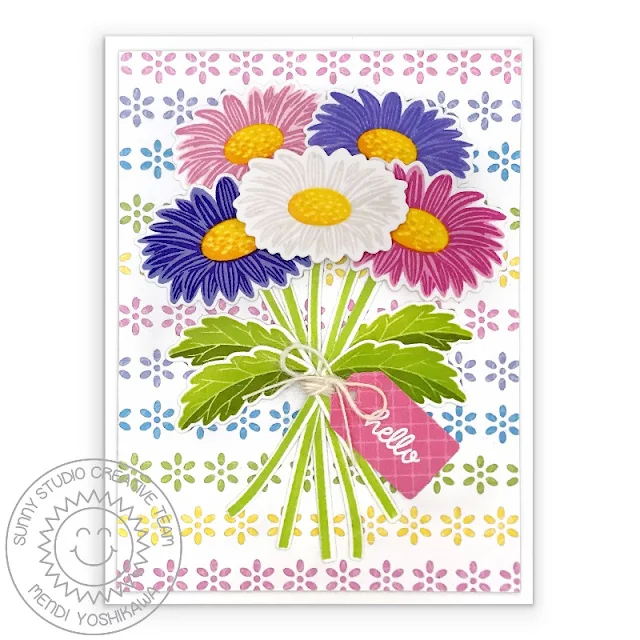
Card No. 2:  For my next card, I used another die from that same Eyelet Lace Border dies set to create my background pattern. I drew some light pencil lines using my clear grid ruler and then repeatedly ran the daisy cutout die through my machine to create an overall pattern. I then erased my pencil lines and added some strips of tone-on-tone paper to the back from our new Spring Fling Paper pack. I actually had a bunch of 1/2" strips leftover from making other cards so I was really happy to find a way to use them all and I adore the sweet romantic look that it created.

For my daisy bouquet, I stamped some stems using our Timeless Tulips Stamps and then tied some twine around them before adhering them to my card front.  As a final touch I heat embossed the word "hello" from our Chubby Bunny Stamps onto a tag from our Sweet Treats Bag Die using a scrap from our Very Merry Paper pack.
Sunny Studio Blog: Gerber Daisy Bouquet Hello Card with Flower Background (using Cheerful Daisies Stamps, Eyelet Lace Border Dies & Spring Fling 6x6 Paper)

Card No. 3:  Up next is another bouquet, this time using our Vintage Jar stamps and those same stems from our Timeless Tulip stamps. To frame my scene I created a lacy scalloped mat using the outer portion of our newest Frilly Frames Eyelet Lace dies.  I then stamped a sentiment from our new Pink Peonies Stamps (which will be shared more on Thursday) and mounted my entire panel onto a piece of rainbow heart patterned paper from our new Spring Fling Paper pack.
Sunny Studio Blog: Best Wishes Rainbow Ombre Gerber Daisy Bouquet Wedding Card (using Cheerful Daisies & Vintage Jar Stamps, Frilly Frames Eyelet Lace Dies & Spring Fling 6x6 Paper)

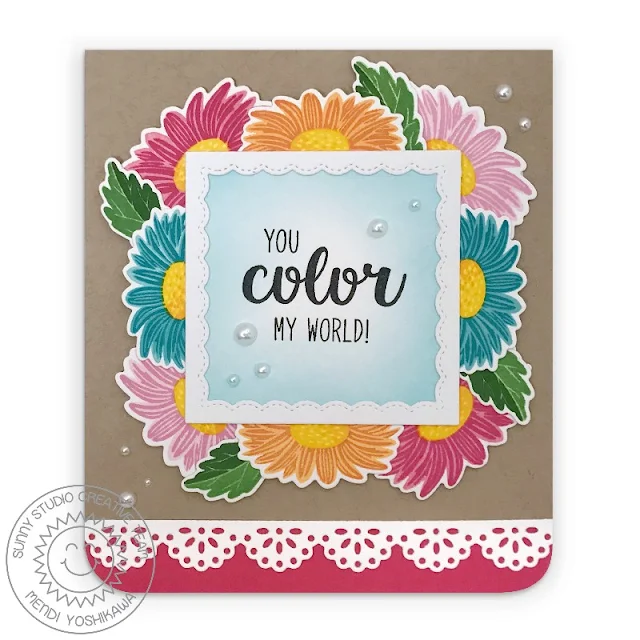
Card No. 4:  For this card, I arranged my colorful daisies around one of the scalloped frames from our Fancy Frames Square dies which I then stamped with a greeting from our Color Me Happy Stamps.  I scattered some simple White Pearls for some added interest and then added a lacy scalloped edge from our Eyelet Lace Border dies.  I love the way the bright daisies pop against the kraft background!
Sunny Studio Blog: You Color My World Rainbow Gerber Daisy Card (using Cheerful Days Stamps, Fancy Frames Square & Eyelet Lace Border Dies)

Card No. 5:  Up next is a card that uses the interior portion of the Frilly Frames Eyelet Lace dies in a unique way. I turned the background die on it's side and ran it through my machine twice, overlapping it by one row the second time to help line things up and create a continuous background pattern.  It's yet another fun way to stretch your supplies!  I then added a small strip of polka-dot print by heat embossing the pattern onto a piece of black cardstock using our Background Basics Stamps

For my daisy stems I was feeling too lazy to stamp them so I simply used the coordinating Timeless Tulips dies to cut them from some green cardstock instead which I think worked well and saved me a little time. My greeting from the set was stamped onto a piece of striped teal paper from our Dots & Stripes Pastels Paper pack and then cut into a pennant shape using our Fishtail Banner dies.
Sunny Studio Blog: Layered Daisy Hello Spring Handmade Card (using Cheerful Daisy & Background Basics Stamps, Frilly Frames Eyelet Lace & Fishtail Banner Die and Dots & Stripes Pastel Paper)

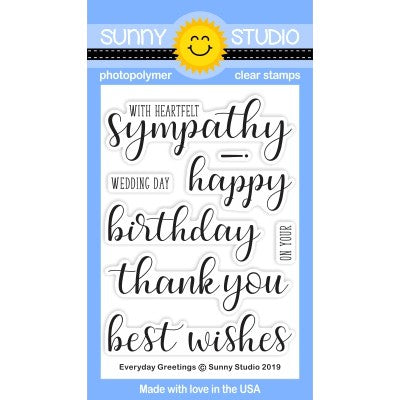
Card No. 6: For my last card of the day, I stamped some white daisies.  To do this I skipped the bottom layer and just stamped the top layer directly onto the coordinating die-cuts.  I love bold complimentary color schemes so I turned to red cardstock to go with my green leaves and the green grid print from our Gingham Jewel Tones Paper pack.  To leave room for my sentiment, I cut the scalloped panel from our Frilly Frames Eyelet Lace dies in half, before running in through my die-cutting machine again with the inside portion of the eyelet lace die.  I then heat embossed my sentiment in white using our Everyday Greetings stamps and taped the two sides back together, hiding the seam beneath my daisies.
Sunny Studio Blog: Layered Daisy Red, White & Green Scalloped Thank You Card (using Cheerful Daisy & Everyday Greetings Stamps, Frilly Frames Eyelet Lace Dies & Gingham Jewel Tones Paper)

To help you line up our Cheerful Daisies stamps like a pro I've created a special layering guide (you can click on the photo below to view it larger).  The guide shows the stamps starting with the lightest ink color, working towards the darkest, but sometimes I find it easier to start backwards. They both work depending on what your preference is.  The black outline indicates where that layer touches the previously stamped layer.  :)
Sunny Studio Blog: Cheerful Daisies Layered Daisy Step-by-step Layering Guide

I frequently am asked which ink colors I used for my layered images.  While I think there are so many great options out there, these are the colors I used today for my stamped images (in the ordered shared from lightest to darkest)...

Lavender Daisy
Simon Says Stamp Hydrangea
Colorbox Grape (Card No. 1 & 2)
or Catherine Pooler Grape Crush (Card No. 2 & 3)

Dark Violet Daisy (Card No. 5)
Colorbox Grape Slushy
Colorbox Imperial


Light Pink Daisy (Card No. 2 & 4)
Colorbox Bubblegum

Colorbox Candy

Medium Pink Daisy (Card No. 1, 2 & 3)
Colorbox Candy

Versafine Charming Pink

Hot Pink Daisy (Card No. 1)
Versafine Charming Pink

Colorbox Raspberry

Pinkish Red Daisy (Card  No. 4)
Colorbox Cherry

Colorbox Blossom

Orange Daisy (Card No. 3, 4 & 5)
Papertrey Ink Summer Sunrise
Colorbox Pumpkin Pie


Aqua Daisy (Card No. 4 & 5)
Colorbox Seaglass
Colorbox Ocean
or
Lawn Fawn Peacock


White Daisy (Card No. 2 & 6)
Simon Says Stamp Barely Beige


Centers for each Daisy
Versafine Cheerful
Colorbox Banana

Papertrey Ink Summer Sunrise

Green Leaves (Card  No. 4)
Colorbox Grasshopper
Colorbox Green Apple
Colorbox Golf Course

Olive Green Leaves (all other cards)
Colorbox Kiwi
Colorbox Tree Frog
Colorbox Artichoke

That wraps up today's sneak peeks.  I know that's quite a bit of information and it means so much to have you hang out with me today. I'd love to give a $25 gift code to one lucky winner using the rafflecopter below.  Make sure to keep checking back all this week for more peeks & prizes for up to five chances to win. The contests run through Saturday at Midnight PST with winners announced here on Sunday, January 12th. :)

a Rafflecopter giveaway Here's a closer look at the new Cheerful Daisies stamps & coordinating dies, as well as the new Frilly Frames Eyelet Laces Dies and Eyelet Lace Border Dies used today (available for purchase on Friday, January 10th).
Sunny Studio Stamps: Cheerful Daisies Layered Layering Daisy Flower 4x6 Clear Photopolymer Stamp Set     Sunny Studio Stamps: Cheerful Daisies Layered Layering Daisy Flower Coordinating Metal Cutting Dies

Sunny Studio Stamps: Frilly Frames Eyelet Lace Scalloped Mat with Interchangeable Mix & Match Background Standalone Metal Cutting Dies     Sunny Studio Stamps: Eyelet Lace Daisy Flower Scalloped Border Standalone Metal Cutting Dies

Other Supplies Used:
Color Me Happy Stamps
Shop at:
Sunny Studio
Fishtail Banner Dies
Shop at:
Sunny Studio
Timeless Tulips Dies
Shop at:
Sunny Studio
Timeless Tulips Stamps
Shop at:
Sunny Studio

Vintage Jar Stamps
Vintage Jar Stamps
Shop at:
Sunny Studio
Fancy Frames-Circle Dies
Shop at:
Sunny Studio
Fancy Frames-Square Dies
Shop at:
Sunny Studio
Background Basics Stamps
Shop at:
Sunny Studio
Gingham Jewel Tones 6x6 Paper
Shop at:
Sunny Studio
Dots & Stripes Pastels 6x6 Paper
Shop at:
Sunny Studio
Everyday Greetings Stamps
Shop at:
Sunny Studio
Sweet Treats Gift Bag
Shop at:
Sunny Studio
Spring Fling Paper
Spring Fling Paper
Shop at:
Sunny Studio
White Pearls
White Pearls
Shop at:
Sunny Studio