Showing posts with label Christmas Garland Frame. Show all posts

Friday, December 13, 2019

Christmas Garland Frame Cards with Candice and Rachel

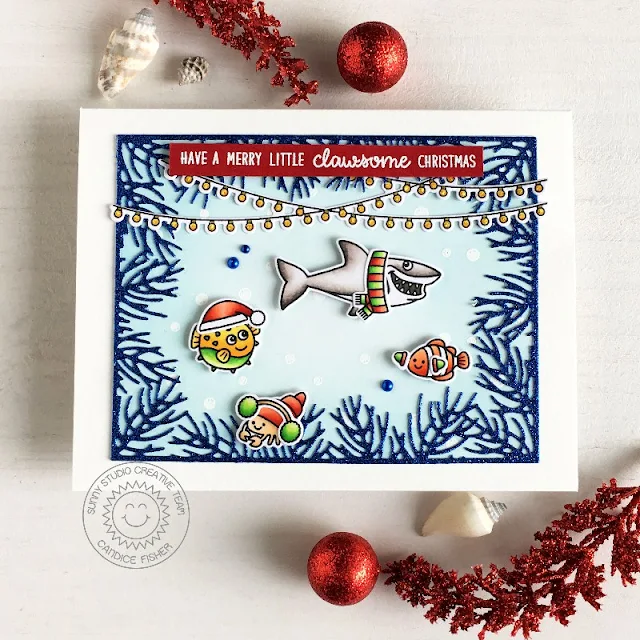
Candice with you today, sharing a different use for the new Christmas Garland Frame die as coral!

Sunny Studio Stamps: Christmas Garland Frame Dies Merry Mice Scenic Route Best Fishes Christmas Card by Candice Fisher

The Sunny Studio products I used for my card:
For the background, I first heat embossed the bubbles in white and then inked over with tumbled glass oxide ink. I then die cut the Christmas Garland Frame from navy glitter paper, using a shim to get a deep cut through the thickness of the cardstock. I love how it looks like coral for this card!

Sunny Studio Stamps: Christmas Garland Frame Dies Merry Mice Scenic Route Best Fishes Christmas Card by Candice Fisher

Next, I stamped the fishes and winter accessories, colored with Copic markers and then used the coordinating dies listed above to cut out. The christmas lights I stamped and cut out with the coordinating dies, colored with Copics and added yellow Stickles for some shimmer.

To finish the card, I heat embossed the sentiment in white from both the Merry Mice and Best Fishes stamp sets on a red banner. For the embellishments, I simply added a few navy domes from the Rainbow Pearls.

Thank you so much for stopping by today!

------------------------------------------------

Hello everyone! It's Rachel here and I have a festive winter card that features the gorgeous Christmas Garland Frame Die. I've combined this die with the Jolly Gingerbread Stamp Set.

Sunny Studio Stamps: Christmas Garland Frame Dies Jolly Gingerbread Christmas Card by Rachel Alvarado

To create my frame, I first started with a piece of Ranger White Watercolor Paper that I had trimmed to slightly larger than 4.25" x 5.5". I then quickly watercolored this piece with both Daniel Smith Viridian Watercolor Paint and Ken Oliver Turquoise Colorburst Watercolor Powder. I then let this piece dry before I die cut it. Once I had it cut out, I then splattered it with both dark green diluted watercolor paint as well as diluted Opaque White Paint. I added some of this diluted white paint to the ends of each piece to resemble fallen snow.

Next I trimmed a piece of smooth white card stock to 4.25" x 5.5" and lightly blended some Catherine Pooler Hot Tub Ink. I splattered this blended area with both some water drops as well as some more diluted white paint. I added some stitched snow drifts using the Woodland Border Dies. 

Sunny Studio Stamps: Christmas Garland Frame Dies Jolly Gingerbread Christmas Card by Rachel Alvarado

For my images, I stamped them onto a sheet of Neenah Solar White 110lb Card Stock and colored everything with Copics. I cut them out and then added them to my card with both liquid adhesive and 3D Foam Tape depending on which ones I wanted to add more dimension to. I used a fun sentiment from the Jolly Gingerbread Set and added it to the left side of my front snow drift before adding it to my card base.

Thanks so much for stopping by! I hope you enjoyed my card today!

Sunny Studio Supplies Used:

Jolly Gingerbread Stamps
Shop at:
Sunny Studio
Jolly Gingerbread Dies
Shop at:
Sunny Studio
Best Fishes Stamps
Best Fishes Stamps
Shop at:
Sunny Studio
Best Fishes Dies
Best Fishes Dies
Shop at:
Sunny Studio
Merry Mice Stamps
Merry Mice Stamps
Shop at:
Sunny Studio
Merry Mice Dies
Merry Mice Dies
Shop at:
Sunny Studio
Scenic Route Stamps
Scenic Route Stamps
Shop at:
Sunny Studio
Scenic Route Dies
Scenic Route Dies
Shop at:
Sunny Studio
Christmas Garland Frame
Shop at:
Sunny Studio

Thursday, December 5, 2019

Hogs & Kisses Cards with Anja and Vanessa

Hi everyone, Anja here and today I'm back again with another Christmas card featuring the Hogs & Kisses set. I combined the cute piggy with the house border stamp from the Scenic Route set.
Sunny Studio Stamps: Hogs & Kisses Scenic Route Christmas Garland Frame Christmas Cards by Anja Bytyqi

For my background, I blended together some blue Distress Oxide Inks (Stormy Sky, Faded Jeans and Chipped Sapphire) onto a piece of Bristol paper and added white paint splatters with a brush. I stamped the row of houses and the pig in Memento Tuxedo Black Ink and did some coloring with Copic Markers. I used the coordinating dies to cut out the images.

Sunny Studio Stamps: Hogs & Kisses Scenic Route Christmas Garland Frame Christmas Cards by Anja Bytyqi

The pun sentiment is a combination of the gold heat embossed word 'Hoggy' and the scripty 'Christmas' die which is included in the Christmas Garland Frame set and stretches across the whole width of my card. I die cut it from red glitter cardstock. Finally, I adhered the house border panel and pig with foam tape for a little bit of dimension.

Thank you so much for stopping by! Have a wonderful day!

-------------------------------------------------

Hello to you! Vanessa here with a card using the cute Hogs & Kisses set. I created a little scene and loved digging through my beloved Sunny Studio stash to find elements to add to this.

Sunny Studio Stamps: Hogs & Kisses Scenic Route Santa Claus Lane Seasonal Trees Christmas Card by Vanessa Menhorn

I first covered the front of my card with patterned paper from the Subtle Grey Tones 6x6 paper pad to create the background of my scenery. Then I stamped all the images onto white cardstock, colored the elements with Copics, die-cut everything with the matching dies and adhered the images to the card. 

Sunny Studio Stamps: Hogs & Kisses Scenic Route Santa Claus Lane Seasonal Trees Christmas Card by Vanessa Menhorn

Finally, I stamped the sentiment onto a strip of red cardstock, heat-embossed it with white embossing powder, trimmed the strip and adhered it to the card.

I used so many different sets, I decided to give you a list of them:

Thank you for visiting today, hope to see you again next week!

Sunny Studio Supplies Used:

Blissful Baking Dies
Shop at:
Sunny Studio
Blissful Baking Stamps
Shop at:
Sunny Studio
Summer Picnic Dies
Summer Picnic Dies
Shop at:
Sunny Studio
Summer Picnic Stamps
Shop at:
Sunny Studio
Happy Owlidays Stamps
Shop at:
Sunny Studio
Happy Owlidays Dies
Happy Owlidays Dies
Shop at:
Sunny Studio
Seasonal Trees Stamps
Shop at:
Sunny Studio
Seaonal Trees Dies
Seaonal Trees Dies
Shop at:
Sunny Studio
Subtle Grey Tones Paper
Shop at:
Sunny Studio
Santa Claus Lane Stamps
Shop at:
Sunny Studio
Santa Claus Lane Dies
Shop at:
Sunny Studio
Scenic Route Stamps
Scenic Route Stamps
Shop at:
Sunny Studio
Scenic Route Dies
Scenic Route Dies
Shop at:
Sunny Studio
Hogs & Kisses Stamps
Shop at:
Sunny Studio
Hogs & Kisses Dies
Hogs & Kisses Dies
Shop at:
Sunny Studio
Christmas Garland Frame
Shop at:
Sunny Studio

Monday, December 2, 2019

Embossing Folder Focused Cards with Leanne and Eloise

Hello everyone, Leanne here! Have you started decorating for the holidays yet? I just love the Farmhouse style of decorating especially for Christmas. It was this decorating trend that inspired my card today. Most of the Farmhouse Christmas decor ideas I've seen include buffalo plaid, so for my card I created a green and black plaid background using the Buffalo Plaid Embossing Folder

Sunny Studio Stamps: Layered Poinsettia Dies Fancy Frames Dies Christmas Garland Frame Dies Christmas Card by Leanne West

To achieve the green and black plaid, I started with green card stock and then I used Onyx Black VersaFine to ink up the embossing folder before running it through my die cut machine. I added the embossed plaid panel to an A2 sized card base. I die cut one of the Fancy Frames Rectangles to place in the center of the plaid background.

Sunny Studio Stamps: Layered Poinsettia Dies Fancy Frames Dies Christmas Garland Frame Dies Christmas Card by Leanne West

The Farmhouse decorating style is known for it's simplicity so I followed suit and kept this card design fairly clean and simple. I die cut the "Merry Christmas", using the Christmas Garland Frame Dies, from black glitter card stock and adhered to the frame at an angle. I then used the Layered Poinsettia dies to create a single flower to add just below the greeting. For a little bit of embellishment, I added a few clear sequins to finish off the card. 

------------------------------------------------

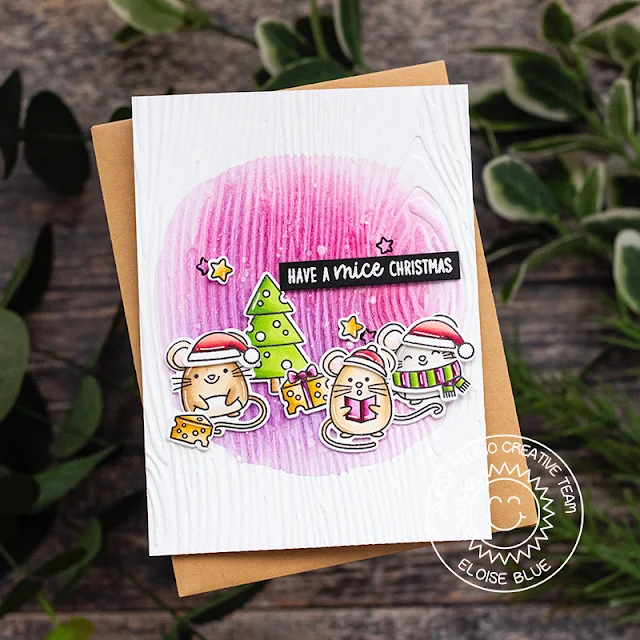
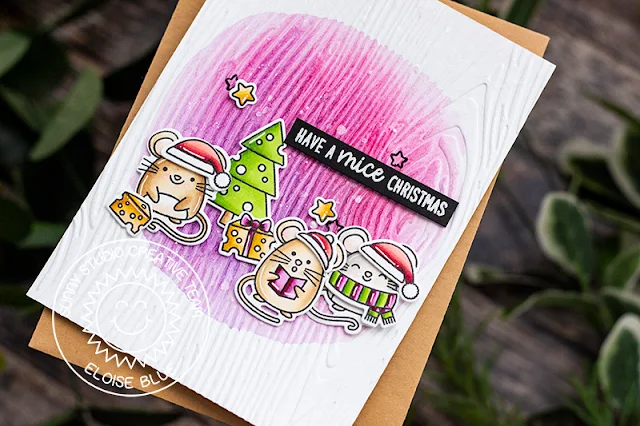
Hi friends, Eloise here and today I’ll be using the Woodgrain Embossing Folder along with Merry Mice to create a Christmas card.

Sunny Studio Stamps: Merry Mice Embossing Folders Christmas Card by Eloise Blue

I started off with stamping out my images and colouring them in with Copic Markers. I cut them out and then added white details using a gel pen.

(Copic Markers Used: B0000, B000 / YG03, YG23, YG25, YG17 / R000, R00 / R32, R35, R37, R39 / YR20, YR21, YR23, YR24 / W00, W0, W1, W3 / E50, E51, E53, E55 / E30, E31, E34, E35 / RV91, RV93, RV95, RV99 / RV63, RV66, RV69, R89 / 0)

Sunny Studio Stamps: Merry Mice Embossing Folders Christmas Card by Eloise Blue

I then took a piece of watercolour cardstock and ran that through my die cutting machine with the Woodgrain Embossing Folder. I then water-coloured a pink/purple circle into the centre.

Lastly, I adhered my images into place and white heat embossed the ‘Have A Mice Christmas’ sentiment onto a thin strip of black cardstock and adhered that on too.

Thanks so much for stopping by today and I’ll see you all next week. 


All retail purchases of any size will have 10% donated to Convoy of Hope to help with children’s feeding initiatives and disaster response.

And as always orders will also come with our mini holiday light bulb die (not pictured).

Sunny Studio Supplies Used:


Fancy Frames- Rectangles
Shop at:
Sunny Studio
Buffalo Plaid Embossing
Shop at:
Sunny Studio
Woodgrain Embossing
Woodgrain Embossing
Shop at:
Sunny Studio
Merry Mice Stamps
Merry Mice Stamps
Shop at:
Sunny Studio
Merry Mice Dies
Merry Mice Dies
Shop at:
Sunny Studio
Layered Poinsettia Dies
Shop at:
Sunny Studio
Christmas Garland Frame
Shop at:
Sunny Studio

Saturday, November 30, 2019

Guest Designer Spotlight: Cards with Keeway Tsao

Hello friends! It’s Keeway Tsao from Kiwi Koncepts and I’m so excited to be here today to share with you some fun holiday inspirations with the Winter 2019 release!

Sunny Studio Stamps: Merry Mice Christmas Garland Frame Die Christmas Cards by Keeway Tsao

My first showcases the Merry Mice stamp and dies and Christmas Garland frame die. I first stamped the mice in stockings in a dark brown hybrid ink and colored them up with copic markers. I then used the matching dies to die cut the images out.

Sunny Studio Stamps: Merry Mice Christmas Garland Frame Die Christmas Cards by Keeway Tsao

Next, I die cut the Christmas Garland frame out of white card stock. I then used a blending brush to ink blend various green distress oxide inks onto the frame. The different green inks add variation and depth to the pine. I ink blended an A2 panel with a lighter green and yellow ink colors to back the frame and also added berries that I had die cut out of red card stock.

Sunny Studio Stamps: Merry Mice Christmas Garland Frame Die Christmas Cards by Keeway Tsao

I stamped the sentiment in the bottom center and added my images above it with foam tape. Finally, I lightly dabbed on glue around each berry and sprinkled chunky glitter onto it to give it a sparkly look. After giving it a few minutes to dry, I used a brush to gently remove any loose glitter remaining on the card.

Sunny Studio Stamps: Christmas Garland Frame Dies Santa Claus Lane Layered Snowflake Frame Dies Christmas Cards by Keeway Tsao

My next card showcases the Santa Claus Lane stamps and dies and Layered Snowflake Frame Die. Again, I stamped my images in a dark brown hybrid ink and colored them with copic markers. I die cut the images out with the matching dies.

Sunny Studio Stamps: Christmas Garland Frame Dies Santa Claus Lane Layered Snowflake Frame Dies Christmas Cards by Keeway Tsao

My background costs of three layers. The bottom layer is ink blended with Blueprint Sketch, Broken China, and Tumbled Glass distress oxide inks and splattered with white paint. The center layer is die cut with the smaller of the two Layered Snowflake Frames out of white card stock and gently blended with Tumbled Glass distress oxide ink. The top layer is die cut with the larger of the two Layered Snowflake Frames out of white card stock and ink blended with Broken China and Tumbled Glass distress oxide inks. These layers were adhered together.

Sunny Studio Stamps: Christmas Garland Frame Dies Santa Claus Lane Layered Snowflake Frame Dies Christmas Cards by Keeway Tsao

I used the large ‘merry christmas’ sentiment die from Christmas Garland frame die out of red card stock. This was added towards the bottom half of the card, with the images right above it with foam tape. Now that I’m in the glittery mood, I decided to dab some clear adhesive around the frame to add some chunky glitter around the snowflake frame for a sparkly final touch!

Hope you enjoy today’s inspiration and see you next time!

------------------------------------------------------


All retail purchases of any size will have 10% donated to Convoy of Hope to help with children’s feeding initiatives and disaster response.

And as always orders will also come with our mini holiday light bulb die (not pictured).

Sunny Studio Supplies Used:

Santa Claus Lane Stamps
Shop at:
Sunny Studio
Santa Claus Lane Dies
Shop at:
Sunny Studio
Merry Mice Stamps
Merry Mice Stamps
Shop at:
Sunny Studio
Merry Mice Dies
Merry Mice Dies
Shop at:
Sunny Studio
Layered Snowflake Frame
Shop at:
Sunny Studio
Christmas Garland Frame
Shop at:
Sunny Studio