Showing posts with label Botanical Backdrop. Show all posts

Wednesday, December 9, 2020

Classy Christmas Cards and Video Tutorial with Ana and Christy

Hi friends and happy Wednesday! It’s Ana today with a festive Christmas card showcasing gorgeous Classy Christmas stamps and coordinating dies!

Sunny Studio Stamps: Classy Christmas Season's Greetings Frilly Frame Dies Christmas Card by Ana Anderson

I started by stamping the images from Classy Christmas set, colored them with Copic markers and cut them with coordinating dies. Next, I stamped the Merry Christmas sentiment in red ink and cut them with coordinating dies (from Season’s Greetings stamp set and coordinating die set).

I really wanted to keep the background white, but wanted to add some interest so I used Botanical Backdrop die to emboss the leaves on the background.

Sunny Studio Stamps: Classy Christmas Season's Greetings Frilly Frame Dies Christmas Card by Ana Anderson

I adhered the sentiments first, then arranged the images in corners. Once I had them all in place, I used liquid glue and foam tape to adhere them to the background. For finishing touches I added highlights and accents with white and gold gel pens, and added few White Pearls to embellish.

Isn’t this stamp set so beautiful!? I love the way those poinsettias, leaves and berries stand out on the white background!

----------------------------------------------

Hey friends, it's Christy here with a card featuring our beautiful Classy Christmas stamp set. I stamped all the images that I wanted to color in black ink and then colored them with my Copic markers. The pine boughs I stamped in a sage green ink, and then I cut out all the images with the matching dies.

Sunny Studio Stamps: Classy Christmas Frilly Frame Dies Fancy Frame Dies Christmas Card by Christy Reuling

I wanted to make a shaker card, so I die cut the Frilly Frames Lattice out of dark gray cardstock, then lined the back with acetate. I popped that up on foam tape over the same color card base, after filling the inside with sequins and stars in coordinating colors.

Sunny Studio Stamps: Classy Christmas Frilly Frame Dies Fancy Frame Dies Christmas Card by Christy Reuling

For my sentiment, I heat embossed the word "noel" on the same color cardstock in Platinum embossing powder, and then trimmed it out with a flag banner die from Fancy Frames Rectangle. I layered my images along the left side of the card and tucked my sentiment inside the cluster so it extended over to the right side. Then I finished off the card with some Stickles glitter glue for some added bling.

If you'd like to see how this card came together, you can check out the video tutorial below: 


Sunny Studio Supplies Used:

Fancy Frames- Rectangles
Shop at:
Sunny Studio
Botanical Backdrop Die
Shop at:
Sunny Studio
Frilly Frames Lattice Dies
Shop at:
Sunny Studio
Season's Greetings Stamps
Shop at:
Sunny Studio
Season's Greetings Dies
Shop at:
Sunny Studio
Classy Christmas Stamps
Shop at:
Sunny Studio
Classy Christmas Dies
Shop at:
Sunny Studio

Tuesday, August 11, 2020

Designer's Choice Cards with Angelica and Juliana

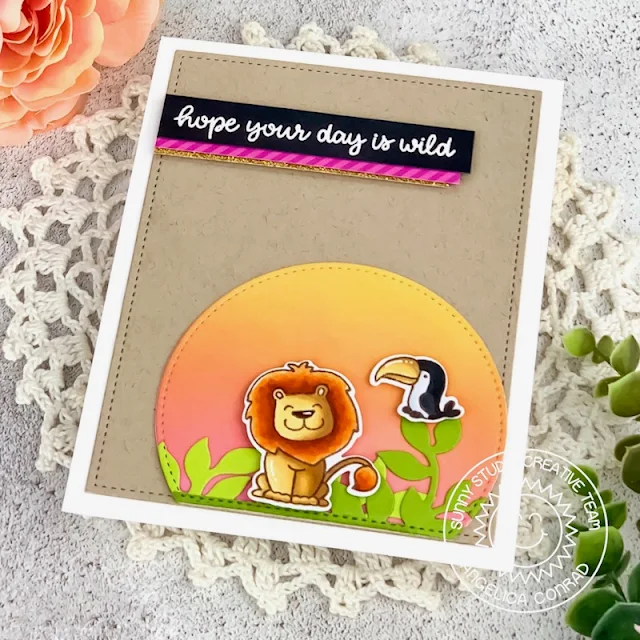
Hi friends! This is Angelica, and I have a fun card to share today, showcasing the Savannah Safari stamp set.

Sunny Studio Stamps: Savanna Safari Everyday Card by Angelica Conrad

I stamped the images with chocolate ink, and colored them with Copic Markers. I made an ink-blended background, using Picked Raspberry and Scattered Straw Distress Oxide inks. I die-cut the inked panel with a Stitched Semi-Circle die, and glued on some Botanical Backdrop greenery. 

Sunny Studio Stamps: Savanna Safari Everyday Card by Angelica Conrad

To assemble the card, I die-cut kraft card stock with the large Frilly Frames Retro Petals die, and attached it to a card base. I added the semi-circle, and attached the safari friends with thin foam squares. Lastly, I added a white heat-embossed sentiment , which I paired with a thin strip of pink Striped Silly pattern paper, and yellow glitter paper.

Thanks so much for joining me today. I hope I was able to pass on some crafty inspiration!

-------------------------------------------------------

Hello Sunny Studio friends! It's Juliana and today I'm sharing not one, but two ocean themed birthday cards. They feature the Sea You Soon Stamp Set, Tropical Scenes Stamp Set and Best Fishes Stamp Set.

Sunny Studio Stamps: Best Fishes Sea You Soon Tropical Scenes Birthday Cards by Juliana Michaels

I began by stamping images from the Sea You Soon Stamp Set, Tropical Scenes Stamp Set and Best Fishes Stamp Set. I colored all of the images with Copic Markers and then die cut them using the coordinating dies. When creating scene cards, I usually stamp and color a ton of images to have on hand. This way I can mix and match to figure out which ones to group together as I play around with creating each scene.

Sunny Studio Stamps: Best Fishes Sea You Soon Tropical Scenes Birthday Cards by Juliana Michaels

Once all of the coloring and stamping was completed, I began working on the frame area for each scene. I die cut the frame using the Fancy Frames Square Dies from a piece of cardstock. I backed the frame with double sided foam adhesive strips and then added a piece of patterned paper from the Summer Splash Paper and the ocean coral border from the Tropical Scenes Stamp Set. I cut the border in half and was able to use each piece - one for each card.

Sunny Studio Stamps: Best Fishes Sea You Soon Tropical Scenes Birthday Cards by Juliana Michaels

I then went about mix and matching the various images to create each scene. To finish off the card I added the sentiment from the Best Fishes Stamp Set onto a strip of white cardstock.

I hope you enjoyed today's ocean themed birthday card inspiration and I hope you have a jawsome day!

Sunny Studio Supplies Used:

Fancy Frames-Square Dies
Shop at:
Sunny Studio
Striped Silly 6x6 Paper
Shop at:
Sunny Studio
Botanical Backdrop Die
Shop at:
Sunny Studio
Best Fishes Stamps
Best Fishes Stamps
Shop at:
Sunny Studio
Best Fishes Dies
Best Fishes Dies
Shop at:
Sunny Studio
Summer Splash 6x6 Paper
Shop at:
Sunny Studio
Frilly Frames Retro Petals Dies
Shop at:
Sunny Studio
Savanna Safari Stamps
Shop at:
Sunny Studio
Savanna Safari Dies
Savanna Safari Dies
Shop at:
Sunny Studio
Sea You Soon Stamps
Sea You Soon Stamps
Shop at:
Sunny Studio
Sea You Soon Dies
Sea You Soon Dies
Shop at:
Sunny Studio
Tropical Scenes Stamps
Shop at:
Sunny Studio
Tropical Scenes Dies
Shop at:
Sunny Studio
Stitched Semi-Circle Dies
Shop at:
Sunny Studio

Tuesday, August 4, 2020

Savanna Safari Cards with Leanne and Vanessa

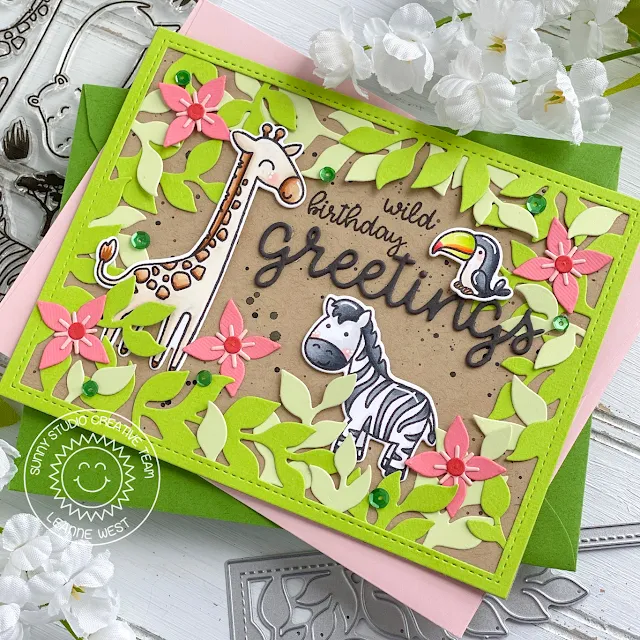
Hello friends! Leanne here and I have some wild inspiration for a fun birthday card. I have combined a leafy die cut frame with the cute animals from Savanna Safari for this gender neutral birthday card. I think it's always a win, win to have some versatile birthday cards on hand. 

Sunny Studio Stamps: Savanna Safari Botanical Backdrop Dies Birthday Card by Leanne West

I started with an A2 size kraft card base. I splattered the front with some thinned black paint. I die cut two Botanical Backdrop frames - one from bright green card stock and one from pastel green. I adhered the complete bright green frame to the card base. I cut up the pastel green one to add extra leaves and make the frame look very full. I Copic colored the giraffe, zebra, and toucan from Savanna Safari to create a fun little jungle scene. I stamped part of the sentiment and finished it off with the large die cut Greetings Word.  

Copic colors used: YR30, E30, E31, E34, E35, N0, N2, N4, N6, YG00, YG01, R00, R14, YR12, YR15

Sunny Studio Stamps: Savanna Safari Botanical Backdrop Dies Birthday Card by Leanne West
 
To embellish and enhance the scene even further, I added some die cut flowers and green sequins. The flower dies are included in the Botanical Backdrop set.  

---------------------------------------------------------

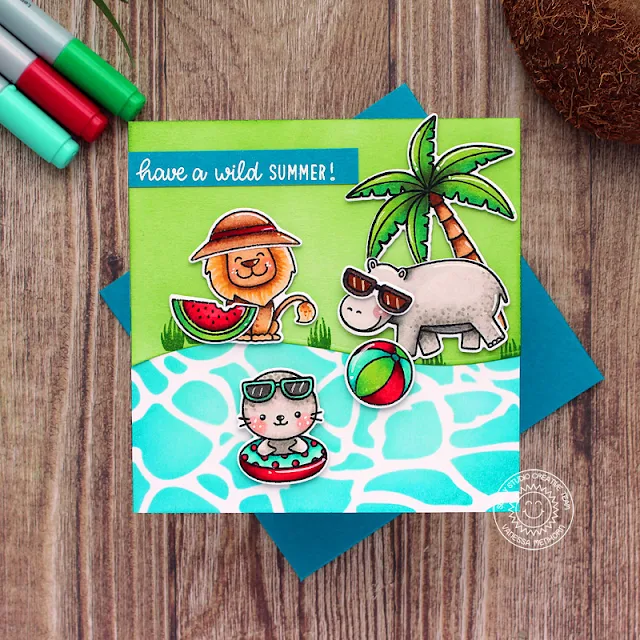
Hello to you! Vanessa here with a new summer card using the Savanna Safari Set. A lion, a hippo and a seal ... sounds like the beginning of a bad joke! But I thought they would be fun to hang out together on a card:


Sunny Studio Stamps: Savanna Safari Sealiously Sweet Summer Card by Vanessa Menhorn

I first inked the front of my card base with turquoise Distress Ink, using a stencil to create the water. Now I die cut the shore, using the Oceans Of Joy dies, from white cardstock, inked it with green Distress Ink, stamped the grass and adhered the piece to the card. I stamped the images from Savanna SafariSealiously Sweet and Seasonal Trees onto white cardstock, colored them with Copics, die-cut everything with the matching dies and adhered the elements to the card with foam tape.


Sunny Studio Stamps: Savanna Safari Sealiously Sweet Summer Card by Vanessa Menhorn

Finally, I stamped and heat-embossed the sentiment onto a strip of petrol cardstock and adhered it to the card.


I hope you like this cute party! Thank you for visiting today, see you on Thursday! 


Sunny Studio Supplies Used: 


Oceans of Joy Dies
Oceans of Joy Dies
Shop at:
Sunny Studio
Greetings Word Die
Greetings Word Die
Shop at:
Sunny Studio
Botanical Backdrop Die
Shop at:
Sunny Studio
Seasonal Trees Stamps
Shop at:
Sunny Studio
Seaonal Trees Dies
Seaonal Trees Dies
Shop at:
Sunny Studio
Savanna Safari Stamps
Shop at:
Sunny Studio
Savanna Safari Dies
Savanna Safari Dies
Shop at:
Sunny Studio
Sealiously Sweet Stamps
Shop at:
Sunny Studio
Sealiously Sweet Dies
Shop at:
Sunny Studio

Tuesday, June 9, 2020

Sealiously Sweet Cards with Leanne and Mindy

Hello everyone, Leanne here! With our spring days getting warmer and warmer, this has me dreaming of all things summer. One of my favorite summer treats is fresh watermelon. When I saw the little seal with a slice of watermelon in Sealiously Sweet, I knew I had to make a card centered around a watermelon theme. 

Sunny Studio Stamps: Sealiously Sweet Sweet Word Die Blooming Frame Dies Botanical Backdrop Dies Everyday Card by Leanne West

I started with an A2 size card base. I used some watermelon patterned paper from the Summer Splash pad to cover the card front. I trimmed a white card stock panel to 5" tall by 3.75" wide and die cut a 3" circle out of it. 

I backed the circle opening with an ink blended background panel. I used three shades of Distress Oxide ink - Festive Berries, Worn Lipstick, and Twisted Citron. Copics used: YG11, YG13,YG17, C00, C1, C3, C5, RV13, RV21, RV25, R00.

Sunny Studio Stamps: Sealiously Sweet Sweet Word Die Blooming Frame Dies Botanical Backdrop Dies Everyday Card by Leanne West

I Copic colored the seals and watermelon from Sealiously Sweet. I added them to the center of the circle and then stamped part of the greeting right above them. To complete the greeting I used the Sweet Word Die. To accent the scene, I added some die cut flowers and leaves. The flower is from the Blooming Frame die set. The leaf is from Botanical Backdrop. One last thing I did to complete this card design, is add the striped border which is a piece of patterned paper from Striped Silly.  

--------------------------------------------------------

Hello! It’s Mindy from My Creative Scoop. Today I‘m sharing a card made with these adorable seals from the Sealiously Sweet Stamp Set.

Sunny Studio Stamps: Sealiously Stitched Semi-Circle Dies Birthday Card by Mindy Baxter

I used my Tim Holtz Distress Oxide Inks, Peacock Feathers and Salty Ocean to create my water. I also used the Stitched Semi-Circle Dies to create the shape of my water. I just took a card-front piece of cardstock and then left out the corner of the cardstock so it wasn’t being cut by the die.

I stamped my images in Memento Black ink onto my Copic Xpress it Blending Card.
Here’s a list of Copics I used: Seals – N1, N3, N5, R32, R30; Inter-tubes – R32, R30, Y02, Y000, YG13, YG17, BV02, BV000, BG13, BG11, YR12, YR00.

Sunny Studio Stamps: Sealiously Stitched Semi-Circle Dies Birthday Card by Mindy Baxter

Check out my Video Tutorial below on coloring and how I made this little seal float!!


I hope you enjoyed my card and video tutorial. Thanks for stopping by!

Sunny Studio Supplies Used:

Sweet Word Die
Sweet Word Die
Shop at:
Sunny Studio
Striped Silly 6x6 Paper
Shop at:
Sunny Studio
Botanical Backdrop Die
Shop at:
Sunny Studio
Summer Splash 6x6 Paper
Shop at:
Sunny Studio
Blooming Frame Die
Blooming Frame Die
Shop at:
Sunny Studio
Sealiously Sweet Stamps
Shop at:
Sunny Studio
Sealiously Sweet Dies
Shop at:
Sunny Studio
Stitched Semi-Circle Dies
Shop at:
Sunny Studio