Friday, July 2, 2021

Beach Buddies Cards with Candice and Tammy

It's Candice with you this fabulous Friday with a fun summery card using the adorable Beach Buddies stamp set!

Sunny Studio Stamps: Beach Buddies Sealiously Sweet Stitched Circle Dies Summer Card by Candice Fisher

I used these Sunny Studio products for my design:

I began my card with a 6 1/2 x 5 card base. For the background, I trimmed some thick white cardstock to fit a little smaller than my card base and added 3 rows of the coral, yellow, and blue striped stitched circles to the front.

Sunny Studio Stamps: Beach Buddies Sealiously Sweet Stitched Circle Dies Summer Card by Candice Fisher

Next, I stamped all of my images from Beach Buddies & Sealiously Sweet stamp sets, colored them with Copic markers, and used the coordinating dies to cut them out. I added the images to the circles using foam tape. I heat embossed the sentiments in white on black banners and the 'Sunshine' in yellow and trimmed it out with scissors. I finished by adding them with foam tape and sprinkled the water drops all around!

Thank you for stopping by!

---------------------------------------------

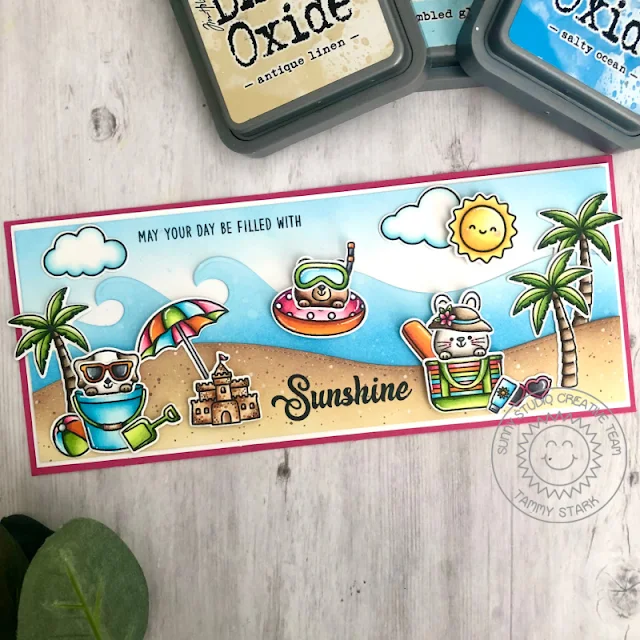
Hi friends! Tammy here with this fun, summer themed slimline card, featuring the adorable stamp set, Beach Buddies. These cuties are enjoying a day at the beach, and with the blazing temps here in Vegas, I must say I'm jealous, lol!

Sunny Studio Stamps: Beach Buddies Beach Babies Tropical Scenes Summer Card by Tammy Stark

To begin, I cut Bristol cardstock to 3 1/4 X 8 1/4" and lightly ink blended the sky with Tumbled Glass Distress Oxide ink. I cut the ocean and sandy borders using the Slimline Nature Borders Dies and ink blended them with Salty Ocean, Antique Linen, and Vintage Photo Distress Oxide inks and attached to the background.

I stamped, colored with Copic markers, and die cut images from the following sets:
Beach BuddiesCoordinating Dies
Beach BabiesCoordinating Dies
Tropical ScenesCoordinating Dies
Balloon RidesCoordinating Dies

Sunny Studio Stamps: Beach Buddies Beach Babies Tropical Scenes Summer Card by Tammy Stark

Next, I arranged the stamped images onto my card and attached them, using foam tape on some for dimension. I then stamped the sentiment from Beach Buddies in black ink onto my card. Lastly, I attached the card front to white cardstock, then onto a bright pink 3 1/2 X 8 1/2" card base to complete my card.

Thanks so much for stopping by today! Have a wonderful weekend!

Sunny Studio Supplies Used:

Beach Buddies Stamps
Shop at:
Sunny Studio
Beach Buddies Dies
Beach Buddies Dies
Shop at:
Sunny Studio
Beach Babies Stamps
Beach Babies Stamps
Shop at:
Sunny Studio
Beach Babies Dies
Beach Babies Dies
Shop at:
Sunny Studio
Dots & Stripes Pastels 6x6 Paper
Shop at:
Sunny Studio
Sealiously Sweet Stamps
Shop at:
Sunny Studio
Sealiously Sweet Dies
Shop at:
Sunny Studio
Tropical Scenes Stamps
Shop at:
Sunny Studio
Tropical Scenes Dies
Shop at:
Sunny Studio
Slimline Nature Borders
Shop at:
Sunny Studio
Balloon Rides Stamps
Shop at:
Sunny Studio
Balloon Rides Dies
Balloon Rides Dies
Shop at:
Sunny Studio
Stitched Circle Large Dies
Shop at:
Sunny Studio

Thursday, July 1, 2021

Poppy Fields Cards with Vanessa and Anja

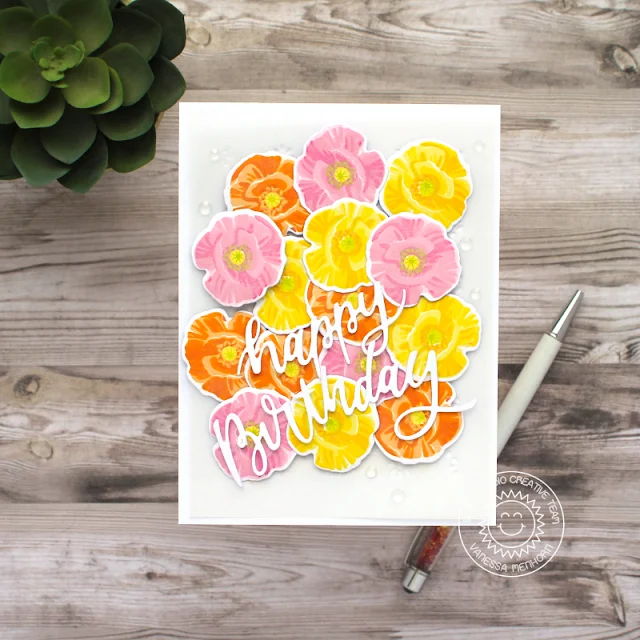
Hello to you! Vanessa here with a pastel birthday card using the beautiful Poppy Fields set. Although I love the classic red poppies, I decided to go with iceland poppies for my card:

Sunny Studio Stamps: Poppy Fields Frilly Frame Dies Blooming Frame Dies Floral Card by Vanessa Menhorn

First, I trimmed a panel of vellum slightly smaller than my white card base and die-cut the Frilly Frames Eyelet Lace from it. After I had adhered it to the card, I stamped all the poppies, die-cut them with the matching dies and adhered them to the card with foam tape.

These sets were used for today's card:
Poppy Fields stamps + dies
Frilly Frames Eyelet Lace Dies
Blooming Frame Die
Crystal Clear Jewels

Sunny Studio Stamps: Poppy Fields Frilly Frame Dies Blooming Frame Dies Floral Card by Vanessa Menhorn

I used the following inks for my flowers:
Pink: Distress Ink Spun Sugar + Kitsch Flamingo + Picked Raspberry, MFT Cotton Candy
Yellow: Hero Arts Soft Yellow + Butter Bar, MFT Sunshine, Distress Ink Squeezed Lemonade
Orange: Hero Arts Soft Yellow + Soft Apricot, Distress Ink Dried Marigold, Memento Morocco

Now I die-cut the happy birthday from white cardstock and adhered it before finishing the card off with clear jewels.

Thank you for visiting today! 

-------------------------------------------------

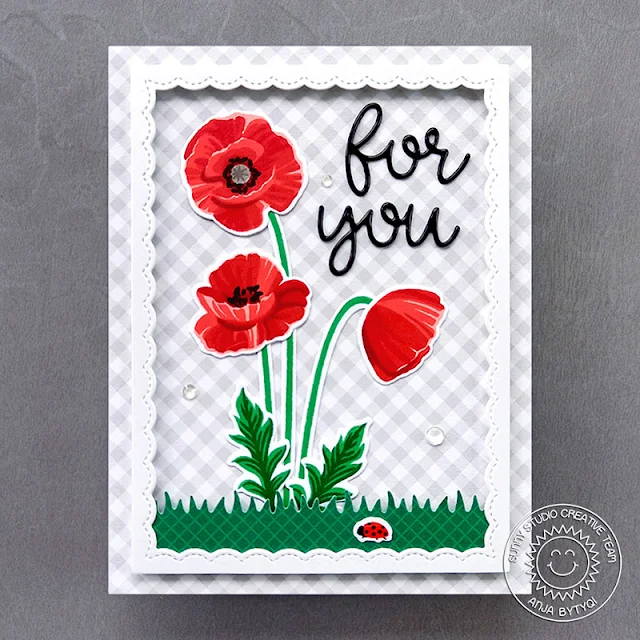
Hi everyone, Anja here. Poppies are some of my favorite flowers, so I was excited to create a card with the Poppy Fields Stamps.

Sunny Studio Stamps: Poppy Fields Fancy Frame Dies Picket Fence Border Dies Floral Card by Anja Bytyqi

I started with an A2 card base and trimmed the gingham patterned paper from the Subtle Grey Tones 6x6 Paper pack to the same size. I then cut one of the Fancy Frames Rectangle Dies from white cardstock and adhered it with foam strips.

Next, I stamped the layered poppies, leaves as well as the tiny ladybug from the Layered Basket set using dye inks (you can find the ink colors below). I used the coordinating dies to cut all the pieces out and arranged them on my card. I added a grass border (Picket Fence Die) at the bottom which I die cut from green grid paper (Gingham Jewel Tones Paper).

Dye Inks used:
Poppies: Altenew Pink Pearl, Coral Bliss, Crimson, Vineyard Berry, Grapevine; Simon Says Stamp Stone, Cobblestone; Leaves: Altenew Just Green, Hunter Green; Stems: Altenew Just Green; Ladybug: Altenew Heart Beat

Black details: VersaFine Onyx Black Ink

Sunny Studio Stamps: Poppy Fields Fancy Frame Dies Picket Fence Border Dies Floral Card by Anja Bytyqi

I die cut the words 'for you' included in the Gift Card Pocked Die set from black cardstock and double heat embossed them with clear embossing powder for a glossy look. To finish off my card, I adhered three Crystal Clear Jewels.

Thank you so much for stopping by! See you soon!

Sunny Studio Supplies Used:

Gift Card Pocket
Gift Card Pocket
Shop at:
Sunny Studio
Picket Fence Border Dies
Shop at:
Sunny Studio
Poppy Fields Stamps
Poppy Fields Stamps
Shop at:
Sunny Studio
Poppy Fields Dies
Poppy Fields Dies
Shop at:
Sunny Studio
Fancy Frames- Rectangles
Shop at:
Sunny Studio
Gingham Jewel Tones 6x6 Paper
Shop at:
Sunny Studio
Subtle Grey Tones Paper
Shop at:
Sunny Studio
Blooming Frame Die
Blooming Frame Die
Shop at:
Sunny Studio
Frilly Frames-Eyelet Lace
Shop at:
Sunny Studio
Layered Basket Stamps
Shop at:
Sunny Studio
Layered Basket Dies
Layered Basket Dies
Shop at:
Sunny Studio

Wednesday, June 30, 2021

Candy Shoppe Cards and Video Tutorial with Franci and Julia

Hi there! Franci here with you today with a sweet card showcasing the Candy Shoppe set. Aww I love this set so much! 

Sunny Studio Stamps: Candy Shoppe Beach Buddies Birthday Card by Franci Vignoli

First of all I created my card base out of white cardstock, then masked the front bottom and inked the top with Distress Ink.

Then I stamped, colored with Copics and die cut all my images from these sets: Candy Shoppe + coordinated dies and Beach Buddies + coordinated diesI love these little bears surrounded by sweets and candies, they're so cute! 

Sunny Studio Stamps: Candy Shoppe Beach Buddies Birthday Card by Franci Vignoli

I glued everything in place with foam adhesive, stamped my sentiment and added some details with a white gel pen. Finally I added some Birthday Cake Dot Sprinkles confetti here and there.

I'm so happy about how this card turned out and I hope you like it too :) Have a lovely day!

-------------------------------------------

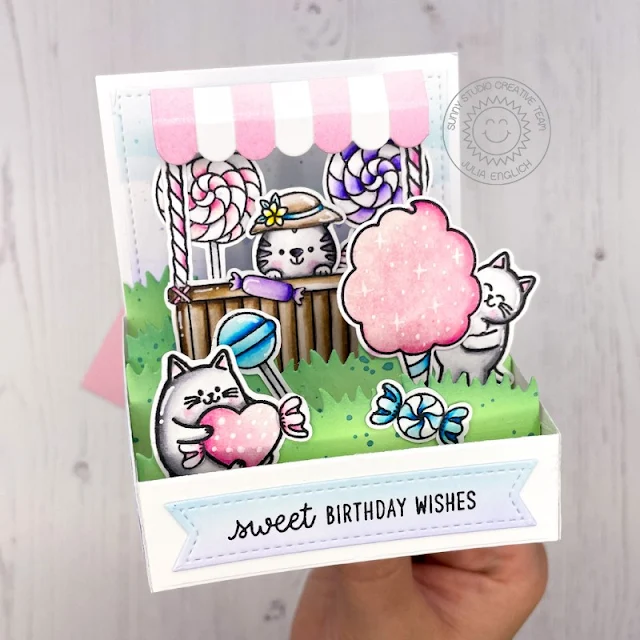
Hey crafty friends! It’s Julia here with sweet birthday box card!

Sunny Studio Stamps: Candy Shoppe Beach Buddies Meow & Furever Tiki Time Stitched Rectangle Dies Birthday Card by Julia Englich


First, I stamped out all of my adorable images from Candy ShoppeMeow & FureverBeach Buddies and Tiki Time onto Strathmore Bristol Smooth paper and I used Zig Clean Color Real Brush Markers to color them in. 

Sunny Studio Stamps: Candy Shoppe Beach Buddies Meow & Furever Tiki Time Stitched Rectangle Dies Birthday Card by Julia Englich

Then, to create the box I used a die set, but you can also do it without any specialty dies! You will need one back panel measuring 3 1/2 x 4 1/2", two side panels 2 1/2" long, 2 slanting downwards to 1" in height. Those side panels are scored at 1/2" on the taller side. Finally, for the front of the box you need a strip of cardstock 4 1/2 x 1 " scored at 1/2" and 4". For the inside grassy borders, the panels measure 4 1/4 x approx. 1" and they are scored at 3/8" and  3 7/8". For the background of my box, I used the second to largest of the Stitched Rectangle dies and I just trimmed a little bit off at the bottom.  

I ink blended the stitched panel using a cloud stencil and Distress Oxide inks. I also added the same ink colors to the sides of the box. For my sentiment strip, I used the banner dies from the Stitched Rectangle dies, added the same ink colors I used for the background and stamped the sentiment from Candy Shoppe in black.

Inks used: Tumbled Glass, Shaded Lilac, Spun Sugar, Kitsch Flamingo, Cracked Pistachio, Evergreen Bough Zig Markers used:  999, 904, 97, 94, 10; 64, 68; 52, 55; 200, 202; 803, 80;32, 31

Sunny Studio Stamps: Candy Shoppe Beach Buddies Meow & Furever Tiki Time Stitched Rectangle Dies Birthday Card by Julia Englich


To assemble the box, I added liquid glue to the flaps of the side pieces and adhered them to the back panel. I adhered my stitched background piece to the back and one of the grassy borders on top of that. Then, I added the front piece to the front of the left side panel and I also started adding my grassy hills with liquid glue to the inside of the left side panel. Once they had a bit of time to dry, I flipped the pieces over to the right, lined them up and added glue to all the flaps. Then I just had to close the right side panel onto the adhesive and give it some time to dry! I added the side panels and the sentiment banner to the outside of the box.

Sunny Studio Stamps: Candy Shoppe Beach Buddies Meow & Furever Tiki Time Stitched Rectangle Dies Birthday Card by Julia Englich


Finally, it was time to build my scene. I wanted to have a little candy stand, so I used the roof of the Sweet Treat House Add-On, the bottom of the tiki bar from Tiki Time and the twizzler sticks from Candy Shoppe to build it! I added all the accessories to the adorable little kitties and I adhered everything to the grassy borders inside the box!

Check out the video tutorial below to see how this card came together:


I had so much fun making this sweet box card and I really hope you like it! Thanks so much for stopping by today! Have an amazing week!

Sunny Studio Supplies Used:

Beach Buddies Stamps
Shop at:
Sunny Studio
Beach Buddies Dies
Beach Buddies Dies
Shop at:
Sunny Studio
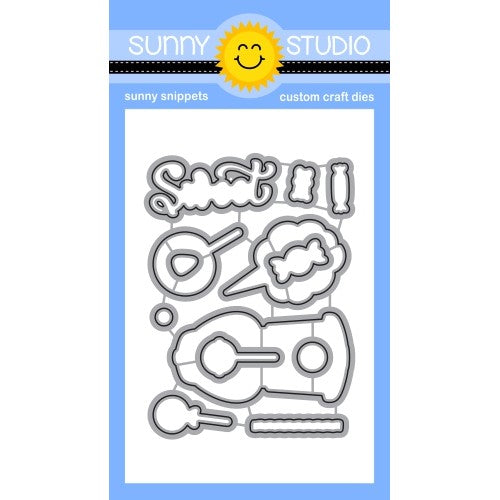
Candy Shoppe Stamps
Candy Shoppe Stamps
Shop at:
Sunny Studio
Candy Shoppe Dies
Candy Shoppe Dies
Shop at:
Sunny Studio
Tiki Time Stamps
Tiki Time Stamps
Shop at:
Sunny Studio
Tiki Time Dies
Tiki Time Dies
Shop at:
Sunny Studio
Stitched Rectangle Dies
Shop at:
Sunny Studio
Sweet Treats House Add-on
Shop at:
Sunny Studio
Meow & Furever Stamps
Shop at:
Sunny Studio
Meow & Furever Dies
Meow & Furever Dies
Shop at:
Sunny Studio

Tuesday, June 29, 2021

Happy Hamsters Cards with Isha and Kavya

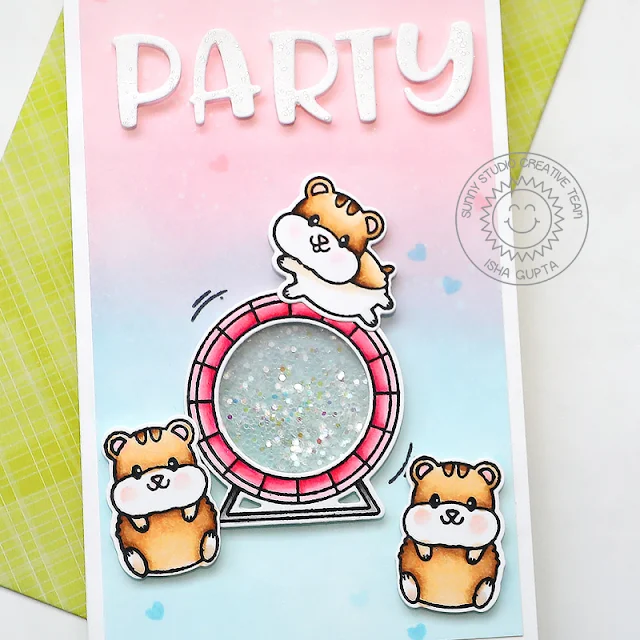
Hello everyone! Isha here with an interactive shaker card featuring the Happy Hamster stamps and dies. I needed to make a card for my younger daughter who is getting her end of the year school report card and did very well. She is soft and fun by nature hence the color choice and shaker element :) Various stamps and dies by Sunny Studio go perfectly well together and this is what I like the most.

Sunny Studio Stamps: Happy Hamster Stitched Circle Dies Balloon Rides Critter Themed Birthday Card by Isha Gupta

I started by creating a white slimline card. Cut a white mat layer and sponge this piece with distress oxide inks. I then stamped the solid heart from the Happy Hamsters stamp set.

Stamp the images from the Happy Hamsters stamp set, color and die-cut using the coordinating dies. I turned the hamster wheel spinner into my shaker element. I die-cut two acetate pieces using one of the Stitched Circle Large dies. Adhere one acetate circle to the center opening from behind. Now I adhered 3d foam to it, surrounding the circle fully leaving no gaps between the foam. Fill the well with chunky glitter and adhere the 2nd. acetate to cover the well.

Sunny Studio Stamps: Happy Hamster Stitched Circle Dies Balloon Rides Critter Themed Birthday Card by Isha Gupta

Stamp the banners from the Balloon rides stamp, color using copic markers and die-cut using the coordinating dies.

Adhere the mat layer to the card base. Stamp the sentiment using words from the Happy HamstersBold Balloons and Everything's Rosy stamp set. Die-cut the word "PARTY" using the Chloe Alphabet dies. Adhere to the card using 3d foam. Apply spectrum noir clear shimmer pen to it. Assemble everything together.

Thanks for dropping by and have a nice day!

-----------------------------------------------

Hi everyone, Kavya here. I am back on the blog with another fun card using the new Happy Hamsters stamp set! These hamsters are just the perfect size to be combined with other stamp sets to create fun critter scenes. I created a fun ‘just because’ card for a friends that loves to bake! 

Sunny Studio Stamps: Happy Hamster Blissful Baking Make A Wish Critter Themed Birthday Card by Kavya

I first started off by stamping and coloring a bunch of images from Happy HamstersBlissful Baking and Make a Wish sets. For the background, I ink blended an A2 card base using shades of red, pink and pale yellow/melon dye inks. I then embossed the panel using the Sunburst embossing folder and added a scalloped frame border (I used a different one but the Fancy Frames Rectangle die is a perfect alternative!) cut using white shimmer cardstock. Finally, I arranged all the stamped images on the panel and added a sentiment from Candy Shoppe stamp set to finish it off! 

Sunny Studio Stamps: Happy Hamster Blissful Baking Make A Wish Critter Themed Birthday Card by Kavya

That’s it folks! I hope you liked this fun card :) Be sure to check back tomorrow for more inspiration … you wouldn’t be disappointed! 

Sunny Studio Supplies Used:

Blissful Baking Dies
Shop at:
Sunny Studio
Blissful Baking Stamps
Shop at:
Sunny Studio
Candy Shoppe Stamps
Candy Shoppe Stamps
Shop at:
Sunny Studio
Happy Hamsters Stamps
Shop at:
Sunny Studio
Happy Hamsters Dies
Happy Hamsters Dies
Shop at:
Sunny Studio
Chloe Alphabet Dies
Chloe Alphabet Dies
Shop at:
Sunny Studio
Bold Balloons Stamps
Shop at:
Sunny Studio
Fancy Frames- Rectangles
Shop at:
Sunny Studio
Sunburst Embossing
Sunburst Embossing
Shop at:
Sunny Studio
Everything's Rosy Stamps
Shop at:
Sunny Studio
Make A Wish Stamps
Make A Wish Stamps
Shop at:
Sunny Studio
Make A Wish Dies
Make A Wish Dies
Shop at:
Sunny Studio
Balloon Rides Stamps
Shop at:
Sunny Studio
Balloon Rides Dies
Balloon Rides Dies
Shop at:
Sunny Studio
Stitched Circle Large Dies
Shop at:
Sunny Studio