Monday, June 29, 2020

Savanna Safari Cards with Lynn and Ashley

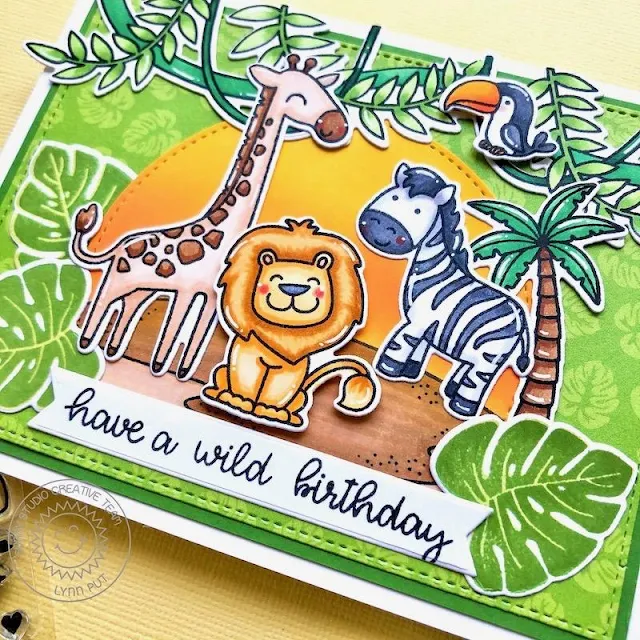
Hello there! It’s Lynn here today and I’m excited to be sharing a card I created featuring the fun Savanna Safari stamps and coordinating dies.

Sunny Studio Stamps: Savanna Safari Tropical Scenes Radiant Plumeria Frilly Frame Dies Stitched Semi-Circle Dies Birthday Card by Lynn Put

To create my card, I started out by stamping some of the adorable animal images from the Savanna Safari stamp set and coloring them using Copic markers then I used the coordinating dies to die cut them out. I also used the Tropical Scenes stamp set and coordinating dies and used the palm tree and vines images.

For my background I die cut a piece of the Summer Splash patterned paper using the Frilly Frames Retro Petals dies and matted that piece with some green cardstock. I used the Stitched Semi-Circle dies with white cardstock and blended on some Carved Pumpkin and Mustard Seed Distress Oxide ink along the top and stamped the bottom with the water/hill image from the Tropical Scenes set which I colored using Copic markers. 

Sunny Studio Stamps: Savanna Safari Tropical Scenes Radiant Plumeria Frilly Frame Dies Stitched Semi-Circle Dies Birthday Card by Lynn Put

I stamped my sentiment onto a banner and added some tropical leaves from the Radiant Plumeria stamp set and coordinating dies. After that I adhered my animal images, popping up the lion and toucan bird with foam tape.

---------------------------------------------------------

Hello friends! It's Ashley with a clean and simple card using the adorable critters from Savanna Safari

Sunny Studio Stamps: Savanna Safari Circle Snowflake Dies Birthday Card by Ashley Ebben

I knew when I first saw the set that I wanted to make a sunset scene. I blended Distress Oxides in Worn Lipstick and Dried Marigold for the sky and added Scattered Straw for the grass. I stamped a few trees from Savanna Safari in Memento Tuxedo Black on top, then added grassy details with Copics. I die cut the overlapping circles from Snowflake Circle Frame from metallic gold cardstock, then cut down my ink blended background to fit inside. I added the circle piece to a white card base.

Sunny Studio Stamps: Savanna Safari Circle Snowflake Dies Birthday Card by Ashley Ebben

I stamped the animals from Savanna Safari in Memento Tuxedo Black and colored with Copics before cutting them out with the matching dies. I used foam tape to add them to my card. I then stamped the sentiment from Savanna Safari in Memento Tuxedo Black on the white card base to finish.

Thank you so much for stopping by! Have a wonderful day!

Sunny Studio Supplies Used:

Summer Splash 6x6 Paper
Shop at:
Sunny Studio
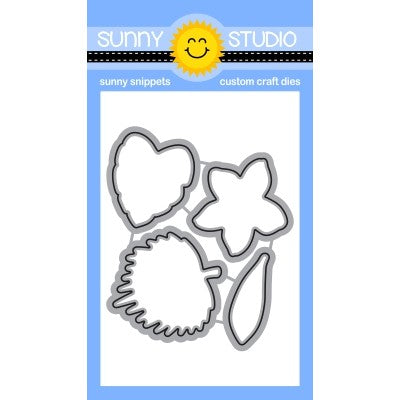
Frilly Frames Retro Petals Dies
Shop at:
Sunny Studio
Snowflake Circle Frame
Shop at:
Sunny Studio
Radiant Plumeria Stamps
Shop at:
Sunny Studio
Radiant Plumeria Dies
Shop at:
Sunny Studio
Savanna Safari Stamps
Shop at:
Sunny Studio
Savanna Safari Dies
Savanna Safari Dies
Shop at:
Sunny Studio
Tropical Scenes Stamps
Shop at:
Sunny Studio
Tropical Scenes Dies
Shop at:
Sunny Studio
Stitched Semi-Circle Dies
Shop at:
Sunny Studio

Saturday, June 27, 2020

Guest Designer Spotlight: Sealiously Sweet Cards with Keeway Tsao

Hello friends! It’s Keeway Tsao from Kiwi Koncepts and I’ll be sharing some summer inspirations with you today. This year has been tough for all of us and never before I have I be so thankful to have this hobby to help me stay sane indoors and continue to reach out to my friends and family through cardmaking!

Sunny Studio Stamps: Sealiously Sweet Tropical Scenes Summer Themed Cards by Keeway Tsao

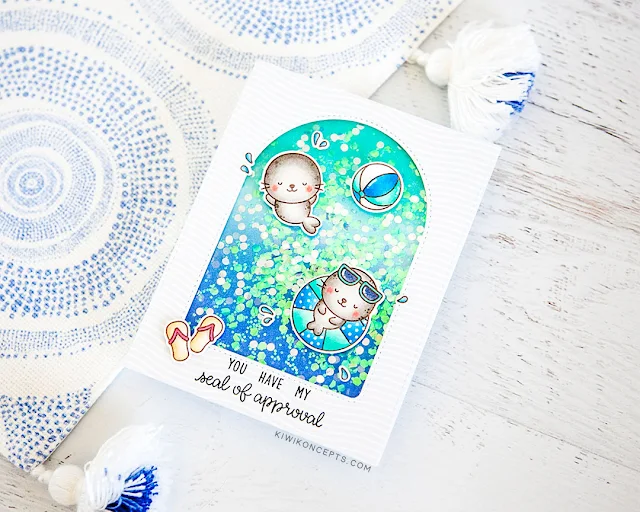
My projects will be focused on the recent summer release, particularly the Sealiously Sweet stamps! These adorable seals caught my eye immediately and I can’t get enough of them. I colored the entire set with Copic markers and die cut them with the coordinating dies.

Sunny Studio Stamps: Sealiously Sweet Tropical Scenes Summer Themed Cards by Keeway Tsao

I also used the Tropical Scenes stamps to help me set this fun tropical scene for my adorable seals. I did some simple ink blending with distress oxide inks to give it that oceanic look and then I stamped my sentiment in the top right corner.

Sunny Studio Stamps: Sealiously Sweet Tropical Scenes Summer Themed Cards by Keeway Tsao

I added my colored island onto the card and then all the different seals for this fun, tropical party! Don’t you just want to jump in and party with them?

Sunny Studio Stamps: Sealiously Sweet Tropical Scenes Stitched Arch Dies Summer Themed Cards by Keeway Tsao

This next card uses the remaining seals and accessories that didn’t quite make it to the first card! This time, I decided to go for an oceanic shaker card. I used the Stitched Arch dies and Subtle Grey Tones 6x6 paper to create my frame and added a layer of acetate sheet behind it.

Sunny Studio Stamps: Sealiously Sweet Tropical Scenes Stitched Arch Dies Summer Themed Cards by Keeway Tsao

I created a simple backdrop with ink blending again and lightly splattered it with water and paint. I added some layers of foam tape around for the shaker frame and added lots of iridescent blue, green, and clear sequin into the area to give it that ocean sparkle. I then added my frame to close off the shaker area.

Sunny Studio Stamps: Sealiously Sweet Tropical Scenes Stitched Arch Dies Summer Themed Cards by Keeway Tsao

I usually like to shake the card at this point a couple times to make sure I had a good “seal” around the card so that sequins aren’t falling out. Then, at last, I can add the rest of my images to the card with foam tape.

I hope you enjoy today’s inspiration. Have a lovely summer!

Sunny Studio Supplies Used:

Subtle Grey Tones Paper
Shop at:
Sunny Studio
Sealiously Sweet Stamps
Shop at:
Sunny Studio
Sealiously Sweet Dies
Shop at:
Sunny Studio
Tropical Scenes Stamps
Shop at:
Sunny Studio
Tropical Scenes Dies
Shop at:
Sunny Studio
Stitched Arch Dies
Stitched Arch Dies
Shop at:
Sunny Studio

Friday, June 26, 2020

Herringbone Frame Focused Cards with Rachel and Candice

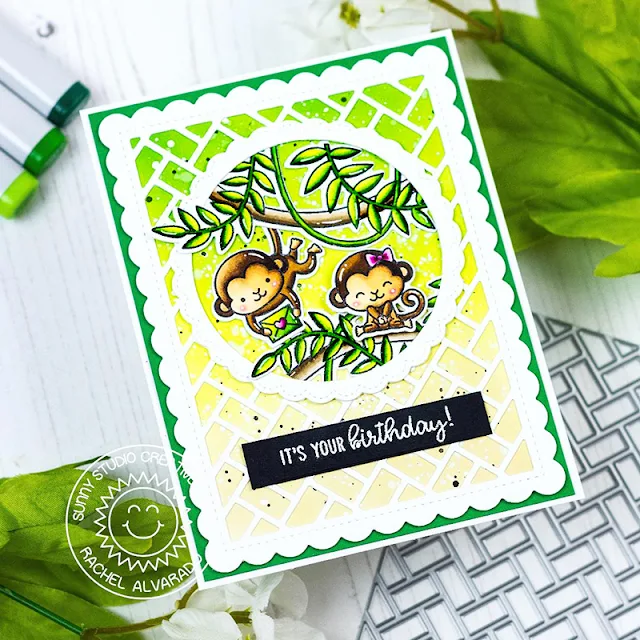
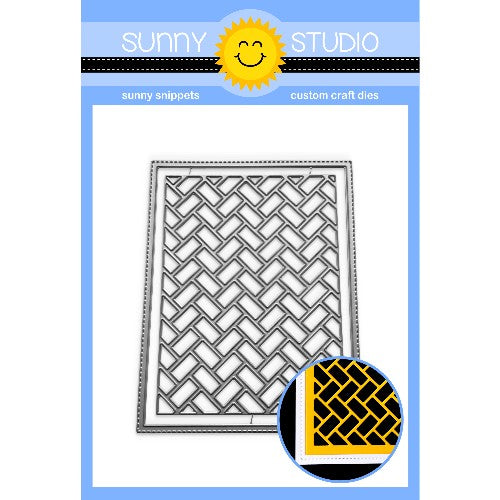
Hello crafty friends! It's Rachel here and I am sharing a birthday card today that features the Frilly Frames Herringbone Die Set

Sunny Studio Stamps: Frilly Frame Dies Fancy Frame Dies Love Monkey Tropical Scenes Birthday Cards by Rachel Alvarado

I combined this set with the Frilly Frames Hexagon Die Set because I wanted a scalloped edge to go with my design. I used images from both the Love Monkey and Tropical Scenes Stamp Sets. All of my images were stamped with Memento Tuxedo Black Ink and colored them with Copic Markers. I used the coordinating dies to cut them out.

Sunny Studio Stamps: Frilly Frame Dies Fancy Frame Dies Love Monkey Tropical Scenes Birthday Cards by Rachel Alvarado

For my background, I blended some Antique Linen, Twisted Citron, and Mowed Lawn Distress Oxide Inks. I splattered this blend with both water and diluted white, green, and brown paints for some added interest. To create my circle frame in the center, I used a basic circle die to cut a circle in the top center of my herringbone design and then used the Fancy Frame Circle Die Set to cut a scalloped circular frame from white card stock. Lastly, I heat embossed my sentiment (from both the Love Monkey and Savanna Safari stamp sets) onto a strip of black card stock using Fine Detail White Embossing Powder.

Thanks so much for stopping by! Have a wonderful weekend!

------------------------------------------------------

Hello my crafty friends! Candice back today with you sharing a card using the Frilly Frames Herringbone Frame as a stencil!

Sunny Studio Stamps: Frilly Frame Dies Cruising Critters Birthday Card by Candice Fisher

I used a few Sunny Studio products to create my card:
For the background, I trimmed a piece of pattern paper from the Spring Fling Pack to fit my card base of 5 x 6 1/2. I then die cut a stitched frame from thick black cardstock with a strip fitting into the bottom for the road.

I die cut the herringbone from sturdy cardstock and used this as my stencil to create the brick wall background. I taped the herringbone stencil over Bristol Smooth paper and inked with tea dye & antique linen, fading as I went up.

Sunny Studio Stamps: Frilly Frame Dies Cruising Critters Birthday Card by Candice Fisher

Next, I stamp the car full of cuties, colored them with copic markers and used the coordinating dies to cut them out. To put the card together, I glued the stenciled background into the frame and added the road along the bottom, using a white gel pen to add the lines. I then adhered the car with foam tape and stamped the sentiment in the top corner with Versafine black ink. I added a few droplets to finish the card!

Thank you so much for visiting today!

Sunny Studio Supplies Used:

Fancy Frames-Circle Dies
Shop at:
Sunny Studio
Love Monkey Stamps
Love Monkey Stamps
Shop at:
Sunny Studio
Love Monkey Dies
Love Monkey Dies
Shop at:
Sunny Studio
Cruising Critters Stamps
Shop at:
Sunny Studio
Cruising Critters Dies
Shop at:
Sunny Studio
Spring Fling Paper
Spring Fling Paper
Shop at:
Sunny Studio
Savanna Safari Stamps
Shop at:
Sunny Studio
Tropical Scenes Stamps
Shop at:
Sunny Studio
Tropical Scenes Dies
Shop at:
Sunny Studio
Frilly Frames Herringbone
Shop at:
Sunny Studio

Thursday, June 25, 2020

Sealiously Sweet Cards with Vanessa and Anja

Hello to you! Vanessa here with an interactive summer card using the adorable Sealiously Sweet set. These cute seals are enjoying a relaxing day at the pool: 

Sunny Studio Stamps: Sealiously Sweet Stitched Semi-Circle Dies Happy Word Die Summer Themed Card by Vanessa Menhorn

I created a square card base from white cardstock and colored the edges with Copic Markers. Then I trimmed a panel of white cardstock slightly smaller than the card base. Using the Stitched Semi-circle Dies, I made a mask for my pool. First, I created the water. For this, I applied lines of masking fluid and inked the semi-circle with blue Distress Oxide Ink. I applied small water droplets and removed the masking fluid when everything was dried. Now I adhered a mask over the pool and inked the rest of my panel with grey Distress Oxide ink. 

Sunny Studio Stamps: Sealiously Sweet Stitched Semi-Circle Dies Happy Word Die Summer Themed Card by Vanessa Menhorn

After I had applied tiny ink droplets, I drew the stones with a colored pencil. I removed the mask and die-cut a small circle from the position where the floating seal was going to sit. Then I stamped my images onto white cardstock, colored everything with Copic Markers and die-cut the elements with the matching dies. To make the seal float and turn around, I adhered a small coin to the back of the image, then a piece of foam tape onto the coin and behind the panel, underneath the circle, another small coin. Now I was ready to put the square panel onto my card base with foam tape.

I added the other images and die-cut the Happy Word Die from white cardstock. After I had colored it with the matching Copics, I adhered it to the card. Finally, I stamped the word "summer" onto a strip of black cardstock, heat-embossed it with white embossing powder and adhered it to the card with foam tape.

Sunny Studio Stamps: Sealiously Sweet Stitched Semi-Circle Dies Happy Word Die Summer Themed Card by Vanessa Menhorn

Now, let's see this card in action!

I'd love to join these cuties, how about you? Wishing you a happy day! Thanks for stopping by!

----------------------------------------------------------

Hi everyone, Anja here and today I have something cute for you! I made a slimline card with the Sealiously Sweet Stamps. Aren't these seals way too adorable?! They are going to have some fun at the pool for sure!

Sunny Studio Stamps: Sealiously Sweet Staggered Circle Dies Summer Themed Card by Anja Bytyqi

My white card base is different in size than a regular slimline card – it measures 7 5/8" × 3 11/16". I cut out a slightly smaller panel from aqua cardstock and used the Staggered Circle Die to create some windows. I trimmed a piece of teal cardstock to go behind the window openings.

I stamped the sentiment in VersaMark Ink and white heat embossed it. For a bit of dimension, I popped up the aqua panel with foam tape.

Sunny Studio Stamps: Sealiously Sweet Staggered Circle Dies Summer Themed Card by Anja Bytyqi

Next, I stamped the seals as well as the accessory stamps in Memento Tuxedo Black Ink and colored them with Copic Markers. I used the coordinating dies to cut everything out. I tucked the seals inside the windows and scattered the other images all over the card to complete my fun summer scene.

Thank you so much for stopping by! Have a sunny day!

Sunny Studio Supplies Used:

Happy Word Die
Happy Word Die
Shop at:
Sunny Studio
Staggered Circles Die
Shop at:
Sunny Studio
Sealiously Sweet Stamps
Shop at:
Sunny Studio
Sealiously Sweet Dies
Shop at:
Sunny Studio
Stitched Semi-Circle Dies
Shop at:
Sunny Studio

Wednesday, June 24, 2020

Stitched Arch Die Focused Cards with Tammy and Ana

Hi crafty friends! Tammy here sharing this fun summer themed card, featuring the new Stitched Arch DiesI paired this awesomely versatile die with the darling seals from Sealiously Sweet to create a bright and happy summer card.

Sunny Studio Stamps: Stitched Arch Dies Sealiously Sweet Stitched Semi-Circle Dies Tropical Scenes Everyday Card by Tammy Stark

To begin, I cut the beach ball and ocean wave papers from the Summer Splash Paper to 4 1/4 X 5 1/2". Using the largest die from the Stitched Arch DiesI cut a window from the beach ball paper. Then, I cut a sandy hill using the Stitched Semi-Circle DiesI attached the sand to the ocean waves patterned paper background and adhered the window panel over the background with foam tape.

Next, I stamped the adorable images from Sealiously Sweet  and Tropical Scenes (palm trees) with Memento Tuxedo Black Ink, colored with Copic markers, and cut out with the Sealiously Sweet Dies and Tropical Scenes Dies.

Copic Colors Used: Seals: C00, C0, C1, C3, C5, R30; Orange: YR04, YR14, YR12; Yellow: Y15, Y11, Y00; Blue: B05, B02, B00; Greens: YG01, YG03, YG25; Palm trees: YG17, YG25, YG03, YG01, E30, E31, E34, E35

Sunny Studio Stamps: Stitched Arch Dies Sealiously Sweet Stitched Semi-Circle Dies Tropical Scenes Everyday Card by Tammy Stark

I arranged the colored images to my card, attaching with foam tape for dimension. Next, I stamped my sentiment on a white banner strip and adhered it to the bottom of the arch opening. I then attached the card front to a white A2 card base to complete my card.

Thanks so much for stopping by!! Hope you all have a sealiously amazing day!! :)

----------------------------------------------------

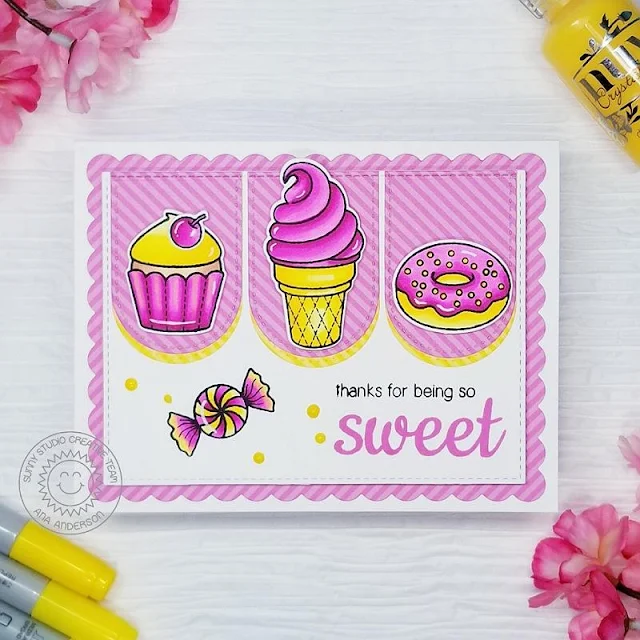
Hello crafty friends! Ana here today with a sweet card showcasing Stitched Arch Dies and Sweet Shoppe stamps and diesI was really in the mood for some bright and cheerful girly colors today and decided on a pink and yellow color combo for this card.

Sunny Studio Stamps: Stitched Arch Dies Sweet Shoppe Frilly Frame Dies Everyday Card by Ana Anderson

I started by stamping the sweets (from Sweet Shoppe set) and coloring them with Spectrum Noir and Copic markers. I die cut the images next and started working on the background.

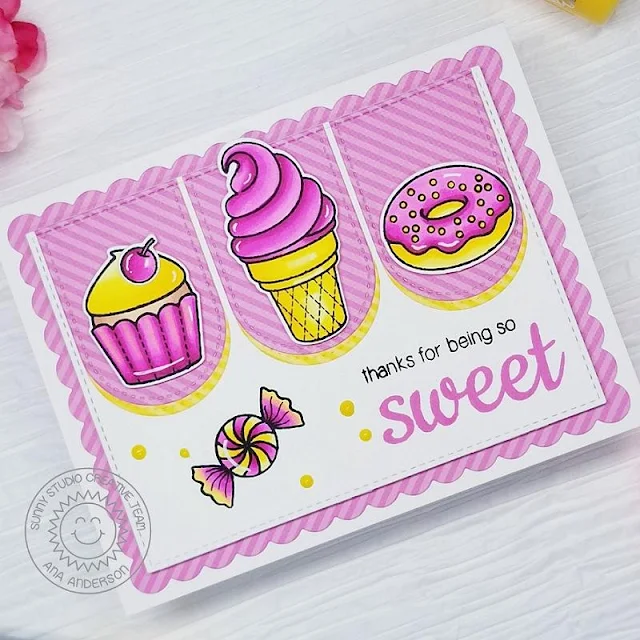
I chose pink and yellow patterned papers from Striped Silly 6x6 paper pack. I used stitched scalloped mat die (from Frilly Frames Hexagon die set) to cut out the scalloped background. I then used the second smallest Stitched Arch die to cut the pink and yellow arches and layered them together with tape runner.

I adhered the stitched arch die cuts to a piece of white cardstock, then die cut the white cardstock with a stitched rectangle mat (from Frilly Frames Retro Petals die set). Next, I adhered the white panel to pink scalloped background, added the images to arch die cuts with foam tape and stamped the sentiment. 

Sunny Studio Stamps: Stitched Arch Dies Sweet Shoppe Frilly Frame Dies Everyday Card by Ana Anderson

At this point the bottom part of the card front seemed a little empty to me, so I stamped the candy (from Sweet Shoppe) on the left side of the panel and colored it with the same markers I used for the bigger images. I added yellow Nuvo drops to embellish and some highlights with white gel pen and my card was finished!

Thank you so much for spending time with us today! I really hope you like today’s card and got inspired. I’ll see you next week and until then I wish you happy crafting!

Sunny Studio Supplies Used:

Sweet Shoppe Dies
Sweet Shoppe Dies
Shop at:
Sunny Studio
Sweet Shoppe Stamps
Sweet Shoppe Stamps
Shop at:
Sunny Studio
Striped Silly 6x6 Paper
Shop at:
Sunny Studio
Summer Splash 6x6 Paper
Shop at:
Sunny Studio
Frilly Frames Hexagon Dies
Shop at:
Sunny Studio
Frilly Frames Retro Petals Dies
Shop at:
Sunny Studio
Sealiously Sweet Stamps
Shop at:
Sunny Studio
Sealiously Sweet Dies
Shop at:
Sunny Studio
Tropical Scenes Stamps
Shop at:
Sunny Studio
Tropical Scenes Dies
Shop at:
Sunny Studio
Stitched Arch Dies
Stitched Arch Dies
Shop at:
Sunny Studio
Stitched Semi-Circle Dies
Shop at:
Sunny Studio