Showing posts with label Fishtail Banners II. Show all posts

Tuesday, May 7, 2019

Summer Cards with Angelica and Mendi

Hi friends, Angelica here sharing a birthday shaker card using the Best Fishes stamp set. Here’s how I put it together.

Sunny Studio Stamps: Summer Cards using Best Fishes & Fabulous Flamingos Stamps by Angelica Conrad and Mendi Yoshikawa

The first step is making the card front. On a sheet of Yupo paper, I moved Tim Holtz Turquoise and Sailboat Blue alcohol inks around to resemble water. I worked from one corner to the other, the path I knew my windows were going to be. 

Sunny Studio Stamps: Summer Cards using Best Fishes & Fabulous Flamingos Stamps by Angelica Conrad and Mendi Yoshikawa

While the panel was drying, I made the inside panel that would be seen through the window. I smooshed watercolor paper into Distress Oxide inks that I had swiped onto my craft mat and sprayed with water. I did this three times, using my heat tool to dry the paper after each layer. Once my Yupo paper was dry, I die-cut the windows using the Staggered Circles Die.

Sunny Studio Stamps: Summer Cards using Best Fishes & Fabulous Flamingos Stamps by Angelica Conrad and Mendi Yoshikawa

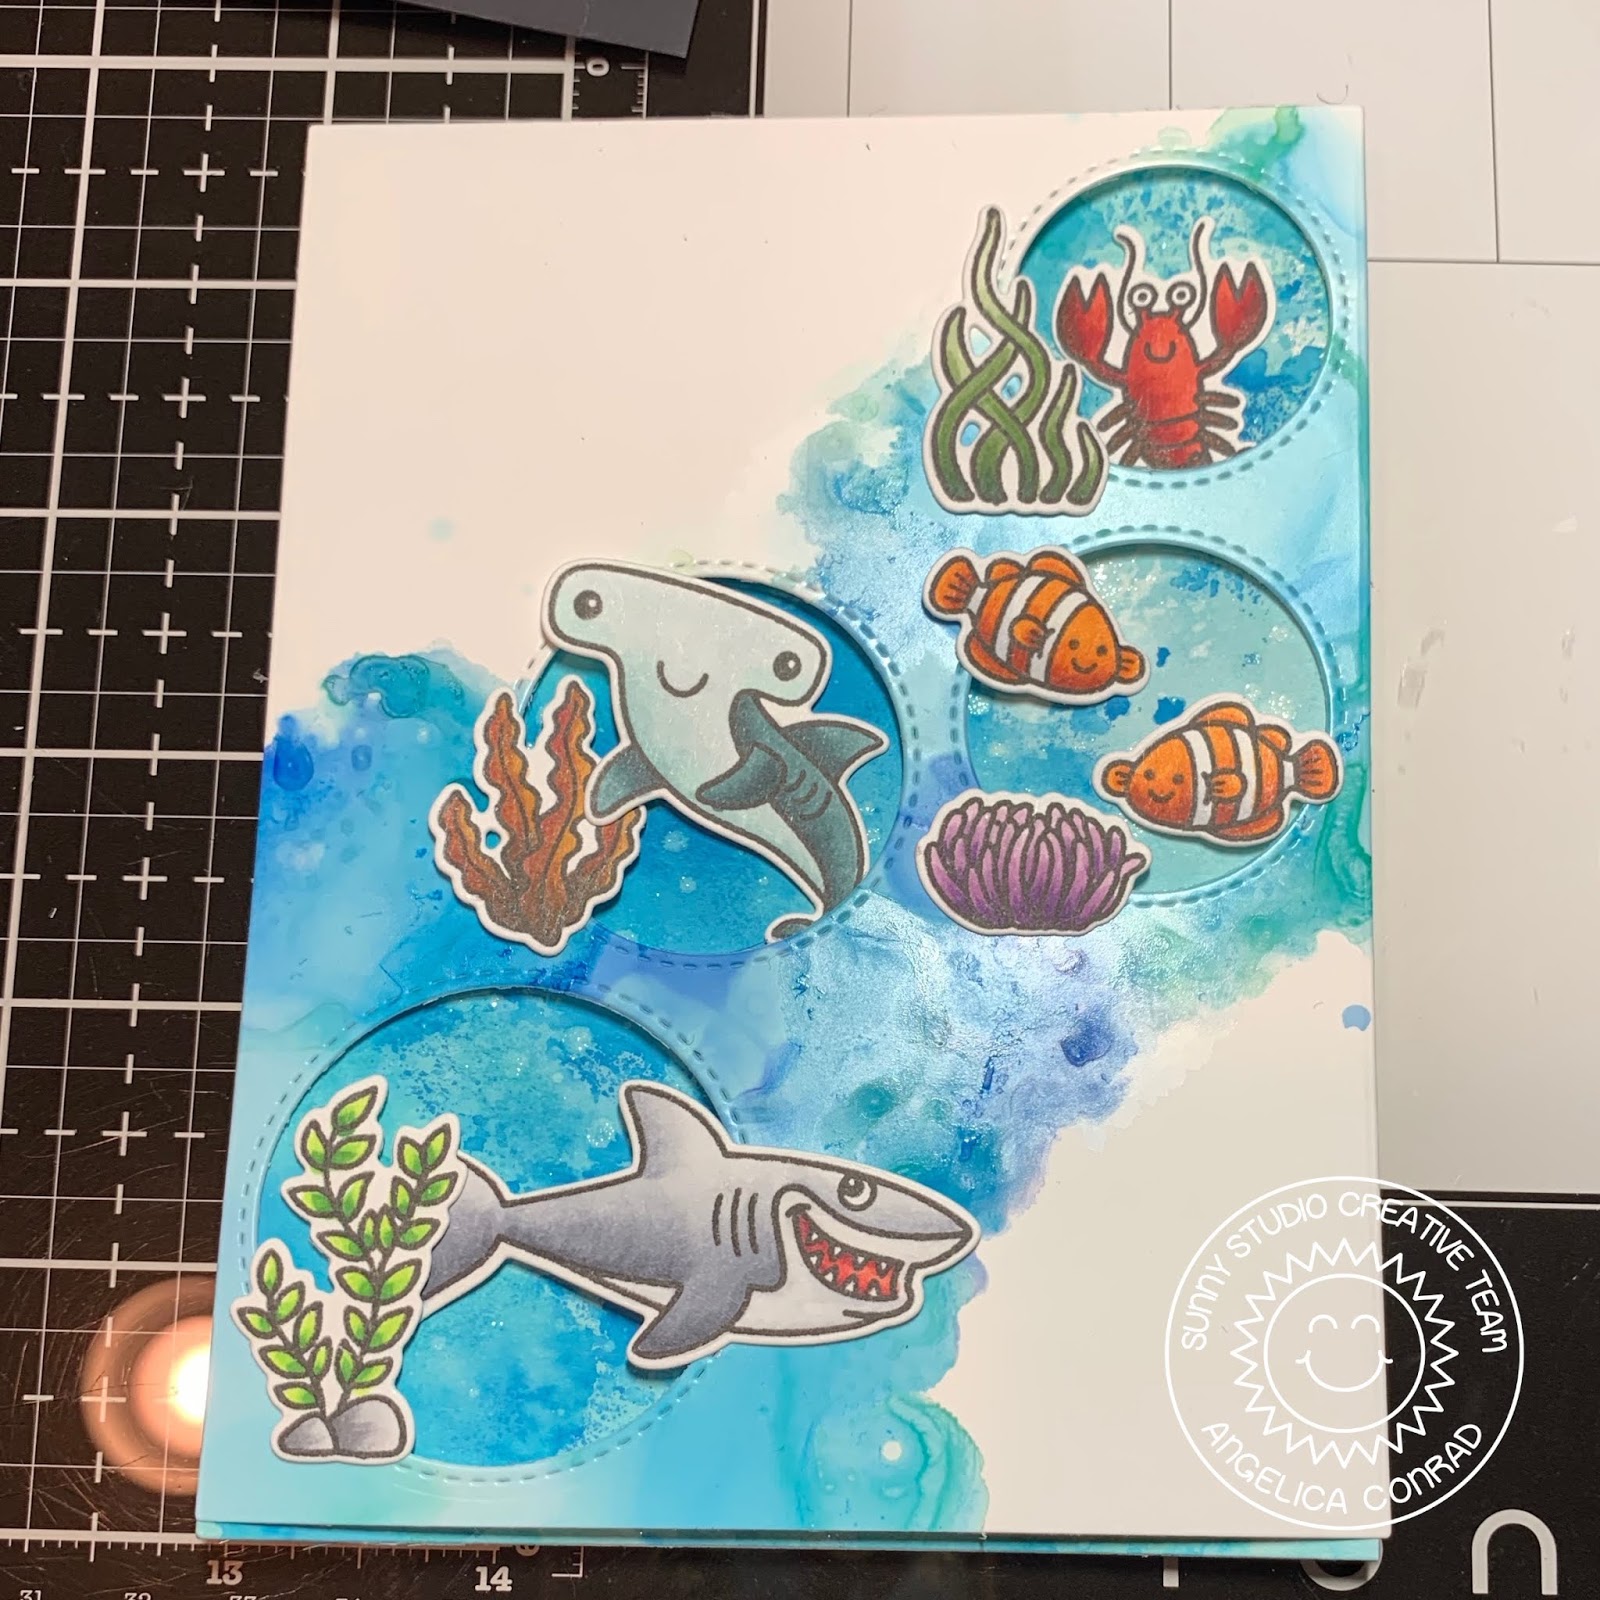
I stamped several images from the Best Fishes stamp set, and pulled out a rainbow of Copic colors to color them with. I used the coordinating dies to die-cut them out, then planned out my card front. After moving the images around, I finally found the arrangement I wanted to use. I always do this, then take a picture of it so I know how to assemble the images when it’s time to complete the card.

Sunny Studio Stamps: Summer Cards using Best Fishes & Fabulous Flamingos Stamps by Angelica Conrad and Mendi Yoshikawa

To assemble the shaker element, I turned the Yupo paper over and used 1/8 Scor tape and a sheet of acetate to close the windows. Next I took thin strips of foam adhesive and wrapped them around each window, then on the rest of paper for support. I added clear and pink confetti into the windows, then carefully closed the back up with the watercolor background. I attached the card front to a card base, then added the images with thin foam squares. I stamped and white heat-embossed the sentiments using words from the stamp set. My last step was trimming the sentiments into thin strips, and attaching them to the card.

That's all that I have for today. Thanks for stopping by!

-------------------------------------------------

Hello there!  Mendi here today filling in for Juliana with a card featuring our newest Frilly Frames Dies.  I ran out of time during the sneak peek week to show how awesome the new Frilly Frames Chevron dies work together with both our Fishtail Banner die sets.  For my card here I paired them with the scallop from our Fishtail Banner 2 and the straight edge banner on our original Fishtail Banner dies to create "strips" which I cut from a rainbow of cardstock colors.

Sunny Studio Stamps: Fabulous Flamingos Rainbow Chevron Scalloped Card (using Fishtail Banner & Frilly Frames Dies)

I just adore how all our Frilly Frames can mix and match with each other.  The chevron dies come with a ric rac edge, but I wanted to continue the scalloped theme so I paired the inside portion of the die with the outside portion of our Frilly Frames Stripes Die.  I then backed them with a piece of navy cardstock.

I wanted to keep the rest of my card fairly simple to keep the attention on my rainbow chevron stripes so I colored a small grouping from our Fabulous Flamingo Stamps and dies, using Copic Markers and heat embossed a sentiment on some more of that same navy cardstock to ground my images.

Sunny Studio Stamps: Fabulous Flamingos Rainbow Chevron Scalloped Card (using Fishtail Banner & Frilly Frames Dies)

I hope we've inspired you in your cardmaking. Thanks so much for stopping by and hanging with us today.  :)

Sunny Studio Supplies Used:

Fishtail Banner II Dies
Shop at:
Sunny Studio
Staggered Circles Die
Shop at:
Sunny Studio
Frilly Frames Chevron Die
Shop at:
Sunny Studio
Frilly Frames Stripes Die
Shop at:
Sunny Studio
Best Fishes Stamps
Best Fishes Stamps
Shop at:
Sunny Studio
Best Fishes Dies
Best Fishes Dies
Shop at:
Sunny Studio
Fabulous Flamingos Stamps
Shop at:
Sunny Studio
Fabulous Flamingos Dies
Shop at:
Sunny Studio

Thursday, March 14, 2019

Everything's Rosy Cards with Anja and Vanessa

Hi everyone, Anja here today with a floral birthday card showcasing the pretty Everything's Rosy Stamps. It's just magical how the images come to life by stamping each of the individual layers.

Sunny Studio Stamps: Everything's Rosy Fishtail Banners Birthday Card by Anja Bytyqi

For the background, I tried something different and created a cardstock chevron pattern using the Fishtail Banners Dies and Fishtail Banners II Dies. I just love the pierced detail at the edges.

Sunny Studio Stamps: Everything's Rosy Fishtail Banners Birthday Card by Anja Bytyqi

I stamped the roses and leaves with dye inks (find the ink colors below) and the help of a stamp positioning tool. I used the coordinating Everything's Rosy Dies to cut them out. Next, I stamped the sentiment from the Puppy Dog Kisses set in VersaMark Ink onto a strip of black cardstock and white heat embossed it.

Altenew Dye Inks used: Roses: Pink Pearl, Coral Bliss, Heart Beat, Vineyard Berry, Grapevine; Leaves: Bamboo, Parrot, Olive

To finish off my card, I adhered some sequins and tiny dots of Platinum Stickles.

Thank you so much for stopping by! Hope to see you again next time!

--------------------------------------------------------------------

Hello everyone! Vanessa here with a card using the wonderful Everything's Rosy set. For today's card I was inspired by blue porcelain designs featuring blue flowers.

Sunny Studio Stamps: Everything's Rosy Fancy Frames Congrats Card by Vanessa Menhorn

I trimmed a panel of white cardstock slightly smaller than my card base, stamped the sentiment and adhered the panel to the card. Now I die-cut the Fancy Frames Rectangle Dies from white cardstock and adhered the frames.

Sunny Studio Stamps: Everything's Rosy Fancy Frames Congrats Card by Vanessa Menhorn

Then I stamped the roses and the leaves onto white cardstock, die-cut them with the matching dies and adhered the images with foam tape. Here are the inks I used for my roses: MFT Blue Breeze, Memento Summer Sky, Hero Arts Soft Sky, Hero Arts Pool, Memento Nautical Blue. To finish the card off, I added gold and clear sequins.

Not the usual colors for flowers, but I love the design on porcelain! I have to admit, I wanted to cover a panel with a lot of the roses first, but then I dropped an ink pad onto the panel and was just able to save these roses :) 

Thank you for stopping by!

Sunny Studio Supplies Used:

Fishtail Banner Dies
Shop at:
Sunny Studio
Fishtail Banner II Dies
Shop at:
Sunny Studio
Fancy Frames- Rectangles
Shop at:
Sunny Studio
Everything's Rosy Stamps
Shop at:
Sunny Studio
Everything's Rosy Dies
Shop at:
Sunny Studio
Puppy Dog Kisses Stamps
Shop at:
Sunny Studio

Wednesday, March 6, 2019

Chubby Bunny Cards with Franci and Mona

Hello there and happy Wednesday! Franci here with you today, with a little Spring themed treat box :)

Sunny Studio Stamps: Chubby Bunny Sliding Window Dies Fancy Frames Hello Spring Card by Franci Vignoli

I looove these little cuties from the Chubby Bunny set, they are super adorable and perfect for Easter/Spring time, I can't help smiling every time I look at them! I decide to create a fun project today cause I needed a little treat box/ party favor idea and I'm so happy about how it turned out!

First of all I die cut the Sliding Window die twice out of lilac cardstock and I cut the "scored" sides with my trimmer. I also die cut the little window included in the set out of only one of the 2 pieces and from the side that does not have little tab attached.

Sunny Studio Stamps: Chubby Bunny Sliding Window Dies Fancy Frames Hello Spring Card by Franci Vignoli

I glued my little box together and added a little strip of green patterned paper from the Flirty Flowers paper to create the grass for my bunnies to stand on. I stamped, colored and die cut all the images, added some details with a white gel pen and glued them down to the grass. I think you could also add a little piece of acetate behind the window so your critters have more stability.

Finally I die cut a little banner using the Fancy Frames Rectangle dies out of white cardstock and I stamped a "Hello Spring" sentiment, I glued it down too and added a little clear bag with lots of candies :) It's cute, isn't it?! 

Can't wait to create more and also try to modify this to make also a little shadow box! Hope you like it too and thanks for stopping by today, have a lovely day! 

------------------------------------------------------

Hi crafty friends! It's Mona here, today I am showing you a pretty, but easy tag tutorial, featuring the Chubby Bunny Stamp Set.

Sunny Studio Stamps: Chubby Bunny Fancy Frames Spring Greetings Build-A-Tag Hello Spring Card by Mona Toth

I started the cardmaking with Stamping and Coloring. I stamped the cute bunny images from the Chubby Bunny Stamp Set and I also stamped tulip images from the Spring Greetings Stamp Set


Sunny Studio Stamps: Chubby Bunny Sliding Window Dies Fancy Frames Spring Greetings Build-A-Tag Hello Spring Card by Mona Toth

I colored the images with Copic markers.

Sunny Studio Stamps: Chubby Bunny Sliding Window Dies Fancy Frames Spring Greetings Build-A-Tag Hello Spring Card by Mona Toth

(Used colors: 0, C0, C1, C3, C5, R20, R22 E0000; Y11, Y15, Y19; YR14, YR07; RV06, RV11, RV34, YG 01, YG03, YG17;)

Sunny Studio Stamps: Chubby Bunny Sliding Window Dies Fancy Frames Spring Greetings Build-A-Tag Hello Spring Card by Mona Toth

When I was done I started the Die-cutting process. I used the Build a Tag #2 Dies, the Fishtail Banner II Dies and the cute banner from the Fancy Frames Rectangle Dies and I made die-cuts. 


Sunny Studio Stamps: Chubby Bunny Sliding Window Dies Fancy Frames Spring Greetings Build-A-Tag Hello Spring Card by Mona Toth

You will need the following pieces for one tag, so if you want to make more like me you can chose more colors.

Sunny Studio Stamps: Chubby Bunny Sliding Window Dies Fancy Frames Spring Greetings Build-A-Tag Hello Spring Card by Mona Toth

There is one more step before you adhere everything together. I wanted to add more dimension to the tags so I run them through my Die-cut machine with the Fishtail Banner II Dies.

Sunny Studio Stamps: Chubby Bunny Sliding Window Dies Fancy Frames Spring Greetings Build-A-Tag Hello Spring Card by Mona Toth

In the end I added my heat embossed sentiment to the banner and put my tag together. Thank you very much for reading through my post, I hope that you have enjoyed it and I have inspired you! If you like my creations let's be friends on Instagram. :)

Sunny Studio Supplies Used:

Fishtail Banner II Dies
Shop at:
Sunny Studio
Fancy Frames- Rectangles
Shop at:
Sunny Studio
Sliding Window Dies
Sliding Window Dies
Shop at:
Sunny Studio
Build-A-Tag #2 Dies
Build-A-Tag #2 Dies
Shop at:
Sunny Studio
Flirty Flowers 6x6 Paper
Shop at:
Sunny Studio
Chubby Bunny Stamps
Chubby Bunny Stamps
Shop at:
Sunny Studio
Chubby Bunny Dies
Chubby Bunny Dies
Shop at:
Sunny Studio
Spring Greetings Stamps
Shop at:
Sunny Studio
Spring Greetings Dies
Shop at:
Sunny Studio

Friday, December 22, 2017

Christmas Themed Gift Tags with Lexa

Hello everyone! Lexa here with you today. Have you got all of your presents wrapped up? Don’t forget the gift tags too. This time of the year is the most wonderful and hectic at the same time. So today I will share some inspiration for last minute tags that can maybe save you a little time in these last few days before Christmas.


Sunny Studio Stamps: Gleeful Reindeer and Jolly Gingerbread Christmas Themed Gift Tags by Lexa Levana

I used the Tag Toppers Traditional Dies together with the Fishtail Banner II Dies. Attached them to the paper with low tack tape and die cut them at the same time. Such a time saver. I blend Distress Inks for the background, Spun Sugar, Worn Lipstick, Cracked Pistachio, Peacock Feathers. After I'm happy with the blending I stamped Frosty Flurries with matching dye inks.


Sunny Studio Stamps: Gleeful Reindeer and Jolly Gingerbread Christmas Themed Gift Tags by Lexa Levana

I stamped all of the images with Versafine black ink and watercolored them with Distress markers. The Gleeful Reindeers are so adorable, and no one can get enough of the cute gingerbread boy from Jolly Gingerbread. After I finished putting them all together, now it's time to tie up some ribbons and twines to finish the tags.


Sunny Studio Stamps: Gleeful Reindeer and Jolly Gingerbread Christmas Themed Gift Tags by Lexa Levana

Thank you so much for visiting the blog today! I hope you enjoy today's post and have an amazing holiday.

Sunny Studio Supplies Used:

Fishtail Banner II Dies
Shop at:
Sunny Studio
Gleeful Reindeer Dies
Shop at:
Sunny Studio
Gleeful Reindeer Stamps
Shop at:
Sunny Studio
Tag Topper Dies-Traditional
Shop at:
Sunny Studio
Frosty Flurries Stamps
Shop at:
Sunny Studio
Jolly Gingerbread Stamps
Shop at:
Sunny Studio
Jolly Gingerbread Dies
Shop at:
Sunny Studio