Thursday, June 13, 2019

Frilly Frames Dies Cards with Anja and Vanessa

Hi everyone, Anja here and today I'm highlighting the new Frilly Frames Chevron Dies. I combined this versatile 2-piece die set with the Fabulous Flamingos Stamps.

Sunny Studio Stamps: Frilly Frames Fabulous Flamingos Fresh & Fruity Tropical Paradise Happy Word Die Summer Themed Cards by Anja Bytyqi and Vanessa Menhorn

It's always fun to try new color combos, so I picked some bright and fresh colors for my summer birthday card. I started off with an A2 card base made from white cardstock. I used both dies together and cut the pinked frame with the chevron pattern from blush pink cardstock. Then I used the chevron die and cut it from three other cardstock colors. I repeatedly inlaid the chevrons into the blush pink die-cut.

Sunny Studio Stamps: Frilly Frames Fabulous Flamingos Fresh & Fruity Tropical Paradise Happy Word Die Summer Themed Cards by Anja Bytyqi and Vanessa Menhorn

Next, I stamped the images in Memento Tuxedo Black Ink and colored them with Copic Markers. I used the coordinating Fabulous Flamingos Dies to cut them out. The sentiment is included in the Party Pups Stamps set and I stamped it in VersaMark Ink on a thin black cardstock strip and white heat embossed it. To finish off my card, I adhered three matching enamel dots.

Thank you so much for stopping by! Wishing you a lovely day!

---------------------------------------------

Hello everybody! Vanessa here today with a colorful summer card using the Frilly Frames Stripes DiesIt took me a while to assemble this card, because a lot of die-cutting was involved, but I love the result!

Sunny Studio Stamps: Frilly Frames Fabulous Flamingos Fresh & Fruity Tropical Paradise Happy Word Die Summer Themed Cards by Anja Bytyqi and Vanessa Menhorn

I first die-cut the frame from Kraft cardstock. Then I die-cut it from all the colors I had in my cardstock scrap stash. I assembled the frame and adhered it to the card base. Now I stamped the fruit images from Fresh & Fruity and Tropical Paradise onto white cardstock, colored them with Copics, fussy-cut the elements and adhered them to the card.

Sunny Studio Stamps: Frilly Frames Fabulous Flamingos Fresh & Fruity Tropical Paradise Happy Word Die Summer Themed Cards by Anja Bytyqi and Vanessa Menhorn

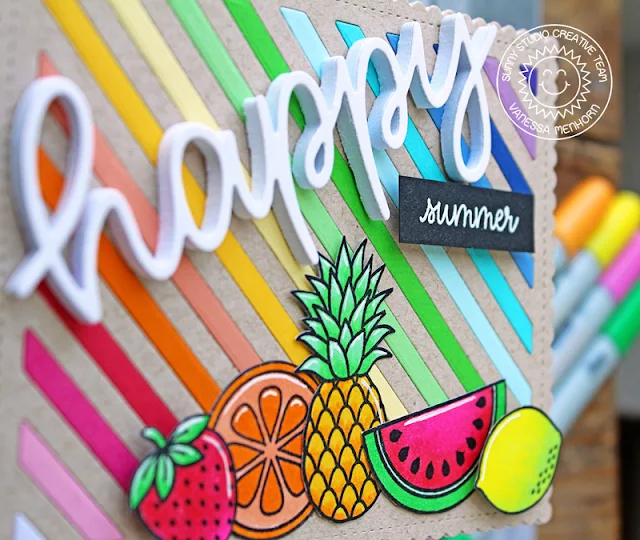
Next, I die-cut the Happy Word Die from white cardstock and fun foam and adhered it. I stamped and heat-embossed the "summer" from Fabulous Flamingos onto a strip of black cardstock, trimmed it and adhered it with foam tape.

I hope you like my idea to use up those cardstock scraps! I have plenty of stripes left to create more colorful cards :) Thanks for stopping by! 

Sunny Studio Supplies Used:

Fresh & Fruity Dies
Fresh & Fruity Dies
Shop at:
Sunny Studio
Fresh & Fruity Stamps
Shop at:
Sunny Studio
Tropical Paradise Dies
Shop at:
Sunny Studio
Tropical Paradise Stamps
Shop at:
Sunny Studio
Party Pups Stamps
Party Pups Stamps
Shop at:
Sunny Studio
Happy Word Die
Happy Word Die
Shop at:
Sunny Studio
Frilly Frames Chevron Die
Shop at:
Sunny Studio
Frilly Frames Stripes Die
Shop at:
Sunny Studio
Fabulous Flamingos Stamps
Shop at:
Sunny Studio
Fabulous Flamingos Dies
Shop at:
Sunny Studio

Wednesday, June 12, 2019

Hawaiian Hibiscus Cards with Mona and Franci

Hi crafty friends! It's Mona here, today I am showing you a bright floral card featuring the Hawaiian Hibiscus stamp set. I love this stamp set so much and I wanted to create a vintage card with it.

Sunny Studio Stamps: Hawaiian Hibiscus Sunshine Word Die Frilly Frames Dies Hello Cards by Mona Toth and Franci Vignoli

This time I started the card making with stamp layering. For the stamping I used Hybrid Inks from Scrapbook.com and green colored mini ink cubes from Altenew. For the leaves I used the Bamboo,  Parrot and Shadow Creek colors. For the Flowers I used many colors and I mixed and matched them from the lightest to darkest. (For the flowers I used the following colors: Yellow 1, 3; Violet 2, 3, 4; Rise 2,3,4; Pink 2; Blue 1,4.) When the layering was done I Die-cut the images with the coordinating dies.

Sunny Studio Stamps: Hawaiian Hibiscus Sunshine Word Die Frilly Frames Dies Hello Cards by Mona Toth and Franci Vignoli

The next step was the background. I made a die-cut with the Frilly Frames Stripes Dies from a light teal cardstock and adhered to the card base. When it was done, I die-cut the Sunshine sentiment with the Sunshine Word Die and I adhered it to the card base.

Sunny Studio Stamps: Hawaiian Hibiscus Sunshine Word Die Frilly Frames Dies Hello Cards by Mona Toth and Franci Vignoli

In the end I stamped the "Aloha" sentiment to my card and embellished the card with tiny Hearts confetti and it was done. Thank you very much for reading through my post, I hope that you have enjoyed it and I have inspired you! If you like my creations let's be friends on Instagram. :)

----------------------------------------------------

Hi there! Franci here with you today, showcasing the Hawaiian Hibiscus set.

Sunny Studio Stamps: Hawaiian Hibiscus Sunshine Word Die Frilly Frames Dies Hello Cards by Mona Toth and Franci Vignoli

This set is amazing!! I have a love/hate relationship with layering sets cause they can be tricky to align and solid images are not super easy for me to stamp, but this set is no trouble and all the joy!! These flowers are the easiest images to align ever and every layer is amazing, the final effect is so beautiful! So if you are a little bit scared, I say ... get this set and you'll love it!

Sunny Studio Stamps: Hawaiian Hibiscus Sunshine Word Die Frilly Frames Dies Hello Cards by Mona Toth and Franci Vignoli

Back to my project. First of all I created my white card base as usual, then I created my background by Sponging Distress inks on to a stripes stencil. You can easily masked the front of the card with some thin strips of masking paper and ink on top to achieve the same pattern :)

I let it dry and then added some little spatters of dark blue and rose gold watercolors with a fine tip brush. I stamped my Hibiscus flowers and the leaves using a combo of Lawn Fawn inks and Memento Drops inks. I die cut all the images with their coordinated dies and glued them down with foam adhesive.

Sunny Studio Stamps: Hawaiian Hibiscus Sunshine Word Die Frilly Frames Dies Hello Cards by Mona Toth and Franci Vignoli

Finally I added some sparkle clear sequins and stamped my sentiment. I'm so happy with this clean and simple card, it makes me dream about beautiful beaches and the lovely time of summer vacations!

Hope you like it too and thank you so much for stopping by today!

Sunny Studio Supplies Used:

Sunshine Word Die
Sunshine Word Die
Shop at:
Sunny Studio
Frilly Frames Stripes Die
Shop at:
Sunny Studio
Hawaiian Hibiscus Stamps
Shop at:
Sunny Studio
Hawaiian Hibiscus  Dies
Hawaiian Hibiscus Dies
Shop at:
Sunny Studio

Tuesday, June 11, 2019

Seasonal Trees Cards with Angelica and Juliana

Hi friends, Angelica here with a card using the Seasonal Trees stamp set. Since the weather is finally turning warm, I decided to use the palm tree to make a fun summer beach scene.

Sunny Studio Stamps: Seasonal Trees Sending Sunshine Coastal Cuties Pirate Pals Cards by Angelica Conrad and Juliana Michaels

I paired the palm tree with a little girl from the Coastal Cuties stamp set. I used the coordinating dies for the tree and the girl to cut them out, then I got my scene ready. I masked off a thin line to blend a blue ocean. I masked the ocean and blended a light blue sky. Next, I used a Ranger Emboss It Pen to to add embossing ink where I wanted sand. I poured Stampendous Chunky Metallic Seasonings embossing enamel over the embossing ink, and melted it with my heat tool.

Sunny Studio Stamps: Seasonal Trees Sending Sunshine Coastal Cuties Pirate Pals Cards by Angelica Conrad and Juliana Michaels

For the card front, I embossed white card stock using the Sunburst Embossing folder. I die-cut a Rectangle Fancy Frame out of green pattern paper from the Surprise Party Paper Pack. I trimmed the beach scene down, and attached the frame. I adhered the the scene to the card front, then added the colored images with foam squares. I stamped and white heat-embossed a sentiment from Sending Sunshine stamps onto yellow card stock, and added it to the card front. I added the card front to an A2 size card base to finish the card.

Sunny Studio Stamps: Seasonal Trees Sending Sunshine Coastal Cuties Pirate Pals Cards by Angelica Conrad and Juliana Michaels

I hope I have given you some ideas for the Seasonal Trees stamp set. This is a set that you will be Abe to use all year long. That's all that I have for today. Thanks for stopping by!

-------------------------------------------------

Hello friends! It's Juliana here to share an argh-mazing card with you today. Pirate Pals is one of my all time favorite Sunny Studio Stamp Sets and I couldn't resist pairing it with the palm tree from Seasonal Trees Stamps.

Sunny Studio Stamps: Seasonal Trees Sending Sunshine Coastal Cuties Pirate Pals Cards by Angelica Conrad and Juliana Michaels

To get started I stamped images from Pirate Pals Stamps, Seasonal Trees Stamps, and Sending Sunshine Stamps with Memento Ink and then colored them with Copic Markers. Once the coloring was finished, I die cut them using the coordinating Pirate Pal Dies, Seasonal Trees Dies and Sending Sunshine Dies. Once I had all of the images stamped and colored, I realized I would need a larger than normal card to create the scene I had in my head. I settled on a nontraditional size and ended up with a card that is 3.5 x 7.75 inches. You of course can adjust this as needed to fit the scene you create.

Sunny Studio Stamps: Seasonal Trees Sending Sunshine Coastal Cuties Pirate Pals Cards by Angelica Conrad and Juliana Michaels

For the beach, I trimmed a piece of kraft cardstock to 3.5 x 7.75 inches and then took one of the sloped borders from the Woodland Border Dies and die cut it. I then took the other border lined it up with the end of the first cut, used Therm O Web Purple Tape to hold it in place and die cut the rest of the piece. By doing this, I was able to create a longer border cut that would fit my card size.

Sunny Studio Stamps: Seasonal Trees Sending Sunshine Coastal Cuties Pirate Pals Cards by Angelica Conrad and Juliana Michaels

Next I cut a piece of Bristol Smooth Paper to 3.25 x 7.5 inches and ink blended the top portion with Distress Oxide in Salty Ocean using a foam applicator. Once this was complete, I adhered the sandy beach and the card was ready for me to start creating my scene. I layered all of the images along the beach and used double sided foam adhesive to pop up the pirates and the parrot for added dimension.

Sunny Studio Stamps: Seasonal Trees Sending Sunshine Coastal Cuties Pirate Pals Cards by Angelica Conrad and Juliana Michaels

I also added in some die cut clouds using the Fluffy Clouds Dies and I tucked those in behind the other images. I waited to do this until the very end, so I could place the clouds exactly where I wanted them between the stamped images. If you decide to do this too, make sure you don't fully adhere all of your images until the clouds are in place.

Sunny Studio Stamps: Seasonal Trees Sending Sunshine Coastal Cuties Pirate Pals Cards by Angelica Conrad and Juliana Michaels

To complete the card, I stamped the Ahoy Matey sentiment from the Pirate Pals Stamp. I hope you enjoyed this bit of argh-mazing inspiration using the Seasonal Trees and Pirate Pals Stamps. Thanks so much for stopping by today!

Sunny Studio Supplies Used:

Pirate Pals Dies
Pirate Pals Dies
Shop at:
Sunny Studio
Pirate Pals Stamps
Pirate Pals Stamps
Shop at:
Sunny Studio
Fancy Frames- Rectangles
Shop at:
Sunny Studio
Coastal Cuties Stamps
Shop at:
Sunny Studio
Coastal Cuties Dies
Coastal Cuties Dies
Shop at:
Sunny Studio
Seasonal Trees Stamps
Shop at:
Sunny Studio
Seaonal Trees Dies
Seaonal Trees Dies
Shop at:
Sunny Studio
Sending Sunshine Stamps
Shop at:
Sunny Studio
Sending Sunshine Dies
Shop at:
Sunny Studio
Surprise Party 6x6 Paper
Shop at:
Sunny Studio

Monday, June 10, 2019

Best Fishes Cards with Leanne and Eloise

Hello crafty friends! Leanne here and I’m swimming by to share an under the sea themed shaker card. This card was simple and easy to create with the help of the Best Fishes stamp set and a Stitched Oval die. I made my own stencil to create a wave pattern to help set the scene. 

Sunny Studio Stamps: Best Fishes Catch A Wave Woodland Borders Best Wishes Punny Cards by Leanne West and Eloise Blue

I started by stenciling the wave pattern onto a piece of light blue card stock that is trimmed slightly narrower than A2 width. I made the stencil using the Catch A Wave dies and copy paper. I used Mermaid Lagoon Distress Ink and a blending brush to achieve the tone on tone pattern. Next, I used one of the Stitched Oval dies to create the shaker well and filled it with various aqua colored sequins and micro beads.  

Sunny Studio Stamps: Best Fishes Catch A Wave Woodland Borders Best Wishes Punny Cards by Leanne West and Eloise Blue

I created the sandy bottom out of kraft card stock and a Woodland Border die. I splattered this piece with white and brown paint to give it a more realistic look. I Copic colored several images from the Best Fishes stamp set and die cut with the coordinating Best Fishes dies. I adhered the images directly onto the acetate window with glue dots.  

Sunny Studio Stamps: Best Fishes Catch A Wave Woodland Borders Best Wishes Punny Cards by Leanne West and Eloise Blue

I added just a few of the same sequins I used inside the shaker to the outside around the scene. To complete the card I added the greeting which I trimmed into a thin strip and tucked under the shark’s fin. I think the theme and color scheme of this card is very gender neutral and the Best Fishes greeting is multi-purpose. These type of cards are so handy to have when we need one at a moment’s notice.  

-------------------------------------------------

Hello friends, Eloise here and today I’m sharing a card using the Best Fishes Stamp Set. This is definitely one of my favourites from the release, I’ve used it so many times and honestly ocean themed stamp sets are my most used ones.

Sunny Studio Stamps: Best Fishes Catch A Wave Woodland Borders Best Wishes Punny Cards by Leanne West and Eloise Blue

I started off with stamping and colouring my images in with Copic Markers. I then cut them out. For my background, I ink blended over a curved stencil with Tumbled Glass and Scattered Straw Ink to create an under the sea background. Once it was ink blended, I splattered some water on the background and dried it with a heat tool.

Sunny Studio Stamps: Best Fishes Catch A Wave Woodland Borders Best Wishes Punny Cards by Leanne West and Eloise Blue

(Copic Markers Used: W00, W0, W1, W3, W4, W5, W7, W9 / YR00, YR02, YR12, YR18 / Y11, Y13, Y15, YR23 / R00, R20 / 0 / YG01, YG23, YG17, YG67 / Y21, Y31, YR12, YR24 / E42, E43, E44, E47 / RV91, RV93, RV95, RV99)


Sunny Studio Stamps: Best Fishes Catch A Wave Woodland Borders Best Wishes Punny Cards by Leanne West and Eloise Blue

I then added foam tape onto the backs of my images and adhered them into place on my background. For my sentiment, I stamped the ‘Best Fishes’ from the stamp set, in black ink on the top right-hand corner. Lastly, I adhered my panel onto a light grey card base.

Thanks so much for stopping by today and I’ll see you all next time. 

Sunny Studio Supplies Used:

Woodland Borders Dies
Shop at:
Sunny Studio
Stitched Oval Dies
Stitched Oval Dies
Shop at:
Sunny Studio
Catch A Wave Dies
Catch A Wave Dies
Shop at:
Sunny Studio
Best Fishes Stamps
Best Fishes Stamps
Shop at:
Sunny Studio
Best Fishes Dies
Best Fishes Dies
Shop at:
Sunny Studio