Thursday, January 24, 2019

Chubby Bunny Cards with Vanessa and Anja

Hello everybody! Vanessa here today with a z-fold card using the cute Chubby Bunny set. These little bunnies are adorable, I wanted to put a lot of them onto my card. A z-fold card offers plenty of space to do so.

Sunny Studio Stamps: Chubby Bunny Rustic Winter Dies Easter Themed Interactive Card by Vanessa Menhorn

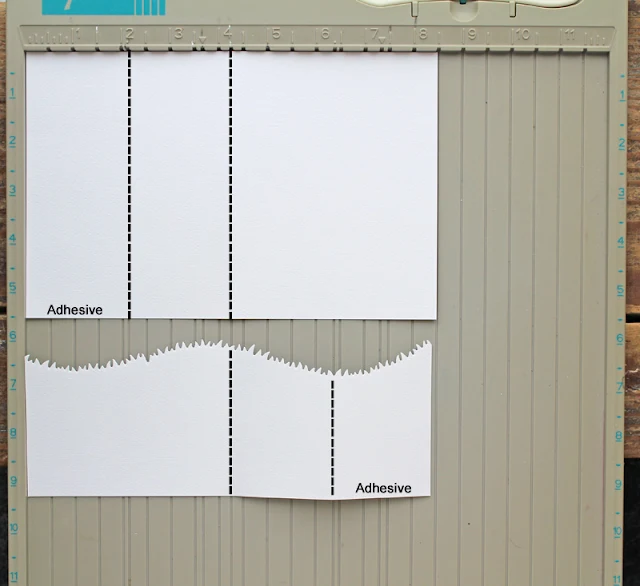
For the base, I trimmed my cardstock pieces like this:

Sunny Studio Stamps: Chubby Bunny Rustic Winter Dies Easter Themed Interactive Card by Vanessa Menhorn

As you can see, I trimmed the upper panel 5 1/2 x 8 1/2 and scored it at 2 1/8 and 4 1/4. For the grass layer, I scored the panel at 4 1/4 and 2 1/8 from the other side. To assemble the card, I put on the adhesive as shown in the pic. 

Sunny Studio Stamps: Chubby Bunny Rustic Winter Dies Easter Themed Interactive Card by Vanessa Menhorn

But before assembling, I used a cloud stencil on the base to create the sky, then I die-cut the birch trees and leaves from Rustic Winter, colored them with Copics and adhered them. 

Sunny Studio Stamps: Chubby Bunny Rustic Winter Dies Easter Themed Interactive Card by Vanessa Menhorn

Now I trimmed a strip of cardstock, inked it with green Distress Oxide ink, die-cut a grass edge and adhered it.

Sunny Studio Stamps: Chubby Bunny Rustic Winter Dies Easter Themed Interactive Card by Vanessa Menhorn

I stamped all the images onto white cardstock, colored them with Copics and adhered them, raising some with foam tape.

Sunny Studio Stamps: Chubby Bunny Rustic Winter Dies Easter Themed Interactive Card by Vanessa Menhorn

As you can see, I added two more strips of grass into the square to add more dimension here. And when folded, the card fits into an envelope easily.

I'll be trying to provide you with a video of this card in action, so you might like to check my Instagram account for it! Thanks for stopping by today!

-------------------------------------------------------------

Hello everyone, Anja here and I'm happy to be back again with a new card showcasing the adorable Chubby Bunny Stamps. I just love their cute little faces!


Sunny Studio Stamps: Chubby Bunny Window Trio Square Dies Easter Themed Card by Anja Bytyqi

At first, I created an A2 landscape top-folding card base from white cardstock. I used the Window Trio Square Dies to cut three openings into a panel of lilac cardstock. I also chose a stitched scalloped die to create a decorative border.

Next, I took a piece of Strathmore Bristol Smooth Cardstock and marked where the windows would be with a pencil. I did some light handed ink blended with Distress Oxide Inks (Spun Sugar, Milled Lavender, Tumbled Glass). I picked one of the purple Gingham Pastels 6x6 Papers, cut it to size and adhered it at the bottom of my card base and popped up the window panel with foam tape.

Sunny Studio Stamps: Chubby Bunny Window Trio Square Dies Easter Themed Card by Anja Bytyqi

I stamped the bunnies, sentiment banner and a little flower in Memento Tuxedo Black Ink and colored them with Copic Markers (colors listed below). I used the coordinating dies to cut the images out and adhered them with foam squares.

(Copic colors used - Aqua: BG10, BG11, BG32, BG45; Green: G40, YG11, YG13; Grey: C00, C0, C1, C3; Pink: RV10, RV02, RV55; Purple: V000, V01, V12, V15)

Thank you so much for stopping by! Have a fabulous day!

Sunny Studio Supplies Used:

Window Trio- Square Die
Shop at:
Sunny Studio
Rustic Winter Dies
Rustic Winter Dies
Shop at:
Sunny Studio
Gingham Pastels 6x6 Paper
Shop at:
Sunny Studio
Chubby Bunny Stamps
Chubby Bunny Stamps
Shop at:
Sunny Studio
Chubby Bunny Dies
Chubby Bunny Dies
Shop at:
Sunny Studio

Wednesday, January 23, 2019

Love Monkey Cards with Franci and Mona

Hello there! Franci here with you today with a love themed card feat the new adorable Love Monkey set.

Sunny Studio Stamps: Love Monkey Staggered Circle Dies Monkey Themed Love Card and Franci Vignoli

First, I created a standard card base out of white cardstock. Then I cut out a coordinating panel from white cardstock as well and I die cut some circles out of it using the new Staggered Circles die.

I used the partial die cutting technique, leaving out of my Big Shot sandwich the circles I didn't want to cut out. I position my die how I want it on my card and adjust the last clear plate on top to leave out the parts that I don't want to be cut out. I put some washi tape to keep everything in place and pass through the die cutting machine.

Sunny Studio Stamps: Love Monkey Staggered Circle Dies Monkey Themed Love Card and Franci Vignoli

I backed all the windows up with some lovely papers from the new paper sets and I stamped, colored and die cut all the images with the coordinating dies.

I glued them all down with liquid glue and foam tape, stamped the sentiment and the little hearts all around. Finally I added some details with a white gel pen and this clean and simple love themed card is complete! 

Hope you like this and thank you so much for stopping by today :)

--------------------------------------------------------

Hi crafty friends! It's Mona here and today I am going to show you an interactive card with the gorgeous Love Monkey Stamp Set!

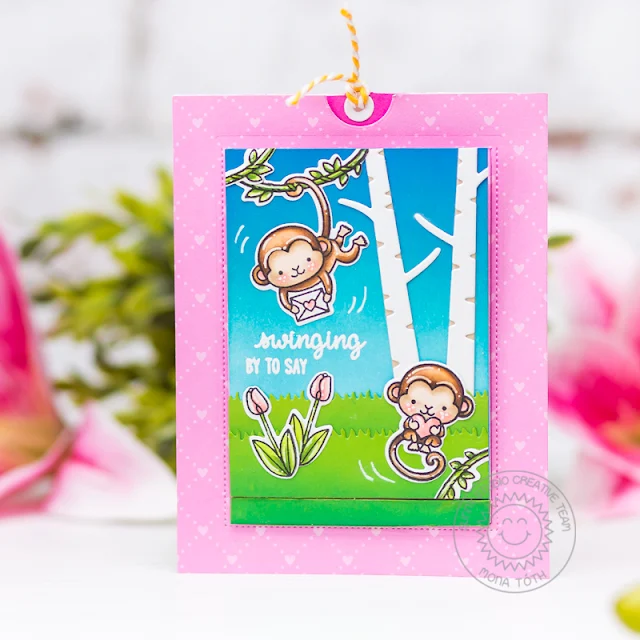
Sunny Studio Stamps: Love Monkey Sliding Window Dies Rustic Winter Monkey Themed Hello Card and Mona Toth

I started the card making with die-cutting. I picked a beautiful pink patterned paper from the Flirty Flowers 6x6 Cardstock and run it through my Die-Cut machine with the Sliding Window Dies. You can find a video tutorial at Sunny Studio Stamps Youtube Channel on how to use this amazing die. 

Sunny Studio Stamps: Love Monkey Sliding Window Dies Rustic Winter Monkey Themed Hello Card and Mona Toth

When it was done I built up the scene. I made tree Die-cuts with the Rustic Winter Dies and fresh grass with Comic Strip Everyday Dies.

Sunny Studio Stamps: Love Monkey Sliding Window Dies Rustic Winter Monkey Themed Hello Card and Mona Toth

After this I made the backgrounds of my scene with ink blending. For outside I cut a 3x4" size cardstock and blended with Blueprint Sketch, Mermaid Lagoon and Tumbled Glass Distress Oxide Inks. I also blended the Die-cut grasses with Twisted Citron and Lucky Clover Distress Oxides. I blended the inside "secret" background with Spun Sugar and Picked Raspberry Distress Oxide Inks. 

Sunny Studio Stamps: Love Monkey Sliding Window Dies Rustic Winter Monkey Themed Hello Card and Mona Toth

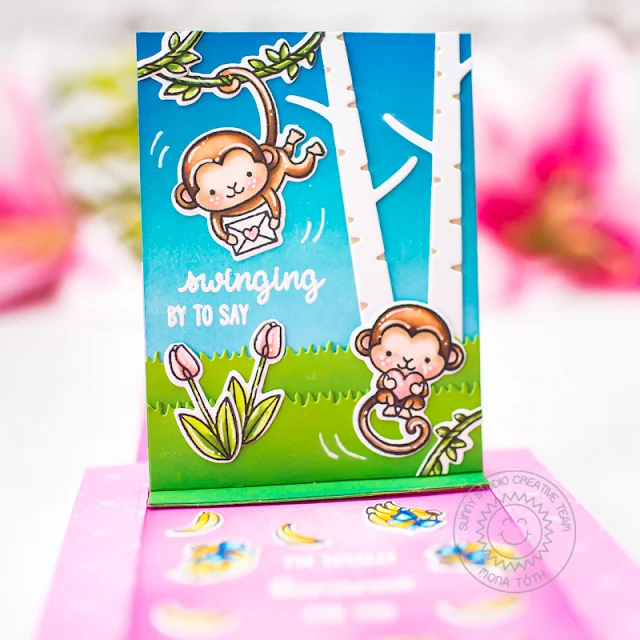
After heat embossing the sentiments I started the stamping and coloring. I stamped the images from the Love Monkey Stamp Set and cute tulips from Spring Greetings stamp set. These monkeys are absolutely super cute! 


Sunny Studio Stamps: Love Monkey Sliding Window Dies Rustic Winter Monkey Themed Hello Card and Mona Toth

I stamped monkeys and lots of bananas to my hidden panel. I colored them with Copic Markers. After the coloring I used the coordinating dies to cut the images and added highlights with Signo Uniball white pen.

(Used Copic Markers: Y11, Y15, Y19, E0000, E000, E30, E33, E35, E42, E47, YG01, YG03, YG17, YG67, B000, B05, B18, R20, R32)

Sunny Studio Stamps: Love Monkey Sliding Window Dies Rustic Winter Monkey Themed Hello Card and Mona Toth

In the end I styled my card and adhered everything together. Thank you very much for reading through my post, I hope that you have enjoyed it and I have inspired you! If you like my creations let's be friends on Instagram. :)

Sunny Studio Supplies Used:

Comic Strip Everyday Dies
Shop at:
Sunny Studio
Sliding Window Dies
Sliding Window Dies
Shop at:
Sunny Studio
Rustic Winter Dies
Rustic Winter Dies
Shop at:
Sunny Studio
Flirty Flowers 6x6 Paper
Shop at:
Sunny Studio
Love Monkey Stamps
Love Monkey Stamps
Shop at:
Sunny Studio
Love Monkey Dies
Love Monkey Dies
Shop at:
Sunny Studio
Spring Greetings Stamps
Shop at:
Sunny Studio
Spring Greetings Dies
Shop at:
Sunny Studio
Staggered Circles Die
Shop at:
Sunny Studio