Wednesday, October 28, 2015

Bright Birthday Smiles Balloon Card with Audrey

Hello there!  Audrey here with a bright and happy birthday card using the Birthday Smiles stamp set and the  Fishtail Banners dies!  

                      
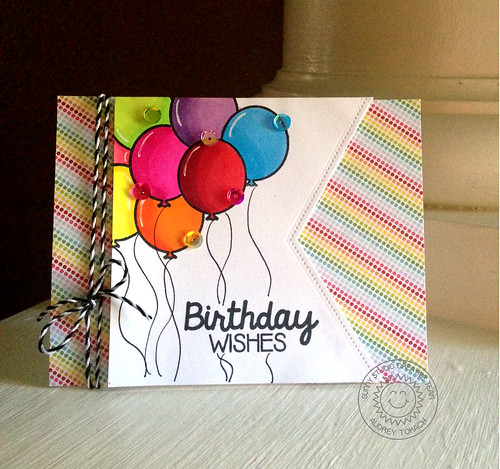
I started off by die-cutting a piece of white cardstock with the Fishtail banners dies and chose to use the little dotted edge die from the set.  Then on that same panel, I stamped the open line balloon image, masked it off and stamped again, repeating this process until I was happy with how my bunch looked.  

I colored the balloons with my Copic markers and used a white gel pen to add highlights to each balloon.  I stamped the sentiment near the bottom right of the banner and then hand drew balloon strings with a black marker (but there is a string image in the stamp set if you prefer).  I cut a landscape orientated card base and added some brightly colored patterned paper to coordinate with my balloons, popping the panel up on the card base.  I added some twine and tied a bow on the left side of the card base, adding a fun scattering of sequins to finish things off.


Sunny Studio Birthday Wishes


That's all for me today!  I hope you enjoyed my bright birthday card!  Be sure to stop back again tomorrow for lots more inspiration from the design team! :)

Tuesday, October 27, 2015

Birthday Smiles Watercolor Ice Cream & Cherry Cards with Heidi

Hello everybody, Heidi here! This week we are introducing the "Birthday Smiles" stamp set, so I created this birthday card which was very simple to make, so I hope you will give it a try!
Let me show you the card and tell you a little bit more about it.


I created a watercolor wash for the background  using similar colors as those that I used for the scoops of ice cream.  I stamped the sentiment on to the left bottom corner of the right--These nice and bold sentiments can be stamped directly on the card panel (I love that).  I stamped and colored the cone and the scoops of ice cream using Copic Markers. I fussy cut the images and I popped them up on the right side of the card, on top of the watercolor wash. 

To finish the card I added a cherry from the "Birthday smiles" stamp set and some random sequins, picking up the colors of the card.

While I had my supplies out on my desk I created another quick card using the same cherry stamp from the set along with the fishtail banner dies to create a pennant for my heat embossed sentiment.


The adorable stamp set used for both of today's cards is available at the Sunny Studio Stamps shop, and it's a most have to create cute and fun card for birthdays or just to simply send a happy message.

Thanks so much for stopping by.  Don't forget to tag your projects on social media using the #SunnyStudioStamps so you can be featured on our Sunny Saturday Share.

Have a lovely day!

Monday, October 26, 2015

Snow Kissed Penguin Winter Birthday Card with Melissa

Hi everyone Melissa here. Today I have a card to share with you using the Birthday Smiles stamp set and the Fishtail Banner dies. I think the Birthday smiles set is so versatile and fun, I especially love the balloons and the ice-cream (I will have to be sure to use that in a future card!). 


To create this card I first marked out a rectangle on a piece of card, this would be the area for my scene. I die-cut a piece of masking paper and laid it where I wanted the snowy hill to be. I then stamped the little hearts and dots from the Birthday Smiles set onto the background with Versamark ink also adding some smaller dots with the Versamarker. I added white embossing powder and heat embossed those onto the background. 

After I had done that I added the inky sky. I did this by blending Faded Jeans, Chipped Sapphire and a Black Soot Distress Inks. I then stamped the balloon and the little penguin from Snow Kissed onto some white card, colored them with Copic markers and fussy cut them. I stuck the balloon and the penguin onto the card and added a string to have the penguin holding the balloon. 


I stuck the background panel onto a card with some patterned paper and then laid over top a piece of card with a rectangle die cut out of the middle.  I like creating scenes this way because I think it adds some dimension to the card. To finish it off I cut a strip of white card and die cut both ends using one of the fishtail banner dies. I then added the sentiment in silver embossing power. 

That finishes up the card for today. I hope you enjoyed it! Thanks for stopping by!

Supplies:


Saturday, October 24, 2015

Sunny Saturday Share: Customer Fall & Winter Cards


Hello there!  I'm popping in today with another Sunny Saturday Share with some darling cards uploaded to our Flickr group by some of our talented customers.  :)

Up first we have a gorgeous card by Francine Vuilleme using our Happy Home set.  I love her beautiful coloring with the rolling hills and sky that fades into the background.  Her house really pops and I am smitten.


KimberlyRae at Kreations by KimberlyRae also shared these sweet cards this past week using our Harvest Happiness stamp set.  :)


I absolutely adore this darling card set and the fun way she made the envelopes match with some stamping too!  :)


Joyce Erb has also created a couple of darling cards using our penguins from the Bundled Up & Snow Kissed stamp sets which she shared with us on facebook page (You can see both her cards on her blog here).  I love all the sparkle and snowflakes she added to make her card shine!  :)


I hope you will join these ladies by uploading your own creations using our stamps and dies to the Sunny Studio Flickr Group or share them with us on our facebook page.  Please don't be shy or worry about not being good enough.  I really want to see what you've made and you never know... You just might see your lovely projects featured on our next Sunny Saturday share.  ;)

Friday, October 23, 2015

Furever Friends Purrfect Birthday Card and Tag with Marion

Hello. It's Marion here with a fun way to use the Furever Friends stamp set and its coordinating dies. If you struggle with colouring animal images or maybe you are just short on time, this technique could be one for you to try.


To begin with, I cut a panel of watercolor paper and painted a gradient of colour using Distress inks (from the top down, Barn Door, Festive Berries, Ripe Persimmon, a mixture of Ripe Persimmon/Mustard Seed and Mustard Seed). As I wanted the watercolour panel to be quite vibrant, I added several layers of each colour, making sure to heat set the panel between each layer.

I then stamped and die cut the cat from the Furever Friends stamp set from the same watercolour paper and then adhered it to the card without adding any colour. I love the contrast of the white cat against the vibrant background.  To finish off both the card and tag, I white heat embossed a sentiment onto black card stock.


Supplies used:
Thanks for stopping by today,

Marion

Sunny Studio Supplies Used:

Furever Friends Dies
Shop at:
Sunny Studio
Furever Friends Stamps
Shop at:
Sunny Studio