Showing posts with label Stitched Semi-Circle Dies. Show all posts

Monday, November 14, 2022

Joyful Holiday Paper Focused Cards with Cathy and Bobbi

Hey friends! Cathy here today with a card featuring some of my favorite papers from the Joyful Holiday Paper. I just love the beautiful bold poinsettia prints in this paper pack and the colors are so fun and fresh for the Holidays!

Sunny Studio Stamps: Joyful Holiday Paper Focused Christmas Card by Cathy Chapdelaine (featuring Icing Border Dies, Frilly Frame Dies, Rustic Winter Dies, Reindeer Games, Classy Christmas)

To start, I cut the pink poinsettia paper 3” x 5 1/2", centered a Stitched Semi-Circle Die along the bottom 5 1/2" edge and die-cut the paper. I adhered this piece to the top of an A2 card base. I die-cut the gray snowflake paper using the same die. Before I adhered it to the card front, I die-cut a tree from the Rustic Winter Dies from white and dark gray cardstock and adhered the tree to the left side trimming the excess along the top edge of the semi-circle.

Next, I cut the pink polka dot paper 1” x 5 1/2" and adhered it to the bottom of the card front. To create the double scalloped edges, I cut a piece of white glitter cardstock and dark brown cardstock 1 “ x 5 1/2" and die-cut the bottom edge of each piece using the Icing Border Dies. I overlapped the pieces and adhered them across the bottom of the semi-circle. For extra interest, I cut a piece of gray cardstock 5/8” x 5 1/2" and die-cut along the center of the strip using an Frilly Frame Eyelet Lace Die. I adhered this across the top edge of the glitter cardstock. I love that little bit of extra detail.

Sunny Studio Stamps: Joyful Holiday Paper Focused Christmas Card by Cathy Chapdelaine (featuring Icing Border Dies, Frilly Frame Dies, Rustic Winter Dies, Reindeer Games, Classy Christmas)

I stamped the cute reindeer from the Reindeer Games Stamps on Neenah Classic Crest 80lb solar white cardstock, colored it with Copics and die-cut it using the coordinating dies. The large poinsettia from the Classy Christmas Stamps goes beautifully with the poinsettia paper and I decided to fussy cut the image and pop it up with foam tape to really make it stand out.

To finish, I die-cut the gray/white plaid paper using the tag die from the Stitched Semi-Circle Dies, heat embossed the sentiment and added a Pure White Jewel over the hole in the tag.

I hope you enjoyed and thanks for stopping by today! For more inspiration, please visit my blog www.inkredibleadventures.com and you can also find me on Instagram as @cathy.chapdelaine.

---------------------------------------------------

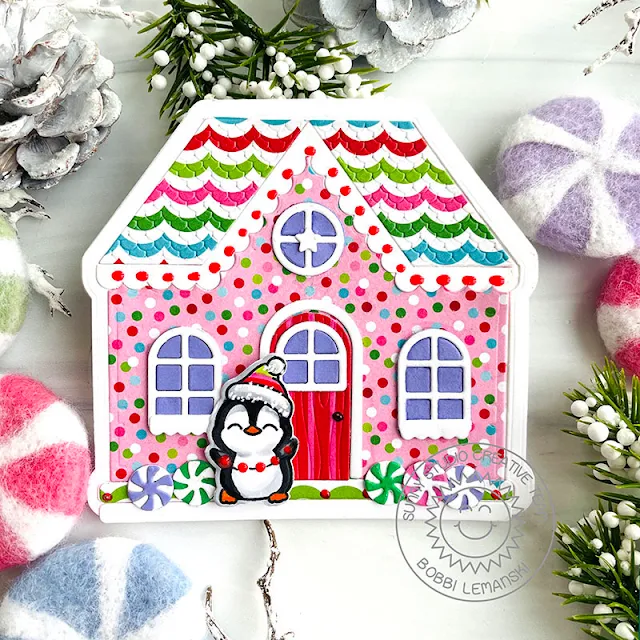
Hello crafty friends. It’s Bobbi here and I’m sharing a few peppermints and shiny candies on this cute gingerbread house covered in fun holiday papersI’m using the Gingerbread House dies with the new Joyful Holiday pattern paper pack and the cute penguins from the Penguin Party stamp set and dies. Inside, I also used one of the sentiments from the Holiday Greetings stamps and dies.

Sunny Studio Stamps: Joyful Holiday Paper Focused Christmas Card by Bobbi Lemanski (featuring Gingerbread House Dies, Penguin Party, Holiday Greetings)

To make this gingerbread house, I cut the elements from the vibrant and coordinating paper from the Joyful Holiday Paper pack and Neenah 80lb. Classic Crest Solar White cardstock for the white elements. I also used a blue-violet color cardstock for the window insets and green and pink for the peppermints, too.  To make the white card base, I scored an 8-1/2″ X 5-1/2″ piece of white cardstock and placed the largest house die on top of the folded cardstock, ensuring the top cutting line (i.e., the rooftop line) was above the folded edge. This keeps the fold line intact and creates a scored card base.

Sunny Studio Stamps: Joyful Holiday Paper Focused Christmas Card by Bobbi Lemanski (featuring Gingerbread House Dies, Penguin Party, Holiday Greetings)

In addition to adding the many cute accent elements from the gingerbread die set, I also applied Pearl Pen (similar to Nuvo Drops) to add red, glossy candies around the roof line and on the bottom. Next, I stamped and colored a cute penguin using the Penguin Party stamp set and dies. I colored the penguin using Copic Sketch markers in 100, C7, C5, C3, C1, YR68, YR09, RV09, RV55 and YG03. I added a garland of red candies between the penguin’s hands, too. I used a white gel pen to add extra “fluff” to the penguin’s Santa hat.

Sunny Studio Stamps: Joyful Holiday Paper Focused Christmas Card by Bobbi Lemanski (featuring Gingerbread House Dies, Penguin Party, Holiday Greetings)

Inside the card, I added an outline of the pink confetti paper (cut out using the two different sizes of house outlines in the die set)two more penguins and a script phrase using the Holiday Greetings stamps and dies. I used blue ink for the script. Using my Copic markers, I added tiny confetti dots of color around the sentiment and penguins to match the pink pattern paper. I kept them tiny so that they would not bleed through the white paper. I used the following Copic Sketch markers to color the penguins: 100, C7, C5, C3, C1, YR68, YR09, RV09, RV55, RV02, R29, and YG03.


Thanks for stopping by today. If you want to see more ideas and inspiration from me, subscribe to my blog, BobbiHartDesign.com. I’ll send you updates on new posts! You can also find me on Instagram as @BobbiHartDesign and on Facebook as BobbiHartDesign.


Sunny Studio Supplies Used:

Gingerbread House Dies
Shop at:
Sunny Studio
Icing Border DIes
Icing Border DIes
Shop at:
Sunny Studio
Rustic Winter Dies
Rustic Winter Dies
Shop at:
Sunny Studio
Frilly Frames-Eyelet Lace
Shop at:
Sunny Studio
Stitched Semi-Circle Dies
Shop at:
Sunny Studio
Classy Christmas Stamps
Shop at:
Sunny Studio
Holiday Greetings Stamps
Shop at:
Sunny Studio
Holiday Greetings Dies
Shop at:
Sunny Studio
Penguin Party Stamps
Shop at:
Sunny Studio
Penguin Party Dies
Penguin Party Dies
Shop at:
Sunny Studio
Reindeer Games Stamps
Shop at:
Sunny Studio
Reindeer Games Dies
Reindeer Games Dies
Shop at:
Sunny Studio
Joyful Holiday Paper
Shop at:
Sunny Studio

Tuesday, August 30, 2022

Too Cute To Spook Cards with Isha and Kavya

Hello everyone! Isha here today sharing the Too Cute To Spook stamps and dies from the new release. I hope you might have enjoyed all the lovely cards Mendy shared last week.

Sunny Studio Stamps: Too Cute to Spook Card by Isha Gupta (featuring Stitched Semi-Circle Dies, Picket Fence Border Dies)

To start, I sponged clouds in the background using various distress inks. Die-cut this panel using the outline die of the Frilly Frame Quatrefoil. Now die-cut this panel using the Stitched Semi-Circle die. Adhere the positive to the white card base. Stamp the trees from the Too Cute To Spook stamp set using black ink to this semi-circle. Adhere vellum to this piece. Adhere the negative piece to the card base using 3d foam.

Sunny Studio Stamps: Too Cute to Spook Card by Isha Gupta (featuring Stitched Semi-Circle Dies, Picket Fence Border Dies)

Die-cut the grass from the Picket Fence Border die. Sponge distress inks in blue, teal and purple. Stamp the images, colour using copic markers. Die-cut using the coordinating dies. Adhere the images to the card. I did not stamp any sentiment, so I could stamp on the inside of the card.

Thanks for stopping by and have a nice day.

------------------------------------------------

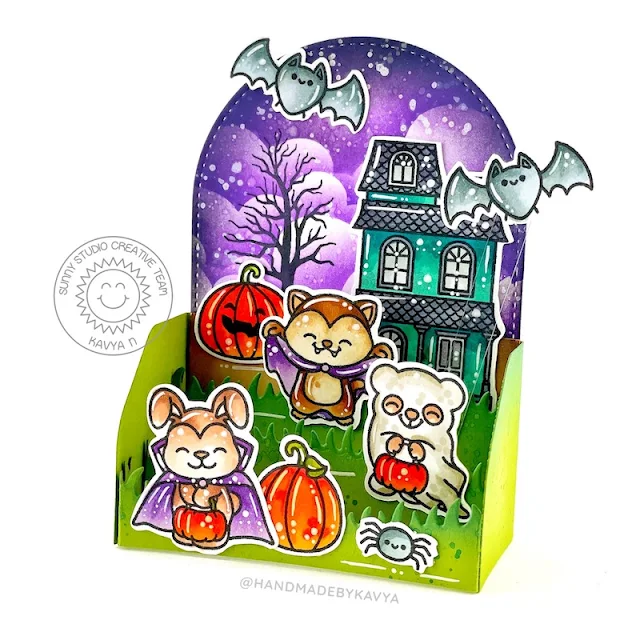
Hi folks, Kavya here. I am back on the blog with another fun project using one of my favorite stamps from the release! This is something unusual for me because I used just one stamp set! Can you believe that? I have also been hooked to interactive cards so I have been trying to find ways to repurpose existing dies in my stash to create 3D cards. 

Sunny Studio Stamps: Too Cute to Spook Card by Kavya (featuring Slimline Dies, Stitched Arch Dies)

Today’s card is a 3D box card that I made using the Stitched Arch dies. The side pieces were measured and hand cut while the grass was cut using Slimline Nature Border dies. 

Sunny Studio Stamps: Too Cute to Spook Card by Kavya (featuring Slimline Dies, Stitched Arch Dies)

For the background, I used the die cut clouds as a stencil and ink blended using shaded of purple dye ink. 

Sunny Studio Stamps: Too Cute to Spook Card by Kavya (featuring Slimline Dies, Stitched Arch Dies)

Then, I stamped and colored a bunch of images from Too Cute To Spook and added them to the card base. I also used some acetate to make a ‘floating’ bat! 

That’s it folks! I hope you liked this fun project :) Happy Crafting!

Sunny Studio Supplies Used:

Picket Fence Border Dies
Shop at:
Sunny Studio
Stitched Arch Dies
Stitched Arch Dies
Shop at:
Sunny Studio
Stitched Semi-Circle Dies
Shop at:
Sunny Studio
Frilly Frames Quatrefoil
Shop at:
Sunny Studio
Slimline Nature Borders
Shop at:
Sunny Studio
Too Cute To Spook Stamps
Shop at:
Sunny Studio
Too Cute To Spook Dies
Shop at:
Sunny Studio

Saturday, August 13, 2022

Guest Designer Spotlight: Baby Elephants Cards with Anja Bytyqi

Hi everyone, Anja here and I'm so honored to be back again as a guest designer. Today I'm featuring the absolutely adorable Baby Elephants StampsFor my first card, I created a summer scene by combining two of the elephants with the Tropical Trees Backdrop Die.

Sunny Studio Stamps: Baby Elephants Card by Anja Bytyqi (featuring Tropical Trees Backdrop Dies)

First, I created an A2 landscape card base from white heavyweight cardstock. I then die cut all the pieces for my beach scene and started on working on the background. I masked off the bottom to create a horizont and stenciled the clouds with Saltwater Taffy Distress Oxide Ink. The gradient ink blending for the water was done with Peacock Feathers, Salvaged Patina and Tumbled Glass Distress Oxide Ink.

Next, I colored the sand (Antique Linen, Frayed Burlap) and palm trees (Mowed Lawn, Rustic Wilderness, Frayed Burlap, Gathered Twigs, Black Soot) with Distress Oxide Inks as well. The sea gulls were die cut from light grey cardstock.

I stamped the elephants in Memento Tuxedo Black Ink and colored them with Copic Markers. I cut them out with the coordinating Baby Elephants Dies. The sentiment (Inside Greetings Birthday Stamps) was stamped in VersaMark Ink onto a turquoise cardstock strip and heat embossed in white.

Finally, I assembled the scene by adhering the die cuts and images. I layered two of the white stitched frames on top of each other for a bit of dimension.

Sunny Studio Stamps: Baby Elephants Card by Anja Bytyqi (featuring Stitched Semi-Circle Dies, Frilly Frame Dies, Slimline Dies)

Of course, I also had to make a Baby card with the sweet elephant sleeping in the clouds.

I started off with a lilac A2 card base and picked the purple starry patterned paper from the Surprise Party 6x6 Paper Pack. I die cut it with the full-size A2 stitched rectangle die from the Frilly Frames Quatrefoil Dies set. To create a window opening, I used the second largest of the Stitched Semi-Circle Dies.

For the purple night sky background, I did some circular ink blending with Distress Oxide Inks (Villainous Potion, Wilted Violet and Milled Lavender). I used the cloudy border from the Slimline Nature Borders Dies set and cut it from white cardstock. I added Tumbled Glass Distress Oxide Ink to the top edge.

Next, I stamped the images in Memento Tuxedo Black Ink and colored them with Copic Markers. I cut them out with their matching dies. I arranged and glued down everything behind the semi-circle window and popped up the starry patterned paper panel with foam tape.

The sentiment was stamped in VersaMark Ink onto a black cardstock fishtail banner and I heat embossed it with white embossing powder. I adhered it below the elephant image to finish off my card.

Thank you so much for stopping by! Have an amazing weekend!

Sunny Studio Supplies Used:

Surprise Party 6x6 Paper
Shop at:
Sunny Studio
Stitched Semi-Circle Dies
Shop at:
Sunny Studio
Frilly Frames Quatrefoil
Shop at:
Sunny Studio
Slimline Nature Borders
Shop at:
Sunny Studio
Inside Greetings Birthday
Shop at:
Sunny Studio
Baby Elephants Stamps
Shop at:
Sunny Studio
Baby Elephants Dies
Baby Elephants Dies
Shop at:
Sunny Studio
Tropical Trees Backdrop
Shop at:
Sunny Studio

Tuesday, May 17, 2022

Wedded Bliss Cards with Kavya and Isha

Hi folks! Kavya here with another fun project to share with you all :) Today’s card shows you a fun way to revisit some old stamps in your stash to create a fun wedding card.

Sunny Studio Stamps: Wedded Bliss Card by Kayva (featuring Seasonal Trees, Scenic Route, Heart Bouquet, Cruising Critters)

I first started off by creating my background. I ink blended the sky using Antique Linen and Victorian Velvet. For the land, I used a strip of Linen colored cardstock. Then, I stamped and colored images from Wedded BlissSeasonal TreesScenic Route stampsHeart Bouquet and the car portion of Cruising Critters

Sunny Studio Stamps: Wedded Bliss Card by Kayva (featuring Seasonal Trees, Scenic Route, Heart Bouquet, Cruising Critters)

Finished it off with a fence from Scalloped Fence dies a sentiment from Wedded Bliss and you are done! 

That’s it folks! I hope you liked this fun card :) Happy crafting!

-----------------------------------------

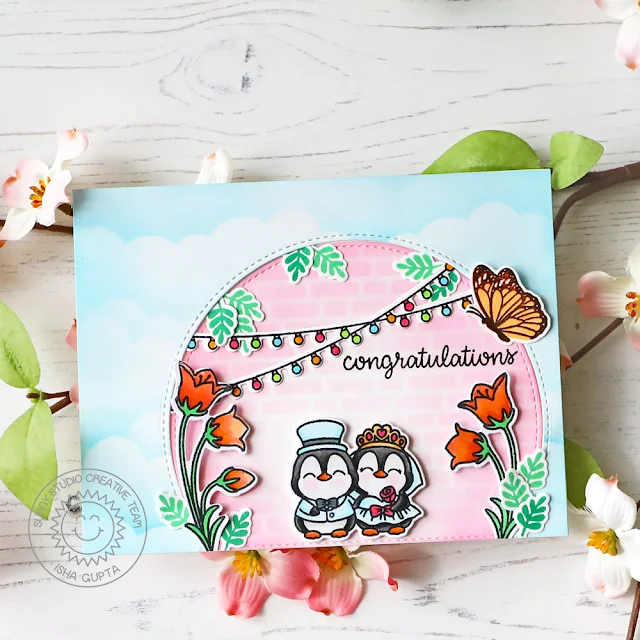
Hello everyone! Isha, here today with a sweet card featuring the Wedded Bliss Stamps and dies. It's such a cute penguin couple. It reminds me of the weddings happening in the old castles.

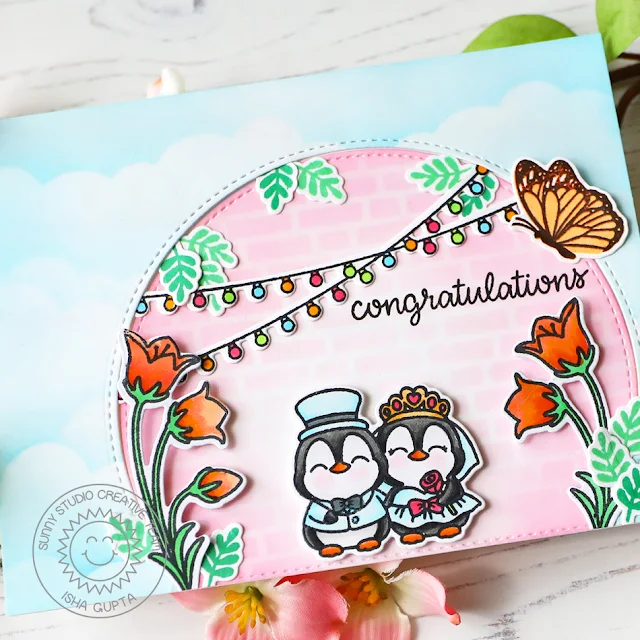
Sunny Studio Stamps: Wedded Bliss Card by Isha Gupta (featuring Stitched Semi-Circle Dies, Inside Greetings, Scenic Route, Garden Fairy)

I started by creating the cloud background by sponging tumbled glass distress oxide ink through the cloud stencil. I then die-cut the semi circle from the Stitched Semi Circle dies, sponged kitsch flamingo distress oxide ink and then added some more ink through the brick stencil. Next, I stamped the images, coloured and die-cut them.

Sunny Studio Stamps: Wedded Bliss Card by Isha Gupta (featuring Stitched Semi-Circle Dies, Inside Greetings, Scenic Route, Garden Fairy)

Wedded Bliss Stamps and Dies - Penguin Couple
Crisp Autumn Stamps and Dies - Leaves
Scenic Route Stamps and Dies - Lights
Garden Fairy Stamps and Dies - Flowers
Watering Can Stamps and Dies - Butterfly
Inside Greetings Congrats stamp - Sentiment

Adhere the images to create the scene, stamp sentiment.

Thanks for dropping by! Have a nice day.

Sunny Studio Supplies Used:

Scalloped Fence Die
Scalloped Fence Die
Shop at:
Sunny Studio
Crisp Autumn Stamps
Crisp Autumn Stamps
Shop at:
Sunny Studio
Crisp Autumn Dies
Crisp Autumn Dies
Shop at:
Sunny Studio
Seasonal Trees Stamps
Shop at:
Sunny Studio
Seaonal Trees Dies
Seaonal Trees Dies
Shop at:
Sunny Studio
Cruising Critters Stamps
Shop at:
Sunny Studio
Cruising Critters Dies
Shop at:
Sunny Studio
Scenic Route Stamps
Scenic Route Stamps
Shop at:
Sunny Studio
Scenic Route Dies
Scenic Route Dies
Shop at:
Sunny Studio
Stitched Semi-Circle Dies
Shop at:
Sunny Studio
Garden Fairy Stamps
Garden Fairy Stamps
Shop at:
Sunny Studio
Garden Fairy Dies
Garden Fairy Dies
Shop at:
Sunny Studio
Heart Bouquet Stamps
Shop at:
Sunny Studio
Heart Bouquet Dies
Heart Bouquet Dies
Shop at:
Sunny Studio
Watering Can Stamps
Watering Can Stamps
Shop at:
Sunny Studio
Watering Can Dies
Watering Can Dies
Shop at:
Sunny Studio
Wedded Bliss Stamps
Wedded Bliss Stamps
Shop at:
Sunny Studio
Wedded Bliss Dies
Wedded Bliss Dies
Shop at:
Sunny Studio
Inside Greetings Congrats
Shop at:
Sunny Studio