Thursday, August 6, 2020

Stitched Arch Die Focused Cards with Vanessa and Anja

Hello to you! Vanessa here with a card inspired by a beloved book using the Stitched Arch Dies. Do you know The Giraffe and the Pelly and Me by Roald Dahl? It was one of the first books I read to my daughter and it is still one of our favorites. This card was inspired by it:


Sunny Studio Stamps: Stitched Arch Dies Savanna Safari Love Monkey Birthday Card by Vanessa Menhorn


I first created a square card base sized 6,5x6,5 and inked the front with blue Distress Oxide ink, using a cloud stencil. Now I trimmed the kraft cardstock panel the same size and die-cut the windows from it. I stamped the images from Savanna SafariTropical ScenesLove Monkey and Fabulous Flamingos onto white cardstock, colored them with Copics, die-cut everything with the matching dies, cut the giraffe into halves and adhered the elements to the card.

Sunny Studio Stamps: Stitched Arch Dies Savanna Safari Love Monkey Birthday Card by Vanessa Menhorn

Finally, I stamped and heat-embossed the sentiment onto a strip of black cardstock and adhered it to the card with foam tape.

Wishing you all a wonderful day! Thanks for stopping by!

-----------------------------------------------


Hi everyone, Anja here. I'm a big fan of dies with stitching details and the Stitched Arch
Dies are really versatile. By hazard, I discovered that you can build a heart with them.


Sunny Studio Stamps: Stitched Arch Dies Pink Peonies Birthday Card by Anja Bytyqi

I started off with a turquoise A2 card base. From a slightly smaller white cardstock panel, I die cut the second largest arch twice using the Partial Die Cutting Technique. To get the heart shape, I rotated the die 90 degrees before running it through my die cutting machine again. For the actual heart, I die cut the arch from 3 shades of turquoise cardstock. I did some additional die cutting and inlaid the pieces into the negative white space.

Next, I stamped the floral and leaf images from the Pink Peonies set onto the same cardstock colors and some vellum using VersaMark Ink. I used the coordinating dies to cut everything out and arranged the images into a cluster right over the heart. I adhered them with liquid glue and popped up the largest peony in the center with foam tape.

I stamped the birthday sentiment from the Floating By set in VersaMark Ink onto a small cardstock strip and white heat embossed it. I adhered it with foam tape as well and added matching enamel dots and clear sequins to finish off my card.

Thank you so much for stopping by! Wishing you a beautiful day!


Sunny Studio Supplies Used:

Love Monkey Stamps
Love Monkey Stamps
Shop at:
Sunny Studio
Love Monkey Dies
Love Monkey Dies
Shop at:
Sunny Studio
Fabulous Flamingos Stamps
Shop at:
Sunny Studio
Fabulous Flamingos Dies
Shop at:
Sunny Studio
Floating By Stamps
Floating By Stamps
Shop at:
Sunny Studio
Pink Peonies Stamps
Pink Peonies Stamps
Shop at:
Sunny Studio
Pink Peonies Dies
Pink Peonies Dies
Shop at:
Sunny Studio
Savanna Safari Stamps
Shop at:
Sunny Studio
Savanna Safari Dies
Savanna Safari Dies
Shop at:
Sunny Studio
Tropical Scenes Stamps
Shop at:
Sunny Studio
Tropical Scenes Dies
Shop at:
Sunny Studio
Stitched Arch Dies
Stitched Arch Dies
Shop at:
Sunny Studio

Wednesday, August 5, 2020

Sealiously Sweet Cards with Tammy and Ana

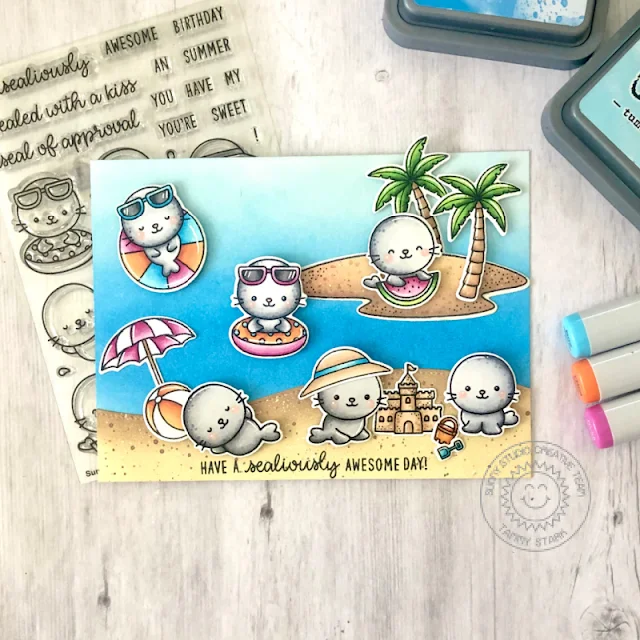
Hi Friends! Tammy here sharing this sweet card, featuring the cuties from the adorable Sealioulsy Sweet Stamp Set.

Sunny Studio Stamps: Sealiously Sweet Tropical Scenes Beach Babies Summer Themed Card by Tammy Stark

To begin, I created an A6 card, so I cut my Bristol smooth cardstock to 4 1/2 X 6 1/4". I ink blended the background with Salty Ocean and Tumbled Glass Distress Oxide inks. Next, I cut a border using the Woodland Borders Dieand used Antique Linen and Vintage Photo Distress Oxide inks to create a sandy beach. I splattered some watered down brown and white acrylic paints onto it with a paintbrush to add some interest to the sand, and attached it to the inked background.


Next, I stamped, colored with Copic markers, and die cut images from the following sets:
Sealiously SweetCoordinating Dies

Tropical ScenesCoordinating Dies

Beach BabiesCoordinating Dies


Sunny Studio Stamps: Sealiously Sweet Tropical Scenes Beach Babies Summer Themed Card by Tammy Stark


I stamped the sentiment from Sealiously Sweet in black ink along the bottom of my card. I then arranged the images onto my card, attaching some with foam adhesive for dimension. To finish my card, I adhered the completed card front to a white 4 1/2 X 6 1/4" card base.


Thanks so much for stopping by today! See you next time!!


--------------------------------------------------------

Hello friends! It’s Ana today sharing a summer card featuring super adorable Sealiously Sweet stamps and coordinating dies and Stitched Semi-Circle dies.

Sunny Studio Stamps: Sealiously Sweet Stitched Semi-Circle Dies Summer Themed Card by Ana Anderson

I wanted to create 3 summer pools for these sweet seals and decided to use the smallest Stitched Semi-Circle die for the 3 openings. I couldn’t fit all 3 on standard A2 size card, so I customized the size to fit the design. The card base measures 7.5” x 3.75” and background is about 1/8” smaller.

Once I cut the openings, I backed them with wave patterned paper from Summer Splash paper pack. I stamped the adorable seals from Sealiously Sweet set and colored them with Copic markers, then used coordinating dies to cut them out.

Sunny Studio Stamps: Sealiously Sweet Stitched Semi-Circle Dies Summer Themed Card by Ana Anderson

On a piece of black cardstock, I white heat embossed the sentiments and trimmed them into strips the same length as the width of the background. I added the embossed sentiments with foam tape, then adhered the seals also using foam tape. To embellish the card, I added Clear droplets and highlights with white gel pen and my card was finished.

Aren’t these little seals playing in the water just the cutest ever!? I just love how cute this card turned out and I hope I’ve inspired you to create little seal triple pool party as well!

Thank you so much for spending time with us today! I hope you have a wonderful week!

Sunny Studio Supplies Used:

Beach Babies Stamps
Beach Babies Stamps
Shop at:
Sunny Studio
Beach Babies Dies
Beach Babies Dies
Shop at:
Sunny Studio
Woodland Borders Dies
Shop at:
Sunny Studio
Summer Splash 6x6 Paper
Shop at:
Sunny Studio
Sealiously Sweet Stamps
Shop at:
Sunny Studio
Sealiously Sweet Dies
Shop at:
Sunny Studio
Tropical Scenes Stamps
Shop at:
Sunny Studio
Tropical Scenes Dies
Shop at:
Sunny Studio
Stitched Semi-Circle Dies
Shop at:
Sunny Studio

Tuesday, August 4, 2020

Savanna Safari Cards with Leanne and Vanessa

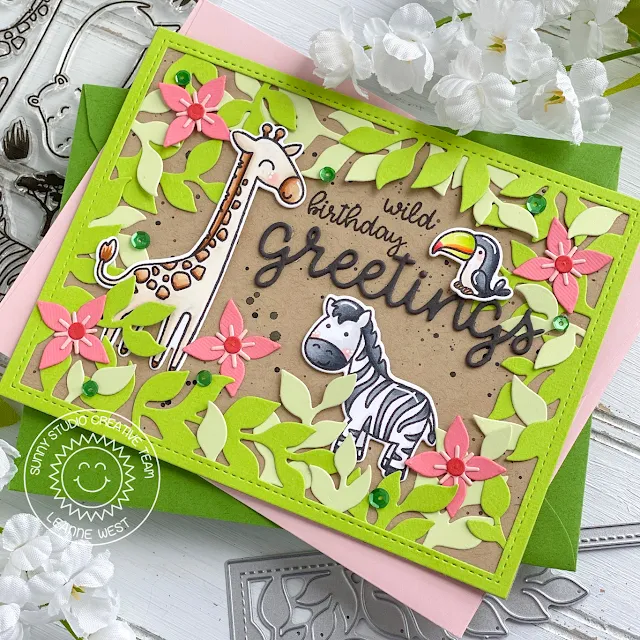
Hello friends! Leanne here and I have some wild inspiration for a fun birthday card. I have combined a leafy die cut frame with the cute animals from Savanna Safari for this gender neutral birthday card. I think it's always a win, win to have some versatile birthday cards on hand. 

Sunny Studio Stamps: Savanna Safari Botanical Backdrop Dies Birthday Card by Leanne West

I started with an A2 size kraft card base. I splattered the front with some thinned black paint. I die cut two Botanical Backdrop frames - one from bright green card stock and one from pastel green. I adhered the complete bright green frame to the card base. I cut up the pastel green one to add extra leaves and make the frame look very full. I Copic colored the giraffe, zebra, and toucan from Savanna Safari to create a fun little jungle scene. I stamped part of the sentiment and finished it off with the large die cut Greetings Word.  

Copic colors used: YR30, E30, E31, E34, E35, N0, N2, N4, N6, YG00, YG01, R00, R14, YR12, YR15

Sunny Studio Stamps: Savanna Safari Botanical Backdrop Dies Birthday Card by Leanne West
 
To embellish and enhance the scene even further, I added some die cut flowers and green sequins. The flower dies are included in the Botanical Backdrop set.  

---------------------------------------------------------

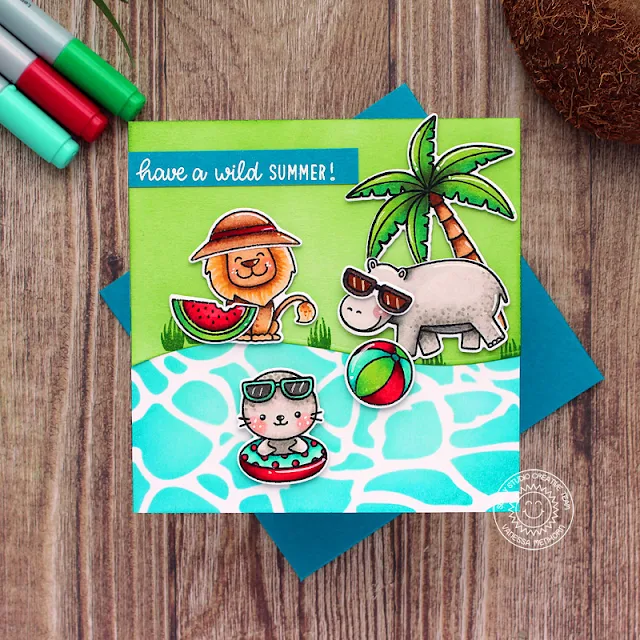
Hello to you! Vanessa here with a new summer card using the Savanna Safari Set. A lion, a hippo and a seal ... sounds like the beginning of a bad joke! But I thought they would be fun to hang out together on a card:


Sunny Studio Stamps: Savanna Safari Sealiously Sweet Summer Card by Vanessa Menhorn

I first inked the front of my card base with turquoise Distress Ink, using a stencil to create the water. Now I die cut the shore, using the Oceans Of Joy dies, from white cardstock, inked it with green Distress Ink, stamped the grass and adhered the piece to the card. I stamped the images from Savanna SafariSealiously Sweet and Seasonal Trees onto white cardstock, colored them with Copics, die-cut everything with the matching dies and adhered the elements to the card with foam tape.


Sunny Studio Stamps: Savanna Safari Sealiously Sweet Summer Card by Vanessa Menhorn

Finally, I stamped and heat-embossed the sentiment onto a strip of petrol cardstock and adhered it to the card.


I hope you like this cute party! Thank you for visiting today, see you on Thursday! 


Sunny Studio Supplies Used: 


Oceans of Joy Dies
Oceans of Joy Dies
Shop at:
Sunny Studio
Greetings Word Die
Greetings Word Die
Shop at:
Sunny Studio
Botanical Backdrop Die
Shop at:
Sunny Studio
Seasonal Trees Stamps
Shop at:
Sunny Studio
Seaonal Trees Dies
Seaonal Trees Dies
Shop at:
Sunny Studio
Savanna Safari Stamps
Shop at:
Sunny Studio
Savanna Safari Dies
Savanna Safari Dies
Shop at:
Sunny Studio
Sealiously Sweet Stamps
Shop at:
Sunny Studio
Sealiously Sweet Dies
Shop at:
Sunny Studio

Monday, August 3, 2020

Stitched Semi-Circle Die Focused Cards with Ashley and Juliana

Hello friends! It’s Ashley with my first Christmas card of the year featuring the Stitched Semi-Circle dies! I thought the semi-circles would make the perfect snow globe for a shaker card!

Sunny Studio Stamps: Stitched Semi-Circle Alpaca Holiday Scenic Route Christmas Card by Ashley Ebben

I started by stamping and masking the tree scene from Scenic Route and the mountains from Alpaca Holiday on white cardstock with Memento Tuxedo Black ink. I blended Pinkfresh Studio inks in Peach Fuzz and Coral Reef onto the sky. Then I removed the masks and colored the rest of the scene with Copics. 

I stamped the alpaca, hat, and some presents from Alpaca Holiday in Tuxedo Black. I colored everything with Copics and cut out with the matching dies, then added them to the card. 

Sunny Studio Stamps: Stitched Semi-Circle Alpaca Holiday Scenic Route Christmas Card by Ashley Ebben

I cut a piece of Holiday Cheer paper to card size then die cut with the largest Stitched Semi-Circle. I cut a base for the snow globe out of brown wood grain paper from the Amazing Argyle paper pack and added it to the bottom of the semi-circle. I stamped the sentiment from Alpaca Holiday in VersaMark ink and embossed with white. 

I added a piece of acetate to the back of the snow globe with strong double sided tape. I added two layers of foam tape around the outside. I filled the card with snowflake sequins, iridescent white confetti, and clear seed beads, then carefully placed the background on top to complete the shaker.

Thank you so much for stopping by! Have a wonderful day!

---------------------------------------------------

Hello Sunny Studio friends! It's Juliana and today I'm sharing a card featuring the Stitched Semi-Circle Dies. I've paired it with the Radiant Plumeria Stamp Set to create a clean and simple background for my card.

Sunny Studio Stamps: Stitched Semi-Circle Dies Radiant Plumeria Everyday Card by Juliana Michaels

I began by stamping and die cutting images from the Radiant Plumeria Stamp Set. I then die cut a piece of white cardstock using the largest die from the Stitched Semi-Circle Dies. I layered this onto a piece of kraft cardstock die cut with the stitched rectangle mat from the Frilly Frames Retro Petals Dies.

Sunny Studio Stamps: Stitched Semi-Circle Dies Radiant Plumeria Everyday Card by Juliana Michaels

Once the background was complete, I layered the images from the Radiant Plumeria Stamp Set popping some of the flowers up with double sided foam adhesive. I then added some pink pearls from the Rainbow Pearls. For the sentiment I heat embossed it with white embossing powder on black cardstock and then trimmed it to size.

I hope you enjoyed learning how I used the Stitched Semi-Circle Dies to create a background for my card. It's such a versatile die set with unlimited possibilities!

Sunny Studio Supplies Used:

Amazing Argyle 6x6 Paper
Shop at:
Sunny Studio
Holiday Cheer 6x6 Paper
Shop at:
Sunny Studio
Alpaca Holiday Stamps
Shop at:
Sunny Studio
Alpaca Holiday Dies
Alpaca Holiday Dies
Shop at:
Sunny Studio
Frilly Frames Retro Petals Dies
Shop at:
Sunny Studio
Scenic Route Stamps
Scenic Route Stamps
Shop at:
Sunny Studio
Radiant Plumeria Stamps
Shop at:
Sunny Studio
Radiant Plumeria Dies
Shop at:
Sunny Studio
Stitched Semi-Circle Dies
Shop at:
Sunny Studio