Thursday, June 4, 2020

Summer Sweets Cards with Vanessa and Anja

Hello to you! Vanessa here with a happy card using the yummy Summer Sweets stamps. I wanted the card to scream summer, so I chose very bright colors:

Sunny Studio Stamps: Summer Sweets Radiant Plumeria Sealiously Sweet Cruisin' Cuisine Fabulous Flamingos Summer Themed Card by Vanessa Menhorn

First, I inked the white cardstock panel with yellow, orange, green and blue Distress Oxide Inks and applied ink and water droplets. Then I stamped the sentiment from Radiant Plumeria and adhered the panel to my card base. 

For this card, I used various stamp sets + dies:


Sunny Studio Stamps: Summer Sweets Radiant Plumeria Sealiously Sweet Cruisin' Cuisine Fabulous Flamingos Summer Themed Card by Vanessa Menhorn

I stamped all the images onto white cardstock, colored everything with Copic Markers, die-cut the elements with the matching dies and adhered the pieces to the card, raising some with foam-tape. Finally, I added matching Rainbow Droplets.

I am ready for summer. And for all the treats! How about you? Have a wonderful time, see you next week!

--------------------------------------------------

Hello everyone, Anja here and today's card highlights the Summer Sweets Stamps. The days are getting longer and with the warm weather lately it already feels like summer. Time to get some ice cream!

Sunny Studio Stamps: Summer Sweets Stitched Semi-Circle Dies Summer Themed Card by Anja Bytyqi

I started off with a white A2 card base and created an ink smooshed background in yummy Distress Oxide colors: Spun Sugar, Picked Raspberry, Dried Marigold, Abandoned Coral.

Next, I stamped the ice cream images in VersaFine Onyx Black Ink and heat embossed them with clear embossing powder. I watercolored them with Karin Brushmarkers and used the coordinating dies to cut everything out.

Sunny Studio Stamps: Summer Sweets Stitched Semi-Circle Dies Summer Themed Card by Anja Bytyqi

I die cut one of the Stitched Semi-Circles from white cardstock, glued it to the background and adhered the images onto it with foam adhesive. I stacked four Sweet Word die cuts together and white heat embossed the sentiments onto black cardstock strips.

Finally, I embellished my card with Red & Pink Clay Heart Confetti and added sparkly Crystal Stickles dots.

Thank you so much for stopping by! Have a fabulous day!

Sunny Studio Supplies Used:

Sweet Word Die
Sweet Word Die
Shop at:
Sunny Studio
Fabulous Flamingos Stamps
Shop at:
Sunny Studio
Fabulous Flamingos Dies
Shop at:
Sunny Studio
Cruisin' Cuisine Stamps
Shop at:
Sunny Studio
Cruisin' Cuisine Dies
Shop at:
Sunny Studio
Radiant Plumeria Stamps
Shop at:
Sunny Studio
Sealiously Sweet Stamps
Shop at:
Sunny Studio
Sealiously Sweet Dies
Shop at:
Sunny Studio
Summer Sweets Stamps
Shop at:
Sunny Studio
Summer Sweets Dies
Summer Sweets Dies
Shop at:
Sunny Studio
Stitched Semi-Circle Dies
Shop at:
Sunny Studio

Wednesday, June 3, 2020

Cruisin' Cuisine Cards with Tammy and Ana

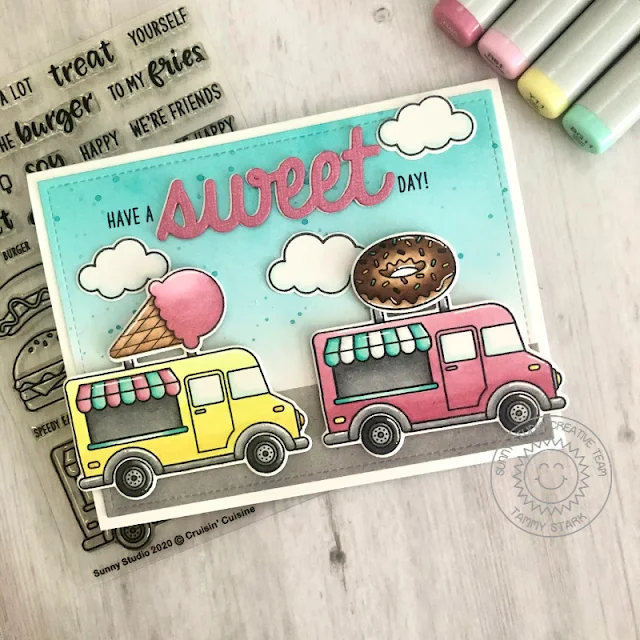
Hi friends! Tammy here with this super sweet and fun card featuring Cruisin' CuisineI love that you can create so many darling food trucks...perfect for the foodie in your life.


Sunny Studio Stamps: Cruisin' Cuisine Plane Awesome Sweet Word Die Everyday Card by Tammy Stark

To begin, I cut a stitched rectangle from Bristol cardstock and ink blended the top with Peacock Feathers and Tumbled Glass Distress Oxide ink. I then masked off the bottom of the card and blended with Smokey Shadow and Black Soot to create a street for my food trucks. Once dry, I attached to my card base.

Next, I stamped my images from Cruisin' Cuisine and Plane Awesome (clouds) onto Bristol cardstock with Memento Tuxedo Black Ink. All images were colored with Copic markers, highlighted with a white gel pen, and cut out using the coordinating Cruisin' Cuisine Dies and Plane Awesome Dies.


Sunny Studio Stamps: Cruisin' Cuisine Plane Awesome Sweet Word Die Everyday Card by Tammy Stark

I arranged the stamped images onto my card and attached the food trucks with foam tape for dimension. Next, I die cut a title from pink cardstock with the Sweet Word Die three times and attached it to the center of my card. I stamped the rest of the sentiment from the Cruisin' Cuisine Stamp in black ink to complete my card.

Thanks so much for stopping by!! Hope everyone has a sweet day!!

------------------------------------------------------

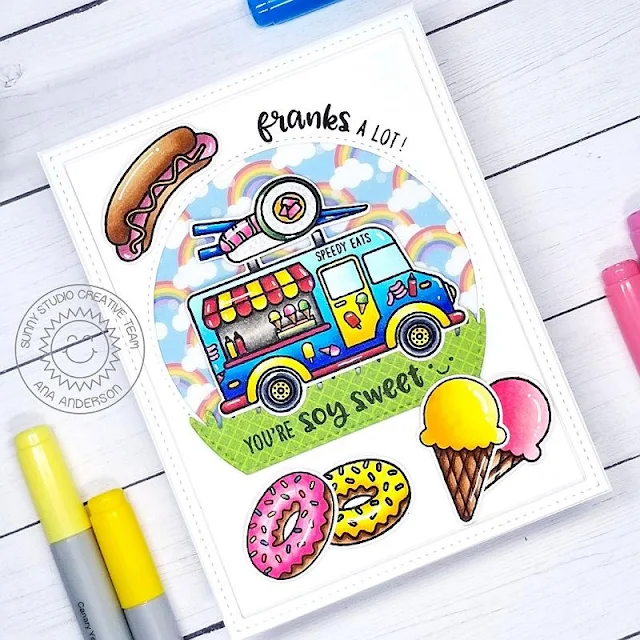
Hello crafty friends! It’s Ana today with a fun and colorful card for any foodie in your life, featuring the new stamp/die set Cruising Cuisine! My card features a fast food truck that serves all sorts of yummy, speedy eats!


Sunny Studio Stamps: Cruisin' Cuisine Stitched Semi-Circle Dies Frilly Frame Dies Everyday Punny Card by Ana Anderson

To start I stamped and colored all images from Cruising Cuisine set and cut them with coordinating dies. I decorated the truck with tiny images from the set before coloring it. For the background I used middle Stitched Semi-Circle die to create a window. I backed the opening with a rainbow patterned paper from Spring Fling paper pack.

To create the grass, I used green paper from Gingham Jewel Tones Paper Pack which I die cut with a grass border die from Sunny Sentiments dies and middle Stitched Semi Circle die for the bottom. I stamped the sentiment on the background, then added the rest of the sentiment to the grass die cut before adhering it to the background.


Sunny Studio Stamps: Cruisin' Cuisine Stitched Semi-Circle Dies Frilly Frame Dies Everyday Punny Card by Ana Anderson

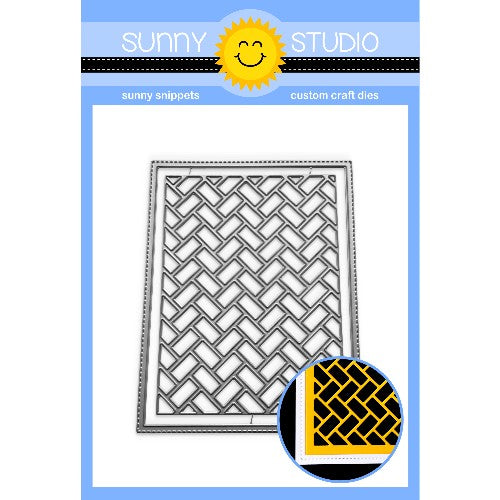
I added the hot dog to the top, truck in the middle of the scene and donuts and ice cream cones to the bottom of the panel. I finished the card by adding stitched frame I created with Frilly Frames Herringbone die.

Aren’t these images from Cruising Cuisine the cutest ever! This set reminds me of vacations, summer and really makes me smile! Thanks for stopping by today, I hope you’ve enjoyed this post and got inspired! I’ll see you next week!

Sunny Studio Supplies Used:

Sunny Sentiments Dies
Shop at:
Sunny Studio
Sweet Word Die
Sweet Word Die
Shop at:
Sunny Studio
Gingham Jewel Tones 6x6 Paper
Shop at:
Sunny Studio
Plane Awesome Stamps
Shop at:
Sunny Studio
Plane Awesome Dies
Plane Awesome Dies
Shop at:
Sunny Studio
Spring Fling Paper
Spring Fling Paper
Shop at:
Sunny Studio
Cruisin' Cuisine Stamps
Shop at:
Sunny Studio
Cruisin' Cuisine Dies
Shop at:
Sunny Studio
Frilly Frames Herringbone
Shop at:
Sunny Studio
Stitched Semi-Circle Dies
Shop at:
Sunny Studio

Tuesday, June 2, 2020

Tool Time Card with Angelica

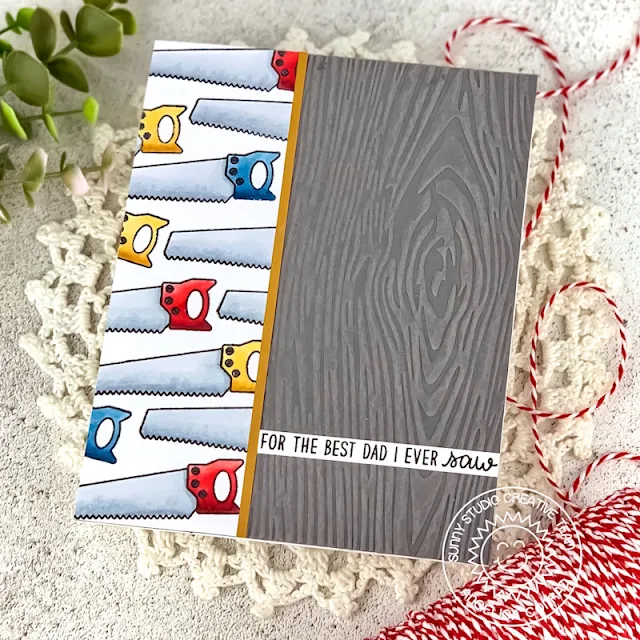
Hi friends! This is Angelica, and I am stopping by with a quick card, showcasing the Tool Time stamp set.

Sunny Studio Stamps: Tool Time Woodgrain Embossing Folder Father's Day Card by Angelica Conrad

I stamped the saw on the left side of a card stock panel, and colored with Copic markers. I used the Woodgrain Embossing Folder to emboss gray card stock. I attached the panel to a card base, added a strip of the colored card stock, and glued a thin strip of honey card stock. I finished the card with a matching sentiment from the stamp set.

Sunny Studio Stamps: Tool Time Woodgrain Embossing Folder Father's Day Card by Angelica Conrad

This was a super fun card to put together. And now my daughter has a cute Father’s Day card to give to her daddy! That’s all that I have for today… Thanks for stopping by!

Sunny Studio Supplies Used:


Woodgrain Embossing
Woodgrain Embossing
Shop at:
Sunny Studio
Tool Time Stamps
Tool Time Stamps
Shop at:
Sunny Studio
Tool Time Dies
Tool Time Dies
Shop at:
Sunny Studio

Monday, June 1, 2020

Tea-riffic Cards with Lynn and Ashley

Hello there! It’s Lynn here and today I'm sharing a card I created featuring the sweet new Tea-rrific stamp set and coordinating dies.

Sunny Studio Stamps: Tea-riffic Spring Scenes Frilly Frame Dies Friendship Card by Lynn Put

To create my card, I started out by stamping several of the images from the Tea-rrific stamp set then coloring them using Copic markers and die cutting them out using the coordinating dies. For each of the tea cups and the tea pot, I added a flower, for the tea cups I used a flower from the Spring Scenes stamp set and coordinating dies and for the tea pot I used a flower from the Chickie Baby stamp set and coordinating dies

Sunny Studio Stamps: Tea-riffic Spring Scenes Frilly Frame Dies Friendship Card by Lynn Put

Next I die cut and stitched rectangle, stamped my sentiment along the top and adhered my images, popping up the blue and yellow tea cups with foam tape. For my background, I used the Frilly Frames Polka-Dot die and die cut it from white cardstock then trimmed down a piece of Classic Gingham yellow paper and adhered it on top. I added foam tape to the backside of my Frilly Frames piece and adhered it to my card base then added the rectangle with my images.

Thanks so much for stopping by!

------------------------------------------------------------

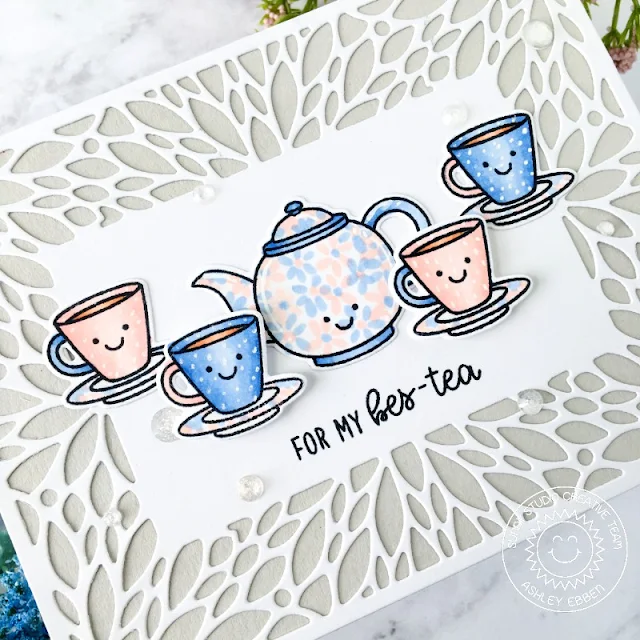
Hello everyone! It's Ashley with a cute friendship card featuring the new Tea-riffic mini set! This card looks fancy thanks to that beautiful Blooming Frame, but it actually comes together pretty quickly!

Sunny Studio Stamps: Tea-riffic Blooming Frame Dies Friendship Card by Ashley Ebben

I started by die cutting a piece of white cardstock using the Blooming Frame die. I used a shim and ran it through my machine a couple times to be sure I cut all those spaces out. I placed the frame on light grey cardstock for a nice neutral background for my images.

I stamped the images from Tea-riffic using Memento Tuxedo Black ink and colored with Copics. I made a floral petal pattern on the teapot to try to mimic the pattern in the Blooming Frame. I added some cute smiley faces and white gel pen accents before die cutting the images with the Tea-riffic dies.

Sunny Studio Stamps: Tea-riffic Blooming Frame Dies Friendship Card by Ashley Ebben

I added the images to the card, popping the front two cups up with foam squares. I used a sentiment from Summer Sweets to make this a friendship card and finished with a few Studio Katia Icy Sparkle crystals.

Thank you so much for stopping by! Have a wonderful day!

Sunny Studio Supplies Used:

Classic Gingham 6x6 Paper
Shop at:
Sunny Studio
Frilly Frames Polka-Dot
Shop at:
Sunny Studio
Chickie Baby Stamps
Chickie Baby Stamps
Shop at:
Sunny Studio
Chickie Baby Dies
Chickie Baby Dies
Shop at:
Sunny Studio
Spring Scenes Stamps
Shop at:
Sunny Studio
Spring Scenes Dies
Spring Scenes Dies
Shop at:
Sunny Studio
Blooming Frame Die
Blooming Frame Die
Shop at:
Sunny Studio
Summer Sweets Stamps
Shop at:
Sunny Studio
Tea-riffic Stamps
Tea-riffic Stamps
Shop at:
Sunny Studio
Tea-riffic Dies
Tea-riffic Dies
Shop at:
Sunny Studio

Saturday, May 30, 2020

Guest Designer Spotlight: Savanna Safari Cards with Nicky Meek

Hey everyone, it's Nicky Meek here with you. Safari anybody? Today I'm happily guest designing for Sunny Studio Stamps again and I'm featuring the fun new stamp set Savanna Safari for my two cards I'm sharing here.

Sunny Studio Stamps: Savanna Safari Birthday Cards by Nicky Meek

My first card is a slimline card with finished dimensions of 8 1/2 x 3 1/2 inches. I prepared the base and set it to one side and then took a panel and stamped and ink blended it using several colours in the yellow and orange family for a sunset scene.

Sunny Studio Stamps: Savanna Safari Birthday Cards by Nicky Meek

On Copic friendly cardstock the cute critters from the stamp set were stamped and Copic coloured, die cut with the coordinating dies, and applied to the scene with foam tape. Points were highlighted with a white gel pen.

The sentiment was stamped and applied with foam tape and I finished the card by using a black gel pen to dot in some ground texture and add the birds to the sky.

Sunny Studio Stamps: Savanna Safari Birthday Cards by Nicky Meek

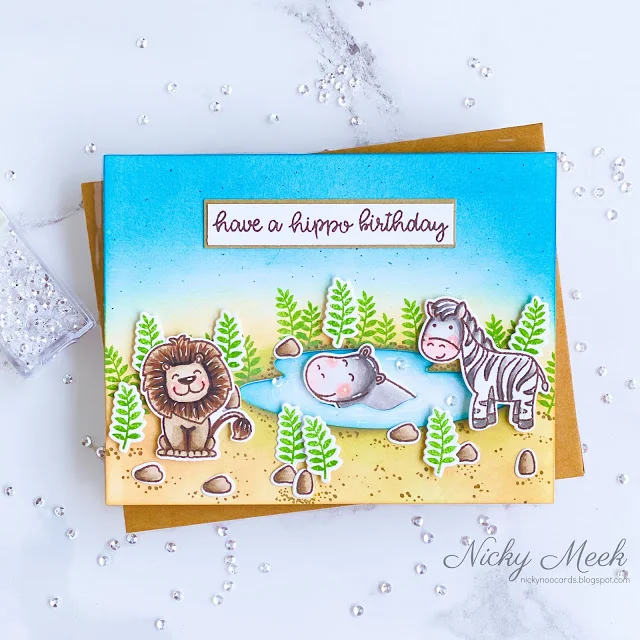
I wanted to create something quite a bit different for my second card which is a standard A2 finished size.

Again I ink blended a panel using Distress Oxides and distressed it just a little. I took the 'watering hole' die and die cut the opening in the panel. I took the cut out piece and ink blended it and then die cut a little 'wave' opening so that the hippo's head could poke through. The panel was backed with foam tape and applied to the card base and then I recessed the 'water' in the gap created and adhered it.

Sunny Studio Stamps: Savanna Safari Birthday Cards by Nicky Meek

I stamped the greenery around the pond directly and also stamped and die cut some of the images for some dimension, backing them with foam tape and applying them. All other images were stamped on Copic friendly cardstock and applied with more of the foam tape and as planned the hippo was placed in the watering hole to cool off!

To finish out the card I dotted in some ground texture, stamped and applied the sentiment and added some tiny sparkling clear sequins in the water for a little interest.

Many thanks for stopping by today.

Just a reminder that tomorrow is the last day of our shipping promotion. Shop HERE using the code "stayinghome" (for US customers) or "together" (for international customers) on orders of $25 or more.  Limit one promo code per order.


Sunny Studio Supplies Used:

Savanna Safari Stamps
Shop at:
Sunny Studio
Savanna Safari Dies
Savanna Safari Dies
Shop at:
Sunny Studio