Tuesday, December 17, 2019

Scalloped Tags Holiday Projects with Angelica and Juliana

Hi Friends! Angelica here, sharing some last minute Christmas tag ideas, using the Scalloped Tag Circle Dies.


Sunny Studio Stamps: Scalloped Tag Dies Holiday Style Season's Greetings Christmas Gift Tags by Angelica Conrad

I used one of my all-time favorite Sunny Studio Stamps stamp sets for these tags, Holiday Style. I stamped my scene on several panels white card stock, and used a multiliner pen to add string. I die-cut the panels into tags, then picked pattern papers from Very Merry and Holiday Cheer paper packs to make frames.

Sunny Studio Stamps: Scalloped Tag Dies Holiday Style Season's Greetings Christmas Gift Tags by Angelica Conrad

I die-cut a circle first, then die-cut the tag around the circle to make the frames. I attached the frames to the tags with thin foam strips. Lastly, I used a stamp from Season's Greetings stamp set, and dies from Sweet Treat Bag dies to make the mini tags. I attached them to the circle tags with baker's twine. To create my images, I used the following ink colors: Silver bell- Altenew Limestone, Silver Stone, and Pure Graphite (Rock Collection) Red Bow- Pinkfresh Studio Coral Reef, Passion Fruit, Berrylicious (Heartbeat Collection) Thanks so much for joining me today. I hope I have helped with Christmas tag inspiration. Happy Holidays!

------------------------------------------------

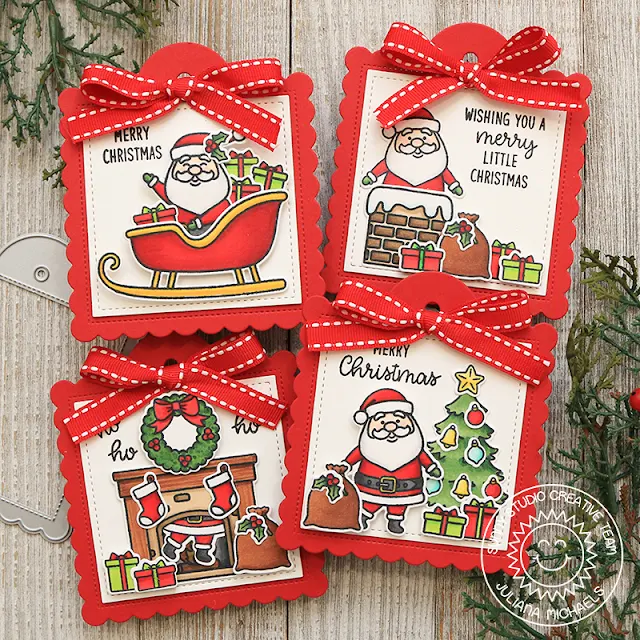
Hello Sunny Studio Friends! It's Juliana here and today I'm excited to share a set of Christmas tags featuring the Scalloped Tag Square Dies. I've paired it up with the Santa Claus Lane Stamp Set to create a festive set of tags that tell a little story if you look closely at each tag.

Sunny Studio Stamps: Scalloped Tag Dies Season's Greetings Santa Claus Lane Christmas Gift Tags by Juliana Michaels

I began by stamping and coloring a bunch of the images from the Santa Claus Lane Stamp Set with Copic Markers. I then die cut them with the Santa Claus Lane Dies. As the scenes came together, I ended up having to stamp and color more images to fill them out.

Sunny Studio Stamps: Scalloped Tag Dies Season's Greetings Santa Claus Lane Christmas Gift Tags by Juliana Michaels

Next, I took the largest tag from the Scalloped Square Tag Dies and cut it four times from red cardstock. I then took a square die from my stash and cut four squares from white cardstock. You could also use a paper trimmer to cut the squares.

Sunny Studio Stamps: Scalloped Tag Dies Season's Greetings Santa Claus Lane Christmas Gift Tags by Juliana Michaels

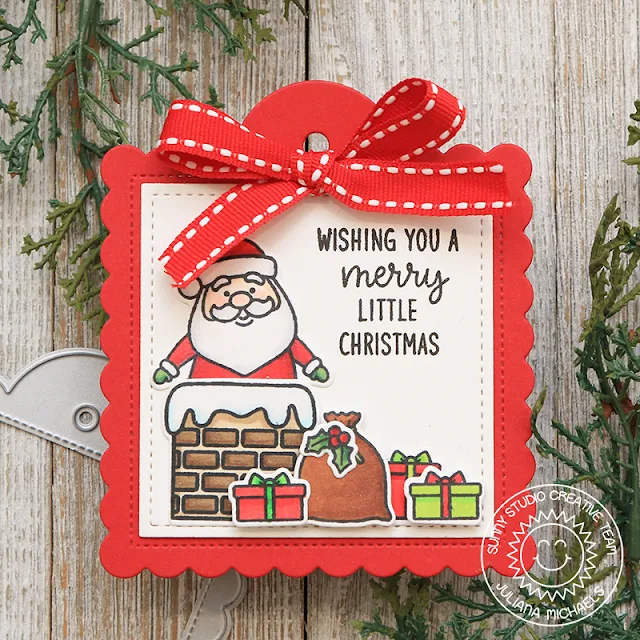
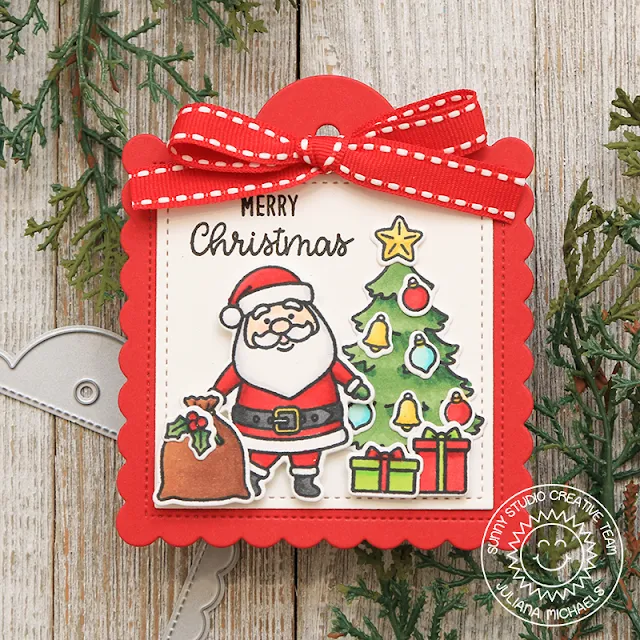
I then went about creating the scene for each of the tags. If you look at each tag, you will see a little story unfold. It begins with Santa flying from the North Pole in his sleigh. He then lands on the roof with all the goodies from his sleigh.  Next, he comes down through the chimney with lots of toys. And last but not least, he puts all the presents under the tree!

Sunny Studio Stamps: Scalloped Tag Dies Season's Greetings Santa Claus Lane Christmas Gift Tags by Juliana Michaels

For the sentiment on each of the tags, I used a combination of stamps from the Santa Claus Lane Stamp Set and Merry Mice Stamps Set.

Sunny Studio Stamps: Scalloped Tag Dies Season's Greetings Santa Claus Lane Christmas Gift Tags by Juliana Michaels

Thanks so much for stopping by today! I hope you enjoyed this festive Christmas tag inspiration using the Scalloped Square Tag Dies and the Santa Claus Lane Stamp Set

Sunny Studio Supplies Used:

Holiday Style Dies
Holiday Style Dies
Shop at:
Sunny Studio
Holiday Style Stamps
Shop at:
Sunny Studio
Holiday Cheer 6x6 Paper
Shop at:
Sunny Studio
Very Merry 6x6 Paper
Shop at:
Sunny Studio
Season's Greetings Stamps
Shop at:
Sunny Studio
Season's Greetings Dies
Shop at:
Sunny Studio
Santa Claus Lane Stamps
Shop at:
Sunny Studio
Santa Claus Lane Dies
Shop at:
Sunny Studio
Merry Mice Stamps
Merry Mice Stamps
Shop at:
Sunny Studio
Scalloped Tags-Circle
Shop at:
Sunny Studio
Scalloped Tags-Square
Shop at:
Sunny Studio
Sweet Treats Gift Bag
Shop at:
Sunny Studio

Monday, December 16, 2019

Scalloped Tags Holiday Projects with Leanne and Eloise

Hey everyone, it's Leanne here. 'Tis the Season for making Christmas tags and I have a special tag design to share today. I have used felt to make my tag which also can be used as an ornament. The base has been created with the large Scalloped Circle Tag die. The size is just perfect for a Christmas tree ornament.  

Sunny Studio Stamps: Scalloped Tag Dies Mug Hugs Warm & Cozy Dies Christmas Gift Tags by Leanne West

I started by die cutting the Scalloped Circle base from some white glitter felt. If you don't have glitter felt then you can just use glitter card stock. The pink scalloped frame was cut using a die from the Fancy Frames Circles set. The medium size Fancy Frames circle lines up perfectly with the outer edge of the large Scalloped Circle Tag. I stitched the pink frame to the white tag base. To decorate my tag, I used dies from Warm & Cozy. I added stitching detail and sequins to the mittens before gluing them on. I used a felt glue to adhere the mittens and mug to the tag. 

Sunny Studio Stamps: Scalloped Tag Dies Mug Hugs Warm & Cozy Dies Christmas Gift Tags by Leanne West

I backed the felt tag with another tag die cut from heavy weight white card stock.  This makes the tag very sturdy and allows for stamping on the back.  I stamped the greeting which is from Mug Hugs. I then used "to & from" stamps from Season's Greetings to complete the tag. Since this tag is intended to double as an ornament, I tied on some thick red & white bakers twine that will hold up for years of enjoyment on the Christmas tree. 

--------------------------------------------------- 

Hi friends, Eloise here today to share some tags with you all. I used the Scalloped Tag Square Dies along with Santa Claus Lane and Hogs & Kisses Stamp Sets.

Sunny Studio Stamps: Scalloped Tag Dies Santa Claus Lane Christmas Gift Tags by Eloise Blue

I started off with stamping out my images onto some white cardstock and coloured them in with Copic Markers. I also stamped down the speech bubble from Hogs & Kisses and stamped the sentiment from Santa Claus Lane inside. Once they were all stamped and coloured, I cut them out and added white gel pen details.

(Copic Markers Used: R14, R24, R29, R89 / Y11, Y13, Y15, Y19 / YG01, YG23, YG25, YG17 / W00, W0 / W1, W3, W5, W7 / E000, E00, E21, E02)

Sunny Studio Stamps: Scalloped Tag Dies Santa Claus Lane Christmas Gift Tags by Eloise Blue

Next I die cut three of the tags out of Navy Cardstock and three from white cardstock. I cut snowy hills from the white tags and adhered them onto the navy tags. I added foam tape to all the images and adhered them into place. I then added foam tape onto the speech bubble sentiments and adhered them on also. Lastly, I tied some hemp cord twine through the tops.

Thanks so much for stopping by today and I hope you enjoyed my tags today. See you next week! 

Sunny Studio Supplies Used:

Mug Hugs Stamps
Mug Hugs Stamps
Shop at:
Sunny Studio
Fancy Frames-Circle Dies
Shop at:
Sunny Studio
Warm & Cozy Dies
Warm & Cozy Dies
Shop at:
Sunny Studio
Season's Greetings Stamps
Shop at:
Sunny Studio
Santa Claus Lane Stamps
Shop at:
Sunny Studio
Santa Claus Lane Dies
Shop at:
Sunny Studio
Hogs & Kisses Stamps
Shop at:
Sunny Studio
Hogs & Kisses Dies
Hogs & Kisses Dies
Shop at:
Sunny Studio
Scalloped Tags-Circle
Shop at:
Sunny Studio
Scalloped Tags-Square
Shop at:
Sunny Studio

Saturday, December 14, 2019

Guest Designer Spotlight: Cards with Keeway Tsao

Hello friends! It’s Keeway Tsao from Kiwi Koncepts and I’ll be sharing some fun holiday inspirations with you today! We’re less than a couple weeks away, but there’s still time to make some last minute cards!

Sunny Studio Stamps: Merry Mice Santa Claus Lane Christmas Garland Frame Dies Layered Snowflake Frame Dies Winter Themed Holiday Cards by Keeway Tsao

I really love the Merry Mice set, the mice are so cute! When I saw those cheese trees, I knew I must create a winter scene with it. I stamped several images from the set in a dark brown hybrid ink and colored them up with Copic markers. I then used the matching dies to die cut the images out.

Sunny Studio Stamps: Merry Mice Santa Claus Lane Christmas Garland Frame Dies Layered Snowflake Frame Dies Winter Themed Holiday Cards by Keeway Tsao

Next, I worked on ink blending a snowy sky and used Pine Needles, Peacock Feathers, Cracked Pistachio, and Old Paper distress oxide inks. I splattered white acrylic paint generously. Then die cut some snow drifts out of white card stock and blended the edges with Broken China distress oxide ink.

Sunny Studio Stamps: Merry Mice Santa Claus Lane Christmas Garland Frame Dies Layered Snowflake Frame Dies Winter Themed Holiday Cards by Keeway Tsao

After adding my snow layers, I added my images onto the scene with foam tape. I used the large ‘winter wishes’ sentiment die cut from the Layered Snowflake Frame Die. It is die cut out of white card stock and adhered right on the background, and that completes the card!

Sunny Studio Stamps: Merry Mice Santa Claus Lane Christmas Garland Frame Dies Layered Snowflake Frame Dies Winter Themed Holiday Cards by Keeway Tsao

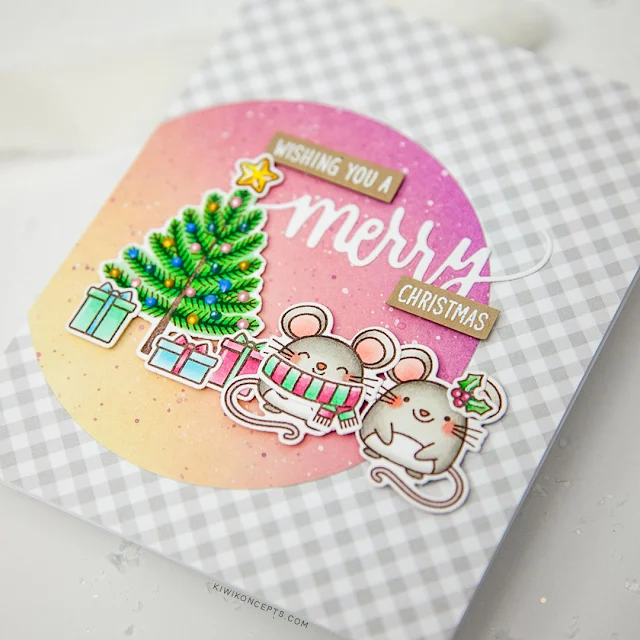
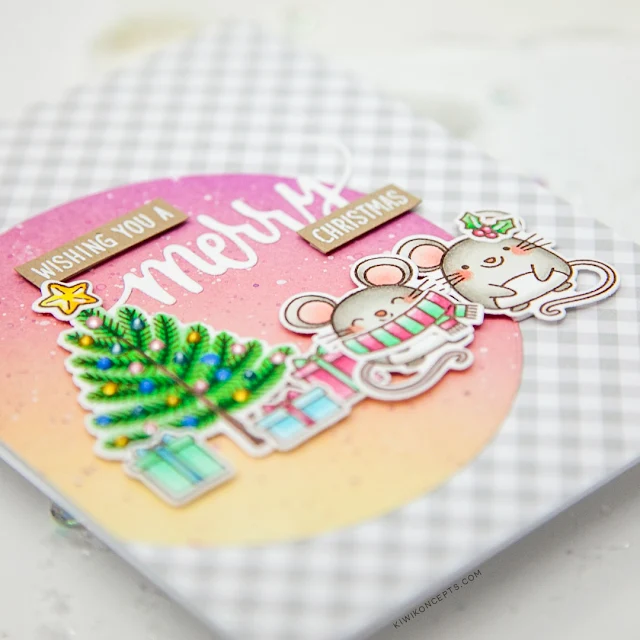
My next card once again uses the Merry Mice set, but I also borrowed some images from the Santa Claus Lane set. Again, I stamped my images in a dark brown hybrid ink and colored them with Copic markers. I die cut the images out with the matching dies.

Sunny Studio Stamps: Merry Mice Santa Claus Lane Christmas Garland Frame Dies Layered Snowflake Frame Dies Winter Themed Holiday Cards by Keeway Tsao

I ink blended a background with Wilter Violet, Victorian Velvet and Antique Linen and die cut it with a simple circle die. I offset this background on some grey plaid pattern paper from Subtle Grey Tones 6x6 Paper.

Sunny Studio Stamps: Merry Mice Santa Claus Lane Christmas Garland Frame Dies Layered Snowflake Frame Dies Winter Themed Holiday Cards by Keeway Tsao

I added my images thereafter with foam tape for dimension. For the sentiment, I die cut the ‘merry’ using the sentiment die found in the Christmas Garland Frame. I then heat embossed the ‘wishing you a’ and ‘christmas’ from the Santa Claus Lane set in white onto kraft card stock. I trimmed it down to thin strips and added it above and below the ‘merry’ with foam tape.

I hope you enjoy today’s inspiration. Happy holidays folks!

Sunny Studio Supplies Used:

Subtle Grey Tones Paper
Shop at:
Sunny Studio
Santa Claus Lane Stamps
Shop at:
Sunny Studio
Santa Claus Lane Dies
Shop at:
Sunny Studio
Merry Mice Stamps
Merry Mice Stamps
Shop at:
Sunny Studio
Merry Mice Dies
Merry Mice Dies
Shop at:
Sunny Studio
Layered Snowflake Frame
Shop at:
Sunny Studio
Christmas Garland Frame
Shop at:
Sunny Studio

Friday, December 13, 2019

Christmas Garland Frame Cards with Candice and Rachel

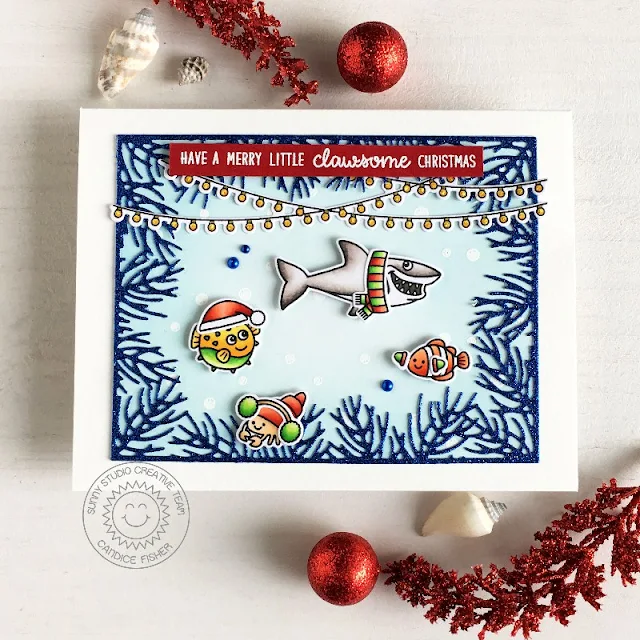
Candice with you today, sharing a different use for the new Christmas Garland Frame die as coral!

Sunny Studio Stamps: Christmas Garland Frame Dies Merry Mice Scenic Route Best Fishes Christmas Card by Candice Fisher

The Sunny Studio products I used for my card:
For the background, I first heat embossed the bubbles in white and then inked over with tumbled glass oxide ink. I then die cut the Christmas Garland Frame from navy glitter paper, using a shim to get a deep cut through the thickness of the cardstock. I love how it looks like coral for this card!

Sunny Studio Stamps: Christmas Garland Frame Dies Merry Mice Scenic Route Best Fishes Christmas Card by Candice Fisher

Next, I stamped the fishes and winter accessories, colored with Copic markers and then used the coordinating dies listed above to cut out. The christmas lights I stamped and cut out with the coordinating dies, colored with Copics and added yellow Stickles for some shimmer.

To finish the card, I heat embossed the sentiment in white from both the Merry Mice and Best Fishes stamp sets on a red banner. For the embellishments, I simply added a few navy domes from the Rainbow Pearls.

Thank you so much for stopping by today!

------------------------------------------------

Hello everyone! It's Rachel here and I have a festive winter card that features the gorgeous Christmas Garland Frame Die. I've combined this die with the Jolly Gingerbread Stamp Set.

Sunny Studio Stamps: Christmas Garland Frame Dies Jolly Gingerbread Christmas Card by Rachel Alvarado

To create my frame, I first started with a piece of Ranger White Watercolor Paper that I had trimmed to slightly larger than 4.25" x 5.5". I then quickly watercolored this piece with both Daniel Smith Viridian Watercolor Paint and Ken Oliver Turquoise Colorburst Watercolor Powder. I then let this piece dry before I die cut it. Once I had it cut out, I then splattered it with both dark green diluted watercolor paint as well as diluted Opaque White Paint. I added some of this diluted white paint to the ends of each piece to resemble fallen snow.

Next I trimmed a piece of smooth white card stock to 4.25" x 5.5" and lightly blended some Catherine Pooler Hot Tub Ink. I splattered this blended area with both some water drops as well as some more diluted white paint. I added some stitched snow drifts using the Woodland Border Dies. 

Sunny Studio Stamps: Christmas Garland Frame Dies Jolly Gingerbread Christmas Card by Rachel Alvarado

For my images, I stamped them onto a sheet of Neenah Solar White 110lb Card Stock and colored everything with Copics. I cut them out and then added them to my card with both liquid adhesive and 3D Foam Tape depending on which ones I wanted to add more dimension to. I used a fun sentiment from the Jolly Gingerbread Set and added it to the left side of my front snow drift before adding it to my card base.

Thanks so much for stopping by! I hope you enjoyed my card today!

Sunny Studio Supplies Used:

Jolly Gingerbread Stamps
Shop at:
Sunny Studio
Jolly Gingerbread Dies
Shop at:
Sunny Studio
Best Fishes Stamps
Best Fishes Stamps
Shop at:
Sunny Studio
Best Fishes Dies
Best Fishes Dies
Shop at:
Sunny Studio
Merry Mice Stamps
Merry Mice Stamps
Shop at:
Sunny Studio
Merry Mice Dies
Merry Mice Dies
Shop at:
Sunny Studio
Scenic Route Stamps
Scenic Route Stamps
Shop at:
Sunny Studio
Scenic Route Dies
Scenic Route Dies
Shop at:
Sunny Studio
Christmas Garland Frame
Shop at:
Sunny Studio

Thursday, December 12, 2019

Feeling Frosty Cards with Vanessa and Anja

Hello to you! Vanessa here with a card using the adorable Feeling Frosty set. I used almost every snowman from the set to create this gathering of frosty friends.

Sunny Studio Stamps: Feeling Frosty Christmas Home Winter Themed Card by Vanessa Menhorn

First, I inked the front of a white card base with Distress Oxide Inks. Now I hand-cut snow hills from white cardstock, inked the edges with blue ink and adhered them. I stamped all the images onto white cardstock, colored them with Copic markers, die-cut the elements with the matching dies and adhered them to the card, raising some with foam tape.

Stamps and dies used: Feeling Frosty StampsFeeling Frosty Dies, Christmas Home StampsChristmas Home Dies, Gleeful Reindeer StampsGleeful Reindeer Dies

Sunny Studio Stamps: Feeling Frosty Christmas Home Winter Themed Card by Vanessa Menhorn

After I had added "snow" with a white gel pen, I stamped and heat-embossed the sentiment onto a strip of black cardstock with white embossing powder, trimmed it and adhered it.

I love these snowmen so much, they are the coolest gang :) Thank you for stopping by today!

-------------------------------------------------------

Hello everyone, Anja here to share a card made with the Feeling Frosty set which is one of my favorites. I already used it a couple of times and wanted to come up with something different. So I tried my hand on no-line coloring which I find quite intimidating to be honest.

Sunny Studio Stamps: Feeling Frosty Fancy Frame Dies Scenic Route Winter Themed Card by Anja Bytyqi

With the help of some masking, I created a one layer scene. I combined the Feeling Frosty snowmen and cups with the hillside border from the Scenic Route set. For a very light stamped color, I used the Inkon3 Fadeout No Line Coloring Detail Ink. I colored the images with Copic Markers and Prismacolor Pencils.

The sky was done by blending Distress Oxide Inks (Milled Lavender and Spun Sugar) and splattering white paint with a brush. I cut one of the Fancy Frames Square Dies from white cardstock to frame my little winter scene.

I think the sentiment is the perfect match for these snowman friends who share a cup of hot cocoa together. It's stamped in VersaMark Ink and heat embossed with Ranger Liquid Platinum Embossing Powder. I die cut a stitched banner and adhered it with foam tape. To finish off my card, I added White Clay Snowflakes and a Pink Clay Heart.

Thank you so much for stopping by! Wishing you a beautiful day!

Sunny Studio Supplies Used:

Gleeful Reindeer Dies
Shop at:
Sunny Studio
Gleeful Reindeer Stamps
Shop at:
Sunny Studio
Christmas Home Stamps
Shop at:
Sunny Studio
Christmas Home Dies
Christmas Home Dies
Shop at:
Sunny Studio
Fancy Frames-Square Dies
Shop at:
Sunny Studio
Feeling Frosty Stamps
Shop at:
Sunny Studio
Feeling Frosty Dies
Feeling Frosty Dies
Shop at:
Sunny Studio
Scenic Route Stamps
Scenic Route Stamps
Shop at:
Sunny Studio