Tuesday, October 23, 2018

Build A Tag Foxy Christmas Tag Set with Juliana

Hello friends! It's Juliana Michaels here and I'm so happy to be here today to share a trio of Christmas tags I created using the new Foxy Christmas stamp set and Build A Tag No. 1! These new tag dies make creating fun and unique gift tags a breeze when you combine them with cardstock, patterned paper, stamps, and die cuts.

Sunny Studio Stamps: Build A Tag No 1 Foxy Christmas Holiday Cheer Christmas Tag Set by Juliana Michaels

I began by stamping and coloring several of the adorable foxes and gift boxes from the Foxy Christmas stamp set. I used Copic Markers for all of the coloring and then die cut them using the coordinating die set.

Sunny Studio Stamps: Build A Tag No 1 Foxy Christmas Holiday Cheer Christmas Tag Set by Juliana Michaels

Next, I took one of the tags from the Build A Tag No. 1 and die cut it from white cardstock. I then took some of the patterned papers from the Holiday Cheer 6x6 paper pad and die cut them using one of the tag toppers from the tag die set. 


Sunny Studio Stamps: Build A Tag No 1 Foxy Christmas Holiday Cheer Christmas Tag Set by Juliana Michaels

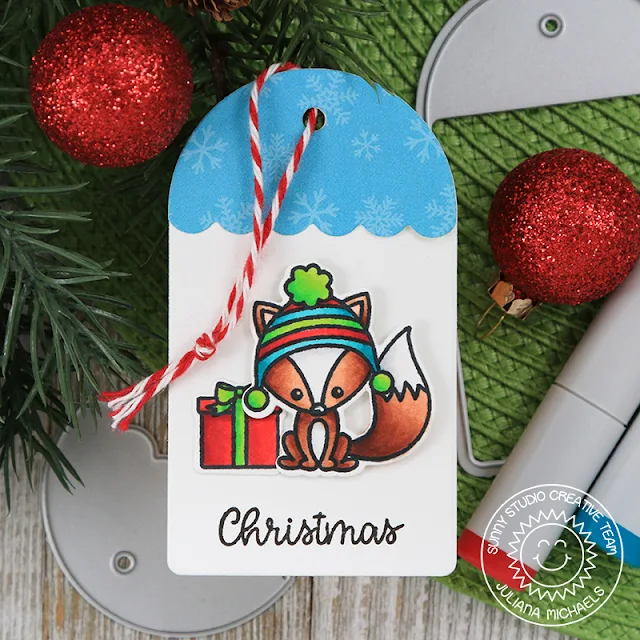
Once I had all of the pieces die cut, I was ready to start assembling the tags. I layered the toppers and die cut images onto the tags and created a little “scene” on each one. To finish off each tag, I added a piece of red and white baker's twine.

Sunny Studio Stamps: Build A Tag No 1 Foxy Christmas Holiday Cheer Christmas Tag Set by Juliana Michaels

I hope you enjoyed this bit of Christmas gift tag inspiration using the new Build A Tag No.1 and Foxy Christmas stamp set. Thanks so much for stopping by today!

Sunny Studio Supplies Used:

Holiday Cheer 6x6 Paper
Shop at:
Sunny Studio
Foxy Christmas Stamps
Shop at:
Sunny Studio
Foxy Christmas Dies
Foxy Christmas Dies
Shop at:
Sunny Studio
Build-A-Tag #1 Dies
Build-A-Tag #1 Dies
Shop at:
Sunny Studio

Monday, October 22, 2018

Eskimo Kisses Winter Themed Watercolored Card with Eloise

Hi friends, Eloise here and today I'll be sharing a card using the Eskimo Kisses mini set along with the last year Winter release - Polar Playmates. These sets work perfectly together so I thought I would mix them today.

Sunny Studio Stamps: Eskimo Kisses Polar Playmates Winter Themed Watercolored Card by Eloise Blue

To start off, I stamped out all my images from both Eskimo Kisses and Polar Playmates. I coloured my images in with Copic Markers and die cut them out using the coordinating dies. 

(Copic Markers Used: E71, E74, E77 / Y11, Y15, Y19 / R21, R22, R24 / B0000, B000, B01 / YR20, YR12, YR15 / YG61, YG63, YG67 / E000, E00, E21 / E31, E35, E37 / YR31, YR24, YR27 / W00, W0, 0 / C00, C0 / W3, W5, W7)

For my background I took a piece of watercolour cardstock and did a quick watercolour background. I dried it off with a heat tool and adhered my images down in a slight grid. 

Sunny Studio Stamps: Eskimo Kisses Polar Playmates Winter Themed Watercolored Card by Eloise Blue

For my sentiment, I white heat embossed the 'Eskimo Kisses' sentiment onto a strip of black cardstock and adhered it down as well. To finish up I used the brand new Holiday Cheer 6x6 and added a striped piece on the side of the card base. 

Thanks so much for stopping by today and I'll see you next week. 

Sunny Studio Supplies Used:  

Polar Playmates Stamps
Shop at:
Sunny Studio
Polar Playmates Dies
Shop at:
Sunny Studio
Holiday Cheer 6x6 Paper
Shop at:
Sunny Studio
Eskimo Kisses Stamps
Shop at:
Sunny Studio
Eskimo Kisses Dies
Eskimo Kisses Dies
Shop at:
Sunny Studio

Saturday, October 20, 2018

Guest Designer Spotlight: Christmas Cards with Leanne West

Hello everyone! Leanne West here with you today and I’m very excited to be sharing some cards I’ve made using the newest Sunny Studio release. This winter release is packed with so much variety. There’s cute and whimsical characters, fabulous stand-alone dies, and a beautiful layering set. I’ll be featuring a little of everything on my cards so let’s jump right in!

Sunny Studio Stamps: Christmas Trimmings Alpaca Holiday Warm & Cozy Woodland Borders Christmas Cards by Leanne West

For this first card I’ve used the Christmas Trimmings stamp set and coordinating dies to create a wreath. I stamped several of the layered holly leaves in two different color ways. To get a perfect circle of leaves, I adhered them to a narrow circle frame that gets completely hidden when all the leaves are added. I tucked in some of the berries and added a bit of chunky glitter to each holly leaf. 


Sunny Studio Stamps: Christmas Trimmings Alpaca Holiday Warm & Cozy Woodland Borders Christmas Cards by Leanne West

Once completely assembled, I adhered the wreath to an A2 sized panel of card stock that I embossed using the Cable Knit embossing folder. This adds just enough interest to the background without being too distracting. I added a twine bow to the wreath and a few sequins to the background. Lastly I added a sentiment strip right along the bottom of the card embossed in silver. 


Sunny Studio Stamps: Christmas Trimmings Alpaca Holiday Warm & Cozy Woodland Borders Christmas Cards by Leanne West

For this next card I played around with some of the dies in the Warm & Cozy stand-alone die set along with the pattern paper from the Holiday Cheer 6x6 paper pack. I used the mittens and hot cocoa mug for the focal point images. I die cut two ovals using the Stitched Ovals die. One I cut from white card stock and inked up with Tumbled Glass Distress Ink. I embossed a sentiment from the Alpaca Holiday stamp set in white.  


Sunny Studio Stamps: Christmas Trimmings Alpaca Holiday Warm & Cozy Woodland Borders Christmas Cards by Leanne West

I layered the two ovals with foam adhesive and added that on top of a wide strip of white card stock embossed with the Dapper Diamonds embossing folder. I cut two strips of the hot cocoa mug pattern paper to add to the top and bottom of the card. Lastly I tied some twine around the very top of the card.  


Sunny Studio Stamps: Christmas Trimmings Alpaca Holiday Warm & Cozy Woodland Borders Christmas Cards by Leanne West

For my last card, I wanted to create a snowy mountain scene using the Alpaca Holiday stamp set and coordinating dies. I colored all the images with Copic markers. I went with a pastel color palette and used some minty greens and pale rose pinks. To create the sky, I inked blended some Stormy Sky Distress Oxide ink onto a background panel and then splattered with white paint to give the look of snow. I die cut four snowy hills using the Woodland Borders dies.


Sunny Studio Stamps: Christmas Trimmings Alpaca Holiday Warm & Cozy Woodland Borders Christmas Cards by Leanne West

I used the largest oval die from the Stitched Ovals set to cut an opening for the scene from some pink snowflake pattern paper from the Holiday Cheer 6x6 paper pack. Once I had all my hills, alpacas, and mountains adhered. I was able to see where I had room for the sentiment, also from the Alpaca Holiday stamp set. I careful curved the stamps before stamping to follow the same curve of the oval frame. I added some snowflakes die cut from silver glitter paper. The smaller snowflake is from the Warm & Cozy die set and the larger snowflake is the current freebie with every order from Sunny Studio. Lastly, I added the scalloped frame which is from the Fancy Frame Rectangle dies.  


Thanks so much for joining me today! I hope I’ve given you a variety of ideas using these fun new products. I will be back next month to share another round of projects using stamps and dies from the winter release. Until then, happy crafting!

Sunny Studio Supplies Used:

Fancy Frames- Rectangles
Shop at:
Sunny Studio
Woodland Borders Dies
Shop at:
Sunny Studio
Holiday Cheer 6x6 Paper
Shop at:
Sunny Studio
Dapper Diamonds Embossing
Shop at:
Sunny Studio
Cable Knit Embossing
Shop at:
Sunny Studio
Christmas Trimmings Stamps
Shop at:
Sunny Studio
Christmas Trimmings Dies
Shop at:
Sunny Studio
Alpaca Holiday Stamps
Shop at:
Sunny Studio
Alpaca Holiday Dies
Alpaca Holiday Dies
Shop at:
Sunny Studio
Stitched Oval Dies
Stitched Oval Dies
Shop at:
Sunny Studio
Warm & Cozy Dies
Warm & Cozy Dies
Shop at:
Sunny Studio

Friday, October 19, 2018

Sweater Vest Dies Shaped Gingham Dad Card with Lexa

Hi everyone! Lexa here today with a monochrome dad card using the brand new Sweater Vest Dies which is perfect for both masculine and holiday theme shaped cards. All you have to do is choose the color combination. Let's get started.

Sunny Studio Stamps: Sweater Vest Dies Shaped Gingham Dad Card by Lexa Levana

I cut the base Sweater Vest on a blue diamond patterned paper from Gingham Jewel Tones collection on both sides. You can choose which one you prefer, a crew neck or a V-neck like mine. I add a cute blue bow tie to complete the look. 

Sunny Studio Stamps: Sweater Vest Dies Shaped Gingham Dad Card by Lexa Levana

I also decided to cut some alphabets die cut to spell "DAD" on the front. It's super easy and simple, perfect for your man. I can't wait to try this die cut for another projects too. A shaped card always look sophisticated without trying too much. Don't you all agree with me?

I really hope you like today's card, thank you so much for stopping by today. Have a wonderful day!

Sunny Studio Supplies Used:

Gingham Jewel Tones 6x6 Paper
Shop at:
Sunny Studio
Sweater Vest Dies
Sweater Vest Dies
Shop at:
Sunny Studio

Thursday, October 18, 2018

Christmas Trimmings Clean & Simple Christmas Card with Vanessa

Hi everyone! Vanessa here with a modern, but classic CAS Christmas card using Christmas TrimmingsI love the versatility of this set! It makes it easy to create cards of all styles. For today's card I chose a clean & simple design that could quickly be mass produced.

Sunny Studio Stamps: Christmas Trimmings Clean & Simple Stamped Merry Christmas Card by Vanessa Menhorn

First, I stamped the sentiment onto my white cardstock panel. Then I stamped the leaves and the berries. After I had adhered the panel to the red card base, I added Glossy Accents to the berries for a little highlight.

Sunny Studio Stamps: Christmas Trimmings Clean & Simple Stamped Merry Christmas Card by Vanessa Menhorn

If you want to change up things a little, just stamp the leaves and berries all over the background or maybe a border of them along one edge? Whatever you like best, I hope to have inspired you to get your Christmas card production going!

Have a wonderful day everybody and thanks for stopping by!

Sunny Studio Supplies Used:

Christmas Trimmings Stamps
Shop at:
Sunny Studio

Wednesday, October 17, 2018

Warm & Cozy Hot Cocoa And Mittens Christmas Cards with Franci

Hello there! Franci here with you today with a couple of clean and simple cards featuring the new Warm & Cozy die set! 

Sunny Studio Stamps: Warm & Cozy Jolly Gingerbread Hot Cocoa And Mittens Christmas Cards by Franci Vignoli

These little mittens and the cup of hot cocoa, with all those little marshmallow, are so cute! I totally fell in love with them. They are so easy and quick to put together, that you can totally choose something like this as the design for all of your Christmas cards! 

Sunny Studio Stamps: Warm & Cozy Jolly Gingerbread Hot Cocoa And Mittens Christmas Cards by Franci Vignoli

First, I created my white card base. I made them 4 x 5 inches, a little smaller than the standard size, and added some dry embossing details with my scoring board. I love doing that because it's such an easy way for adding more interest onto a clean and simple design!

Sunny Studio Stamps: Warm & Cozy Jolly Gingerbread Hot Cocoa And Mittens Christmas Cards by Franci Vignoli

Next, I die cut all of the elements and all of the accessorizes out of both the new Holiday Cheer 6x6 paper pack, as well as white and brown cardstock. I glued everything together with liquid glue and I also added some gold twine to connect the mittens.

Sunny Studio Stamps: Warm & Cozy Jolly Gingerbread Hot Cocoa And Mittens Christmas Cards by Franci Vignoli

I shaded a little bit of the white cardstock with a light grey Copic and added lots of Wink of Stella clear to make my images sparkle. I softly inked the front of my card with Peacock Feathers Distress ink and I glued all of the elements down with foam adhesive.

Sunny Studio Stamps: Warm & Cozy Jolly Gingerbread Hot Cocoa And Mittens Christmas Cards by Franci Vignoli

Then I stamped the sentiment, from the Jolly Gingerbread stamp set, onto the bottom right corner and I also added some sparkling clear sequins to finish my cards.

Thank you so much for stopping by today!

Sunny Studio Supplies Used:

Jolly Gingerbread Stamps
Shop at:
Sunny Studio
Holiday Cheer 6x6 Paper
Shop at:
Sunny Studio
Warm & Cozy Dies
Warm & Cozy Dies
Shop at:
Sunny Studio

Tuesday, October 16, 2018

Alpaca Holiday Framed Snowy Scene Christmas Card with Juliana

Hello friends! It's Juliana Michaels and I'm excited to share a sweet little Christmas card I created using the Alpaca Holiday stamp set! These adorable little alpacas just bring a smile to my face and I'm pretty sure this Christmas card will do the same for it's recipient.

Sunny Studio Stamps: Alpaca Holiday Fancy Frames Rectangles Frosty Flurries Snowy Scene Christmas Card by Juliana Michaels

I began by stamping and coloring the images from the Alpaca Holiday stamp set with Copic markers. I then die cut them using the coordinating die set. Once the coloring and cutting was complete, I set these to the side to start working on the snowy scene I wanted to create.

Sunny Studio Stamps: Alpaca Holiday Fancy Frames Rectangles Frosty Flurries Snowy Scene Christmas Card by Juliana Michaels

To create the framed scene, I took the smaller of the rectangle dies from the Fancy Frames Rectangles die set and cut if from white cardstock. I then cut a rectangle from Bristol Paper that was sized to layer behind the frame. I inked this up with Distress Oxide in Blueprint Sketch and Salty Ocean. To make it look like snow, I lightly sprinkled water onto the paper and dabbed it dry. I still wanted a more snowy look, so I grabbed the the Frosty Flurries stamp. I wipe the inked paper with an embossing powder tool and then stamped the image with Versamark embossing ink (the embossing powder tool will prevent any extra embossing powder from sticking to the paper in areas where you might not want it). I then heat set it with white embossing powder. Now, I had the snowy background I was looking for!


Sunny Studio Stamps: Alpaca Holiday Fancy Frames Rectangles Frosty Flurries Snowy Scene Christmas Card by Juliana Michaels

Next, I cut a thin strip of white cardstock and adhered that to the bottom edge of the snowy background. I then layered on the stamped and colored images to create the scene. For the sentiment, I stamped it onto a piece of white cardstock that I die cut using the pennant die from the Fancy Frames Rectangles die set. To complete the card, I adhered the framed snowy scene to a piece of patterned paper from the Holiday Cheer 6x6 paper pad.

I hope this card inspires you to pull out the Alpaca Holiday stamp set and start creating some Christmas cards with it! We can't wait to see what you create and share with us!

Sunny Studio Supplies Used:

Frosty Flurries Stamps
Shop at:
Sunny Studio
Fancy Frames- Rectangles
Shop at:
Sunny Studio
Alpaca Holiday Stamps
Shop at:
Sunny Studio
Alpaca Holiday Dies
Alpaca Holiday Dies
Shop at:
Sunny Studio