Showing posts with label Everyday Greetings. Show all posts

Monday, May 27, 2019

Hawaiian Hibiscus Cards with Leanne and Eloise

Hi friends, Leanne here. Or maybe "Aloha" is more appropriate since the card I’m sharing today is covered in beautiful floral images from the Hawaiian Hibiscus stamp set. I was so anxious to ink up this set and see the magic happen as I stamp each layer. It did not disappoint!

Sunny Studio Stamps: Hawaiian Hibiscus Everyday Greetings Frilly Frames Dies Floral Themed Cards by Leanne West and Eloise Blue

I started this card by creating a pink ombre background. I blended Tattered Rose, Worn Lipstick, and Picked Raspberry Distress Oxide Ink onto the entire card front. I then splattered it with clean water and thinned white paint. I added the Filly Frames Lattice over top. 

Sunny Studio Stamps: Hawaiian Hibiscus Everyday Greetings Frilly Frames Dies Floral Themed Cards by Leanne West and Eloise Blue

Ink colors used to stamp the hibiscus & leaves:  (pinks - Altenew Razzleberry, Rebellite, Pinkalicious, & Pink Diamond)  (yellows - Catherine Pooler Tiara & Tiki Torch) (greens - Catherine Pooler Mint To Be, Garden Party, & Lime Rickey)

Sunny Studio Stamps: Hawaiian Hibiscus Everyday Greetings Frilly Frames Dies Floral Themed Cards by Leanne West and Eloise Blue

I stamped out several hibiscus and leaves and die cut with the coordinating Hawaiian Hibiscus dies. I adhered them with dimensional foam squares over the lattice while leaving space to add a greeting. I stamped and heat embossed in silver the best wishes greeting from Everyday Greetings. I trimmed into strip with hand cut fish tail ends. To finish off this card, I added just a few clear sequins. 

--------------------------------------------------

Hi friends, Eloise here and today I’m sharing a card using the Hawaiian Hibiscus Stamp Set.

Sunny Studio Stamps: Hawaiian Hibiscus Everyday Greetings Frilly Frames Dies Floral Themed Cards by Leanne West and Eloise Blue

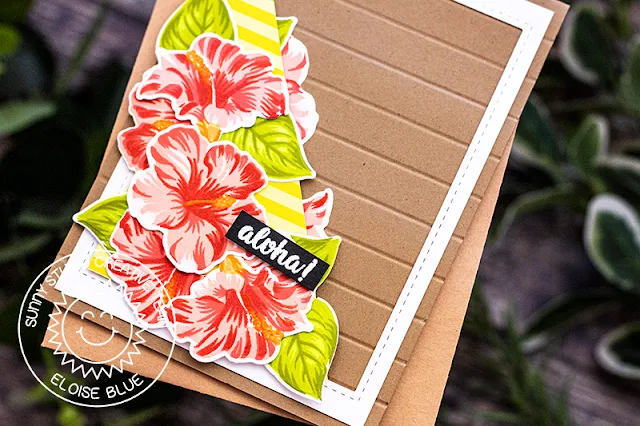
To start off I stamped out six of the hibiscus flowers and six leaves using some Altenew Inks. I then cut them out.

(Altenew Inks Used: Blush, Rouge, Crimson, Velvet / Sunkissed, Orange Cream, Autumn Blaze, Firebrick / Bamboo, Olive, Moss)

Sunny Studio Stamps: Hawaiian Hibiscus Everyday Greetings Frilly Frames Dies Floral Themed Cards by Leanne West and Eloise Blue

Next, I took a piece of brown cardstock and cut it down to a card base. I used my scoring tool to score ½” horizontal lines along the background. I then took a piece of white cardstock, cut it down to around 3 ¾” wide by 5 ¼” tall and cut a rectangle die from the centre. I added adhesive onto the back and adhered it into place. I then took a piece of yellow stripe cardstock from the Summer Splash Paper Pack and cut down a small rectangle and then in half into two triangles. I added foam tape onto the back of one of the rectangles and adhered it down into place as well.

Sunny Studio Stamps: Hawaiian Hibiscus Everyday Greetings Frilly Frames Dies Floral Themed Cards by Leanne West and Eloise Blue

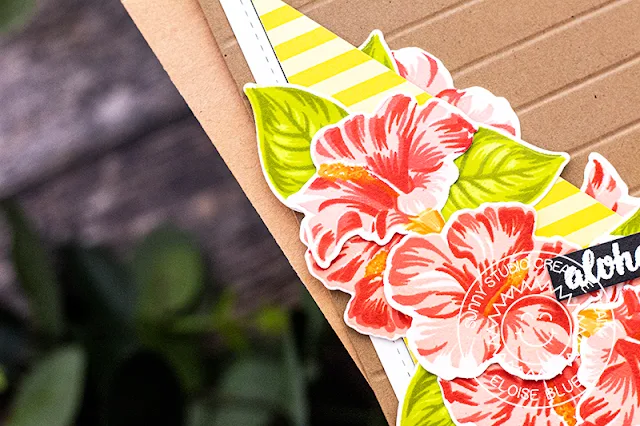
Lastly, I adhered my hibiscus flowers into place with each of the leaves. I then white heat embossed the ‘Aloha’ sentiment onto a black strip of cardstock. I added more foam tape onto the back and adhered it into place.

Thanks so much for stopping by today, I hope you enjoyed, and I’ll see you next week. 

Sunny Studio Supplies Used:

Frilly Frames Lattice Dies
Shop at:
Sunny Studio
Everyday Greetings Stamps
Shop at:
Sunny Studio
Hawaiian Hibiscus Stamps
Shop at:
Sunny Studio
Hawaiian Hibiscus  Dies
Hawaiian Hibiscus Dies
Shop at:
Sunny Studio
Summer Splash 6x6 Paper
Shop at:
Sunny Studio

Thursday, May 9, 2019

Hawaiian Hibiscus Cards with Vanessa and Anja

Hi everybody! Vanessa here with a flower card using the wonderful Hawaiian Hibiscus set.

Sunny Studio Stamps: Hawaiian Hibiscus Botanical Backdrop Everyday Greetings Floral Cards by Vanessa Menhorn and Anja Bytyqi

It is not easy to decide what colors to use for the gorgeous hibiscus blossoms, there's such a wide range of biodiversity available! I ended up with the best known red version - because I had multiple red inks in my stash :)

I started with a panel of white cardstock and inked the bottom part with yellow Distress Ink. Then I added ink droplets, stamped and heat-embossed the "aloha" with gold embossing powder and adhered the panel to the red card base.

Sunny Studio Stamps: Hawaiian Hibiscus Botanical Backdrop Everyday Greetings Floral Cards by Vanessa Menhorn and Anja Bytyqi

Now I stamped the flowers and leaves using the following colors - Blossoms, from lightest to darkest color: MFT Cotton Candy, Hero Arts Pale Tomato, MFT Cherry Crisp, Hero Arts Raspberry Jam, MFT Sunshine (Center). Leaves, from lightest to darkest color: MFT Sour Apple, Distress Ink Mowed Lawn, MFT Green Eyed Monster

After I had die-cut the elements with the matching dies, I adhered everything to the card, using foam tape for more dimension. Finally, I added gold sequins.

Don't you love how these layered stamps work? Mendi did such a great job with these! Thank you for visiting, see you next week!

---------------------------------------------------------

Hi everyone, Anja here and today I have a new summer card for you using the beautiful Hawaiian Hibiscus Stamps. Do you know how many working hours and effort went into designing these kind of layering stamps? I'm always amazed by the detailed images and it is so much fun to stamp the layers in different colors.

Sunny Studio Stamps: Hawaiian Hibiscus Botanical Backdrop Everyday Greetings Floral Cards by Vanessa Menhorn and Anja Bytyqi

So here is my floral birthday card where I combined the pretty hibiscus flowers with a foiled Botanical Backdrop frame. I put a piece of Deco Foil Turquoise Transfer Sheet by Therm o Web on cardstock using Ken Oliver's Stick it adhesive. Then I ran it through my die cutting machine with the floral frame die.

Next, I stamped the layered flowers and leaves (find ink colors below) and cut them out with the coordinating dies. Originally, I wanted the darkest layer to be a bright pink. First, I tried pigment ink which sits on top of the paper, but it wasn't bright enough. Then I remembered the vibrant pink embossing powder that I had in my stash for years. But as it isn't opaque, it turned out red ;-) I thought it gave a nice contrast to the first three stamped layers though and kept going.

Sunny Studio Stamps: Hawaiian Hibiscus Botanical Backdrop Everyday Greetings Floral Cards by Vanessa Menhorn and Anja Bytyqi

I stamped the birthday sentiment from the Everyday Greetings set in VersaMark Ink and heat embossed it with turquoise embossing powder. Finally, I adhered the images and also added some matching crystals and enamel dots.

Dye Inks used - Hibiscus Flowers: MFT Insulation Pink, Altenew Sunkissed and Orange Cream; Leaves: Altenew Bamboo, Parrot and Olive

Thank you so much for stopping by! Have a nice day!

Sunny Studio Supplies Used:

Botanical Backdrop Die
Shop at:
Sunny Studio
Everyday Greetings Stamps
Shop at:
Sunny Studio
Hawaiian Hibiscus Stamps
Shop at:
Sunny Studio
Hawaiian Hibiscus  Dies
Hawaiian Hibiscus Dies
Shop at:
Sunny Studio

Friday, May 3, 2019

Slice Of Summer Cards with Rachel and Lexa

Hello! It's Rachel here and I'm sharing a card with you today featuring the new Slice of Summer Stamp Set. I love all of the layering stamps from Sunny Studio Stamps! Even my kids were pretty impressed with how realistic these watermelons looked.

Sunny Studio Stamps: Slice Of Summer Berry Bliss Everyday Greetings Fancy Frames Summer Themed Thank You Cards by Rachel Alvarado and Lexa Levana

To start, I first stamped my watermelons with various shades of red and green inks. Inks Used: Reds: Altenew Rouge, Altenew Crimson, Versafine Crimson Red; Greens: Altenew Parrot, Altenew Bamboo, Altenew Moss

I then used the coordinating dies to cut out my watermelon pieces and set them aside to work on my card base. I added a piece of both red and green patterned paper from the Classic Gingham Paper Pad and then added a small strip of dark green card stock to separate them.

Sunny Studio Stamps: Slice Of Summer Berry Bliss Everyday Greetings Fancy Frames Summer Themed Thank You Cards by Rachel Alvarado and Lexa Levana

I used the Fancy Frames Circle Dies to cut a centerpiece for my card from white card stock. Before adhering everything together, I heat embossed my sentiment onto the bottom portion of my card with Fine Detail White Embossing Powder. Lastly, I adhered my watermelon with both adhesive tape and 3D Foam Squares for some added dimension.

Thanks so much for dropping by! Wishing you all a lovely weekend!

----------------------------------------------

Hi everyone! Lexa here today to share a summer card using Slice of Summer Stamps and the coordinating dies. It creates the most juicy summer fruits layering stamp, they are honestly good enough to eat. You'll love it since it has offer you many choices of sentiments to match your projects. I have mine paired up with the older stamp set called Berry Bliss to add more fruits and colors.

Sunny Studio Stamps: Slice Of Summer Berry Bliss Everyday Greetings Fancy Frames Summer Themed Thank You Cards by Rachel Alvarado and Lexa Levana

I started my card with masking the card base using purple tape from TOW to create stripes. Then I blend Distress Inks in Worn Lipstick, Abandoned Coral and Squeezed Lemonade. I'm in love with the result the moment I peeled off the tapes. I stamped the images with various dye inks. Then I use the coordinating dies to cut them all. All the images are adhered both with glue and foam tapes to create some dimensions. To balance the layout, the fruits are arranged in horizontal line while the background is vertical. 

Sunny Studio Stamps: Slice Of Summer Berry Bliss Everyday Greetings Fancy Frames Summer Themed Thank You Cards by Rachel Alvarado and Lexa Levana

The bright colors absolutely scream summer, don't you think so? "Thank you" sentiment is from Everyday Greeting Stamps. It's stamped with Versafine black ink and I add transparent embossing powder to create shine. 

Thank you so much for stopping by. I hope you have a wonderful day!

Sunny Studio Supplies Used:

Fancy Frames-Circle Dies
Shop at:
Sunny Studio
Berry Bliss Stamps
Berry Bliss Stamps
Shop at:
Sunny Studio
Berry Bliss Dies
Berry Bliss Dies
Shop at:
Sunny Studio
Classic Gingham 6x6 Paper
Shop at:
Sunny Studio
Everyday Greetings Stamps
Shop at:
Sunny Studio
Slice of Summer Stamps
Shop at:
Sunny Studio
Slice of Summer Dies
Shop at:
Sunny Studio

Wednesday, March 27, 2019

Everything's Rosy Cards with Mona and Franci

Hi crafty friends! It's Mona here, today I am showing you a bright floral card featuring the Everything's Rosy stamp set. I love this stamp set soo much and it is currently my favorite rose stamp set.


Sunny Studio Stamps: Everything's Rosy Everyday Greetings Thank You Card by Mona Toth

This time I started the card making with stamp layering. For the stamping I used Hybrid Inks from Scrapbook.com and green colored mini ink cubes from Altenew. For the leaves I used the Bamboo, Parrot and Moss colors. For the rose I used the Sky hybrid ink combo and for the tiny flower I used the Rose color combo from Scrapbook.com. When it was done I die-cut the images with the coordinating dies.


Sunny Studio Stamps: Everything's Rosy Everyday Greetings Thank You Card by Mona Toth

The next step was the background. I dry embossed a piece of white cardstock with Cable Knit Embossing Folder and backed it with Gingham Pastels Paper.


Sunny Studio Stamps: Everything's Rosy Everyday Greetings Thank You Card by Mona Toth

When it was done, I stamped the "Thank you" sentiment from the Everyday Greetings Stamp Set and after a quick fussy cutting I adhered it to the cardbase.


Sunny Studio Stamps: Everything's Rosy Everyday Greetings Thank You Card by Mona Toth

In the end I styled my card and adhered the flowers to my card base, embellished the card with Iridescent Hearts and Clear Drops and it was done. Thank you very much for reading through my post, I hope that you have enjoyed it and I have inspired you! If you like my creations let's be friends on Instagram. :)

------------------------------------------------------

Hello there! Franci here with you today with a classic "Best Wishes" card.


Sunny Studio Stamps: Everything's Rosy Everyday Greetings Background Basics Best Wishes Card by Franci Vignoli

First of all I created my landscape card base out of white cardstock and I cut out a coordinated panel in blue cardstock. I inked my blue cardstock with Chipped Sapphire distress ink to darken it up a little bit, I cut out 2 strips out of it and I let them dry completely.

I stamped the images from the Everything's Rosy set with just 1 ink each using the second generation stamping technique and I cut them out with their coordinated diesI added a strip of iridescent foil on to one of the blue strips, I also cut out a little strip of white cardstock and I stamped my sentiment from the Everyday Greetings set


Sunny Studio Stamps: Everything's Rosy Everyday Greetings Background Basics Best Wishes Card by Franci Vignoli

I also stamped that super cool pattern from the Background Basics set on to the front of my card with a light blue ink and then I assembled all the elements. I glued down the rose with foam tape and I also added some clear drops.

Hope you like my card and thank you so much for stopping by! 

Sunny Studio Supplies Used:

Background Basics Stamps
Shop at:
Sunny Studio
Cable Knit Embossing
Shop at:
Sunny Studio
Everything's Rosy Stamps
Shop at:
Sunny Studio
Everything's Rosy Dies
Shop at:
Sunny Studio
Everyday Greetings Stamps
Shop at:
Sunny Studio

Saturday, March 23, 2019

Guest Designer Spotlight: Cards with Donna Mikasa

Hi everyone, Donna Mikasa here and I'm so excited to be a guest designer today. Today's cards feature the gorgeous Everything’s Rosy stamp and coordinating dies, and sentiments from Everyday Greetings.

Sunny Studio Stamps: Everything's Rosy Everyday Greetings Sympathy Card by Donna Mikasa

I used monochromatic grays for the sympathy card and chose the following inks for the roses and leaves.

From lightest to darkest: Simon Says Stamp Stone, Hero Arts Wet Cement, Hero Arts Charcoal

Sunny Studio Stamps: Everything's Rosy Everyday Greetings Sympathy Card by Donna Mikasa

A piece of striped patterned paper was adhered to the card base and the roses and leaves were adhered over it. The sentiment was stamped with Versafine Clair Morning Mist and finished off with clear droplets.

Sunny Studio Stamps: Everything's Rosy Everyday Greetings Birthday Card by Donna Mikasa

For the birthday card, diagonal striped paper was adhered to a card base then topped with a smaller panel. The flowers and leaves were adhered to the card and the three-part sentiment was stamped on top. Sequins finished off the card.

Pink flower from lightest to darkest: MFT Pink Lemonade Dye Ink. MFT Cotton Candy Dye Ink, MFT Razzle Berry Dye Ink

Orange flower from lightest to darkest: MFT Pink Lemonade Dye Ink, MFT Coral Crush Dye Ink, MFT Poppy Dye Ink

Leaves from lightest to darkest: MFT Limelight Dye Ink, MFT Sour Apple Dye Ink, Altenew Forest Glades Dye Ink

Sunny Studio Stamps: Everything's Rosy Everyday Greetings Birthday Card by Donna Mikasa

The sentiment was stamped with Versafine Clair Morning Mist. There are four to five layers for each bloom, but I stamped only three layers for a “softer” look.

Sunny Studio Supplies Used:

Everything's Rosy Stamps
Shop at:
Sunny Studio
Everything's Rosy Dies
Shop at:
Sunny Studio
Everyday Greetings Stamps
Shop at:
Sunny Studio

Friday, March 22, 2019

Botanical Backdrop Cards with Lexa and Rachel

Hi everyone! Lexa here today with a birthday card highlighting Botanical Backdrop Dies. This set comes with leafy stitched frame and endless layered flowers to play with. Let's get started right away!

Sunny Studio Stamps: Botanical Backdrop Dies Everyday Greetings Happy Birthday Card by Lexa Levana

First, I blend Peacock Feather Distress Ink all around the edges. Then I die cut the leafy frame on a matching teal patterned paper from Polka-dot Parade Paper

Sunny Studio Stamps: Botanical Backdrop Dies Everyday Greetings Happy Birthday Card by Lexa Levana

I decided to use four color combination for the flowers, which are pink, fuchsia, purple and yellow. Using the flower dies, I randomly die cut bunch of flowers and layer them together one by one. It was so much fun.

Sunny Studio Stamps: Botanical Backdrop Dies Everyday Greetings Happy Birthday Card by Lexa Levana

After I finished with the flowers, I arrange and adhere them on my card using glue and foam tapes for dimensions. I use "happy birthday" from my favorite Everyday Greetings Stamp for the sentiment, I silver embossed it on an eggplant color paper so it will pop up more. Last but not least, I add pink jewels from Pretty Pink Posh to add some sparkles.

Thank you so much for stopping by today! I hope you all like my card and have an amazing day.

--------------------------------------------------------

Hello friends!  It's Rachel here and I am sharing two cards today that feature the gorgeous Botanical Backdrop Die.

Sunny Studio Stamps: Botanical Backdrop Dies Magical Mermaids Hello Word Die Cards by Rachel Alvarado

Sunny Studio Stamps: Botanical Backdrop Dies Magical Mermaids Hello Word Die Cards by Rachel Alvarado

For my first card, I created a fun shaker card and combined the Botanical Backdrop Die with the cute Magical Mermaids Stamp Set. I thought that the leafy frame could pass as some ocean foliage and nicely frame a little underwater scene. I colored all of my images with Copic Sketch Markers and used the coordinating dies to cut them out.

For the underwater background, I blended some Distress Inks (Peacock Feathers, Mermaid Lagoon, Wilted Violet, and Dusty Concord) onto a sheet of Ranger White Watercolor Paper.  I then spritzed this panel lightly with water, blotted it dry with a paper towel and then set it aside to completely dry.

Sunny Studio Stamps: Botanical Backdrop Dies Magical Mermaids Hello Word Die Cards by Rachel Alvarado

Once my background was ready, I added some 3D Foam Adhesive Tape around the edges and added my embellishments. I heat embossed my sentiment with Super Fine Detail White Embossing Powder onto a sheet of Heat Resistant Acetate. Once I attached the acetate, I then glued the final frame onto the outside of the card.

Sunny Studio Stamps: Botanical Backdrop Dies Magical Mermaids Hello Word Die Cards by Rachel Alvarado

For my second card, I didn't do any stamping at all. I simply die cut my images and lightly blended them with some ink. I used the Colorbox Ocean Ink for the green/blue tint and the Colorbox Lemonade Ink for the small yellow flowers.

Sunny Studio Stamps: Botanical Backdrop Dies Magical Mermaids Hello Word Die Cards by Rachel Alvarado

I added a sheet of the Gingham Pastels Paper Pack to the background and then adhered a 3D version of the sentiment "Hello" by die cutting it 5 times.

I hope you enjoyed my cards today! Wishing you all the best weekend!

Sunny Studio Supplies Used:

Magical Mermaid Dies
Shop at:
Sunny Studio
Magical Mermaid Stamps
Shop at:
Sunny Studio
Hello Word Die
Hello Word Die
Shop at:
Sunny Studio
Polka-dot Parade 6x6 Paper
Shop at:
Sunny Studio
Gingham Pastels 6x6 Paper
Shop at:
Sunny Studio
Botanical Backdrop Die
Shop at:
Sunny Studio
Everyday Greetings Stamps
Shop at:
Sunny Studio