Friday, September 9, 2022

Squirrel Friends Cards with Tina and Vanessa

Hello friends, Tina here with a slimline card for you today. Yes, I needed a BIG card to fit as much cuties as I could from the new Squirrel Friends stamp and die set.

Sunny Studio Stamps: Squirrel Friends Card by Tina (featuring Woodsy Autumn, Fall Scenes)

To create this scene card, I started off by cutting a slimline card base and rectangle panel both from Neenah Solar White card stock. I used traditional Autumn colors and blended a soft yellow sky with a cloud stencil and Scattered Straw Distress Oxide.

Next, I created a grassy border with a stitched hill side die and did some more ink blending using a mix of Cracked Pistachio end Evergreen Bough Oxides. To add a sweet detail to the card I die cut two white scalloped borders with the Slimline Basic Border DiesAfter stamping a sentiment from the Squirrel Friends stamps set onto the cloud sky, I was ready to start assembling the card.

First, I glued the grassy border to the sky panel with some liquid glue. Next, I adhered the two border strips and finally I attached this whole piece to the card base.

I wanted to create a sweet wood scene for my squirrels to play around. And I noticed that if I cut out the tree from the new Fall Scenes stamp and die set with my scissors, it would match perfectly with the tree from the Woodsy Autumn stamp set. I also added some mushrooms from that set to complete the scene.

Sunny Studio Stamps: Squirrel Friends Card by Tina (featuring Woodsy Autumn, Fall Scenes)

I love that the Squirrel Friends stamps set comes with a tree trunk in which the squirrels can play hide and seek! So, of course I had to include that in my scene too! After stamping and die cutting all my images, I colored them with my Copic markers and added some details with my white gel pen.

Then it was time to create the scene, the images in the background were glued down flat to the panel with liquid glue, those in front I popped up with some foam tape. I had a lot of fun adding the cute squirrels which I had colored in two shades of brown to make them stand out more.

Next, I scattered some colorful leaves and acorns all over the ground. That gave the squirrels the perfect surroundings to have a fun time! For some matching bling, I adhered a few of the Sunny Studio Stamps Gold Jewels with liquid glue around the stamped sentiment.

I hope you like this sweet card and I’ll see you next week!

--------------------------------------------------

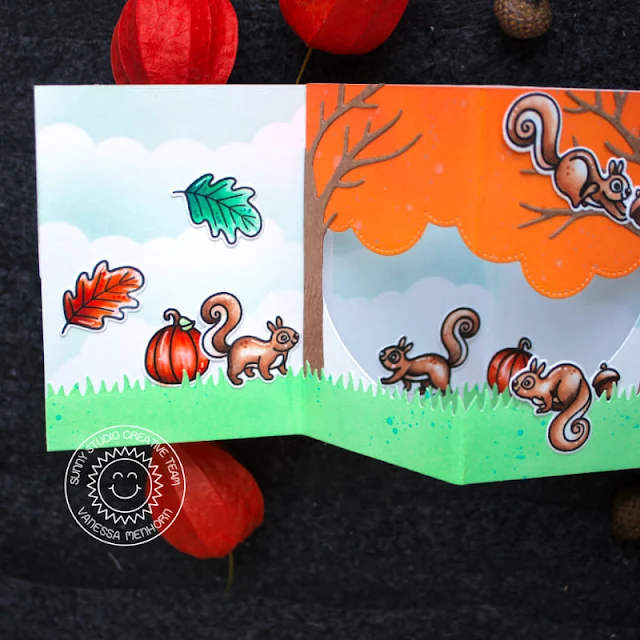
Hello to you! Vanessa here with a fun inside window card using the adorable Squirrel Friends set.

Sunny Studio Stamps: Squirrel Friends Card by Vanessa Menhorn (featuring Picket Fence Border Dies, Autumn Tree Dies, Chloe Alpha Dies)

I created this card with a regular card base + an inside panel of 14 x 10,5 cm. From this middle panel I die-cut an oval, scored the middle and scored the ends of the window to adhere it to the card. I created a video of the process, you will find more info here.

Sunny Studio Stamps: Squirrel Friends Card by Vanessa Menhorn (featuring Picket Fence Border Dies, Autumn Tree Dies, Chloe Alpha Dies)

I used the following products:
Squirrel Friends stamps + dies
Too Cute To Spook stamps + dies
Harvest Mice stamps + dies
Beautiful Autumn stamps + dies
Autumn Tree Dies
Chloe Alphabet Dies
Picket Fence Border Die
Slimline Nature Borders Dies
Stitched Oval 2 Dies

Sunny Studio Stamps: Squirrel Friends Card by Vanessa Menhorn (featuring Picket Fence Border Dies, Autumn Tree Dies, Chloe Alpha Dies)

The images are all colored with Copics and die-cut with the matching dies. I used Distress Oxide inks to create the background, the grass and the tree tops.

Sunny Studio Stamps: Squirrel Friends Card by Vanessa Menhorn (featuring Picket Fence Border Dies, Autumn Tree Dies, Chloe Alpha Dies)

The front is kept pretty simple, the fun is happening on the inside. Don't you love these fun squirrels? 

Sunny Studio Supplies Used:

Chloe Alphabet Dies
Chloe Alphabet Dies
Shop at:
Sunny Studio
Picket Fence Border Dies
Shop at:
Sunny Studio
Beautiful Autumn Stamps
Shop at:
Sunny Studio
Beautiful Autumn Dies
Shop at:
Sunny Studio
Woodsy Autumn Stamps
Shop at:
Sunny Studio
Woodsy Autumn Dies
Woodsy Autumn Dies
Shop at:
Sunny Studio
Slimline Basic Borders
Shop at:
Sunny Studio
Slimline Nature Borders
Shop at:
Sunny Studio
Harvest Mice Stamps
Harvest Mice Stamps
Shop at:
Sunny Studio
Harvest Mice Dies
Harvest Mice Dies
Shop at:
Sunny Studio
Stitched Oval 2 Dies
Shop at:
Sunny Studio
Fall Scenes Stamps
Fall Scenes Stamps
Shop at:
Sunny Studio
Fall Scenes Dies
Fall Scenes Dies
Shop at:
Sunny Studio
Squirrel Friends Stamps
Shop at:
Sunny Studio
Squirrel Friends Dies
Shop at:
Sunny Studio
Too Cute To Spook Stamps
Shop at:
Sunny Studio
Too Cute To Spook Dies
Shop at:
Sunny Studio
Autumn Tree Die
Autumn Tree Die
Shop at:
Sunny Studio

Thursday, September 8, 2022

Pumpkin Patch Die Focused Cards with Waleska and Marine

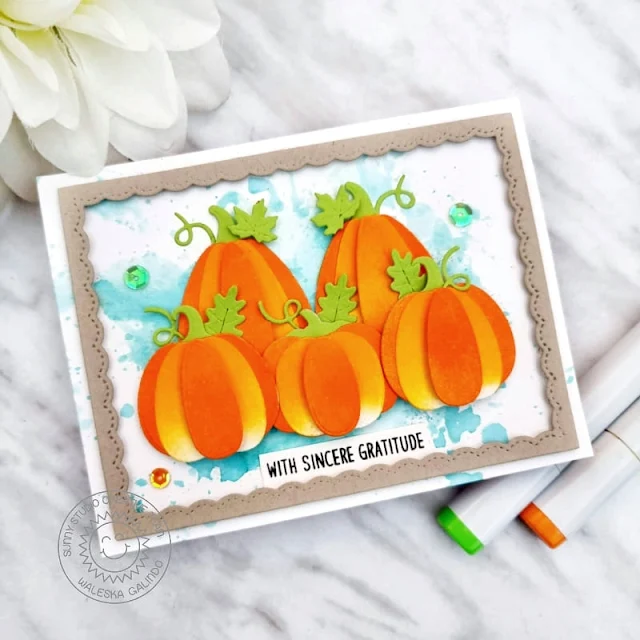
Hi Friends, Waleska here. My card for this week features one of my new favorite pumpkin dies, the Pumpkin Patch Dies, they are so fun and you can make them with or without dimension I just love them!

Sunny Studio Stamps: Pumpkin Patch Die Focused Card by Waleska Galindo (featuring Words of Gratitude, Fancy Frame Dies)

I started die cutting the pieces to create this beautiful pumpkins with white cardstock, I wanted to ink them with Oxide Inks.  For the leaves and stem I used green colored cardstock.  I used Ripe Persimmon and Carved Pumpkin Oxide inks to add color and dimension to the pumpkins. I used 3D Foam tape to elevate some parts too.

Sunny Studio Stamps: Pumpkin Patch Die Focused Card by Waleska Galindo (featuring Words of Gratitude, Fancy Frame Dies)

For the background I used Salvaged Patina Oxide Ink mixed with water with a smooshing technique on Watercolor paper.  I cut the biggest frame from the Fancy Frame Rectangles  with kraft cardstock and adhere it to the front panel.  I assemble the pumpkins in the center of my card and finally I added this panel to an orange card base.

I used the Words of Gratitude stamp set for the sentiment.  Thank you so much for stopping by remember to stay crafty because today is only lived once, do what you love and enjoy it!!!

------------------------------------------

Hey crafty friends, Marine here, thank you so much for stopping by! I'm back today with two cards, both showcasing the brand new Pumpkin Patch die set from the Fall & Winter 2022 collection. I couldn't decide if I wanted to create an autumn card or a Halloween card, so I decided to make both, using die cut pieces only.

Sunny Studio Stamps: Pumpkin Patch Die Focused Card by Marine Simon (featuring Comic Strip Everyday Dies, Picket Fence Border Dies, Tropical Trees Backdrop Dies)

I started by cutting all the pieces I needed to create both cards. And I knew that I wanted to use my alcohol markers to color all those bits and pieces, so I cut everything out of the same paper I always use to color my images. Besides the Pumpkin Patch die set, here are the sets I picked the different dies from:

Comic Strip Everyday: clouds, sun/moon, tree trunks, foliage
Picket Fence Border: grass border & fence
Tropical Trees Backdrop: crows/bats

For the autumn card I went with traditional pumpkins using two shades of orange, I also colored some sunflowers, leaves and swirling stems, a sun and a few clouds, some colorful trees and some birds to be crows.

And for the Halloween card I went with spooky pumpkins using two shades of purple. The sunflowers turned into bright pink flowers, I didn't add any foliage on the trees, the sun turned into the moon and the birds into bats.

Sunny Studio Stamps: Pumpkin Patch Die Focused Card by Marine Simon (featuring Comic Strip Everyday Dies, Picket Fence Border Dies, Tropical Trees Backdrop Dies)

Once everything was colored, I created a background for each card. I cut two 5,5 x 4,25" bristol panels, as well as two grass borders using a die from the Picket Fence Border die set. For the autumn card I went with a turquoise sky using tumbled glass & peacock feathers oxide inks, and a khaki green grass border using shabby shutters & peeled paint oxide inks. And for the Halloween card, I went with dark blue shades for the sky using blueprint sketch, chipped sapphire & black soot oxide inks, and a dark green grass border using mowed lawn & rustic wilderness oxide inks.

Before assembling the cards, I white heat embossed a sentiment at the bottom of each grass border: "Hello autumn" from Fall Kiddos for the autumn card, and "Trick or treat" from Bewitching for the Halloween card. And next I attached the different elements on each panel, starting with the grass borders, and then all the bits and pieces using a combination of foam squares, glue dots & liquid glue.

Sunny Studio Stamps: Pumpkin Patch Die Focused Card by Marine Simon (featuring Comic Strip Everyday Dies, Picket Fence Border Dies, Tropical Trees Backdrop Dies)

And that's it! Love how they both turned out, super cute and bright. I hope you like them too! As always you will find more information and details in the process video, so feel welcome to check it out! Thank you so much for stopping by, and see you next week!

Sunny Studio Supplies Used:

Picket Fence Border Dies
Shop at:
Sunny Studio
Stitched Rectangle Dies
Shop at:
Sunny Studio
Bewitching Stamps
Bewitching Stamps
Shop at:
Sunny Studio
Words of Gratitude Stamps
Shop at:
Sunny Studio
Comic Strip Everyday Dies
Shop at:
Sunny Studio
Fall Kiddos Stamps
Fall Kiddos Stamps
Shop at:
Sunny Studio
Tropical Trees Backdrop
Shop at:
Sunny Studio
Pumpkin Patch Dies
Pumpkin Patch Dies
Shop at:
Sunny Studio

Wednesday, September 7, 2022

Too Cute to Spook Cards with Marie and Marine

Hello Crafty Friends, Marie here! I am super excited to share this card with you today because it features my most favorite holiday of the whole entire year, Halloween! This card features the adorable stamp set Too Cute To Spook, as well as the Fall Scenes stamps. 

Sunny Studio Stamps: Too Cute to Spook Halloween Card by Marie Marco (featuring Fall Scenes)

For this project, I start off by die cutting an A2 sized panel from watercolor paper (this panel is where I stamp my haunted house/fall scene image).  I stamp all my images using Distress Ink in "Antique Linen". I then proceed to water color my images using Derwent Inktense Pencils.  I then die cut all the images using the Too Cute to Spook corresponding dies
and the Fall Scenes corresponding dies.

After coloring my images, I die cut my A2 Background panel using bristol smooth cardstock, and a scalloped rectangle panel in Neenah solar white 110 lb cardstock as my base. 

I inked up my background using Distress Oxide in "Shabby Shutters" then going to a darker green in Distress ink "Rustic Wilderness" and finally to Make the edges super dark, I used Black soot Distress ink. I also embossed my sentiment and bats using black embossing powder. 

Sunny Studio Stamps: Too Cute to Spook Halloween Card by Marie Marco (featuring Fall Scenes)

I proceeded to adhere my A2 background to my scalloped base and attached all my critters and pumpkins. I wanted to give the trick or treaters a Hocus Pocus vibe by adding some matching rhinestone embellishments from Sunny Studio. I love how just adding embellishments just makes a card come to life. 

I hope you were inspired to create some Spooktacular Halloween cards for all your friends and loved ones this year! Until next time, Happy Crafting!!!

---------------------------------------------

Hello crafty friends! Marine here, back with some spooky cute inspiration showcasing the brand new Too cute to spook stamp set, super adorable with fun critters all dressed up to go trick or treating in the neighborhood. Love their happy faces and fun costumes! This set includes everything you need to create a sweet and spooky little scene.

Sunny Studio Stamps: Too Cute to Spook Halloween Card by Marine Simon

I first started by stamping my images using an alcohol marker friendly black ink: three critters, the house, some dead trees and pumpkins, as well as two cute spiders and spider webs. I cut them all using the coordinating dies, and then colored everything using my alcohol markers.

Sunny Studio Stamps: Too Cute to Spook Halloween Card by Marine Simon

Next I cut all the different pieces to build my pop-up card. I went with black mostly, and embossed my "Happy Halloween" sentiment from Too cute to spook in silver on the foreground element. I cut the grass borders out of dark green cardstock, and created a night sky using blueprint sketch, chipped sapphire and black soot oxide inks. 

Sunny Studio Stamps: Too Cute to Spook Halloween Card by Marine Simon

I assembled all those pieces to build the card base, and then I attached all my cute images on the grass borders using 3mm glue dots. I also wanted a couple of bats to fly in the sky, so I attached them on thin strips of acetate, and finally stuck those strips inside the box, using glue dots again.

Sunny Studio Stamps: Too Cute to Spook Halloween Card by Marine Simon

And that's it! I hope that you like this adorable and spooky little scene. As always, feel welcome to watch the process video (click on the image above) for more details and information about this pop-up card. Thank you so much for stopping by and see you next week!

Sunny Studio Supplies Used:

Fall Scenes Stamps
Fall Scenes Stamps
Shop at:
Sunny Studio
Fall Scenes Dies
Fall Scenes Dies
Shop at:
Sunny Studio
Too Cute To Spook Stamps
Shop at:
Sunny Studio
Too Cute To Spook Dies
Shop at:
Sunny Studio

Tuesday, September 6, 2022

Autumn Greenery Die Focused Cards with Kavya and Isha

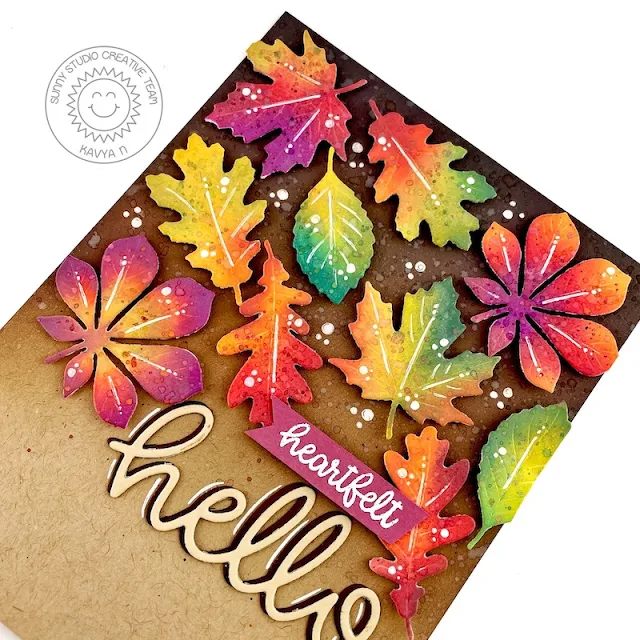
Hi folks, Kavya here. I am back on the blog with another fun project! Anyone who is familiar with my work knows that I love making things realistic. The new Autumn Greenery dies in the latest release were a perfect opportunity for me to try out some realistic ink bending!

Sunny Studio Stamps: Autumn Greenery Everyday Card by Kavya (featuring Hello Word Die)

I first started off by prepping my background. I ink blended an edge of kraft cardstock with some brown die ink and splattered some white and brown paint. Then, I die cut the leaves from Autumn Greenery using white cardstock and ink blended it using different shades of green, yellow, orange, red and purple distress oxide inks. 

Sunny Studio Stamps: Autumn Greenery Everyday Card by Kavya (featuring Hello Word Die)

I then splattered some water drops and added details using a white gel pen. Then, I placed the leaves onto the brown background and added a heat embossed sentiment and a die cut Hello Word to finish off my card!

That’s it folks! I hope you enjoyed this fun project :) Happy Crafting! 

------------------------------------------

Hello everyone, Isha here! Today, I am featuring the Autumn Greenery Dies with you. I love autumn, mainly because of the crisp air and the colors. These new dies are perfect with some intricate impressions.

Sunny Studio Stamps: Autumn Greenery Everyday Card by Isha Gupta (featuring Mini Mat & Tag Dies)

I started by creating the background layer. I took a white card and embossed it using the Cable Knit embossing folder. I then sponged kitsch flamingo and dried marigold distress inks. Flick gold watercolor. Next I die-cut the mat layer using the new Mini Mat and Tag 3 dies. Then I stamped the sentiment using the Cherry Blossoms stamp. Add gold watercolor to the edges. Adhere these mat layers to the card.

Sunny Studio Stamps: Autumn Greenery Everyday Card by Isha Gupta (featuring Mini Mat & Tag Dies)

Die-cut various leaves from the Autumn Greenery dies, add distress ink for the color. Flick water and gold watercolor. Adhere to the card.

Thank you for dropping by and have a nice day!

Sunny Studio Supplies Used:

Hello Word Die
Hello Word Die
Shop at:
Sunny Studio
Cable Knit Embossing
Shop at:
Sunny Studio
Cherry Blossoms Stamps
Shop at:
Sunny Studio
Autumn Greenery Dies
Shop at:
Sunny Studio
Mini Mat & Tag 3 Dies
Shop at:
Sunny Studio

Monday, September 5, 2022

Fall Scenes Cards with Cathy and Bobbi

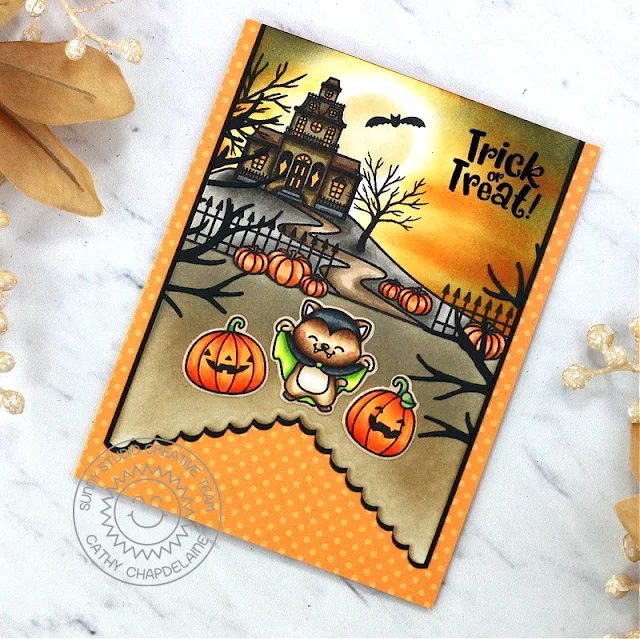
Hey friends! Cathy here sharing a card today featuring the spooktacular haunted mansion from the Fall Scenes stamp set paired with a little cutie from the Too Cute to Spook stamps.

Sunny Studio Stamps; Fall Scenes Card by Cathy Chapdelaine (featuring Too Cute To Spook, Fishtail Banner Dies, Stitched Circle Dies, Autumn Tree Dies)

I started with a piece of Neenah Classic Crest 80lb solar white cardstock cut to 3 3x4” x 5 1/2". I die-cut the bottom edge using a Fishtail Banners II die. I also cut a mat for this panel slightly larger from a piece of black cardstock and die-cut the bottom edge. I stamped the haunted mansion scene towards the top of the cardstock piece and masked the image using eclipse tape. I then inked the ground with Pumice Stone and Frayed Burlap Distress ink.

Sunny Studio Stamps; Fall Scenes Card by Cathy Chapdelaine (featuring Too Cute To Spook, Fishtail Banner Dies, Stitched Circle Dies, Autumn Tree Dies)

To create a spooky night sky, I die-cut a circle from eclipse tape using a 
Stitched Circles Small die and used the negative cut out from the tape to ink a moon with Antique Linen Distress ink. I then masked the moon and inked the sky with Scattered Straw, Wild Honey, Spiced Marmalade and Black Soot Distress inks. I stamped a bat from the Fall Scenes stamps across the moon.

Sunny Studio Stamps; Fall Scenes Card by Cathy Chapdelaine (featuring Too Cute To Spook, Fishtail Banner Dies, Stitched Circle Dies, Autumn Tree Dies)

To finish, I colored the stamped images with Copics and die-cut the Too Cute to Spook images using the coordinating dies. I heat embossed a sentiment from the Too Cute to Spook stamps and adhered a portion of the Autumn Tree die-cut from black cardstock to the left and right sides of the cardstock panel. I cut a piece of paper from the Critter Country paper pack 4 1/4" x 5 1/2" and adhered it to an A2 card base. I then matted the cardstock panel on the black cardstock and adhered it to the card front.

I hope you enjoyed and thanks for stopping by today! For more inspiration, please visit my blog www.inkredibleadventures.com and you can also find me on Instagram as @cathy.chapdelaine. 

----------------------------------------------------

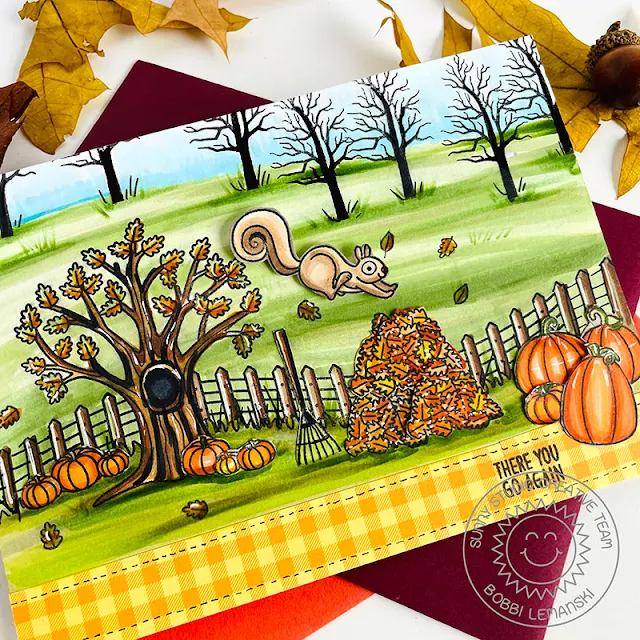
Hello Sunny friends. It’s Bobbi here with a fall scene card featuring some of the new fall sets just released by Sunny Studio Stamps. 


Sunny Studio Stamps; Fall Scenes Card by Bobbi Lemanski (featuring Squirrel Friends, Too Cute to Spook, Words of Gratitude)

Today, I’m using the following products:

Fall Scenes stamps and coordinating dies

Squirrel Friends stamps and coordinating dies

Too Cute to Spook stamps and coordinating dies

Words of Gratitude Stamps

Critter Country Pattern Paper


Sunny Studio Stamps; Fall Scenes Card by Bobbi Lemanski (featuring Squirrel Friends, Too Cute to Spook, Words of Gratitude)

To make this 5″ X 7″ size card, I started by stamping the fence and tree setting from the Fall Scenes stampsNote: Because my card is 7″ wide, I did add in more fencing on both sides to extend the fence line on the card front panel. Next, I created a background landscape using Copic markers in various greens and blues. I used a lot of different greens. Simply explore what you like. I tend to gravitate to yellow-greens for meadows, but since this is a fall scene, I brought in some grayish greens, too. Using the bare silhouette tree from the Too Cute to Spook stamps, I added trees in the background by the sky. This creates some depth in the scene.

Sunny Studio Stamps; Fall Scenes Card by Bobbi Lemanski (featuring Squirrel Friends, Too Cute to Spook, Words of Gratitude)

I stamped the foreground items including: 5 leaf piles, various small pumpkins, and a rake. I also added some larger pumpkins from the Too Cute to Spook stamp set and the flying squirrel is from the Squirrel Friends stamps. Adding the larger pumpkins in the very front provides more scene dimension. All of the images were adhered in place. I popped up the flying squirrel using foam tabs to make him look like he is in the air.

Lastly, I added some designer paper to the bottom of this scene and added faux stitching by hand and a stamped phrase from the Words of Gratitude Stamp set.

Sunny Studio Stamps; Fall Scenes Card by Bobbi Lemanski (featuring Squirrel Friends, Too Cute to Spook, Words of Gratitude)

Inside, I finished the sentiment thought with another one. This card is ready to send!

Thanks for stopping by today. If you want to see more ideas and inspiration from me, subscribe to my blog, BobbiHartDesign.com. I’ll send you updates on new posts! You can also find me on Instagram as @BobbiHartDesign and on Facebook as BobbiHartDesign. Bobbi Hartmann Lemanski, Bobbi Hart♥ Design, Adding h♥art into every design.


Sunny Studio Supplies Used:

Fishtail Banner II Dies
Shop at:
Sunny Studio
Words of Gratitude Stamps
Shop at:
Sunny Studio
Stitched Circle Small Dies
Shop at:
Sunny Studio
Fall Scenes Stamps
Fall Scenes Stamps
Shop at:
Sunny Studio
Fall Scenes Dies
Fall Scenes Dies
Shop at:
Sunny Studio
Squirrel Friends Stamps
Shop at:
Sunny Studio
Squirrel Friends Dies
Shop at:
Sunny Studio
Too Cute To Spook Stamps
Shop at:
Sunny Studio
Too Cute To Spook Dies
Shop at:
Sunny Studio
Autumn Tree Die
Autumn Tree Die
Shop at:
Sunny Studio
Critter Country Paper
Shop at:
Sunny Studio