Friday, September 27, 2019

Sneak Peek Week: Sweet Treats Gift Bag Dies with House Add-on

Hello and welcome to the last day of our Winter Sneak Peek Week!  All this week I have been showcasing projects using our Holiday collection which starts shipping TODAY!!! 

Today's sneak peeks include our last two standalone dies from the release... Our Sweet Treats bag die and our complimentary Sweet Treats House Add-on dies!  I just know you are going to fall in love with these as much as I have.  Make to check out the video tutorial I created on all the fun ways they can be assembled near the bottom of the post.  :)

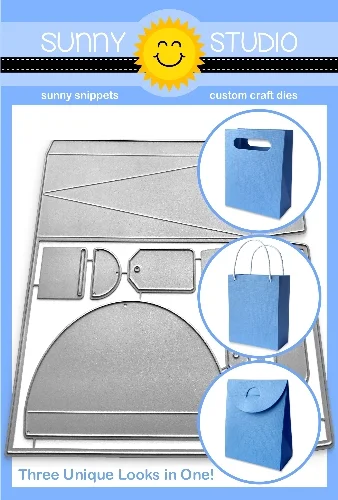
Gift Bag No. 1: The Sweet Treats bag dies comes with different options on how to close or carry the bag giving you three unique looks in one versatile die set. My first bag showcases the circular flap with a hook style closure.  These dies were designed to work beautifully with our 6x6 Papers so you are able to create a bag from just two sheets of 6x6 papers (or two bags from a 12x12 sheet, not counting the flap).  For the body of my bag I used paper from our new Very Merry Paper pack.

For this bag I pulled out my Fancy Frames Square dies to create a window before assembling the pieces which I backed with a piece of clear acetate.  I then cut a flap from a red gingham print from our Holiday Cheer Paper pack and decorated the front using our Santa Claus Lane Stamps and dies.


Gift Bag No. 2:  For my next bag, I left off the flap closure and instead used the oval handle that comes with the die set.  I cut my bag from a snowflake print from our Holiday Cheer Paper pack and then decorated the front and back with our Scenic Route Stamps and the pigs from our Hogs & Kisses Stamps.  I just love how it looks like this little pig is hollering "Merry Christmas".  I wanted him to be decked out for the cold weather too so I dressed him up in the hat and mittens from our Merry Mice Stamps and stamped a greeting from our Merry Sentiments Stamps.


For the back of my bag, I just continued my scene using the other two pigs from the stamp set.  Since the bag measures 3.5" wide, I had some room to play with the placement of my house border and I was able to vary them a bit so they weren't identical on both sides. Such a fun little bag to create!

Gift Bag No. 3:  For this bag, I wanted to create a special little treat to surprise my daughter with on Halloween day so I used some basic black and orange prints from our Classic Gingham, Polka-dot Parade and Heroic Halftones Paper packs.  To decorate my flap I used a set of nesting circle dies in my stash to cut a semi circle--I love how much oomph this little detail adds! To embellish my bag I used our Happy Owl-o-ween Stamps and some Midnight Blue Crystals.
Sunny Studio Stamps: Sweet Treats Halloween Owl Pumpkin & Witch Gift Bag (using Happy Owl-o-ween Stamps, Gingham Jewel Tones, Dots & Stripes Jewel Tones and Heroic Halftones 6x6 Patterned Paper)

Gift Bag No. 4:
 Up next is the third option for our Sweet Treat dies and that is a handled gift bag like this one here.  For this version, I paired it with our new Sweet Treat House Add-on dies, using the scalloped borders, window, door and wreath with bow and berries. 

Both the door and window for this set have been designed as a 2-piece set for maximum flexibility.  You can use them to cut just the outside rectangle or both with the panes/panels or in this case, I used just the window panes to cut openings from my bag background and then filled the open spaces on the inside with acetate.  That then gave me a surface to adhere my windows to.  By having them separate, you can also cut a rectangle for the door and then build the panels over the top for a more realistic dimensional look.
Sunny Studio Stamps: Sweet Treats Holiday Christmas Gift Bag with House Add-on (using Heroic Halftones, Classic Gingham & Amazing Argyle 6x6 Paper)

For the back of my bag, I used our Santa Claus Lane stamps to have Santa peeking out of the window and embellished the back with some fir trees from our Seasonal Trees stamps for added interest.  

For this bag I used prints from our Classic Gingham Paper, Heroic Halftones Paper and Amazing Argyle Paper (for the woodgrain door).
Sunny Studio Stamps: Sweet Treats Holiday Christmas Gift Bag with House Add-on (using Seasonal Trees & Santa Claus Lane Stamps and Classic Gingham & Heroic Halftones 6x6 Patterned Paper)

Gift Bag No. 5:
  Up next is an everyday take on those same supplies.  This time I used the scalloped flap that comes with our Sweet Treats House Add-on dies to create my flap, using some sticky magnetic sheets trimmed down to form my closure.  These are the same magnetic sheets I use to store my dies with my stamps so I actually had small leftover scraps going unused and was really happy to find a wonderful use for them.

For my roof, I used the two alternating scalloped dies from the set to decorate my flap using the two different brown grid prints found in our Gingham Jewel Tones Paper pack.

Sunny Studio Stamps: Sweet Treats Everyday Party Gift Bag with House Add-on and magnetic flap closure

The same little circles that can embellish the wreath as berries become little centers for the flowers with flower box.  You might want to use a jewel picker though because they're definitely on the tiny side.  ;)  A little bird from our Seasonal Trees stamps finished off my bag.
Sunny Studio Stamps: Sweet Treats Everyday Party Gift Bag with House Add-on (using Classic Gingham, Gingham Jewel Tones, Amazing Argyle & Polka-dot Parade 6x6 Patterned Paper)

Gift Bag No. 6:  For my last project of the day, I used the new Sweet Treat House Add-on dies to embellish our Wrap Around Box dies, using papers from our Very Merry Paper pack.  This time I used the little semi-circle window die for my door and cut extras of the shorter panels so that there would be room to still stack them.  

A greeting from our Happy Home stamps and some clay flower confetti were the perfect finishing touches.  I was tickled to discover the little heart die that comes with the set was just the right size to cover the heart in my sentiment!

I have created a video showing how to assemble these three styles of bags which you can watch down below or at our YouTube channel HERE.


That wraps up today's sneak peeks.  I'm so happy you've joined me!  If you missed it, make sure to check out our Birthday blog hop post HERE for a chance to win one of eighteen $25 Gift codes to our online store. Plus I share a few more details about our Holiday release promos shared below.  :)

Sunny Studio Stamps: 4th Birthday 2019 Blog Hop with Prizes, Free Shipping and Free Gifts with Purchase

Here's a closer look at the new items used today (available now as a pre-order HERE and shipping out on Friday, September 27th).


Other Supplies Used:
Happy Home Stamps
Happy Home Stamps
Shop at:
Sunny Studio
Merry Sentiments Stamps
Shop at:
Sunny Studio
Versafine Onyx Black Ink
Shop at:
Sunny Studio
Happy Owl-o-ween Stamps
Shop at:
Sunny Studio

Classic Gingham 6x6 Paper
Shop at:
Sunny Studio
Polka-dot Parade 6x6 Paper
Shop at:
Sunny Studio
Gingham Jewel Tones 6x6 Paper
Shop at:
Sunny Studio
Amazing Argyle 6x6 Paper
Shop at:
Sunny Studio
Holiday Cheer 6x6 Paper
Shop at:
Sunny Studio
Dots & Stripes Pastels 6x6 Paper
Shop at:
Sunny Studio
Wrap Around Box Die
Wrap Around Box Die
Shop at:
Sunny Studio
Seasonal Trees Stamps
Shop at:
Sunny Studio
Seaonal Trees Dies
Seaonal Trees Dies
Shop at:
Sunny Studio
Heroic Halftones 6x6 Paper
Shop at:
Sunny Studio
Very Merry 6x6 Paper
Shop at:
Sunny Studio
Santa Claus Lane Stamps
Shop at:
Sunny Studio
Santa Claus Lane Dies
Shop at:
Sunny Studio
Feeling Frosty Dies
Feeling Frosty Dies
Shop at:
Sunny Studio
Merry Mice Stamps
Merry Mice Stamps
Shop at:
Sunny Studio
Merry Mice Dies
Merry Mice Dies
Shop at:
Sunny Studio
Scenic Route Stamps
Scenic Route Stamps
Shop at:
Sunny Studio
Hogs & Kisses Stamps
Shop at:
Sunny Studio
Hogs & Kisses Dies
Hogs & Kisses Dies
Shop at:
Sunny Studio
Clay Flower Confetti
Shop at:
Sunny Studio


Thursday, September 26, 2019

Layered Poinsettia & Christmas Garland Dies + Season's Greetings Stamps

Hello and welcome to day 4 of our Winter Sneak Peek Week!  All this week I am sharing cards using our new collection for the holidays shipping on Friday, September 27th

Today's sneak peeks include a really fun new layered poinsettia die, a new A2 sized standalone die, 2 new 6x6 embossing folders and a stunning 4x6 sentiment stamp set.  Let's dig right in!

Card No. 1:  For my first card of the day I am using the new Layered Poinsettia dies to create a beautiful holiday card. Each poinsettia has 5 individual petal/ leaf layers (not including the veining or center) so these can be made to look super dimensional.  It's worth noting that all those layers can take a bit of time to put together (for example these two flowers here took me about an hour to cut out and adhere together), but all your hard work is rewarded with some seriously gorgeous finished blooms. 

Each poinsettia package comes with a layering guide to help you get everything lined up just right, but Sandy Alnock also shared a stunning card on her blog HERE showing another great way to use them without having to line them up which would be perfect for mass producing.

For my card I started by cutting a 3.75" square from my front card panel and then inked up my card front beneath using some Worn Lipstick distress ink going lighter towards the center to give my sentiment a glowing appearance.  I then stamped my sentiment in the center using a phrase from our new Season's Greetings stamps. Can I just say I'm smitten?!  These sentiments are such a pretty script and I adore their large size.  You almost don't need to do much more than stamp a sentiment, right?  

The set comes with some extra sprigs and berries which I double stamped with a second ink color just along the edges for some variation and shading.  I then cut them with the dies and layered them beneath each poinsettia. The Iridescent bubbles look so cool for the flower centers and give my card an extra dose of elegance.
Sunny Studio Stamps: Season's Greetings Holiday Christmas Card (using Layered Poinsettia Dies)

Card No. 2:  For my next card, I only used four of the five petal layers for our Layered Poinsettia dies to save some time and I also skipped the dies for the petal veins, this time pulling out some Copic markers in complimentary colors and just flicking on some quick veins.  I mass produced 50 of these flowers for some store displays and while they still took a decent amount of time, they went a bit quicker than my first example. I once again dressed up the centers with some green pearls from our rainbow pearls mix.

For my background, I inked up the raised portions of our new Buffalo Plaid embossing folder with some VersaFine Onyx Black ink using a brayer.  This gives an even application of the ink to the surface, while avoiding adding ink to the bottom layers (you just have to be careful to avoid sticking your fingers in it.  I then gently laid a piece of red cardstock on the clean side of my folder and carefully closed the folder, making sure to hold it tight so it couldn't shift before running it through my die-cutting machine.  I then set it out to fully dry while I worked on cutting out my sentiment.

This "Merry Christmas" phrase comes with our new Christmas Garland Frame die and is another great way to make a big splash on your holiday cards. I cut mine from white cardstock to help it pop against the busy pattern below and then continued the rustic, woodsy feel by cutting an oval window from some wood print paper (from our Amazing Argyle paper Pack) using our Stitched Ovals dies.
Sunny Studio Stamps: Layered Poinsettia Holiday Christmas Card (using Amazing Argyle Paper, Buffalo Plaid Embossing Folder & Merry Christmas Greeting from Christmas Garland Frame Die)

Card No. 3:  Up next is a card focusing all the sprigs and berries from our Season's Greetings Stamps.  I turned to Gina K's Wreath Builder Template to repeatedly stamp the tree bough twigs to form my wreath.  These templates are super fun to play with and like a kaleidoscope, you can create so many variations by simply moving the stamp pieces a little bit here or there (I created a fuller wreath with more variations in ink colors that I really loved, but when I was done I accidentally used a circle die to cut it out that was too small and I had to toss it--I cried a little inside).  Anyway, after that happened I decided I should make the best with what I stamped here on my first attempt. 


This version had some extra space in the center which was feeling like an empty void so I filled it with the word "Christmas" from our Season's Greetings Stamps. Using the original merry word that came with it was just too large for the space so I fussy cut the word Christmas out and paired it with a smaller "merry" word from our Merry Sentiments stamps.  I had some extra berries I had stamped from my first card which I used to dress up my wreath, adding some glossy accents over the top for extra shine. I then framed my wreath using a stitched scalloped circle from our Fancy Frames Circle Dies and mounted them onto a diamond print from our new Subtle Grey Tones 6x6 Paper pack.  The finished size of this card measures 5" square.

Sunny Studio: Merry Christmas Wreath with Berries Holiday Christmas Card (using Fancy Frames Circle Dies, Subtle Gray Tones 6x6 Paper & Season's Greetings Stamps)


Card No. 4: For this card I really wanted to showcase our new Christmas Garland Frame dies. To make my garland look fuller I employed Jennifer McGuire's trick for mirroring die-cuts (shared HERE), cutting a second set from a complimentary color of cardstock and layering them behind the original.  

For my background, I inked up my card base with some tumbled glass distress ink along the edges, fading to white in the center and then stamped my sentiment using the Season's Greetings Stamps.  The Christmas Garland dies come with some dimensional berries which you can layer together from three colors of cardstock which look great with our Layered Poinsettia dies.  It's hard to see the layers in the photo due to my use of the glossy accents over the top, but they look really cool in person!  For this version of my poinsettia I thought I would try to die-cut the veins from the individual leaf petals before layering them together.  While it's a fun look, it's also the most time consuming option I tried.

So what's that thin border around the edge you might be wondering?  Well, my card base was cut a bit too large and was showing though to the front of my card so I thought I would use my trimmer to trim it down after the fact, but my blade caught on the edge of the frame and tore the edge of my finished card (another moment near tears) so I decided to salvage it by cutting some thin strips of cardstock to match and layer over the boo-boo.  Now rather than being something my eye goes to every time I see it, it looks like something that is a design element with the border on all four sides. :)
Sunny Studio Stamps: Season's Greetings Holiday Christmas Card (using Christmas Garland Frame and Layered Poinsettia Dies)

Card No. 5:
 Up next is a card that is pretty similar to the last one, but this time I wanted to go for a more woodsy, rustic feel using our new Woodgrain Embossing Folder together with our Christmas Garland Frame dies.  

I embossed a heavy weight piece of Neenah Desert Storm cardstock (similar to kraft paper in color) and then colored over the surface using a Vintage Photo Distress Crayon which I rubbed into the surface with my finger to really show off the texture of my embossed paper. I then cut the "Merry Christmas" phrase from red cardstock twice and used a glue pen to stack them together for some extra dimension.  For my two pine cones I used our Christmas Trimmings stamps and then fussy cut the images with my scissors, popping them up with some foam tape.  
Sunny Studio:  Pinecone Merry Christmas Rustic Holiday Card (using Christmas Trimmings Stamps, Christmas Garland Frame Dies & Woodgrain 6x6 Embossing Folder)

Card No. 6:
   For this card I went soft and pretty using the exact same Woodgrain Embossing Folder and Christmas Garland Frame dies.  I started by embossing a heavy 110 lb. piece of white cardstock which I then inked up with some Spun Sugar Distress Oxide ink.  This time I cut a single garland frame from white cardstock to place over the top.

I cut three jingle bells from metallic shimmer cardstock using our Silver Bells dies which I layered over a 1" circle punched from charcoal cardstock (or if you don't have the right color, you use white cardstock and create the color you need with some markers).  I wanted a sentiment to match my bells so I heat embossed my Christmas phrase using our Season's Greetings Stamps with silver embossing powder onto vellum.  Then I had the dilemma of how I was going to adhere it without showing any adhesive (since my Spray Mount had gone bad).  The scalloped edge our largest Fancy Frames Rectangle dies came to my rescue! It hid my adhesive and dressed up my card at the same time.
Sunny Studio: Pink, Silver & White Soft Merry Christmas Holiday Card (using Christmas Garland Frame and Silver Bells Dies and Season's Greetings Stamps)

Card No. 7:
   I went clean and simple for my final card of the day using our Snowflake Circle Frame die together with our Layered Poinsettia die.  I stamped my "Happy New Year" sentiment using our Season's Greetings Stamps onto a fun tone-on-tone print from our new Subtle Grey Tones Paper pack and used a little strip of green from our Very Merry Paper pack...
Sunny Studio Stamps: Happy New Year Holiday Card (using Snowflake Circle Frame, Subtle Grey Tones Paper & Layered Poinsettia Dies)

Before I go, I have a little note worth mentioning about cutting intricate dies... A metal shim like this one HERE placed between your platform and your bottom cutting plate will become your new best friend and make life sooo much easier. It just gives your cutting sandwich the extra pressure it needs to cut them out with a lot less stress.
Cheery Lane Metal Shim for Cutting Intricate Dies

Well that wraps up today's sneak peeks.  Thank you so much for joining me. I've really appreciated all of you who have taken the time to leave a sweet comment here or on social media this week. Your kind feedback is what keeps me going and inspires me to put in the long hours to keep this little company running.

In case you missed it, make sure to check out our Birthday blog hop post HERE for a chance to win one of eighteen $25 Gift codes to our online store, along with some amazing Christmas card inspiration from our designer. Plus I share a few more details about our Holiday release promos shared below.  :)

Sunny Studio Stamps: 4th Birthday 2019 Blog Hop with Prizes, Free Shipping and Free Gifts with Purchase

Here's a closer look at the new items used today (available now as a pre-order HERE and shipping out on Friday, September 27th).  

Sunny Studio Stamps: Season's Greetings Large Christmas Sentiment 4x6 Photopolymer Clear Stamp Set    Sunny Studio Stamps: Season's Greetings Berry and Garland Metal Cutting dies to match coordinating stamp set

  Sunny Studio Stamps: Christmas Garland Tree Bough Border & Berries Merry Christmas Frame Metal Cutting DiesSunny Studio Stamps: 2-1/8" wide Layered Poinsettia Metal Cutting Die Set

Sunny Studio Stamps: Buffalo Plaid 6x6 Embossing Folder with Gingham Embossed Texture   Sunny Studio Stamps: Woodgrain 6x6 Embossing Folder with Wood Embossed Texture

Other Supplies Used:
Versafine Onyx Black Ink
Shop at:
Sunny Studio
Silver Bells Die
Silver Bells Die
Shop at:
Sunny Studio
Fancy Frames-Circle Dies
Shop at:
Sunny Studio
Fancy Frames- Rectangles
Shop at:
Sunny Studio
Amazing Argyle 6x6 Paper
Shop at:
Sunny Studio
Christmas Trimmings Stamps
Shop at:
Sunny Studio
Christmas Trimmings Dies
Shop at:
Sunny Studio
Stitched Oval Dies
Stitched Oval Dies
Shop at:
Sunny Studio
Very Merry 6x6 Paper
Shop at:
Sunny Studio
Layered Snowflake Frame
Shop at:
Sunny Studio
Rainbow Pearls
Rainbow Pearls
Shop at:
Sunny Studio
Iridescent Bubbles
Iridescent Bubbles
Shop at:
Sunny Studio
VersaMark Watermark Ink
Shop at:
Sunny Studio