Friday, August 2, 2019

Embossing Folder Focused Cards with Rachel and Lexa

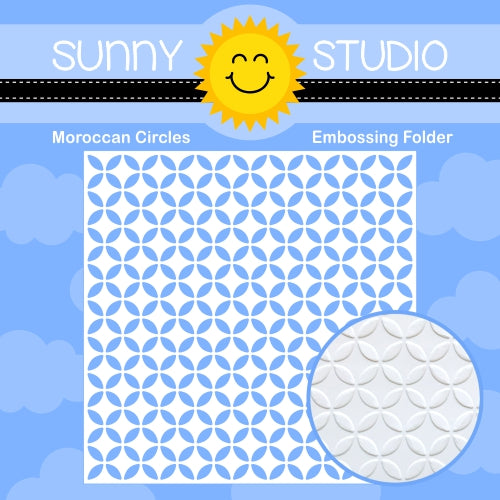
Hello everyone! It's Rachel here and I have a card to share with you today that features both the newly released Moroccan Circle Embossing Folder along with the Plane Awesome Stamp Set!

Sunny Studio Stamps: Plane Awesome Fancy Frames Card by Rachel Alvarado

I love the beautiful detail that you can achieve from this embossing folder! I decided that I wanted some contrasting color with my embossed background, so I inked up the flat side of the embossing folder with some Moonstone Ink by Lawn Fawn and ran it (along with a small sheet of Neenah Solar White 110lb Card Stock) through my die cutting machine using my embossing plates. I repeated the process 3 times so that the ink would have even coverage throughout the entire background.

Sunny Studio Stamps: Plane Awesome Fancy Frames Card by Rachel Alvarado

I then die cut a stitched scallop circle from white card stock for the center of my card using the Fancy Frames Circle Dies. I added another circle behind this that I had also cut from white card stock (using a basic circle die) and then blended this piece with some Stormy Sky Distress Oxide Ink. I splattered this piece with a little bit of water and then both some diluted white and blue paints once this piece had dried.

Sunny Studio Stamps: Plane Awesome Fancy Frames Card by Rachel Alvarado

I heat embossed my sentiment with Fine Detail White Embossing Powder onto a strip of blue card stock and adhered it to the front of my card with some liquid adhesive. For my images, I stamped the plane and the dog from the Plane Awesome Stamp Set (I absolutely love this set!) onto another sheet of Neenah Solar White 110lb Card Stock. I colored my images with Copic Sketch Markers and then used the coordinating Plane Awesome Dies to cut them out.

That's all for today! Thank you so much for taking the time to stop by! Have a wonderful weekend!

-------------------------------------------------

Hi everyone! Lexa here today with a card that will give you an inspiration using an embossing folder. It can add textures and more interests to your cards or projects. Let's get started!

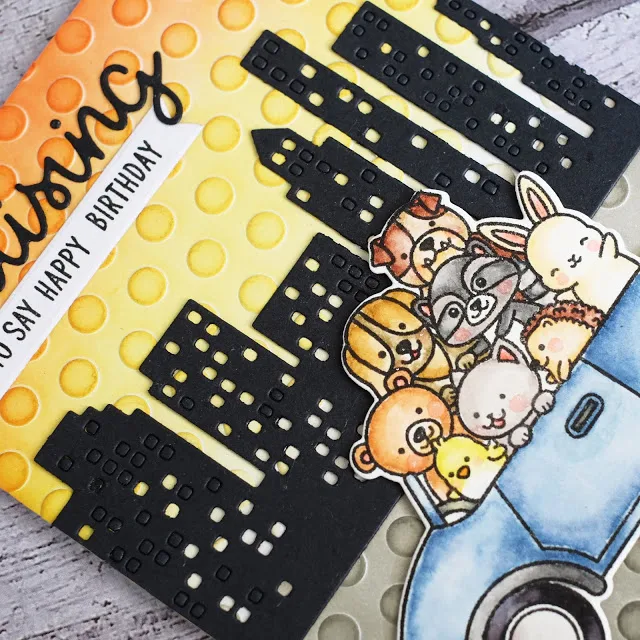
Sunny Studio Stamps: Cruising Critters Cityscape Border Dies Friendship Card by Lexa Levana

I use the brand new Lots of Dots Embossing to create the background. I just simply emboss the plain white cardstock with the polka dots then I blend Distress Inks. For the sunset sky I use Ripe Persimmon, Mustard Seed and Squeezed Lemonade in gradation, then blend Pumice Stone on the bottom part of my card that looks like concrete or street. I use the most adorable stamp called Cruising Critters Stamps, it has eight cute critters from Sunny Studio in one car. I can't stand how cute they are. I stamp it with Versafine black ink and watercolor it with Distress Markers. After finished with the coloring I use the coordinating dies to cut the main image.

Sunny Studio Stamps: Cruising Critters Cityscape Border Dies Friendship Card by Lexa Levana

I want to add a landscape that will create a subtle border between the sky and the ground. I use Cityscape Border Die on black cardstock, I intentionally not remove some of the windows so it looks like some of them are dark. It adds more dimensions. The 'cruising' word is cut on the same black paper and I add a fishtail banner to complete the sentiment.

That's all for today, I hope you have an amazing day! Thank you so much for stopping by today.

Sunny Studio Supplies Used:

Fancy Frames-Circle Dies
Shop at:
Sunny Studio
Lots of Dots Embossing
Shop at:
Sunny Studio
Moroccan Circles Embossing
Shop at:
Sunny Studio
Cruising Critters Stamps
Shop at:
Sunny Studio
Cruising Critters Dies
Shop at:
Sunny Studio
Plane Awesome Stamps
Shop at:
Sunny Studio
Plane Awesome Dies
Plane Awesome Dies
Shop at:
Sunny Studio
Cityscape Border Dies
Shop at:
Sunny Studio

Thursday, August 1, 2019

Elegant Leaves Cards with Anja and Vanessa

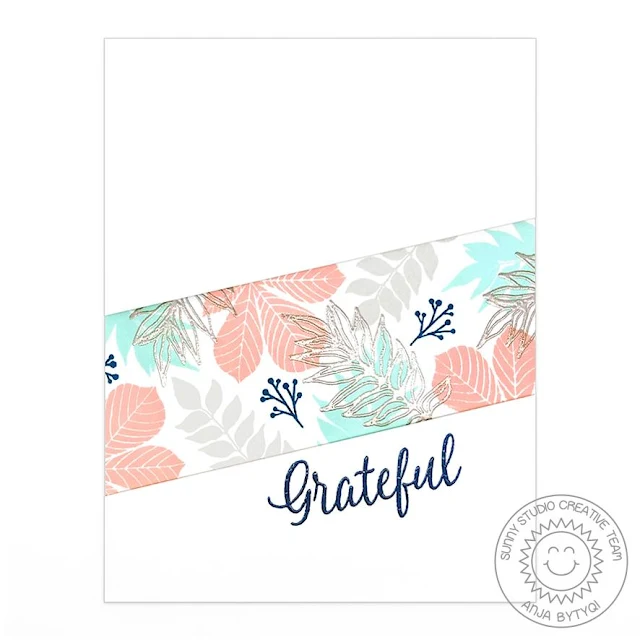
Hello everyone, Anja here and today I'm sharing a card made with the beautiful Elegant Leaves Stamps. Of course this set can be used for fall projects but since we're in the middle of a hot summer, I decided to go with non-traditional colors.

Sunny Studio Stamps: Elegant Leaves Grateful Card by Anja Bytyqi

I started off with a white A2 card base and randomly stamped the solid images in aqua, peach and light grey as well as the little branches in navy. On top I stamped the outline leaves image in VersaMark Ink and heat embossed them with Ranger Liquid Platinum embossing powder.

Sunny Studio Stamps: Elegant Leaves Grateful Card by Anja Bytyqi

Next, I diagonally stamped the word "Grateful" onto white cardstock with navy ink and VersaMark Ink before clear heat embossing it. I cut the panel apart and lastly adhered it with foam tape over my stamped design.

Thank you so much for stopping by! Have a wonderful day!

-------------------------------------------------

Hello everyone! Vanessa here with a watercolor fall card using Elegant Leaves. The colors of fall are so beautiful, I love this season!

Sunny Studio Stamps: Elegant Leaves Thanksful Card by Vanessa Menhorn

I stamped the leaves onto watercolor paper and heat-embossed them with gold embossing powder. Then I colored the images with Peerless Watercolors and die-cut everything with the matching dies.

Sunny Studio Stamps: Elegant Leaves Thanksful Card by Vanessa Menhorn

I trimmed a panel from rustic cream cardstock, stamped and heat-embossed the sentiment with gold embossing powder, added a strip of gold foiled cardstock to the top and adhered the panel to the Kraft card base. Finally, I adhered the leaves to the card, raising some with foam tape.

This stamp set is gorgeous, it is just perfect! And I am longing for a crisp fall day - we are experiencing one heat-wave after the other and I am sick of it. Have a cool day everybody, thanks for stopping by!

Sunny Studio Supplies Used:

Elegant Leaves Stamps
Shop at:
Sunny Studio
Elegant Leaves Dies
Elegant Leaves Dies
Shop at:
Sunny Studio

Wednesday, July 31, 2019

Plane Awesome Cards with Ana and Franci

Hi everyone! It’s Ana here today with three cards featuring Plane Awesome stamps and dies from the newest fall 2019 release! I was so excited when I saw this stamp set – our entire family loves airplanes so naturally I couldn’t stop myself at one card! 
To start, I stamped and colored images for my cards and cut them with coordinating dies.

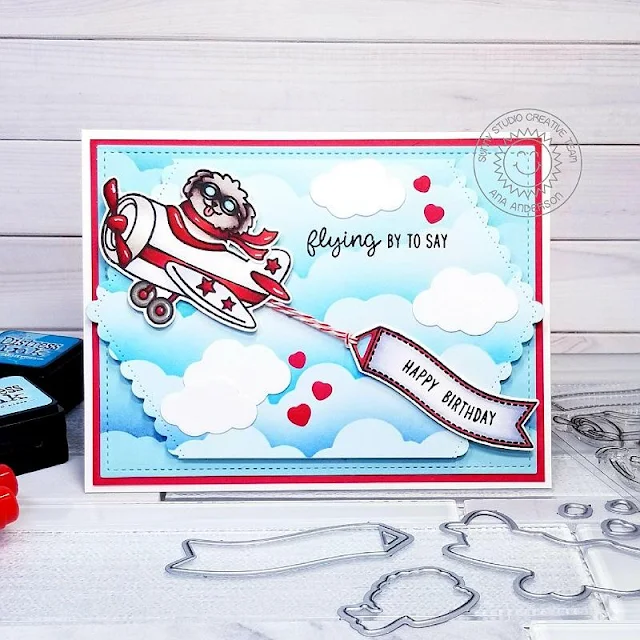
Sunny Studio Stamps: Plane Awesome Fluffy Clouds Border Dies Frilly Frames Dies Plane Themed Everyday Cards by Ana Anderson

For my first card I created the background blending Distress Inks in Mowed Lawn, Twisted Citron, Peacock Feathers and Salty Ocean, then die cut it with Frilly Frames Retro Petals die to create outline stitching.

Sunny Studio Stamps: Plane Awesome Fluffy Clouds Border Dies Frilly Frames Dies Plane Themed Everyday Cards by Ana Anderson

To make the trees, I repeated the inking process and used Woodland Borders Die set to die cut the trees as well the hill on my background panel. I created stitched cloud border with new Fluffy Could Border dies. I white heat embossed the sentiments and added lightly inked clouds.
Sunny Studio Stamps: Plane Awesome Fluffy Clouds Border Dies Frilly Frames Dies Plane Themed Everyday Cards by Ana Anderson

For the second card, I created 3 cloud stencils using Fluffy Cloud Border dies and inked two panels with Tumbled Glass, Broken China, Salty Ocean and Faded Jeans Distress Inks.

Sunny Studio Stamps: Plane Awesome Fluffy Clouds Border Dies Frilly Frames Dies Plane Themed Everyday Cards by Ana Anderson

I used Fishtail Banner II dies for the front cloud panel and Frilly Frames Retro Petals die for the stitching on the back panel. After adhering the images, I added hearts and clouds die cuts from the Plane Awesome die set.
Sunny Studio Stamps: Plane Awesome Fluffy Clouds Border Dies Frilly Frames Dies Plane Themed Everyday Cards by Ana Anderson

My third and final card was crated with Fluffy Clouds Border dies, stencils I made earlier with the dies and Distress Inks in Mustard Seed and Wild Honey.

Sunny Studio Stamps: Plane Awesome Fluffy Clouds Border Dies Frilly Frames Dies Plane Themed Everyday Cards by Ana Anderson

I stamped the sentiments to both clouds, adhered them to the top and bottom of the background panel using foam tape then added little Plane Awesome critter flying around in the middle.

I really hope you liked the three cards I have shared today and love these adorable Plane Awesome cuties as much as I do!

Thank you for stopping by today and I hope you have a wonderful day!

-----------------------------------------------------

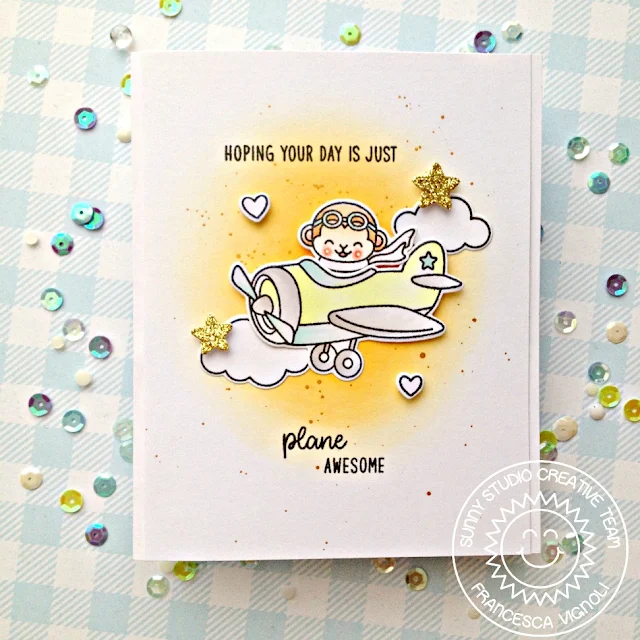
Happy Wednesday friends! Franci here with you today with a fun interactive card showcasing the Plane Awesome set.

Sunny Studio Stamps: Plane Awesome Fluffy Clouds Border Dies Plane Themed Everyday Card by Franci Vignoli

I kept the front simple cause there's a surprise element on the inside so I just cut a panel of white cardstock, I colored it with some Distress ink, added some watercolors splatters and let it dry completely. I did the same with the inside of the card so they could match perfectly.

Sunny Studio Stamps: Plane Awesome Fluffy Clouds Border Dies Plane Themed Everyday Card by Franci Vignoli

I stamped, colored and die cut all the images and I also die cut some stars using the little die that's free with every order at the Sunny Studio shop out of some sparkle gold cardstock. I glued all the images on to the panel and adhered it to the front of my card. 

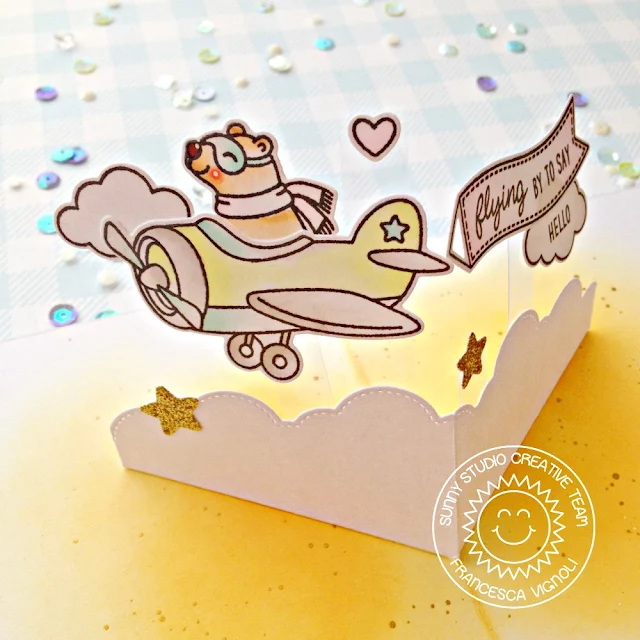
Sunny Studio Stamps: Plane Awesome Fluffy Clouds Border Dies Plane Themed Everyday Card by Franci Vignoli

For the inside I die cut a cloudy border, using the Fluffy Cloud Border dies, out of a stripe of white cardstock, I folded it in half, then cut and score all the sides at an angle to create my interactive element.

Sunny Studio Stamps: Plane Awesome Fluffy Clouds Border Dies Plane Themed Everyday Card by Franci Vignoli

I glued all the images to the cloud using little stripes of acetate and this really make them floating in the center of my card! I glued the cloud bottom flaps to the inside of my card and finally added some more stars.

Hope you like my card and thank you so much for stopping by today!

Sunny Studio Supplies Used:

Fishtail Banner II Dies
Shop at:
Sunny Studio
Woodland Borders Dies
Shop at:
Sunny Studio
Plane Awesome Stamps
Shop at:
Sunny Studio
Plane Awesome Dies
Plane Awesome Dies
Shop at:
Sunny Studio
Fluffy Clouds Border Dies
Shop at:
Sunny Studio
Frilly Frames Retro Petals Dies
Shop at:
Sunny Studio

Tuesday, July 30, 2019

Cruising Critters Cards with Angelica and Juliana

Hi friends! Angelica here with a great thank you card featuring the Cruising Critters stamp set.

Sunny Studio Stamps: Cruising Critters Comic Strip Speech Bubble Dies Hello Card by Angelica Conrad

I stamped and Copic colored the critters, then used the coordinating die to die-cut it. The Cruising Critters stamp set has several words to put together for different themes. I put together a Thanks sentiment, and stamped it in a die-cut speech bubble from the Comic Strip Speech Bubbles Dies. I die-cut a second gold speech bubble, and attached the sentiment on top, exposing a little gold at the bottom.

Sunny Studio Stamps: Cruising Critters Comic Strip Speech Bubble Dies Hello Card by Angelica Conrad

I picked a blue pattern paper from the Heroic Half Tones Paper Pack, and cut it to 4 x 5.25. I added a strip of gold washi tape to the bottom of the paper, then attached it to a card base with foam adhesive. I attached the critters and speech bubble with thin foam squares to finish the card.

Sunny Studio Stamps: Cruising Critters Comic Strip Speech Bubble Dies Hello Card by Angelica Conrad

I hope I have given you ideas for this adorable stamp set. Thanks for stopping by!

------------------------------------------------------

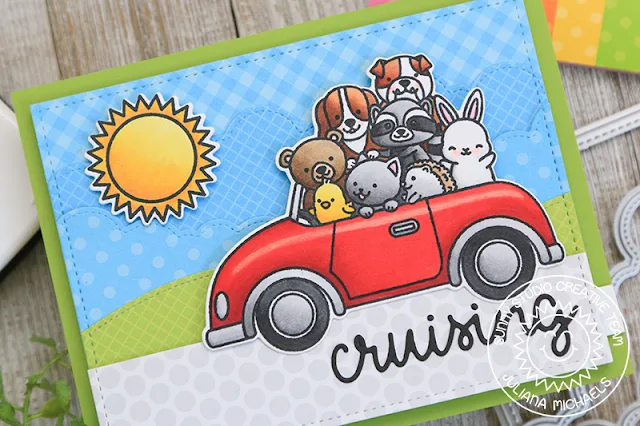
Hello friends! It's Juliana here today to share a new for me interactive card featuring a hidden pull tab! I combined this with the adorable Cruising Critters Stamp Set, so that when you pull the tab, the sentiment is revealed and the little critters go cruising along! Let me share with you how it all came together.

Sunny Studio Stamps: Cruising Critters Comic Strip Speech Bubble Dies Fluffy Clouds Border Dies Hello Card by Juliana Michaels

To get started, I stamped, colored and die cut the Cruising Critters image and the sun from the Sunny Sentiments Stamp Set and set them to the side. I then began working on how to create the hidden pull tab feature. I watched a few videos to see what might work best and came up with the following plan.

Sunny Studio Stamps: Cruising Critters Comic Strip Speech Bubble Dies Fluffy Clouds Border Dies Hello Card by Juliana Michaels

Background Panel: I selected a piece of blue gingham paper (Gingham Pastels) for the background. I then took a blue grid paper (Gingham Pastels) and die cut it using one of the Fluffy Clouds Border Dies. Next, I took a blue polka dot paper (Dots and Stripes Pastels) and cut it with a different Fluffy Clouds Border Die. Then, I took one of the Woodland Border Dies and cut a piece of green grid paper (Gingham Pastels). Finally, I cut a strip of grey polka dot paper (Polka Dot Parade). Put this piece to the side for later.

Sunny Studio Stamps: Cruising Critters Comic Strip Speech Bubble Dies Fluffy Clouds Border Dies Hello Card by Juliana Michaels

I then layered each of these to create the scene adhered all of them together EXCEPT for the grey polka dot and then I took the stitched rectangle die from the Frilly Frames Retro Petals and die cut them. The die cut through all 4 layers of paper with no problems! When placing the green grass area, make sure to leave at least 1.75 inches of paper below the top of the die cut so you have room for the pull tab mechanism.

Sunny Studio Stamps: Cruising Critters Comic Strip Speech Bubble Dies Fluffy Clouds Border Dies Hello Card by Juliana Michaels

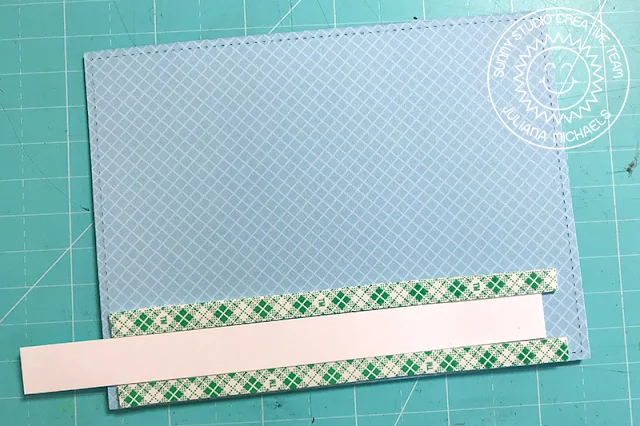
Pull Tab Mechanism: To create this, I used a ruler and pencil to help me draw 2 slits on each edge of the background panel. They are 0.25 inches from the bottom and 0.5 inches from each side. Each slit is 0.5 inches tall and about 1/8” wide. I then used a craft knife to cut through the layers to create the slit.

Next, I took a plastic treat bag and cut a strip of it that was slightly thinner than 0.5 inches and long enough to go through both slits and wrap around the back. I used a tape runner to adhere the ends together and trimmed off any excess. Make sure to place this taped section toward the left slit on the backside of the card. Add double sided foam tape on the outer side of each of the slits and cut a piece in half and place it below the plastic strip.  At this time, you can cut 2 cardstock strips to 0.5 x 1.25” and adhere them to the backside of the plastic strip. Add foam tape to the top of these. This is where the card will be attached. Play around with the exact placement of these tabs so that your car slides.

Sunny Studio Stamps: Cruising Critters Comic Strip Speech Bubble Dies Fluffy Clouds Border Dies Hello Card by Juliana Michaels

Flip the panel over and adhere your pull tab. I used a piece of white cardstock trimmed to 0.5” wide and then I trimmed off the excess once I had my card completed and the sentiment stamped on the pull tab. Next, take double sided foam tape, cut it in half and adhere a piece above and below the pull tab on the backside. This helps hold the slider in place. You can also add a piece of fun foam to the backside , above the top piece of foam tape, so the panel is flat against your card base.

Sunny Studio Stamps: Cruising Critters Comic Strip Speech Bubble Dies Fluffy Clouds Border Dies Hello Card by Juliana Michaels

Once the pull tab mechanism was completed, I could add the grey polka dot paper. I used the stitched rectangle die from the Frilly Frames Retro Petals to cut the paper and then used my paper cut to trim a strip from this to 11/8 inches tall.

Sunny Studio Stamps: Cruising Critters Comic Strip Speech Bubble Dies Fluffy Clouds Border Dies Hello Card by Juliana Michaels

I then adhered the Cruising Critters image to the pull tab mechanism making sure the tires where on the road! I then added the sun and the cruising die cut that comes with the Cruising Critters Die Set. To complete the card, I stamped the sentiment onto the pull tab and then mounted the entire panel onto a piece of green cardstock cut to 4.25x5.5 inches.

I hope you enjoyed learning how I created this hidden pull tab card using the Cruising Critters Stamp Set. Thanks so much for stopping by today!

Sunny Studio Supplies Used:

Sunny Sentiments Dies
Shop at:
Sunny Studio
Sunny Sentiments Stamps
Shop at:
Sunny Studio
Polka-dot Parade 6x6 Paper
Shop at:
Sunny Studio
Woodland Borders Dies
Shop at:
Sunny Studio
Gingham Pastels 6x6 Paper
Shop at:
Sunny Studio
Dots & Stripes Pastels 6x6 Paper
Shop at:
Sunny Studio
Heroic Halftones 6x6 Paper
Shop at:
Sunny Studio
Cruising Critters Stamps
Shop at:
Sunny Studio
Cruising Critters Dies
Shop at:
Sunny Studio
Fluffy Clouds Border Dies
Shop at:
Sunny Studio
Comic Strip Speech Bubble Dies
Shop at:
Sunny Studio
Frilly Frames Retro Petals Dies
Shop at:
Sunny Studio

Monday, July 29, 2019

Super Duper Cards with Leanne and Eloise

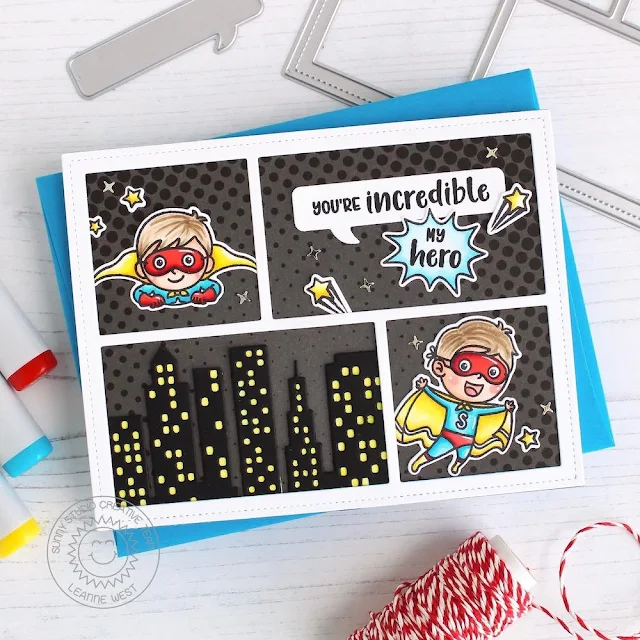
Hello crafty friends, Leanne here! We are featuring a super fun stamp set on the blog today. I have created a comic book style card using these playful images along with some of the new dies and pattern paper. Since I have a shortage of boy themed cards in my ready-to-go card stash, I chose to combine primary colors with black and grey along with the boy images from Super Duper. However, this design could just as easily be themed for a girl by using more feminine colors and the girl images. 

Sunny Studio Stamps: Super Duper Cityscape Border Comic Strip Speech Bubble Dies Super Hero Themed Cards by Leanne West

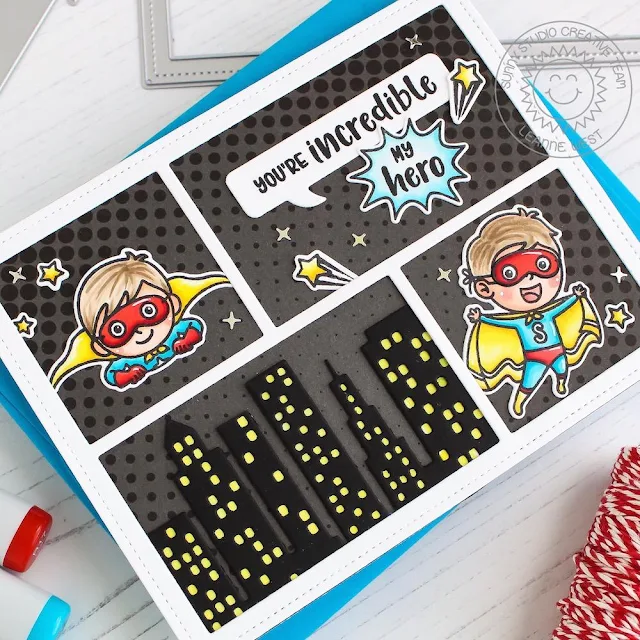
First I covered my A2 size card base with a black and gray halftone pattern from the Heroic Halftones paper pad. Next I added the die cut white frame. This frame die is included in the Comic Strip Speech Bubbles die set. I stamped and Copic colored two super heroes and several stars from the Super Duper stamp set. I die cut the images using the coordinating Super Duper dies. I die cut the Cityscape Border from black card stock and backed it with yellow card stock.  

Sunny Studio Stamps: Super Duper Cityscape Border Comic Strip Speech Bubble Dies Super Hero Themed Cards by Leanne West

I arranged the images, cityscape, and die cut speech bubbles inside the comic strip windows. I only used a portion cityscape and tucked the edges behind the frame. The main images are also slightly tucked under the frame. I really love how these small individual scenes give the card an authentic comic book vibe. I stamped some basic super hero themed sentiments onto the speech bubbles to allow this card to be used for different occasions. It's always good to have a few cards like this on hand. 

---------------------------------------------------

Hello friends, Eloise here and today I’m using the Super Duper Stamp Set to create a ‘You’re My Hero’ card. This could be used as a Father’s Day Card, Thank You Card, etc. I paired it with the new Cityscape Dies and Fluffy Cloud Border Dies as well to help complete the scene.

Sunny Studio Stamps: Super Duper Cityscape Border Comic Strip Speech Bubble Dies Fluffy Clouds Border Dies Super Hero Themed Cards by Eloise Blue

I started off with stamping out my images from Super Duper and colouring them in with Copic Markers. I cut them out and while I had my die cutting machine out, I cut the Fluffy Cloud Border Dies and Fancy Frames Rectangles Dies from white and then the Cityscape Die and Comic Strip Speech Bubble Dies from black.

(Copic Markers Used: E71, E74, E77, E79 / E41, E42, E43, E44 / R00, R30 / 0 / W2, W3, W5, W7 / Y11, Y15, Y19, YR23 / B91, B93, B95, B97 / R14, R24, R27, R89 / E000, E00, E21, E02)

Sunny Studio Stamps: Super Duper Cityscape Border Comic Strip Speech Bubble Dies Fluffy Clouds Border Dies Super Hero Themed Cards by Eloise Blue

I then cut down a piece of yellow starburst paper from Heroic Halftones to the size of my card front. I then used the white frame, flipped it over and adhered the clouds at the top and the cityscape at the bottom, I adhered foam tape onto the back and adhered it into place. I then took the super heroes and adhered them with foam tape too.

Sunny Studio Stamps: Super Duper Cityscape Border Comic Strip Speech Bubble Dies Fluffy Clouds Border Dies Super Hero Themed Cards by Eloise Blue

I then white heat embossed the ‘You’re My Super Hero’ sentiment onto the black speech bubble and also adhered it into place. Lastly, I scattered a few of the Primary Star Confetti around to match the colours used in the colouring.

Thanks so much for stopping by today, I hope you all enjoyed and I’ll see you next week. 

Sunny Studio Supplies Used:

Fancy Frames- Rectangles
Shop at:
Sunny Studio
Heroic Halftones 6x6 Paper
Shop at:
Sunny Studio
Super Duper Stamps
Super Duper Stamps
Shop at:
Sunny Studio
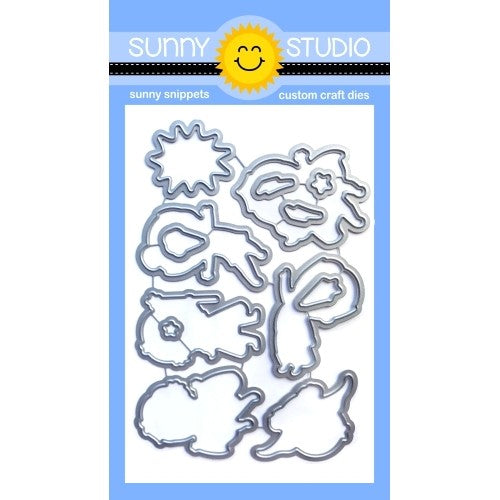
Super Duper Dies
Super Duper Dies
Shop at:
Sunny Studio
Cityscape Border Dies
Shop at:
Sunny Studio
Fluffy Clouds Border Dies
Shop at:
Sunny Studio
Comic Strip Speech Bubble Dies
Shop at:
Sunny Studio