Thursday, January 17, 2019

Love Monkey Cards with Anja and Vanessa

Hi everyone, Anja here sharing a love themed card using the new Love Monkey set. These cuties have stolen my heart!

Sunny Studio Stamps: Love Monkey Fancy Frames Circles Love Themed Card by Anja Bytyqi

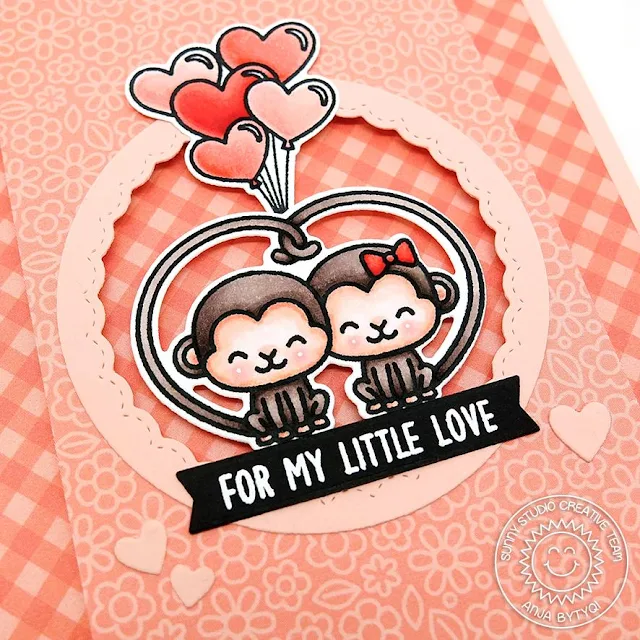
I started with an A2 card base cut from blush pink cardstock. Next, I picked some patterned papers in nice coral tones. One is from the Gingham Pastels 6x6 Paper pack and the other from the Flirty Flowers 6x6 Paper pack. I really like how you can mix and match them. I cut the gingham paper slightly smaller than A2 and directly adhered it to the card base.

I wanted the monkeys to sit in a circle window and created it by mounting the floral paper on a piece of fun foam and die cutting a circle. I also die cut one of the Fancy Frames Circle Dies from cardstock and put it on top of the circle opening as an decorative accent.

Sunny Studio Stamps: Love Monkey Fancy Frames Circles Love Themed Card by Anja Bytyqi

Now, I stamped the monkey couple as well as the heart balloons from another image in Memento Tuxedo Black Ink and colored them with Copic Markers (colors listed below). I used the coordinating dies to cut the images out and glued the balloon strings behind the tails of the monkeys.

(Copic colors used: monkeys - E0000, E000, E00, E11, R20 – E70, E71, E74, E77, E79; balloons/bow - R000, R20, R21, R22, R24, R27)

I stamped the sentiment with VersaMark Ink on a black cardstock banner and heat embossed it with white embossing powder. Finally, I popped up the monkeys with foam tape and added three die cut hearts next to the sentiment banner.

Thank you so much for stopping by! Enjoy your day!

-------------------------------------------------------

Hi everyone! Vanessa here today with a fun shadow box card using Love Monkey. I love interactive, pop-up, sliding cards and it is a lot easier to create them than you might think. Here is what I came up with.

Sunny Studio Stamp: Love Monkey Happy Birthday Shadow Box Monkey Themed Card by Vanessa Menhorn

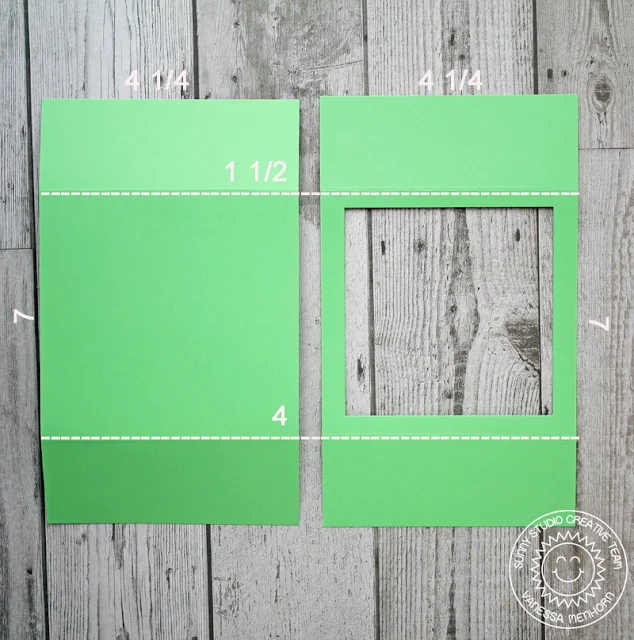
First, I created the box base. For this, I trimmed two pieces of cardstock the size 7 x 4 1/4, scored them at 1 1/2 and 4 and die-cut a square from the front piece. 

Sunny Studio Stamp: Love Monkey Happy Birthday Shadow Box Monkey Themed Card by Vanessa Menhorn

After I had assembled the box, I trimmed a square from white cardstock for the background, inked it with an ink blending tool and a cloud stencil and adhered it. Now I stamped the images onto white cardstock, colored them with Copics, die-cut them with the matching dies and adhered them to the box.

Sunny Studio Stamp: Love Monkey Happy Birthday Shadow Box Monkey Themed Card by Vanessa Menhorn

For a second layer, I just added a strip of the green cardstock to the top and the bottom of the box and was able to adhere some images there for more depth.
Sunny Studio Stamp: Love Monkey Happy Birthday Shadow Box Monkey Themed Card by Vanessa Menhorn

Finally, I stamped the sentiment, using the Polar Playmates stamp set, onto a strip of red cardstock, heat-embossed it with white embossing powder, trimmed it and adhered it to the background.

Sunny Studio Stamp: Love Monkey Happy Birthday Shadow Box Monkey Themed Card by Vanessa Menhorn

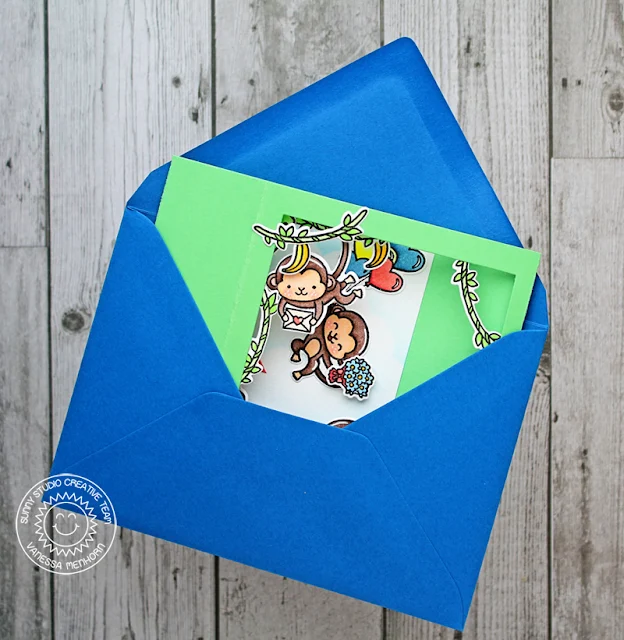
As you can see, it is no problem to put this card into an envelope to send it to someone special!

Sorry for the photo-heavy post :) Thanks for visiting!

Sunny Studio Supplies Used:

Polar Playmates Stamps
Shop at:
Sunny Studio
Fancy Frames-Circle Dies
Shop at:
Sunny Studio
Gingham Pastels 6x6 Paper
Shop at:
Sunny Studio
Flirty Flowers 6x6 Paper
Shop at:
Sunny Studio
Love Monkey Stamps
Love Monkey Stamps
Shop at:
Sunny Studio
Love Monkey Dies
Love Monkey Dies
Shop at:
Sunny Studio

Wednesday, January 16, 2019

Puppy Dog Kisses Cards with Mona and Franci

Hi crafty friends! It's Mona here and today I am going to show you a cute birthday card with cute puppies!

Sunny Studio Stamps: Puppy Dog Kisses Chubby Bunny Fancy Frames Puppy Themed Birthday Card by Mona Toth

I started the card making with stamping and coloring. I stamped the images from the Puppy Dog Kisses and Chubby Bunny stamp sets! Aren't these images cute? Then I colored them with Copic Markers. After the coloring I used the coordinating dies to cut the images and added highlights with Signo Uniball white pen.

Sunny Studio Stamps: Puppy Dog Kisses Chubby Bunny Fancy Frames Puppy Themed Birthday Card by Mona Toth

(Copic Markers: Y11, Y13, Y15, Y19, YR07, R20, R22, Y28, E31, E33, E35, E42, E43, E44, E51,YG01, YG03, YG17, W3, W7)

Sunny Studio Stamps: Puppy Dog Kisses Chubby Bunny Fancy Frames Puppy Themed Birthday Card by Mona Toth

I added a bright and colorful cardstock to the background from the Spring Sunburst 6x6 paper pad.

Sunny Studio Stamps: Puppy Dog Kisses Chubby Bunny Fancy Frames Puppy Themed Birthday Card by Mona Toth

Next, I run the smallest Fancy Frames Rectangle die with Neenah Solar White Cardstock through my die-cut machine, then I made the inside scene with Salty Ocean and Blueprint Sketch Distress Oxide Inks. The cute grass border is from the Comic Strip Everyday dies.

In the end I styled my card and adhered everything together. Thank you very much for reading through my post, I hope that you have enjoyed it and I have inspired you! If you like my creations follow me on Instagram. :)

------------------------------------------------------

Happy Wednesday friends! Franci here with you with a fun card, that's perfect for all your "dog lovers" friends! Omg look at all these cuties!! I'm definitely a dog person, as some of you may know, I have a lovely dog and love her with all my heart so it's always so much fun playing with sweet puppy images!!

Sunny Studio Stamps: Puppy Dog Kisses Puppy Parents Fancy Frames Puppy Themed Card by Franci Vignoli

First of all I stamped, colored and die cut all the images. I combined the lady dog in the center from the Puppy Dog Kisses mini set with lots of other cuties from the Puppy Parents set (that's the sweetest and my fave from the whole new release!!) 

Sunny Studio Stamps: Puppy Dog Kisses Puppy Parents Fancy Frames Puppy Themed Card by Franci Vignoli

I die cut the border from kraft cardstock and I created a frame out of it by die cutting a coordinated rectangle in the center, both using the Frilly Frames Lattice dies. I also cut out my card panel to fit it perfectly and I inked it up with green and blue inks to create a nice and soft grass/ sky background. I glued down everything with foam tape and liquid glue, stamped the sentiment and added some sequins.

It turned out such a fun pawesome scene, didn't it?!

Sunny Studio Supplies Used:

Fancy Frames- Rectangles
Shop at:
Sunny Studio
Comic Strip Everyday Dies
Shop at:
Sunny Studio
Spring Sunburst 6x6 Paper
Shop at:
Sunny Studio
Chubby Bunny Stamps
Chubby Bunny Stamps
Shop at:
Sunny Studio
Puppy Parents Stamps
Shop at:
Sunny Studio
Puppy Parents Dies
Puppy Parents Dies
Shop at:
Sunny Studio
Puppy Dog Kisses Stamps
Shop at:
Sunny Studio
Puppy Dog Kisses Dies
Shop at:
Sunny Studio

Tuesday, January 15, 2019

Staggered Circle Die Cards with Angelica and Juliana

Hello friends! Angelica here with a fun card to share featuring the new Staggered Circles dies. This is a fun die to work with. I love that the circles have an inside and outside stitch. I made this card with my in-laws in mind. They rescue dogs, and they do so much for our family. So seeing the Puppy Parents stamp set, I knew I was making a card for them!

Sunny Studio Stamps: Staggered Circles Puppy Parents Thank You Parents Card by Angelica Conrad

This fun card started with the placement of the Staggered Circles dies. After moving the die around my card front, I found a placement with one circle off the paper. I ran the die and card through my die cut machine, then picked out background papers from the new Flirty Flowers 6x6 paper pack. 

Sunny Studio Stamps: Staggered Circles Puppy Parents Thank You Parents Card by Angelica Conrad

I stamped out images from the Puppy Parents stamp set and colored them with Copic markers. I used the coordinating dies to cut them out, then added them to the circles with thin adhesive squares. 

Sunny Studio Stamps: Staggered Circles Puppy Parents Thank You Parents Card by Angelica Conrad

For the sentiment, I stamped words from the Puppy Parents stamp set with embossing ink onto black card stock, and heat embossed with white embossing powder. I also pulled an ampersand (&) from Born To Sparkle stamp set. I die cut the word "Thanks" from the Vintage Jars die set 3 times out of turquoise card stock, and stacked and glued them together. I glued the word and sentiment strips onto the card front, and attached the card front to an A2 size card base. I brushed the "Thanks" with a Tonic shimmer pen and added Tonic Crystal Glaze for shine.

Thanks so much for stopping by. I hope you have enjoyed this card. I will see you again next week!

---------------------------------------------------------------

Hello Sunny Studio Friends! It's Juliana here with you today to share a Hello Spring card featuring the brand new Staggered Circle die set and Chubby Bunny stamp set. Winter is just getting started here, but I'm already in the mood for spring and warmer weather!

Sunny Studio Stamps: Staggered Circles Chubby Bunny Hello Spring Card by Juliana Michaels

To get started, I stamped three of the bunnies and some of the little flowers from the Chubby Bunny stamp set and color them using Copic markers. After I finished coloring, I die cut them using the coordinating die set.

Sunny Studio Stamps: Staggered Circles Chubby Bunny Hello Spring Card by Juliana Michaels

For the card base, I begin by cutting a piece of white cardstock to 4.25 x 5.5 inches. I then die cut it using the Staggered Circle die set and adhered it onto a piece of computer paper cut to the same size.


Sunny Studio Stamps: Staggered Circles Chubby Bunny Hello Spring Card by Juliana Michaels

To fill the openings, I trimmed pieces of the Flirty Flowers 6x6 patterned paper close to the size of the opening. I then taped the paper in place with Therm O Web Purple tape and ran it through my die cut machine. Once I had all the circles cut, I adhered them into the openings. To finish the card base, I die cut a piece of white cardstock using the Fancy Frames Rectangle die. This will go on top of the circle die cut piece so I trimmed it down to fit just behind the Fancy Frames Rectangle die cut.


To complete the card, I adhered the bunnies using double sided foam adhesive. For the sentiment, I stamped the words onto black cardstock using Versamark embossing ink and embossed it with white embossing powder.

Sunny Studio Stamps: Staggered Circles Chubby Bunny Hello Spring Card by Juliana Michaels

Thanks so much for joining me today. I hope you enjoyed this bit of spring time inspiration in the middle of winter! I hope you have a fabulous week.


Sunny Studio Supplies Used:

Vintage Jar Stamps
Vintage Jar Stamps
Shop at:
Sunny Studio
Born To Sparkle Stamps
Shop at:
Sunny Studio
Fancy Frames- Rectangles
Shop at:
Sunny Studio
Flirty Flowers 6x6 Paper
Shop at:
Sunny Studio
Chubby Bunny Stamps
Chubby Bunny Stamps
Shop at:
Sunny Studio
Chubby Bunny Dies
Chubby Bunny Dies
Shop at:
Sunny Studio
Puppy Parents Stamps
Shop at:
Sunny Studio
Puppy Parents Dies
Puppy Parents Dies
Shop at:
Sunny Studio
Staggered Circles Die
Shop at:
Sunny Studio

Monday, January 14, 2019

Miss Moo Cards with Leanne and Eloise

Hello! Cow are you? Leanne here with you today. Don’t you just love a good pun? I sure do especially when it’s paired with an adorable image like Miss Moo. I’ve created a fun pasture scene to showcase Miss Moo and the coordinating punny sentiment. 

Sunny Studio Stamps: Miss Moo Sunny Sentiments Woodland Borders Hello Cards by Leanne West

I started with a panel of heavy weight white card stock cut slightly smaller than A2 size. I very carefully applied yellow ink with an ink pad to one side of the Sunburst Embossing folder. I centered the white card stock in the folder and ran it through my die cutting machine. The result is just fabulous! Great texture and color at the same time.  

Sunny Studio Stamps: Miss Moo Sunny Sentiments Woodland Borders Hello Cards by Leanne West

I added some clouds which are from the Sunny Sentiments stamp set. I used the Hello Word die to die cut the hello part. I die cut 3 times and adhered them together. For the stamped part of the sentiment, I used “cow are you” from Miss Moo which I white heat embossed onto some dark gray card stock.  

Sunny Studio Stamps: Miss Moo Sunny Sentiments Woodland Borders Hello Cards by Leanne West

I created a layered pasture using the hill borders from the Woodland Border die set and the grass border from the Sunny Sentiments die set. To color the pasture pieces, I sponged on some Mowed Lawn Distress Oxide ink and spritzed with water. I stamped and Copic colored the images and die cut with the coordinating dies. I scattered the flowers over the pasture area and adhered Miss Moo with foam tape. I added the completed panel to an A2 side fold card base.  

Thank you for stopping by and have a moo-valous day! 

---------------------------------------------

Hey everyone, it's Eloise here. To start off my project today I stamped and coloured with Copics my images from Miss Moo and Spring Greetings. I then cut them out using the coordinating dies. While I had my die cutting machine out, I also cut two hearts from the Stitched Hearts die set from white cardstock and also green patterned paper from Dots & Striped Pastels. I then used Woodland Borders and cut hills from the green pieces. 

Sunny Studio Stamps: Miss Moo Stitched Hearts Spring Greetings Love Themed Card by Eloise Blue

(Copic Markers Used: Y00, Y13 / YG01, YG23, YG17 / R00, R20, R22 / E53, E55 / W00, W0, W1 / W3, W5, W7 / E000, E00, E21 / BG11, BG13, BG49)

I added foam tape to the backs of the green pieces and images and adhered them onto the white hearts. I took a piece of pink cardstock, ran through the same sized hearts with a tan embossing mat and embossed the stitching details into the background. 

Sunny Studio Stamps: Miss Moo Stitched Hearts Spring Greetings Love Themed Card by Eloise Blue

I then took Spun Sugar and Picked Raspberry Distress inks and ink blended a little around the edges. I adhered my hearts on flat and stamped the sentiment 'I udderly adore you' onto a strip of blue cardstock that I adhered onto the panel as well. 

Sunny Studio Supplies Used:

Stitched Heart Dies
Stitched Heart Dies
Shop at:
Sunny Studio
Sunny Sentiments Dies
Shop at:
Sunny Studio
Sunny Sentiments Stamps
Shop at:
Sunny Studio
Hello Word Die
Hello Word Die
Shop at:
Sunny Studio
Woodland Borders Dies
Shop at:
Sunny Studio
Dots & Stripes Pastels 6x6 Paper
Shop at:
Sunny Studio
Sunburst Embossing
Sunburst Embossing
Shop at:
Sunny Studio
Spring Greetings Stamps
Shop at:
Sunny Studio
Spring Greetings Dies
Shop at:
Sunny Studio
Miss Moo Stamps
Miss Moo Stamps
Shop at:
Sunny Studio
Miss Moo Dies
Miss Moo Dies
Shop at:
Sunny Studio