Hey stampers, Anni here!
Isn't the new release F-A-B-U-L-O-U-S? And I am starting with my absolute favorite stamp set of all time: Sweet Shoppe! I LOVE LOVE LOVE the images in this set! So much fun to color... And the Sweet word die is just the perfect addition.
A few days ago I bought some cardstock. I just grabbed the colors I liked but when I stood in the line to pay I just realized what a great color combo it was. That was the inspiration for today's card.
I started with stamping the images on Strathmore 300 Bristol Smooth cardstock - the perfect paper for coloring with colored pencils. I use Prismacolors and Polychromos, I like them both and can't choose a favorite. I colored the images and added some highlights with a white gel pen.
Then I fussy cut the images (there are matching dies available too - I am just one of the weird persons that like to fussy cut).
For the sentiment I die cut the Sweet word from cream cardstock several times and stacked them up for more dimension. For my card base I choose some patterned paper. I don't use that much patterned paper but this one fits perfectly I think. It was subtle enough to stamp the rest of the sentiment directly on it. I finished the card by adding some Wink of Stella to the die cut word.
Thanks for stopping by and have a sunny week.
Hello everyone, Eloise here and today I have a fun slider Father's Day card featuring the new Sock Hop stamp set along with a couple of stamps sets from the past release - Island Getaway and Stars and Stripes. I was really inspired to make this card for my Dad for Father's Day, since he loves old cars and I think this car image is perfect for a interactive card.
To begin my card today I stamped out my images from the Sock Hop and Island Getaway stamp sets and used my Copic Markers to colour them in. I then fussy cut out the images with some scissors right along the black line.
I then moved on to creating my scene. For my background I used various colours of Distress Inks to create a sunset, I like to blend on watercolour cardstock because I find it gives a nicer blend. Once I blended the sunset, I used a yellow Distress Ink to make a sun on a separate bit of watercolour paper and then used the circle die from the Fresh and Fruity Coordinating Dies to cut it out. Once that bit was done I cut another piece of watercolour cardstock down and used a curved die to cut the curve on the top of the piece of paper - you could use scissors to do that too. I then took a grey and black Distress Ink to colour the curved piece to look like a road.

Once my ink blending was complete it was time to make the interactive portion of my card. I used a die to cut the the strip in the center of my black ink blended panel, but you could also use a exacto knife and a ruler to create the opening also - I just had a die so I used it. Once that was cut out of the panel I cut some squares of cardstock, adhered and layered them all up to create high enough block to allow my car to slide through - you could also use a coin or something else to do this, but I didn't want my car to slide without actually physically moving it myself. I then took the 'You're My Hero' sentiment from the Stars and Stripes stamp set and white heat embossed it onto my sunset panel in the center towards the top. Now it was time to put my card together.
I started off with adhering the sun flat onto the background also in the center. I then took the two palm trees I stamped, coloured and cut and then foam mounted them onto each sides of the card and cut off the excess. I then used some foam adhesive to pop up my black ink blended panel. But before I adhered it down to my card I cut a strip of white cardstock and placed it under the ink blended panel between the foam adhesive but so I could see it through the die cut strip in the cardstock. I then adhered down my square block onto that white strip and then adhered my coloured car on top of that square block piece. Now I could adhere down the black ink blended piece onto the card base and that finished up my card for today.
I hope you enjoyed my card today and got inspired to create an interactive card, they are so super fun to make! Make sure you check out the blog the rest of the week for more fabulous cards by the design team!
- Eloise
Sunny Studio Products Used:
Hello everyone! Thank you so much for making our release week so fun! I appreciate all the sweet comments that were left--They truly mean so much to me! Make sure to check out my post below to see if you're a winner of one of the $20 gift certificates. :)
I thought I would pop in and share a handful of beautiful customer cards that caught my eye this week...
Tropical Paradise Card by Vanessa (@vanessa.amann on instagram)
Fresh & Fruity Cards by Gracie (@gracielliedesign on instagram)
Fresh & Fruity Card by Laurie C. (@crazycardlady on instagram)
Tropical Paradise Pineapple Card by Rachel Bergfeld (@rbergfeldcarddesigns on instagram)
Tropical Paradise Flamingo Card by Rachel Bergfeld (@rbergfeldcarddesigns on instagram)
Thank you ladies for sharing your talents with us!
I can't wait to see what you all create with our newest stamps and dies!!! Don't forget to tag us with the hashtag #sunnystudiostamps and share your beautiful projects with us on Instagram, our facebook page or in our flickr group!
Rafflecopter has randomly selected the following five winners from each of our giveaways this past week:
- Kimberly Bliss Rendino
- Julene VanKleeck
- Iris Esther Lopez Bartolomei
- Kelli Horger
- Lisa Bankes-Lahiff
Thank you to everyone who stopped by and left comments for here, at instagram and on our facebook page. I read each and every one of them. Your sweet support truly brightened my week and means so much to me! <3
Hello & welcome to the last day of inspiration week. All of our new items for July are now available for purchase in our online store. We've put together some bundles to save you money and don't forget you can use the code "SAVE5" to save $5 on all orders over $49. It's our way of helping you out with shipping. ;)
Today we are featuring our new Fishtail banner II dies which are a follow up to our original Fishtail Banner dies. These can be used together with the originals or on their own. They come with scallops on both sides of the "v" for two unique looks and standalone stitched and dotted lines that can go solo or be paired with either scallop. :)
Up first I have a card using the scalloped edge to create a diamond. I started with by cutting the center diamond in white and then worked my way out from there using a rainbow of colors. To save on paper I just created V's and hid them below the other layers. A ran the stitched border through as a separate pass in my die-cutting machine so that I could get the two dies closer than I would have been able to if I ran them through at the same time. When I was done I realized I hadn't left space to add a full stitched "v" to my white piece so I hung the corners off the edge of my cutting plates so it wouldn't pierce my paper all the way to the edge. I finished my card with a simple stamped sentiment from Sunny Sentiments. :)
Up next is a card featuring a similar scalloped edge, but this time joining them together to create the look of a cute closure. To embellish my card I turned to our new Baby Bear stamp set. I thought it would be fun to create a sweet group of babies all in different outfits. Before adhering my pieces, I inked up my card base with Tumbled Glass Distress ink and then repeatedly stamped the little diaper pin (that is designed to be added to the baby's diaper) in a random pattern. I like the little splash of color and subtle pattern it gives my finished card.

For my next card, I used the new fishtail banners II to create a pennant style shaped card. I started by folding a 4.25 x 11 piece of white cardstock in half to form my card base. I then used the dies to cut through the front of my card and then closed my card and used the first cut to position a second cut for the back. It's possible you could do this in one pass, but I was using really heavy cardstock and didn't want to take my chances.
For my card front, I cut another 4.25 x 5.5 panel from white cardstock and cut it along the bottom using the original Fishtail Banner dies. I then inked it up with Worn Lipstick distress ink and used the sprinkles images from our new Sweet Shoppe stamp set to stamp a subtle tone-one-tone background. I pulled my focal point images from that same set and then completed my card with a banner from our Sunny Borders set inked up in Vintage Sepia distress ink. I was searching for just the right sentiment to fit the space and ended up piecing one together using the word "birthday" from Comfy Creatures and the "sweet wishes" from Sending My Love. :)

For my last card I used the dotted banner on it's own to create a subtle stitched chevron pattern for my card background. I love how classy and sophisticated it feels! To create my three little pennants I inked up strips of cardstock with Worn Lipstick, Tumbled Glass and Fossilized Amber Distress inks and then cut the ends using our original Fishtail Banner dies. I finished off my card with a little pineapple and hibiscus grouping from our Tropical Paradise set.
As I was working on my background I snapped a picture for your to see how I lined things up. I started by using my grid ruler to sketch in some light pencil lines 1/4" apart. By using a clear grid type ruler it made it super quick and easy (if you don't have something like this in your stash I highly recommend it--It's one of my favorite supplies). I also added a line down the center to help ensure I was lining the tip of my "v" in the center each time. I then used the lines to guide me on where to place my die each time. When I was done, I just erased my pencil lines. While this isn't something you'd want to do for mass produced Christmas cards, I actually was able to do this fairly quick and I love the results!
I've put together a free printable for you to download HERE giving you some ideas on how these banner dies can be used. We will be having a sketch contest using them in early September so make sure to stay tuned. ;)
Here's a side by side comparison of the new Fishtail Banner II dies next to the originals...
Also, just a reminder that today is the final day of our $20 gift certificate giveaway. You have until midnight tonight to enter today's contest as well as all our contests from the previous four days. Winners will be announced tomorrow morning. I hope you will stop by our store to see the full reveal in our New Arrivals section. :)

I thought today when never arrive. I have been so excited to finally share some cards using one of my favorite stamp sets from the release (who am I kidding though, they're all my favorites). The set is called Sock Hop and it includes iconic pop culture images from the 50's with a playful twist.
Up first is a card focusing on the poodle skirt wearing dog, the Letterman sweater wearing cat and the little ice cream soda images from the set. I didn't have room to include a table when creating the stamps so I created my own table by using the tree trunk from Summer Picnic as my table base and tracing two oval shadow die-cuts with a sharpie from the Sunny Borders die set to form my table top. For my black and white tile I drew my own floor using this post by Sandy Allnock as inspiration.
I heat embossed a scalloped border in white on black cardstock using the Sunny Borders Stamps and Dies and then repeated the ice cream soda motif on some cardstock inked up with Spun Sugar Distress Ink.
Up next is a card focusing on the fun car from the set. I love that it can fit the critters in the car--They almost remind me of a set of kids riding along in a 1950's Pedal Car.
To set my scene I loosely sketched out my street in pencil, fussy cut it out, erased the pencil lines and then inked it up with Black Soot Distress ink. Before adhering it to my card I inked up a panel in Twisted Citron and Mowed Lawn and then added some texture with my Copic Markers. When I was done I cut off a little wavy portion along the top to form my horizon and adhered it to my card base which had been inked up Tumbled Glass ink. To complete my scene I added trees to the background from our Happy Home stamp set.

Up next is a card spotlighting the cute jukebox from the set. I thought it would be fun to use the checkered blanket from our Summer Picnic set to form my black & white tiled floor. This is a great option if you're nervous drawing your own. I'm sure there is a great way to mask it off to repeat the design, but in the end I decided to stamp 4 of them and just cut them out (which is so easy to do with the straight lines) and then to adhere them on the card so that they formed one continuous design.
For my last card I used Silhouette's Circle Burst cutting file. I opened it up in the Silhouette software and then added a 4.25 x 5.5 rectangle over the top. I used the align commands to center them together and then trimmed it to leave just the areas where the two shapes overlapped. It left me with these rays which were so easy to quickly cut out and apply to my card panel.
I then stitched through the center of each ray with my sewing machine and covered up the messy intersection with a 3-1/2" wide circle cut from white cardstock. For my kitty image I added the sunglasses and guitar accessories from the set and one of the fun retro sentiments from the set.
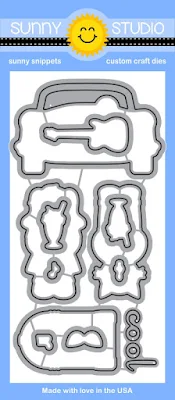
Here's an official look at the new Sock Hop set with the coordinating dies. I spent quite a bit of time researching popular catch phrases from the decade and had a blast creating this one. I hope you like it. :)
Thanks much for swinging by today. Stay tuned tomorrow for one last new release, but before you go make sure to sign up for your chance to win a $20 gift certificate to our store using the rafflecopter below.
We will be giving away one $20 gift certificate each day for a total of five lucky winners this week. The contest for each post closes at Midnight EST on Friday, July 1st with winners announced on Saturday, July 2nd. :)
a Rafflecopter giveaway
Hello there! Welcome to day 3 of our inspiration week! Today I am sharing ideas using our new Sweet Shoppe stamps and dies! :)
Up first is a card focusing on the soft serve ice cream cone from the set. I started by coloring one of the ice creams blue for fun which sparked the idea of coloring them in a rainbow of bright colors (your guess is as good as mine what flavors they are). To add a little personality I stamped a happy face from the set onto one of the cones and then added glossy accents to the ice cream portion of each cone.
For my card panel, I inked the bottom portion up with Tumbled Glass Distress ink using a jumbo dauber. I finished off my card with a sassy sentiment from the set.
For my next card I inked up my background with Picked Raspberry, Carved Pumpkin, Mustard Seed, Twisted Citron, Peacock Feathers and Broken Glass distress inks. I then used those same inks to stamp a trio of sprinkles to form a subtle repeated pattern on my background.
I cut a 3" circle from white cardstock and stamped my sentiment using a MISTI tool and coordinating colors of distress inks. By using the MISTI I could repeatedly ink up the individual letters until they stamped a solid image. I then colored each of my candies with Copic Markers, arranged them around my circle (popping some up with foam tape) and then coated the centers of each with glossy accents.
For my third card I lightly drew diagonal lines across my black cardstock panel 3/4" apart and then repeatedly stamped the word "sweet" using clear VersaMark ink. I then sprinkled a rainbow of different embossing powders starting with red and working my way to the opposite corner. If you don't have a lot of embossing powders on hand, you could also heat emboss in white and then use an alcohol based marker to color over the top.
For my sentiment I cut the word "sweet" using the Sweet Word die and colored it in coordinating colors with my Copic Markers. I then cut 4 more sweet words from black cardstock to layer under the rainbow one. It pops up the word and gives it a cool look when viewing it from an angle. I completed my card with some simple machine stitching along the top and bottom of my sentiment panel, adding a simple cupcake with rainbow sprinkles.
For my fourth card I completely switched gears and went with a Neapolitan ice cream color scheme. I adore pink and brown together, don't you? To give my cones some sparkle I colored over the ice cream portion with a Wink of Stella clear glitter pen and then went over the top with glossy accents which really magnifies the sparkle. For my pink scalloped edge, I stamped and die-cut the edge using our Sunny Borders Stamps and coordinating dies. I completed my card with a sentiment heat embossed in white and a sprinkling of some pale pink iridescent sequins.
For my last card I wanted to do a partial die-cut treatment of the sweet word die so I hung the bottom of the word off the edge of the cutting plates so that when I ran my sandwich through the machine it wouldn't cut along the bottom edge. I then took my craft knife and a ruler and trimmed along the edge to form a small strip below then word. I then trimmed one end off of using our Fishtail Banner dies.
The Sweet shoppe set comes with a stamp of 12 connected sprinkles that were designed to stamp on half the doughnut and then flip around and stamp on the second half of the doughnut. This allows for quick and easy decorating of the donuts, cupcakes and ice cream while still saving some space on the set for more images.
For the jelly filled doughnut, I cover the doughnut hole on my stamp with a bit of scotch tape, inked up my stamp, peeled off the tape and then stamped my image. I then was able to stamp the swirl of frosting in the center. I completed my card by giving the bottom edge a decorative scalloped edge with our Sunny Border dies.
This set can create 15 unique sentiments perfect for both card making and scrapbooking. The sprinkles and toppings in the set can also mix and match for endless customized cupcakes and donuts.
And here's a full look at the new Sweet Shoppe stamp set, coordinating dies and Sweet Word die.
Thanks much for swinging by today. I hope you enjoyed this look at our newest set. Please join us again tomorrow for the full reveal of our fourth stamp set, but before you go make sure to sign up for your chance to win a $20 gift certificate to our store using the rafflecopter below.
We are giving away one $20 gift certificate each day for a total of five lucky winners this week. The contest for each post closes at Midnight PST on Friday, July 1st with winners announced on Saturday, July 2nd. :)