Showing posts with label Stars & Stripes. Show all posts

Saturday, July 23, 2016

Sunny Saturday Share: Fun & Happy Customer Cards for Summer


Hello everyone!  How have you been?  I hope you are all enjoying your summer!  I thought I would pop in and share a handful of fabulous customer cards that caught my eye over the past couple of weeks...  

Sweet Shoppe Ice Cream Card by Juliana Michaels (@julianamichaels on instagram)


Sweet Shoppe Rainbow Sorbet Ice Cream Cone Card by Juliana Michaels

Stars & Stripes Rainbow Card by Creations Galore (@creationsgaloregb on instagram)


Sunny Studio Stamps: Stars & Stripes Rainbow Card by Creations Galore.

Fresh & Fruity Tag by Raquel Stienecker (@raquelstienecker on instagram)


Sunny Studio Stamps: Fresh & Fruity Strawberry Gift Tag by Raquel Stienecker.

Tropical Paradise Tag Cards by Kumiko (@kumiko_hata on instagram)


Sunny Studio Stamps: Tropical Paradise Flamingo Tags by Kumiko

Tropical Paradise Planner Pages by Kim Gaughan (@ombrescissorscrafts on instagram)


Sunny Studio Stamps: Tropical Paradise Plumeria flowers & Pineapple Planner Pages by Kim Gaughan

Island Getaway & Tropical Paradise Card by Irene Martín (@irenemartincrafts on instagram)


Sunny Studio Stamps: Tropical Paradise & Island Getaway Card by Irene Martín

Tropical Paradise Card by Jessica Griswold (@jess71004 on instagram)

Sunny Studio Stamps: Tropical Paradise Flamingo & Hibiscus Flowers Card by Jessica Griswold

Thank you for sharing your talents & beautiful projects with us!

I can't wait to see what you all create with our newest stamps and dies!!!  Don't forget to tag us with the hashtag #sunnystudiostamps and share your beautiful projects with us on Instagramour facebook page or in our flickr group!  

Monday, July 4, 2016

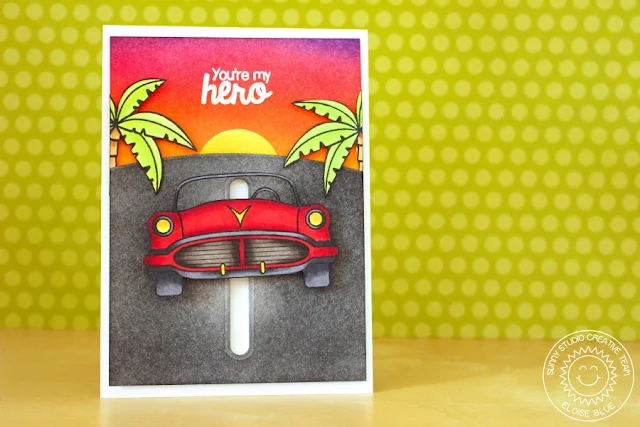
Interactive Slider Car Father's Day Card with Eloise

Hello everyone, Eloise here and today I have a fun slider Father's Day card featuring the new Sock Hop stamp set along with a couple of stamps sets from the past release - Island Getaway and Stars and Stripes. I was really inspired to make this card for my Dad for Father's Day, since he loves old cars and I think this car image is perfect for a interactive card. 

Sunny Studio Stamps: You're My Hero Slider Car Card by Eloise Blue (using Sock Hop, Stars & Stripes & Island Getaway)

To begin my card today I stamped out my images from the Sock Hop and Island Getaway stamp sets and used my Copic Markers to colour them in. I then fussy cut out the images with some scissors right along the black line.

I then moved on to creating my scene. For my background I used various colours of Distress Inks to create a sunset, I like to blend on watercolour cardstock because I find it gives a nicer blend. Once I blended the sunset, I used a yellow Distress Ink to make a sun on a separate bit of watercolour paper and then used the circle die from the Fresh and Fruity Coordinating Dies to cut it out. Once that bit was done I cut another piece of watercolour cardstock down and used a curved die to cut the curve on the top of the piece of paper - you could use scissors to do that too. I then took a grey and black Distress Ink to colour the curved piece to look like a road.


Sunny Studio Stamps: You're My Hero Slider Car Card by Eloise Blue (using Sock Hop, Stars & Stripes & Island Getaway)

Once my ink blending was complete it was time to make the interactive portion of my card. I used a die to cut the the strip in the center of my black ink blended panel, but you could also use a exacto knife and a ruler to create the opening also - I just had a die so I used it. Once that was cut out of the panel I cut some squares of cardstock, adhered and layered them all up to create high enough block to allow my car to slide through - you could also use a coin or something else to do this, but I didn't want my car to slide without actually physically moving it myself. I then took the 'You're My Hero' sentiment from the Stars and Stripes stamp set and white heat embossed it onto my sunset panel in the center towards the top. Now it was time to put my card together.

I started off with adhering the sun flat onto the background also in the center. I then took the two palm trees I stamped, coloured and cut and then foam mounted them onto each sides of the card and cut off the excess. I then used some foam adhesive to pop up my black ink blended panel. But before I adhered it down to my card I cut a strip of white cardstock and placed it under the ink blended panel between the foam adhesive but so I could see it through the die cut strip in the cardstock. I then adhered down my square block onto that white strip and then adhered my coloured car on top of that square block piece. Now I could adhere down the black ink blended piece onto the card base and that finished up my card for today.

I hope you enjoyed my card today and got inspired to create an interactive card, they are so super fun to make! Make sure you check out the blog the rest of the week for more fabulous cards by the design team!

- Eloise

Sunny Studio Products Used:

Monday, May 30, 2016

You're My Hero Card + The Last Day of Our Memorial Day Sale

Happy Memorial Day!  I hope you all have been enjoying a wonderful 3-day weekend with your friends and family!  For those of you who might not be on our store mailing list, I thought I would share with you a special card I created with a mini star die that automatically comes free with every order placed from our online store in May and June.
Sunny Studio Stamps: Stars & Stripes You're My Hero Memorial Day Card by Mendi Yoshikawa

You can download a PDF for this card idea with step-by-step instructions HERE.  For my sentiment I used a stamp from our Stars & Stripes set.


Also, there's still time to take advantage of the 25% off sale in our online store using the code "MEMORIAL", but you must hurry!  This offer expires tonight at midnight PST.  ;)

Sunny Studio Stamps: 25% off Memorial Day 2016 Sale

Hope you enjoy the rest of your day and don't forget to scroll down to see the Eloise's adorable card for today.  :)


Friday, May 13, 2016

Stars & Stripes Reach For The Stars Card with Lexa

Hi there crafty friends.  It's Lexa here with a happy card to celebrate your Friday! :)

When I saw the Stars & Stripes stamp set for the first time I kept thinking what other possibilities I could use it for rather than for a 4th of July card. You may know that I'm not an American so today I'm going to show you that this set absolutely can make through the whole year.

Sunny Studio Stamps: Reach For The Stars Monkey Card by Lexa Levana (using Stars & Stripes and Comfy Creatures)

First, I cut a 4.25" x 5.5" white cardstock panel as a card base, then I embossed it with an arrow pattern. The texture will elevate your plain white background. All the images are stamped with Versafine Black Onyx and I use Distress Markers to watercolor them. I also added some smiley faces to the bigger stars.  Don't they look so cute? The monkey is from Comfy Creatures and I added googly eyes for extra fun.

You can pick some bright colors for this set to make other occasion cards, just like I did. I tied up a white string and tied a bow in the left corner, giving the scalloped banners a place to hang. For the sentiment, I stamp it on a piece fish tail banner which I decided to keep white so it wouldn't overpower the other images.

Sunny Studio Stamps: Reach For The Stars Monkey Card by Lexa Levana (using Stars & Stripes and Comfy Creatures)

I hope you like today's card. Thanks for stopping by.


Thursday, May 12, 2016

Stars & Stripes Let's Celebrate Pinwheel Card with Vanessa

Hey everybody!  Vanessa here with a fun window card using the Stars & Stripes set. I am not from the U.S., so I didn't create a patriotic card with it, but a cute birthday card instead.

Sunny Studio Stamps: Let's Celebrate Koala Bear Card by Vanessa Menhorn (using Stars & Stripes and Comfy Creatures)

I softly inked the bottom portion of a white card base. Then I trimmed a panel from white cardstock slightly smaller than the card and die-cut a square from it. Now I stamped the sentiment and adhered the panel to the card with foam tape. I stamped, colored and die-cut the stars and the pinwheel from Stars & Stripes and the head and hand from Comfy Creatures and adhered everything to the card.  Then I finished it off with matching sequins.

Sunny Studio Stamps: Let's Celebrate Koala Bear Card by Vanessa Menhorn (using Stars & Stripes and Comfy Creatures)

I love to combine the various sets, they go together so well! And this cute Koala Bear face just makes me smile :)

I hope you liked today's card! Thanks so much for stopping by!

Vanessa

Sunny Studio Supplies:

Wednesday, May 11, 2016

Stars & Stripes Fourth of July Cards with Lindsey

Hi! Lindsey here again sharing several cards using the Stars and Stripes stamp set. This set is perfect for Fourth of July cards, but also has images and sentiments that would work great for birthday cards or even a card for your favorite hero! I also incorporated the new Star Border die, the Wavy Border dies and the cute koalas from the Comfy Creatures stamp set. Let's get started.

Sunny Studio Stamps: Fourth of July Flag Card by Lindsey Bailey (using Stars & Stripes, Comfy Creatures, Wavy Borders & Star Border die)

I started with an A2 size card base. I used the Wavy Border dies to create red and white strips of cardstock which became the stripes on my American flag. A simple rectangle out of blue cardstock created the background for the Star Border. I cut the Star Border from white cardstock and trimmed it down to six stars, so it would fit in my rectangle. Once I had the background done, it was time to stamp and color the adorable little boy and girl koala. I colored the koalas using Copic markers and fussy cut them out. I added a star and hat on top of their heads from the Stars and Stripes stamp set


Sunny Studio Stamps: Fourth of July Flag Card by Lindsey Bailey (using Stars & Stripes, Comfy Creatures, Wavy Borders & Star Border die)

Finally, I stamped my sentiment under the blue rectangle on one of the white stripes. Since my sentiment said "reach for the stars", I decided to add a few more larger stars above the little koalas. These stars also came from the Stars and Stripes stamp set. I added a little Wink of Stella to all the stars for a little extra sparkle and that completes my card.

For my second card, I used almost all the images in the Stars and Stripes stamp set to create another fun Fourth of July card. I just arranged the different stamps on my white rectangle, which was slightly smaller than an A2 size card, to see what layout I preferred. Once I had them where I wanted them, I stamped them down. I colored all the images with Copic markers. I also outlined each image with a light blue marker. Then I used my glitter pen to add a little sparkle to all the stars on my card.


Sunny Studio Stamps: Stars & Stripes Fourth of July Card by Lindsey Bailey

After everything was colored, I backed my white rectangle on a piece of red cardstock to really make the white panel pop. Finally, I attached the red panel to a gray polka dot piece of cardstock that was cut to four and a quarter by five and half.


Sunny Studio Stamps: Stars & Stripes Fourth of July Card by Lindsey Bailey

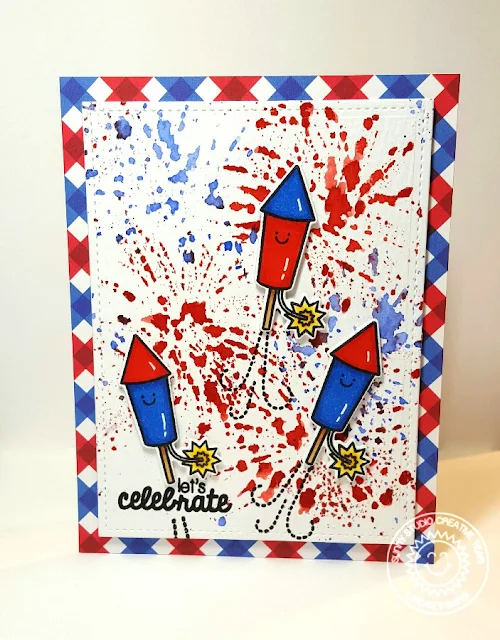
For my last card I decided to focus on the little firecracker image in the set. I wanted to create a background sky full of exploding fireworks with the little firecrackers in the foreground.

Sunny Studio Stamps: Stars & Stripes Red, White & Blue Fourth of July Rocket Card by Lindsey Bailey.

The first thing I did, was create the background using a piece of watercolor cardstock. I used some distress ink on an acrylic block to create the "fireworks." I simply put a dab of ink on the block and then used my water brush to spread the ink around in the shape of a firework. Then, I placed the paper on top of the ink. Ta-da.....watercolor fireworks! I think this technique worked well for the look I was going for. 

Next I stamped and colored three little fire crackers. I also stamped a little face from the set onto each firecracker to give them some personality. Once the watercolor panel was dry, I stamped the sentiment in the bottom left corner where I had a left a little white space. Then, I decided where to place the firecrackers and stamped the little firecracker trail in black. I used foam tape to pop up each of the firecrackers and added a little Wink of Stella to make them sparkle. Finally, I backed my watercolor panel on a gingham blue and red cardstock. 

Sunny Studio Stamps: Stars & Stripes Red, White & Blue Fourth of July Rocket Card by Lindsey Bailey.

I hope you'll check out this fun set, and stay tuned to the blog for more inspiration! I can't wait to see what everyone comes up with! Thanks for reading and have a great day!

Tuesday, May 10, 2016

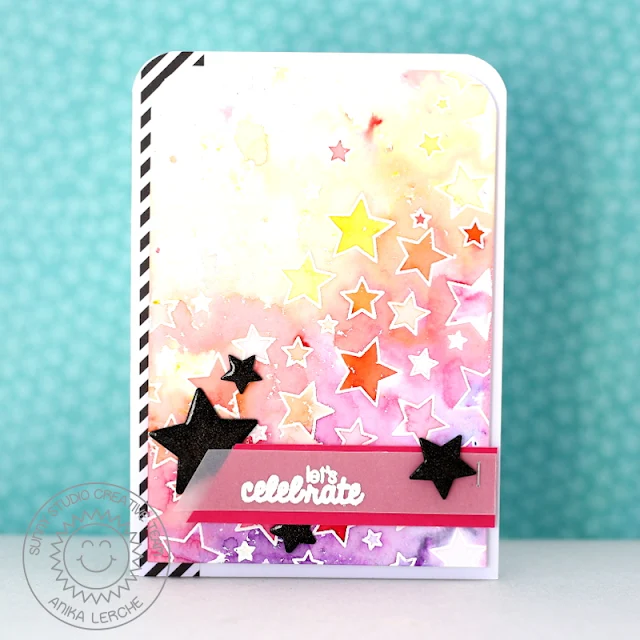
Stars & Stripes Let's Celebrate Card with Anni

Hey stampers, Anni here! How are you today?

Today's card is featuring the new set called Stars and Stripes. What a fantastic set to celebrate all the good things in our lives!

There are five different sizes of stars in this set. Oh my, how I love this! These are great to create backgrounds and that's what I did.

I stamped the stars on watercolor paper and heat embossed them in white. Then I added some pigment powders in yellow, orange, pink and violet, sprayed on some water and whoooo - what an effect!

Sunny Studio Stamps:  Stars & Stripes Let's Celebrate Watercolor Star card by Anni.

I used the matching Stars & Stripes dies to cut out some stars from black cardstock. It is always so much fun to see how black cardstock makes the colors pop. For the sentiment I stamped on a stripe of vellum and heat embossed in white and stapled it to some pink cardstock.

As a last detail I added some black and white striped patterned paper and some Wink of Stella and Glossy Accents to the stars.

Sunny Studio Stamps:  Stars & Stripes Let's Celebrate Watercolor Star card by Anni.

Hope you like my bright and colorful card!
Thanks for stopping by and have a sunny week!

Anni

Monday, May 9, 2016

Everyday Stars & Stripes Encouragement & Celebration Cards with Eloise

Hello everyone! Eloise here and today I’m back today to show you my creations for the new Stars and Stripes stamp set. This set is based around 4th of July but it is so super versatile, that you can use it for many other uses besides 4th of July. There’s a ton of different images and sentiments in here to make lots of different projects for different occasions, which is what I’m going to be doing today. So for today’s cards I made two different simple cards from this stamp set, just using the banner image that has the curvy stripes in it (or it could be a rainbow as well) and for the second card, I’m going to be using the star images.

Sunny Studio Stamps: Everyday Stars & Stripes Encouragement and Celebration Cards by Eloise Blue.

So for my first card, I stamped out a ton of the banner images from the Stars and Stripes stamp set on some watercolour cardstock. I coloured them all in with my peerless watercolours in rainbow colours and then die cut them all out using the coordinating dies.

I then took a piece of white cardstock and started arranging them. I started at the bottom first, so I grabbed my purple and first adhered the first banner down in the middle and then adhered the other two on each side with some foam adhesive. Because I didn’t want any gaps between the images, I used four blue banners for the next time to butt them up in between the purple banners to make sure there are no white spots showing. To adhere these ones I just added runner adhesive on the bottoms of the banner and a little foam strip on the top to make it flush. I continued up the panel going 3 banners, 4 banners, 3 banners etc to create a fun pattern. To make it more full also I added in a few more shades of the same colour as well so it would go higher up on my card. Once I finished at my pink layer, I used a black strip of cardstock. I white heat embossed the sentiment – ‘Let’s Celebrate’ from the same Stars and Stripes set also and then adhered that black strip a little over top of the banners to not show the edges of them. To finish up the first card I added some Wink of Stella to the banners and then adhered the panel onto a white card base.

Sunny Studio Stamps: Everyday Stars & Stripes Encouragement and Celebration Cards by Eloise Blue.

For my second card, I wanted to use all these different sized stars. So I created a small panel out of some watercolour cardstock and distress ink blended some blacks, blues and purples to create a dark night sky. I flicked on some water and shimmer to finish off the night sky look. I then stamped out the stars from the Stars and Stripes stamp set on some more of the same watercolour cardstock, and then clear embossed over it. I then used some Zig Clean Colour Real Brush Markers to watercolour in the stars yellow. I die cut them out using the coordinating dies . I adhered them down to the background and then moved onto my sentiment. I cut a strip of black cardstock and white heat embossed the ‘Reach For The Stars’ from the same stamp set on it and then foam mounted it on the panel. I then took some fun foam and adhered it to the back of my panel and then the panel onto my card base. For a finishing touch I took my Wink of Stella and coated the stars with it for some more sparkle and shine.

Thanks for stopping by the blog today, make sure you check out the blog everyday for some more inspiration using this stamp set!

- Eloise

Sunny Studio Stamps Products Used:

Friday, April 1, 2016

Inspiration Week: Woo Hoo, Birthday Smiles & School Time Dies

Hello there!  Today's the big day!  You can now purchase all the new stamps and dies featured this week in our online store.  Yay!!!  

Before you head over I hope you will take a quick look at all the fun ways you can use our new Woo Hoo Stamps and dies.  ;)

Up first is a graduation card using the set in a straightforward way.  The set comes with both a large diploma and a little shrunken down version for the owl to carry.  For my blue background I stamped a tone-on-tone print using the "Happy Graduation" sentiment and some clear VersaMark ink.  For the yellow portion I used the star border from the Sunny Borders stamps to stamp a continuous pattern.

To round out my little scene I die-cut some clouds from white cardstock using the Rain or Shine dies and used the Fishtail Banner dies for my sentiment strip.
Sunny Studio: Happy Graduation Owl Card by Mendi Yoshikawa (using Woo Hoo stamps, Sunny Borders stamps, Rain or Shine dies and Fishtail Banner dies)

My next card uses the larger graduation cap and diploma in the set without the owl for a slightly more sophisticated design.  To create the red star print, I used the three smallest star stamps from Stars and Stripes to create a random pattern.

Sunny Studio: Red, White & Black Graduation Cap & Diploma Card by Mendi Yoshikawa (using Woo Hoo stamps and Stars & Stripes stamps)

Up next I thought it would be fun to show how you don't have to be limited to graduation cards with this set.  For this one I created a special thank you card for teachers. Using my MISTI I stamped a random alphabet letter border using our Sweet Script stamps stamped onto black cardstock and heat embossed in white to evoke the feeling of a chalkboard and to help reinforced my school theme.  I completed my card with the banner from Sunny Borders and the "Thank You" sentiment from Stars & Stripes.
Sunny Studio: Owl Teacher Thank you Card by Mendi Yoshikawa (using Woo Hoo, Stars & Stripes, Sweet Script & Sunny Borders stamps,


My last card goes patriotic with the cute owl from this set, adding the little hat & sentiment from Stars & Stripes. To create my background I cut 3 to 4 of the Star Borders from red, white and blue cardstock and layered them on a kraft panel.  Because I alternated their position on my panel and the border is only 5.5" long, I cut my finished panel apart and hid the gap under my blue panel (inked up in Stormy Sky distress ink).  I finished off my card using the Fishtail Banner dies to create my little pennant for my sentiment.

Sunny Studio: Patriotic Good Sam Red, White & Blue Owl Card by Mendi Yoshikawa (using Woo Hoo stamps, Stars & Stripes stamps, Star Border die and Fishtail Banner dies)

Here's a closer look at the 3x4 stamp set and dies featured on today's cards...


Sunny Studio Stamps: Woo Hoo Graduation owl stamp set Sunny Studio Stamps: Woo Hoo Dies

Unfortunately I didn't find the time to create some new projects with these, but I'm super excited to finally offer the Birthday Smiles and School Time dies that so many of you have been waiting for as well (the Happy Home dies are expected to follow in July).  ;) 

Sunny Studio Stamps: Birthday Smiles Dies Sunny Studio Stamps: School Time Dies

Would you like to win some of these fun products?  Today we are giving away the Woo Hoo Stamps and coordinating dies to one lucky winner using the Rafflecopter below.  You still have time to win the products featured earlier in the week as well.  ;)

Winners will be announced here on the blog on Sunday, April 3rd.  :)

a Rafflecopter giveaway
I hope you've enjoyed all the ideas this week and will stop by our shop to pick up some of our newest items.  For a limited time we are offering two different exclusive bundles to save you a little extra money and save you some time at checkout.  Don't forget you can also use the code "SAVE5" to save an extra $5 off all orders over $49.  ;)

Thursday, March 31, 2016

Inspiration Week: Introducing Summer Picnic & Comfy Creatures

Hello there!  Today is all about ideas featuring our Comfy Creatures and Summer Picnic sets!  I hope you will take a look at all the fun ideas and sign up for today's giveaway.  

I found myself turning to Comfy Creatures over and over again while working on my cards for this release.  It has so many versatile images that compliment our other sets for fun scene building options.  While I sadly forgot to use them together for my cards this week, the new Comfy Creatures set was designed to mix and match with our previously released Sending My Love stamp set for endless combinations.  I also added two tails to the new set which can be added to either side of the body which work great for the cat and monkey faces.

Up first is a fun scene using the Summer Picnic stamps and the grassy border stamp from Sunny Sentiments.  I might have gone a little overboard with all the images I layered on this card, but it was hard to stop with all the cute choices available in this set! 
Sunny Studio: Every day with you is a Picnic card by Mendi Yoshikawa (using Summer Picnic & Sunny Sentiments stamps)
My second card features the boy body in swim trunks and the hula girl body from Comfy Creatures.  I decided to turn them into monkeys using the two different faces provided in the set and stamping their tails so that they could intertwine with each other.  

I cut my card base using the Stitched Heart Dies and masked off my beach and waves using Post-it Tape and our new Wavy Border dies featured on Monday (inked up from top to bottom in Tumbled Glass, Tea Dye and Salty Ocean distress inks).  After the ink was dry I heat embossed my greeting using the "aloha" sentiment from the new Island Getaway stamps.
Sunny Studio: Aloha Monkey heart shaped card by Mendi Yoshikawa (using Comfy Creatures stamps, Island Getaway stamps, Wavy Border dies & Stitched Heart dies)

Up next is another card featuring the different critters from Comfy Creatures.  I inked up each rectangle in my grid design using Twisted Citron, Mermaid Lagoon, Mustard Seed and Peacock Feathers distress ink.  I then stamped a subtle print in the background of each using some of the smaller images from the set (borrowing the leaf from Island Getaway).  When the distress ink was completely dry I heat embossed my sentiment in white.  


These critters were designed to be able to stamp together in a single layer, but I accidentally made a coloring mistake on my little monkey's head so I ended up stamping a second head and layering over the top with foam tap.  I love the dimension it gives him.  To bad he didn't fall in the center to make things look a little more balanced.  ;)
Sunny Studio: Happy Birthday From the Gang Monkey, Koala Bear & Panda card by Mendi Yoshikawa (using Comfy Creatures stamps)
My next card uses the tree from Summer Picnic (LOVE the versatility of that tree), the monkey and sentiment from Comfy Creatures, the grass from our Sunny Sentiment dies and our Fishtail Banner dies.  

I was inspired to color my grass using a technique similar to the one shared by Nina Trapani in her tutorial HERE.  I included two different bananas in the comfy creatures set: one by itself and one for the creature to hold.  I used the extra banana in the set to stamp a random pattern in my background to reinforce the sentiment.
Sunny Studio: I'm Bananas For You Monkey card by Mendi Yoshikawa (using Summer Picnic & Comfy Creatures stamps, Sunny Sentiments and Fishtail Banner dies)

My next card is a simple take on the Summer Picnic set.  I paired the fun little ant images with the trail from the Backyard Bugs stamps.  I then cut a simple frame from patterned paper on my paper trimmer and stitched it to the perimeter of my card.
Sunny Studio: Even The Best Picnics Have A Few Ants card by Mendi Yoshikawa (using Summer Picnic & Backyard Bugs stamps)

My last card uses the squirrel and tree (cut in half) from Summer Picnic, the birthday sentiment from Comfy Creatures, the banner and "let's celebrate" sentiment from Stars and Stripes and the grass border from Sunny Sentiments for a fun birthday card.  I think this would be super fun done up with a Fourth of July take too!  ;)

Sunny Studio: Banner Birthday card by Mendi Yoshikawa (using Summer Picnic, Stars & Stripes, Comfy Creatures & Sunny Sentiments stamps)

And here's another look at the new products featured on today's cards...


Sunny Studio Stamps: Summer Picnic stamp set Sunny Studio Stamps: Summer Picnic dies

Sunny Studio Stamps: Comfy Creatures stamp set Sunny Studio Stamps: Comfy Creatures dies

Would you like to win some of these fun new products?  Today we are giving away the Summer Picnic and Comfy Creatures stamps to one lucky winner using the Rafflecopter below.  If you're just joining us, make sure to check out our giveaways earlier in the week.  We will also be back tomorrow with one last prize featuring our graduation set.  

Winners will be announced here on the blog on Sunday, April 3rd.  :)

a Rafflecopter giveaway
I hope I've helped jump start your creative juices.  I can't wait to see what fun projects you create with all these set.  Just a reminder that all our new products will be available for sale first thing tomorrow morning in our online store.  ;)