Showing posts with label Scalloped Tag Dies. Show all posts

Wednesday, March 29, 2023

Spring Fever Patterned Paper Focused Cards with Catherine and Marie

Hello Crafty Friends! Catherine here, and today I am sharing a colorful spring card created with Spring Fever Paper and Rainy Days Dies.

Sunny Studio Stamps: Spring Fever Paper Focused Rainy Day Friendship Card by Catherine Cohen (featuring Scalloped Tag Dies)

To start, I added a stitched border by die cuting a stitched rectangle die onto a piece of  A2 white card stock.  Using Versamark Ink, I stamped the rain drops onto the background with the Rain Showers Stamp. I heat embossed the rain drops with clear embossing powder and set the card background aside.

For the tag, I die cut paper from Spring Fever Paper using Scalloped Tag Square Dies. Next, I die cut the cloudy background using a square die 3”x 3”.  Using the same die, I die cut a piece of acetate and wiped it with a dryer sheet to avoid static.  To make the white frame, I nested a 2.5” x 2.5” square die inside the 3”x 3” square die and ran it through my die cut machine with white cardstock. I repeated this with a piece of double-sided foam. I glued the acetate onto the white cardstock frame and then adhered it onto the foam frame. 

Sunny Studio Stamps: Spring Fever Paper Focused Rainy Day Friendship Card by Catherine Cohen (featuring Scalloped Tag Dies)

The umbrella was made using Rainy Days Dies with paper from Spring Fever Paper. I ink blended the umbrella frame and the tip with Hickory Smoke Distress Oxide. I glued the umbrella onto the cloudy background and added Crystal Clear Jewels and attached the acetate frame onto the background forming the shaker.  I glued the umbrella shaker onto the square tag. I adhered the entire tag onto the white embossed card background.

I added a colorful border using paper from the same pack die cut with Ribbon & Lace Border Dies. I added some rain drops from the Rainy Days Dies using blue cardstock and  highlighted a few with Clear Rain DropsI finished the card by tying a bow with yellow twine and a White Heat Embossed sentiment from Spring Showers Stamps.

Thank you so much for joining me today! Have a wonderful week!

--------------------------------------

Hello Crafty Friends, Marie here! I hope you are having a great Spring season so far! I'm happy to be back on the blog sharing a brand new card inspiration featuring Sunny Studio Stamps' Spring Fever Paper. Bright cheerful colors, and an array of beautiful patterns of polka dots, and florals are among the features I absolutely love about this amazing 6x6  paper pack! I love the variety of papers that can be used all year round and for so many different occasions, makes this pack one of my favorites in my stash! Today, I paired the Spring Fever pattern papers with Sunny's adorable Looking Sharp Stamps to create a fun and extra happy birthday card. 

Sunny Studio Stamps: Spring Fever Paper Focused Looking Sharp Birthday Card by Marie Marco

To start, I cut an A2 sized base panel from 110 lb. Neenah Solar white heavyweight cardstock. I cut another A2 sized panel of rainbow pattern paper from the Spring Fever Paper. I adhered the pattern paper to my base using double sided tape adhesive to ensure the paper lay super flat without any bubbles. Then,  I cut out three circles using 2 different sized circle dies from a bright yellow polka dot paper. I played around with the placement of the circles before adhering them to my card front. 

Next, I stamped out all the adorable cacti images on watercolor paper using Antique Linen Distress Ink. I also used a birthday cupcake image from the Panda Party Stamps.  I then water colored my images using Faber-Castell watercolor pencils. I used the corresponding Looking Sharp Dies to cut out the cacti images and used the Panda Party Dies to cut out the cupcake. I adhered all the images inside the yellow circles using double sided tape adhesive, and used small cuts of double sided foam strips to give the cupcakes dimension. 

Sunny Studio Stamps: Spring Fever Paper Focused Looking Sharp Birthday Card by Marie Marco

Lastly, I stamped out my sentiment onto some banner strips and adhered them to the card, and presto! A super fun birthday card for any of your cacti and succulent loving friends or family! I certainly have many people in my life that are  huge fans of these prickly plants so this card will find a home soon! Thank you so much for joining me today, friends! I hope I've inspired you to use more pattern papers in your creations! Until next week, stay safe and Happy Cardmaking! 

Sunny Studio Supplies Used:

Rain Showers Stamps
Rain Showers Stamps
Shop at:
Sunny Studio
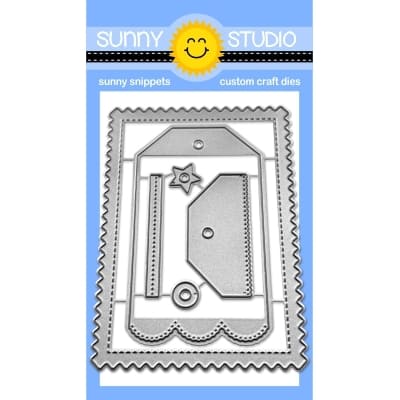
Scalloped Tags-Square
Shop at:
Sunny Studio
Spring Showers Stamps
Shop at:
Sunny Studio
Panda Party Stamps
Panda Party Stamps
Shop at:
Sunny Studio
Panda Party Dies
Panda Party Dies
Shop at:
Sunny Studio
Rainy Days Dies
Rainy Days Dies
Shop at:
Sunny Studio
Ribbon & Lace Dies
Ribbon & Lace Dies
Shop at:
Sunny Studio
Spring Fever Paper
Spring Fever Paper
Shop at:
Sunny Studio

Friday, September 23, 2022

Too Cute to Spook Cards with Tina and Vanessa

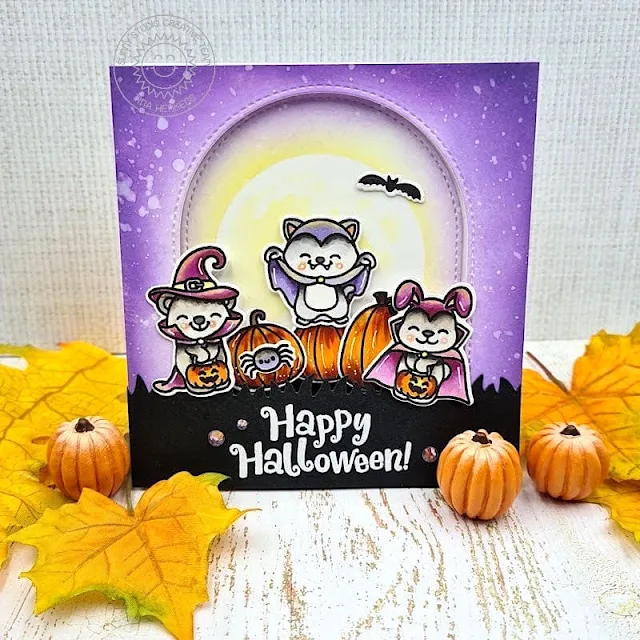
Hello crafty friends, it’s Tina with some spooky Halloween projects for you today! Making these is a lot of fun, you can really go overboard with the color schemes and designs. The new stamp set Too Cute To Spook is just super adorable and I love that there are matching dies as well!

Sunny Studio Stamps: Too Cute To Spook Card and Tag by Tina (featuring Stitched Arch dies, Mini Mat & Tag Dies)

First, I created a card using the cute critters and then added the other sweet images to some tags. For the card I cut a square panel from some Neenah Solar White 110 Lb Card Stock. I placed a circle stencil from my stash in the middle of this panel to mask of the moon and did some Distress Oxide ink blending using Squeezed Lemonade, Shaded Lilac, and Villainous Potion. Next, with the stencil still in place, I splattered some water onto the background.

Once the panel was dry, I removed the stencil and added some detail to the moon using the same Squeezed Lemonade as before.

Sunny Studio Stamps: Too Cute To Spook Card and Tag by Tina (featuring Stitched Arch dies, Mini Mat & Tag Dies)

To create some depth in the design I die cut an arch into the panel with the largest of the Stitched Arch Dies. I also made two  grassy borders out of black card stock and white heat embossed a sentiment from the Too Cute To Spook stamp set onto one of them.

After stamping and die cutting all my images, I colored them with my Copic markers in traditional Halloween colors and added some details with my white gel pen.

To assemble this card, I first glued the arch to a card base with liquid glue. Next, I added the rest of the background panel with foam tape to create some dimension. Then, I adhered the grassy borders and all my images, some of them popped up with tape as well. A few sequins from the Jewels Pastel Mix delivered the perfect subtle bling!

Sunny Studio Stamps: Too Cute To Spook Card and Tag by Tina (featuring Stitched Arch dies, Mini Mat & Tag Dies)

The tags were cut with the new tag shapes from the Mini Mat & Tag 1 and Mini Mat & Tag 4 sets. I used the same color palette as for the card and added the images with foam tape.

I hope you like these spooky projects and will enjoy creating with this adorable set as much as I did! Happy crafting!

-----------------------------------------------

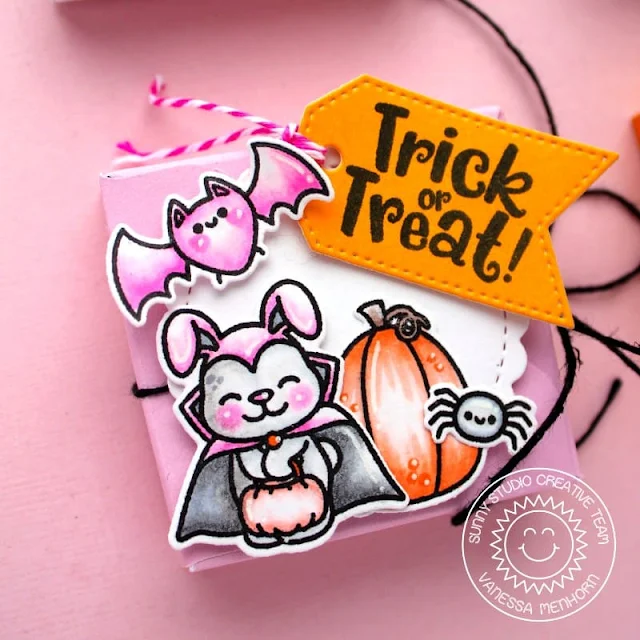
Hello to you! Vanessa here with a pink Halloween treat box set using the Too Cute To Spook set.

Sunny Studio Stamps: Too Cute To Spook Treat Box by Vanessa Menhorn (featuring Fancy Frame Square Dies, Scalloped Circle Mat Dies, Scalloped Tag Square Dies, Window Quad Square Dies)

The boxes were made with an envelope punch board and are 5,5 x 5,5 cm each to hold a small chocolate bar. I trimmed the cardstock 11,9 x 11,9 cm and scored the pieces at 4,9 cm and 7 cm from each side. 

Sunny Studio Stamps: Too Cute To Spook Treat Box by Vanessa Menhorn (featuring Fancy Frame Square Dies, Scalloped Circle Mat Dies, Scalloped Tag Square Dies, Window Quad Square Dies)

After I had assembled the boxes, I trimmed the lids to make it possible to tuck it into the box. Now I stamped all the images, colored everything with Copics and die-cut the pieces with the matching dies. 

Sunny Studio Stamps: Too Cute To Spook Treat Box by Vanessa Menhorn (featuring Fancy Frame Square Dies, Scalloped Circle Mat Dies, Scalloped Tag Square Dies, Window Quad Square Dies)

Here comes a list of the used products:
Too Cute To Spook stamps + dies
Fancy Frames Square Dies
Scalloped Circle Mat 1 Dies
Scalloped Tag Square Dies
Window Quad Square Dies

Sunny Studio Stamps: Too Cute To Spook Treat Box by Vanessa Menhorn (featuring Fancy Frame Square Dies, Scalloped Circle Mat Dies, Scalloped Tag Square Dies, Window Quad Square Dies)

I die-cut tiny tags, frames and scalloped circles from cardstock and adhered the elements to the boxes after tying on black twine for the closure. 

Sunny Studio Stamps: Too Cute To Spook Treat Box by Vanessa Menhorn (featuring Fancy Frame Square Dies, Scalloped Circle Mat Dies, Scalloped Tag Square Dies, Window Quad Square Dies)

How about a pink bat? Onto the tiny tags, I stamped the sentiment and added pink baker's twine.

Have a lovely weekend, my friends! Thanks for stopping by today!

Sunny Studio Supplies Used:

Fancy Frames-Square Dies
Shop at:
Sunny Studio
Scalloped Tags-Square
Shop at:
Sunny Studio
Stitched Arch Dies
Stitched Arch Dies
Shop at:
Sunny Studio
Window Quad Square Die
Shop at:
Sunny Studio
Scalloped Circle Mat 1 Dies
Shop at:
Sunny Studio
Too Cute To Spook Stamps
Shop at:
Sunny Studio
Too Cute To Spook Dies
Shop at:
Sunny Studio
Mini Mat & Tag 1 Dies
Shop at:
Sunny Studio
Mini Mat & Tag 4 Dies
Shop at:
Sunny Studio

Friday, August 19, 2022

Designer's Choice Cards with Vanessa and Audrey

Hello to you! Vanessa here with a fun baby explosion box mini album using the Baby Elephants set.

Sunny Studio Stamps: Baby Elephant Explosion Box Card by Vanessa Menhorn

This box was created with an explosion box board. I created the bases from white and purple cardstock and added various pieces of patterned paper. With an envelope punch board I created matching envelopes, with the Gift Card Pocket Die little pockets for the tags. The lid is a shaker window filled with sequins and clay elements. 

These are the supplies I used for the project:
Baby Elephants stamps + dies
Candy Shoppe stamps + dies
Gift Card Pocket Die
Fluffy Clouds Border Dies
Build-A-Tag #1 Dies
Scalloped Tag Circle Dies
Window Trio Circle Dies
Gingham Pastels Paper
Dots & Stripes Pastels Paper
Flirty Flowers Paper
Sleek Stripes Paper 
Polka Dot Parade Paper
Striped Silly Paper
Rainbow Dot Confetti
Pink & Purple Heart Confetti

Sunny Studio Stamps: Baby Elephant Explosion Box Card by Vanessa Menhorn

To provide space for text and more photos, I added many tags and pockets. The images were colored with Copic markers and die-cut with the matching dies. Can't wait to see it filled with photos of a sweet baby girl! I hope you like it :)

Happy weekend and thanks for stopping by today!

------------------------------------------------

Hello friends! Audrey here with a fun gnome themed card to share with you! If you have fallen in love with this adorable stamp set and want to add it to your collection, don't delay! This set is retiring, but still in stock, and as soon as it's sold out, it's gone for good. Get yours while you can! :)

Sunny Studio Stamps: Home Sweet Gnome Card by Audrey Tokach (featuring Comic Strip Everyday Dies)

To create my card, I started off with a piece of white cardstock cut to 4" x5.25". I cut a piece of computer paper the same size, and die cut a rectangle from the center, creating a stencil or mask of sorts. I taped them together and used Distress ink in Blueprint Sketch (very lightly) and Rustic Wilderness to ink blend a background for the scene. 

Then, I stamped and colored the mushroom trio, two polka dot mushrooms, and the super cute sitting gnome from Home Sweet Gnome, all of which I cut out with the coordinating Home Sweet Gnome dies. I arranged them on the ink blended rectangle, gluing some down with liquid and popping others up with foam tape. I added a trio of tiny clouds to the sky using the Comic Strip Everyday die set, and scattered on some tiny clay hearts above the little gnome's head.

Sunny Studio Stamps: Home Sweet Gnome Card by Audrey Tokach (featuring Comic Strip Everyday Dies)

Then, I stamped a sentiment from the set on a white banner die cut, and popped that up in the grass on my scene. The entire panel was adhered to an A2 card base with foam tape, and to finish off the card, I added a few white gel pen accents.

Sunny Studio Supplies Used:

Candy Shoppe Stamps
Candy Shoppe Stamps
Shop at:
Sunny Studio
Candy Shoppe Dies
Candy Shoppe Dies
Shop at:
Sunny Studio
Gift Card Pocket
Gift Card Pocket
Shop at:
Sunny Studio
Window Trio- Circles Die
Shop at:
Sunny Studio
Striped Silly 6x6 Paper
Shop at:
Sunny Studio
Polka-dot Parade 6x6 Paper
Shop at:
Sunny Studio
Build-A-Tag #1 Dies
Build-A-Tag #1 Dies
Shop at:
Sunny Studio
Gingham Pastels 6x6 Paper
Shop at:
Sunny Studio
Flirty Flowers 6x6 Paper
Shop at:
Sunny Studio
Dots & Stripes Pastels 6x6 Paper
Shop at:
Sunny Studio
Fluffy Clouds Border Dies
Shop at:
Sunny Studio
Scalloped Tags-Circle
Shop at:
Sunny Studio
Sleek Stripes Paper
Sleek Stripes Paper
Shop at:
Sunny Studio
Baby Elephants Stamps
Shop at:
Sunny Studio
Baby Elephants Dies
Baby Elephants Dies
Shop at:
Sunny Studio

Thursday, August 4, 2022

Lovely Lilacs Cards with Marine and Marieke

Hello crafty friends, Marine here with you today, I'm so happy to be back on the blog with a new shaker card, I just can't help myself they're so fun and easy to make, showcasing the gorgeous Lovely Lilacs stamp set, as well as the Watering Can stamp set.

Sunny Studio Stamps: Lovely Lilacs Card by Marine Simon (featuring Watering Can, Stitched Arch Dies, Stitched Rectangle Dies)

I started off with the layering and stamping process of the images. I used dye inks by Lawn Fawn to stamp all the images, and when I use layering stamps for the first time, I always like to prep the stamps, meaning that I first add clear embossing ink on the stamp, next I clean the stamp and then I apply the chosen colored ink. Adding clear embossing ink first helps the colored ink to get a good grip on the stamp and this way the stamping is more precise and the result consistent.

And one amazing thing about Sunny Studio's layering stamp sets is that there is a guide on the products pages to help us line up the stamps correctly and get a beautiful result! So easy and useful!

Next I created the Watering Can. It has only two layers, and I used two shades of yellow in order to compliment the lilac flowers nicely.

Here are the Lawn Fawn ink colors I used to create the flowers & watering can: 
flowers: fresh lavender + grape soda + grape jelly + sugarplum
leaves: celery stick + freshly cut grass + doe
watering can: lemonade + sunflower

Sunny Studio Stamps: Lovely Lilacs Card by Marine Simon (featuring Watering Can, Stitched Arch Dies, Stitched Rectangle Dies)

Next I created the shaker panel. I cut a 5,5 x 4,25" panel out of a Sweater Weather pattern paper, and cut a Stitched Arch window out of it. And I also cut a 5,5 x 4,25" bristol panel that I colored using shaded lilac oxide ink.

I attached a piece of acetate at the back of the window panel, and added four layers of foam tape at the back of it, on the four edges. Next I applied powder inside the window, all along the foam edges, that makes the foam edges non sticky so the sequins don't stick to it. Quickly cleaned the acetate to get rid of any excess of powder, and then added a mix of purple & dark blue sequins + Clear jewels inside the window. 

I peeled the backing papers off the foam tape, and attached the shaded lilac panel to totally close and complete the shaker panel. And next I attached the watering can and flowers using 1mm and 2mm foam squares.

For my sentiment, I cut a banner out of vellum using a die from the Stitched Rectangles die set, and I white heat embossed the "Thinking of you" sentiment from the Watering Can stamp set on it, and I attached that banner on the bottom right hand corner of the panel using clear foam squares.

Sunny Studio Stamps: Lovely Lilacs Card by Marine Simon (featuring Watering Can, Stitched Arch Dies, Stitched Rectangle Dies)

And to totally finish the card, I added a few clear droplets here and there to catch the light and bring more shine. And that's it! I love those beautiful lilac flowers, how the colors coordinate nicely with the watering can and background, and I hope that you like it too. As always, you are more than welcome to check the process video for more details and information (click on the image above). Thank you so much for stopping by, and see you next week!

-------------------------------------------

Hello Sunny Studio friends, Marieke here with you. Today I hope to inspire you with a Clean and Simple card. For my card this time around there is no coloring involved. 

Sunny Studio Stamps: Lovely Lilacs Card by Marieke Slaats (featuring Scalloped Tag Dies, Inside Greetings)

I started with inking up the Lovely Lilacs. Used the colors Milled lavender, Wilted Violet, Villainous Potion, Twisted Citron and Mowed Lawn Distress Oxide inks. Die cut them using the Lovely Lilacs dies.

Sunny Studio Stamps: Lovely Lilacs Card by Marieke Slaats (featuring Scalloped Tag Dies, Inside Greetings)

Out of white cardstock I cut the Scalloped Tag Circle Dies. Die cut an inner circle out of it which left me with a border. Added a black string of twine onto it. Adhered the stamped images behind it and added some foam tape.

Sunny Studio Stamps: Lovely Lilacs Card by Marieke Slaats (featuring Scalloped Tag Dies, Inside Greetings)

Cut a white top-fold base card, splattered some black paint and adhered the tag on the base. Heat set the sentiment out of the Inside Greetings Congrats and cut it using a scissor. Finished the card by adding some different sizes of clear sequins.

Sunny Studio Supplies Used:

Stitched Rectangle Dies
Shop at:
Sunny Studio
Scalloped Tags-Circle
Shop at:
Sunny Studio
Stitched Arch Dies
Stitched Arch Dies
Shop at:
Sunny Studio
Sweater Weather Paper
Shop at:
Sunny Studio
Lovely Lilacs Stamps
Shop at:
Sunny Studio
Lovely Lilacs Dies
Lovely Lilacs Dies
Shop at:
Sunny Studio
Watering Can Stamps
Watering Can Stamps
Shop at:
Sunny Studio
Watering Can Dies
Watering Can Dies
Shop at:
Sunny Studio
Inside Greetings Congrats
Shop at:
Sunny Studio

Friday, July 29, 2022

Country Carnival Cards with Audrey and Vanessa

Hello friends! Audrey here with a Country Carnival card to share with you! This card is a bit different for me as I normally love bright colors and lots of white space on my cards, but I decided to make a night scene card with this stamp set. 

Sunny Studio Stamps: Country Carnival Card by Audrey Tokach (featuring Basic Mini Shape Dies)

I started off with a piece of dark blue cardstock cut to 4" x 5.25". I used a cloud stencil from my stash and some Black Soot Distress Oxide to add some night clouds to the top 2/3 of the panel. I masked off the bottom and inked along the mask to create the ground. Then, I splattered on some gold metallic watercolor and watered down white acrylic paint to add stars to the sky. I stamped and colored the ferris wheel, some of the little bears and the ticket booth from the Country Carnival stamp set, and die cut them with the coordinating Country Carnival dies. The white background of the stamped images was too much contrast for me, so I used a dark blue Copic marker to trace around the edges of the images. 

Sunny Studio Stamps: Country Carnival Card by Audrey Tokach (featuring Basic Mini Shape Dies)

I arranged my scene, and adhered it to the panel. I didn't want sentiment to stand out too much, so I used white pigment ink on the dark cardstock for a more muted sentiment. Then, I used the Basic Mini Shapes Dies II to add some white stars to the sky. Finally, I mounted the panel to a dark blue card base.

---------------------------------------------

Hello to you! Vanessa here with a baby card using the sweet Country Carnival set.

Sunny Studio Stamps: Country Carnival Card by Vanessa Menhorn (featuring Chloe Alphabet Dies, Scalloped Tag Square Dies)

I started with a white card base and inked the background with Kitsch Flamingo Distress Oxide ink. After I had added ink droplets, I die-cut the scalloped tag from white cardstock and stamped the carousel. Now I stamped the image again onto a scrap of cardstock, colored both images with Copics, fussy-cut parts of the second image and adhered these to the tag with foam tape for more dimension. 

Today I used these sets:
Country Carnival stamps dies
Chloe Alphabet Dies
Scalloped Tag Square Dies

Sunny Studio Stamps: Country Carnival Card by Vanessa Menhorn (featuring Chloe Alphabet Dies, Scalloped Tag Square Dies)

I tied-on ribbon and twine and adhered the tag to the card. Now I die-cut the letters, colored them with Copics, added details with a white gel pen and spelled BABY. Finally, I added heart sequins to finish the card off.

Have a lovely weekend, everybody!

Sunny Studio Supplies Used:

Chloe Alphabet Dies
Chloe Alphabet Dies
Shop at:
Sunny Studio
Mini Basic Shape Dies 2
Shop at:
Sunny Studio
Scalloped Tags-Square
Shop at:
Sunny Studio
Country Carnival Stamps
Shop at:
Sunny Studio
Country Carnival Dies
Shop at:
Sunny Studio