Showing posts with label Loopy Letters. Show all posts

Saturday, July 8, 2023

Guest Designer Spotlight: Fabulous Flamingos Cards with Marie Marco

Hello Crafty Friends, Marie here! Summer is here and I'm happy to be back on the blog sharing two cards featuring Sunny Studio's Fabulous Flamingos Stamps. This stamp set is super cute and perfect to give your cards and crafty projects all the tropical summer time vibes! 

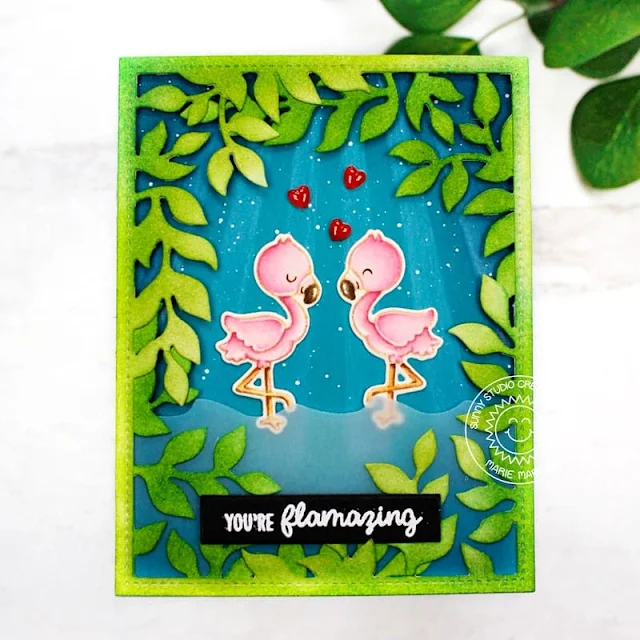
Sunny Studio Stamps: Fabulous Flamingos Tropical Themed Card by Marie Marco (featuring Botanical Backdrop Dies)

My first card features two adorable flamingo friends in a moonlit setting surrounded by lush green tropical foliage created using the Botanical Backdrop Die. To create this card, I started by die cutting an A2 sized card base from 110 lb. heavyweight cardstock paper. Then taking an A2 sized teal colored cardstock paper, I ink- blended the edges with Distress Ink in the colors Uncharted Mariner and Chipped Sapphire. After letting the inked edges dry, I used a sun rays stencil to create the moonlight with white Distress Ink in the color Picket Fence. I also added some white paint splatters to mimic tiny stars. I then attached the teal paper to my card base panel using tape adhesive. 

Sunny Studio Stamps: Fabulous Flamingos Tropical Themed Card by Marie Marco (featuring Botanical Backdrop Dies)

Next, I stamped my images onto watercolor paper using Distress Ink in the color Antique Linen and colored my images using Faber- Castell WaterColor Pencils. I cut out the images using the Fabulous Flamingos Dies. To create the frame, I die cut two botanical frames out of Bristol Smooth cardstock paper. I ink blended the frames using a combination Sour Apple and Field Day Dye Ink From My Favorite Things. I cut out the vines from one of the frames and added it to my main frame to create a lush and full look. I cut a portion of an A2 sized Vellum paper and die cut the top using a waves die. I ink blended the edges with Mermaid Lagoon Distress Ink to mimic water. 

I then attached the vellum to the botanical frame using tape adhesive and lined the edges of my frame with skinny foam tape adding dimension to the scene. I attached the frame to the card base and also added the two flamingos to the card placing their feet behind the vellum so it looks like they are in the water. I heat embossed my sentiment onto thick black cardstock and cut it out using a banner die.  Finally, I added some Mix Red Heart Drops for a cute finishing touch! 

Sunny Studio Stamps: Fabulous Flamingos Tropical Themed Card by Marie Marco (featuring Tropical Trees Backdrop Dies, Loopy Letter Dies)

My next card is a very tropical pop- up birthday box card. I used the Scalloped Box Card Pop-up Die from Lawn Fawn. I also used tropical elements like the palm trees, flying birds, and clouds from Sunny's Tropical Trees Background Die. To start, I stamped all my images with Antique Linen Distress Ink onto watercolor paper and used watercolor pencils to color them all. I then die cut all the flamingos using their corresponding dies. I die cut all the box card components from bristol smooth cardstock. For the outside of the box, I inkblened everything in a beautiful purple shade with Distress Ink in Seedless Preserves. 

For the background I used Seedless Preserves and blended it into the lovely bright orange Dried Marigold Distress Ink to create a tropical sunset. I then die cut the clouds and lightly inked the bottom edges with Seedless Preserves . I cut the flying birds from black cardstock paper. I inked the palm trees using Vintage Photo Distress Oxide for the base and Twisted Citron, Mowed Lawn, and Rustic Wilderness for the Tops. For the inside box panels, I used a combination of Antique Linen Distress Oxide ink and Vintage Photo Oxide Ink to create the sand mounds.  Vellum Paper was perfect for creating waves. I inked the vellum using Mermaid Lagoon Distress Ink, and a white gel pen to create some texture.  

Sunny Studio Stamps: Fabulous Flamingos Tropical Themed Card by Marie Marco (featuring Tropical Trees Backdrop Dies, Loopy Letter Dies)

For the outside panels, I used a pretty orange striped pattern paper from Sunny Studio's Dots & Stripes Pastel Paper. I also used the super fun Loopy Letters Dies to create my punny Birday Sentiment. I didn't have room to spell out Bird-Day, so I had to shorten it. For the rest of my sentiment, I used VersaFine Onyx Black Ink and stamped them on some pink cardstock and cut them out using basic banner dies. I assembled my box card using double sided tape adhesive and liquid glue and presto, my super cute Summer Birthday Card is finished! 

Thank you so much for joining me today! I really loved creating with this stamp set! These flamingos are just irresistibly cute and so fun to color and best of all they are pink! 

Sunny Studio Supplies Used:

Loopy Letters Dies
Loopy Letters Dies
Shop at:
Sunny Studio
Dots & Stripes Pastels 6x6 Paper
Shop at:
Sunny Studio
Botanical Backdrop Die
Shop at:
Sunny Studio
Fabulous Flamingos Stamps
Shop at:
Sunny Studio
Fabulous Flamingos Dies
Shop at:
Sunny Studio
Tropical Trees Backdrop
Shop at:
Sunny Studio

Wednesday, May 31, 2023

Birthday Mouse Card with Catherine

Hello Crafty Friends! It’s Catherine here! Today, I am sharing a fun Circus themed birthday card created with the adorable Birthday Mouse Stamps.

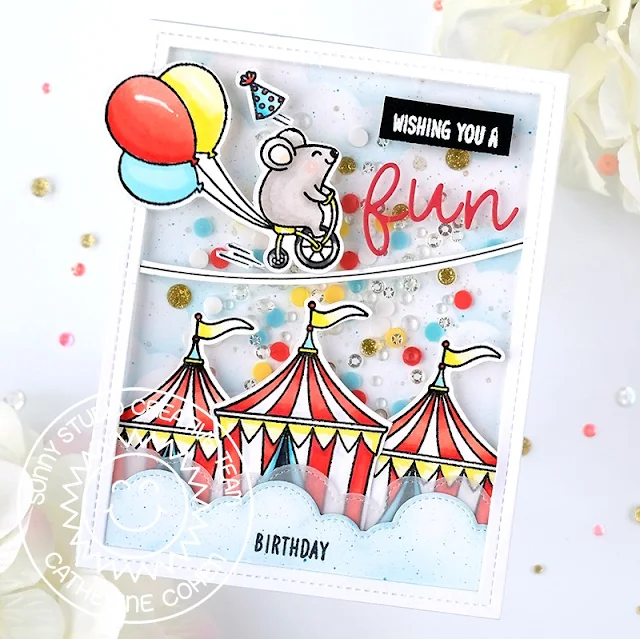
Sunny Studio Stamps: Birthday Mouse Circus Themed Birthday Shaker Card by Catherine Cohen (featuring Fluffy Clouds Border Dies, Country Carnival, Loopy Letter Dies)

With Tumbled Glass Distress Oxide, I ink blended A2 white cardstock using a cloud stencil created with Fluffy Clouds Border Dies. I splattered some blue watercolor and some gold shimmer spray for added details. I set the panel aside to dry.

Next, I die cut two cloudy borders, one with white cardstock and the other with vellum using Fluffy Clouds Border Dies. I ink blended the white cloudy border with Tumbled Glass Distress Oxide and splattered the border with blue watercolor. I stamped “Birthday” from Panda Party Stamps onto the blue cloudy border.

Sunny Studio Stamps: Birthday Mouse Circus Themed Birthday Shaker Card by Catherine Cohen (featuring Fluffy Clouds Border Dies, Country Carnival, Loopy Letter Dies)

I stamped the mouse from Birthday Mouse Stamps, party hat from Purrfect Birthday Stamps, and circus tents from Country Carnival Stamps. I die cut the images with the coordinating dies. I colored the images with Copic Markers listed in my blog link below. I made the tight rope by tracing the edge of an oval plate with a black multi-liner and then fussy cutting the rope.

For the front panel, I die cut acetate to A2 size and a frame out of white cardstock. I adhered the images and the cloudy borders onto the acetate and glued the frame over top. I added Party Confetti, Crystal Clear Jewels, and some gold crystals onto the back panel and adhered the front panel on top.

I finished off the card with a White Heat Embossed sentiment from Panda Party and the word “fun” die cut with red cardstock using Loopy Letters Dies.

Thank you so much for joining me today! Please feel free to visit me at Crafti-Cat for a listed of Copic Markers used. 

Sunny Studio Supplies Used:

Purrfect Birthday Stamps
Shop at:
Sunny Studio
Purrfect Birthday Dies
Shop at:
Sunny Studio
Loopy Letters Dies
Loopy Letters Dies
Shop at:
Sunny Studio
Fluffy Clouds Border Dies
Shop at:
Sunny Studio
Country Carnival Stamps
Shop at:
Sunny Studio
Country Carnival Dies
Shop at:
Sunny Studio
Panda Party Stamps
Panda Party Stamps
Shop at:
Sunny Studio
Birthday Mouse Stamps
Shop at:
Sunny Studio
Birthday Mouse Dies
Birthday Mouse Dies
Shop at:
Sunny Studio

Wednesday, April 5, 2023

Tranquil Tulips Cards with Marie and Catherine

Hello Everyone, Marie here! Spring is one of my most favorite times of the year because everything is beautiful and flowers are blooming left and right. If I could think of a flower that is the quintessential Spring flower, tulips definitely come to mind first! That being said, I am excited to share my latest inspiration card that features Sunny Studio Stamps' Tranquil Tulips Stamps. This layering stamp set allows you to quickly create gorgeous tulips during their different stages of bloom. This set is perfect for mass producing cards! 

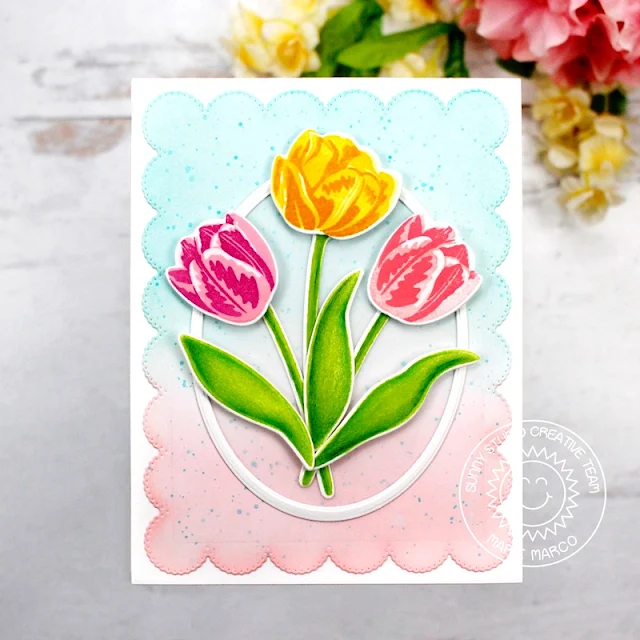
Sunny Studio Stamps: Tranquil Tulips Card by Marie Marco (featuring Loopy Letters Dies, Frilly Frame Dies)

My card today has a very simple design. To start,  I die cut an A2 sized base panel from 110 lb. Neenah Solar White Cardstock. For my background panel I used the Frilly Frames Eyelet Lace Die. I love the scalloped border this die creates! Then taking some Salvaged Patina Distress Oxide Ink, I lightly inked a little more than half the panel, and finished distress inking the rest with Saltwater Taffy Distress Oxide Ink. I also splattered some Salvaged Patina throughout the panel for a little texture. I then  adhered the background panel to the base panel using double sided tape adhesive. 

Next step was to stamp out all my lovely tulips onto Neenah Solar White Cardstock. Each layering flower stamp is individually labeled so it's easy to follow which order they go in. For each tulip bloom, I used three different colors with 3 different ink tones. For the purple tulip, I used a very light Princess Pink Dye Ink for the base, and then a slightly darker Pink in the shade Cotton Candy Dye ink  for the mid tone.These two inks are from MFTstamps. The darkest shade I used is Seedless Preserves Distress Oxide which is a purple that compliments the pink layers very well. For my full bloom yellow tulip, I used Lemon Chiffon Dye Ink, followed by a darker Lemon Drop Dye ink from MftStamps, and the darkest Ink is Fossilized Amber Distress Oxide Ink. 

Sunny Studio Stamps: Tranquil Tulips Card by Marie Marco (featuring Loopy Letters Dies, Frilly Frame Dies)

To make the base of the flower a little darker giving it a more defined gradient, I added a touch of Wild Honey Distress Oxide Ink only to the base. For the pink tulip, I used Spun Sugar Distress Ink, Saltwater Taffy Distress Ink, and finally Worn Lipstick Distress Oxide as the darkest shade. For all the stems and leaves, I used a bright green Twisted Citron Distress Ink, and then Polychromos Color pencils to add some shading. I cut out all the images using the corresponding Tranquil Tulips Dies.

To highlight their beauty, I kept my design very simple by placing all three tulips inside a white oval frame that I created using two oval nesting dies. I gave the flowers dimension by adhering each one with foam tape. I also used foam tape on all the leaves. For the inside of my card, I lightly inked the center of an oval with Salvaged Patina and added a single stemmed tulip, placed off to the side, to create room for my "You're the Best" sentiment. My sentiment was created using the Loopy Letter Dies which I cut from a gold metallic cardstock. 

That concludes this week's card inspiration using the awesome Tranquil Tulips Layering stamps! I had a lot of fun experimenting with various different inks to create the perfect tulip colors! I hope this inspires you to create more Spring projects especially for the upcoming Easter holiday! Thanks so much for joining me today and until next time, Happy Cardmaking! 

-----------------------------------------

Hello Crafty Friends! Catherine here, and today I am sharing some floral gift tags created with Tranquil Tulips Stamps and Vintage Jar Stamps.

Sunny Studio Stamps: Tranquil Tulips Gift Tags by Catherine Cohen (featuring Vintage Jar)

To start, I die-cut the tulips, leaves, and stems, with white cardstock using the coordinating Tranquil Tulips Dies. I placed the die cut images back into the negative spaces. I stamped the images layer by layer with the following Altenew inks:

Yellows: Citrus Burst, Fresh Lemon, Maple Yellow
Pinks: Frosty Pink, Cotton Candy, Coral Berry
Purples: Soft Lilac, Wisteria, Lavendar Fields
Greens: Firefly, Grass Field

I added some highlights onto the tulips and leaves with a white gel pen.

Sunny Studio Stamps: Tranquil Tulips Gift Tags by Catherine Cohen (featuring Vintage Jar)

For the jar, I die cut 6 jars (3 for the front and 3 for the back) out of white cardstock using Vintage Jar Dies. I placed 3 of the jars back into the negative space and stamped the jar using Vintage Jar Stamps with Lawn Fawn Kiddie Pool Ink. I set the 3 jars aside for the back of the tags.  For the front of the jars, I placed the remaining 3 white cardstock jars back into the negative space and stamped the stem images. Next, I stamped the jar on top of the stems using Vintage Jar Stamps and Lawn Fawn Kiddie Pool Ink.

I adhered the tulips, stems, and leaves onto the back of the jar fronts and then glued on the back of the jars. I tied some brown string around the top of the jars. I added tags from Window Quad Square Dies using paper from Gingham Pastels Paper. I added a “thanks” sentiment in the Tranquil Tulips Stamps set using the pennant from Fancy Frames Rectangle Dies.

Thank you so much for joining me today! I would love for you to visit me at Crafti-Cat! Have a lovely day!

Sunny Studio Supplies Used:

Vintage Jar Dies
Vintage Jar Dies
Shop at:
Sunny Studio
Vintage Jar Stamps
Vintage Jar Stamps
Shop at:
Sunny Studio
Fancy Frames- Rectangles
Shop at:
Sunny Studio
Loopy Letters Dies
Loopy Letters Dies
Shop at:
Sunny Studio
Gingham Pastels 6x6 Paper
Shop at:
Sunny Studio
Frilly Frames-Eyelet Lace
Shop at:
Sunny Studio
Window Quad Square Die
Shop at:
Sunny Studio
Tranquil Tulips Stamps
Shop at:
Sunny Studio
Tranquil Tulips Dies
Shop at:
Sunny Studio

Wednesday, February 15, 2023

Ribbon & Lace Die Focused Cards with Catherine and Marie

Hello Crafty Friends! Catherine here and today, I am sharing a spring card created with the pretty Ribbon & Lace Border Dies and Build-A-Birdhouse Dies.

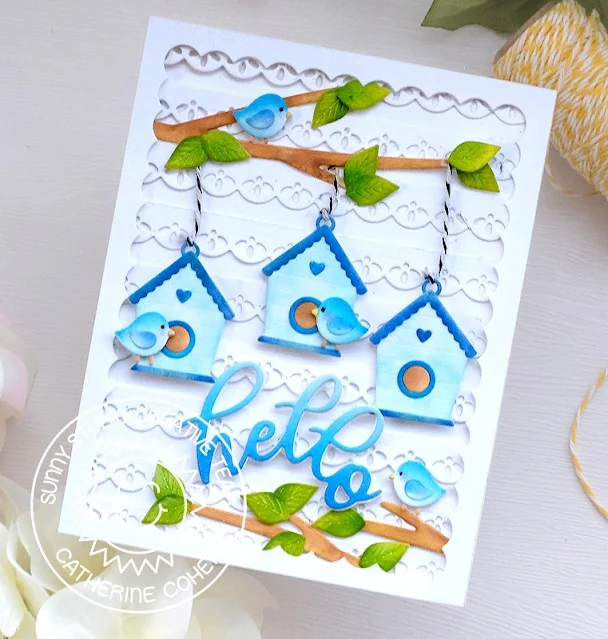
Sunny Studio Stamps: Ribbon & Lace Die Focused Everyday Card by Catherine Cohen (featuring Out On A Limb Dies, Frilly Frame Dies, Build-A-Birdhouse)

To start, I trimmed 9 strips of paper 0.5”H x 4.5” W out of white cardstock. I used one of the scalloped edge border dies in the Ribbon & Lace Border Dies and die cut the 9 strips of paper. I evenly spaced the scalloped edge borders onto a piece of white cardstock 4.5”W x 5 ¾” H and adhered the borders.

I die cut the birds and bird houses from Build-A-Birdhouse and ink blended with Blueprint Sketch, Salty Ocean, Tumbled Glass, Tea Dye, Scattered Straw, and Squeezed Lemonade Distress Oxides. 

I die cut some branches and leaves with Out On A Limb Dies and ink blended with Scattered Straw, Tea Dye, and Gathered Twigs (branches), and Twisted Citron and Mowed Lawn (leaves). 

Sunny Studio Stamps: Ribbon & Lace Die Focused Everyday Card by Catherine Cohen (featuring Out On A Limb Dies, Frilly Frame Dies, Build-A-Birdhouse)

I adhered all the images onto the card and hung the birdhouses onto the branches with black twine.  I added a reversed scallop frame onto the card. I had a piece of white cardstock which was left over from a die cut using Frilly Frames Hexagon and thought it would make a pretty frame.

I finished off the card by adding “hello” from Slimline Scalloped Frame Dies, ink blended with Blueprint Sketch, Salty Ocean and Tumbled Glass Distress Oxides.

Thanks so much for joining me today! For inspiration, please feel free to visit me at Crafti-Cat. Have a wonderful day!

-------------------------------------------

Hey Crafty Friends! It's Marie and today I'm sharing a vintage pastel "Hello" themed card that can easily be a new baby card which features the gorgeous slimline Ribbon & Lace Border Dies from Sunny Studio Stamps' latest Spring 2023 release. This card also features their Baby Elephants Stamps and being a huge fan of elephants, this stamp set is absolutely adorable and so much fun! 

Sunny Studio Stamps: Ribbon & Lace Die Focused Baby Card by Marie Marco (featuring Baby Elephant, Loopy Letter Dies)

To begin my card making process, I first die cut an A2 sized card base from 110 Lb Neenah Solar White Cardstock. Then, I used the Ribbon & Lace Border Dies to create lovely doily like texture using some scrap pieces of pattern paper. I cut another A2 sized panel of pattern paper and die cut the base using one of the border dies. I then adhered that to the white card base, and layered on the rest of the pattern paper. I die cut some white cardstock using one of the ribbon dies from the set and placed that on top of my paper layers.

Sunny Studio Stamps: Ribbon & Lace Die Focused Baby Card by Marie Marco (featuring Baby Elephant, Loopy Letter Dies)

Next, I stamped out all my images onto watercolor paper using Antique Linen Distress Ink and colored them all using Faber- Castell Watercolor pencils. I then cut out the images using the corresponding Baby Elephant Dies. For my "Hi" sentiment, I used the Loopy Letters Dies because it has a very dainty and delicate cursive style that matched the vintage vibe of my card perfectly! For the letters, I layered basic white cardstock on top of some gold cardstock. And finally to finish off my card, I used some gold star die cuts to embellish the background. 

That does it for my super sweet and easy card inspiration of the week! Thank you so much for joining me today and until next week, Happy Crafting!!!  

Sunny Studio Supplies Used:

Loopy Letters Dies
Loopy Letters Dies
Shop at:
Sunny Studio
Frilly Frames Hexagon Dies
Shop at:
Sunny Studio
Slimline Scalloped Frame
Shop at:
Sunny Studio
Out on A Limb Dies
Out on A Limb Dies
Shop at:
Sunny Studio
Baby Elephants Stamps
Shop at:
Sunny Studio
Baby Elephants Dies
Baby Elephants Dies
Shop at:
Sunny Studio
Build-A-Birdhouse Dies
Shop at:
Sunny Studio
Ribbon & Lace Dies
Ribbon & Lace Dies
Shop at:
Sunny Studio

Wednesday, December 28, 2022

Puppy Love Cards with Marie and Alma

Hello Crafty Friends, Marie here. I hope you had a wonderful Christmas!  Today I am sharing a love themed box card featuring Sunny Studio's Puppy Love Stamp. This tiny set is so cute and perfect for all the dog lovers out there as well as for the upcoming Valentine's season.

Sunny Studio Stamps: Puppy Love Love Themed Card by Marie Marco (featuring Mini Mat & Tag Dies, Loopy Letter Dies)

The box card die that I am using is from Lawn Fawn. My first step was to die cut all the box card pieces from Bristol Smooth cardstock paper. I then cut off the two side flaps and the front flap of the box leaving only the back panel. I wanted to create a very pink card to give to my mom, so I softly ink blended the outside of the box and the back panel using Kitsch Flamingo Distress Ink Oxide. I also distress inked the grass panels using Twisted Citron and Mowed Lawn. To create some cute texture to the the fresh grass, I used some water splatters and quickly dabbed it off with a paper towel. 

After assembling my card, I stamped my images with Distress Ink in Antique Linen onto watercolor paper and colored them using watercolor pencils. I cut my images out using the corresponding Puppy Love Dies. Using the Mini Mat & Tag 1 Dies. Using just the mat portion, I cut out a scallop edged background panel. With a cloud stencil, I created some soft pink clouds for the backdrop which I then attached to the back using double sided tape adhesive. 

Sunny Studio Stamps: Puppy Love Love Themed Card by Marie Marco (featuring Mini Mat & Tag Dies, Loopy Letter Dies)

To decorate the sides of the box, I used some pink pattern paper from the All Is Bright 6x6 Paper. For the front of the box card, I used the Loopy Letters Dies to create my own " I woof you "sentiment. 

To finish off my card, I adhered my puppies to the inside of the box and embellished their little hearts using Stickles Glitter Glue. I also took some die cut hearts and placed them all over my scene using clear acetate for that awesome floating illusion!  I also added some Glossy Accents to all the hearts for that gorgeous glossy look. 

And that does it for another week of paper crafting inspiration! Until next time, Have a Very Happy New Year!!! I'll see you in 2023!! Love and Peace

--------------------------------------------

Hi to all, Alma here. Today my card looks a lot like Valentine! I love it to use the bright and colourful pink shades after Christmas. 

Sunny Studio Stamps: Puppy Love Love Themed Card by Alma Störk (featuring Comic Strip Speech Bubble Dies)

The highlight of my card is the cute new Puppy Love Stamps set. I stamped the cute dogs and coloured them with Copic Markers. Then I die-cut the images with the Puppy Love Dies

After that I decided to create a shaker card with the Comic Strip Speech Bubbles Die. I die-cut the frame and cut a rectangle card in the same size, that I wanted to use as a background for the shaker card. Then I whipped the background with Distress Oxide Inks Worn Lipstick, Wilted Violet and Picked Raspberry. 

Sunny Studio Stamps: Puppy Love Love Themed Card by Alma Störk (featuring Comic Strip Speech Bubble Dies)

Then I glued the back and front of the shaker card with 3D Pads together and filled a lot of pink sequins in the card. After that I created glitter clouds with the Fluffy Clouds Dies.

For the decoration of my card I die-cut a lot of hearts with Puppy Love Dies. I stamped the sentiment from the Puppy Love Stamps on the Speech Bubbles from the Comic Strip Speech Bubbles Die

Now I glued all together! Ready!

Sunny Studio Supplies Used:

Loopy Letters Dies
Loopy Letters Dies
Shop at:
Sunny Studio
Comic Strip Speech Bubble Dies
Shop at:
Sunny Studio
All Is Bright Paper
All Is Bright Paper
Shop at:
Sunny Studio
Mini Mat & Tag 1 Dies
Shop at:
Sunny Studio
Puppy Love Stamps
Puppy Love Stamps
Shop at:
Sunny Studio
Puppy Love Dies
Puppy Love Dies
Shop at:
Sunny Studio

Wednesday, December 21, 2022

Holiday Gift Tags with Alma and Marie

Hi, Alma here. Today I want to show you three Christmas Shaker Tags, which I made with the Mini Mat & Tag 2 Dies.

Sunny Studio Stamps: Mini Mat & Tag Die Holiday Gift Tags by Alma Störk (featuring Pristine Poinsettia, Rustic Winter)

First of all I die-cut the tag from the Mini Mat & Tag 2 dies six time. Then I whipped the Tags with the Distress Oxide Inks "Iced Spruce" and "Stormy Sky". Then I die-cut a window in three of the tags with one of the Stitched Arch Dies.

Sunny Studio Stamps: Mini Mat & Tag Die Holiday Gift Tags by Alma Störk (featuring Pristine Poinsettia, Rustic Winter)

After that I die-cut the dears and the birch trees (several time) from the Rustic Winter Dies and color them with Copics. Now I glued the birch trees in the tag with the window. After that I glued a foil behind the window and added  a snow cloud (Slimline Nature Border Dies) and a deer in front of the foil. Then I filled a lot of sequins in the shaker tags and glued all together. 

Finally I added some decoration with the leaves from the Pristine Poinsettia Dies and some ribbon and a little bell! Merry Christmas to all!

-------------------------------------------

Hello Crafty Friends! It's Marie back for more Holiday paper crafting inspiration. Today I'm sharing three large gift tags created using Sunny Studio's Mini Mat & Tag Dies. 

Sunny Studio Stamps: Mini Mat & Tag Die Holiday Gift Tags by Marie Marco

These tags are perfect if you don't have a lot of time to create a card, because their size makes them super fast and easy to embellish! I also love how the back is large enough to write personal messages and attach straight to your gift! 

Sunny Studio Stamps: Mini Mat & Tag Die Holiday Gift Tags by Marie Marco (featuring Passionate Penguins, Winter Wreaths)

For my first tag, I used the Mini Mat & Tag 2 Dies. I start off by die cutting my tag from Neenah Solar White 110 lb heavyweight cardstock. I then die cut another tag from pattern paper and adhered it to the cardstock  base  moving it slightly upward to  reveal a very subtle white scalloped border at the bottom of the tag. I then added the white tag top. I die cut some craft paper and adhere that to the mini mat base using double sided adhesive tape. I splattered both the tag and mini mat using a watered down white acrylic paint. I stamped out my adorable penguins in an envelope images from the Passionate Penguins Stamps onto watercolor paper. I colored my images using Faber- Castell Watercolor pencils.

I wanted to turn this non Holiday image into something super festive so I dressed up my penguin with a Santa hat image from the Passionate Penguins Stamps and cut it out using the Penguin Party Dies. I also used some Holly Berries and leaves from the Winter Wreaths Stamps. I cut out the holly berries and leaves with the corresponding Winter Wreaths Dies. After fussy cutting my penguin image, I adhered it to my tag using double sided foam tape for dimension. I added some gold and white bakers twine tied in a bow to the top of of the tag and then adhered the tag to the mini mat using double sided tape adhesive. I then attached more twine to the top of the mini mat. I added some Ranger Grit Paste in "Snowfall" to the leaves and berries. I added Stickles in Sprinkled Sugar to the bow and santa hat. The grit paste and Stickles leave such a beautiful sugar crystal texture that sparkle and shine! 

Sunny Studio Stamps: Mini Mat & Tag Die Holiday Gift Tags by Marie Marco (featuring Reindeer Games, Winter Wreaths)

For tag number two, I used the Mini Mat & Tag 3 Dies. Using just the Mini Mat, I cut out my base panel from Neenah Solar White 110lb cardstock. I also die cut some patterned paper in a vintage mint shade. I attached the pattern paper to cardstock using double sided adhesive and gave it a subtle snow texture using watered down white paint splatters. I stamped out a wreath using the Winter Wreaths Stamps and cut it out using the Winter Wreaths Dies. I stamped out the adorable flying reindeer from the Reindeer Games Stamps. With Antique linen Distress Ink, I stamped my image onto watercolor paper, and colored it with watercolor pencils. 

Then, using the Reindeer Games Dies I cut out my image. I adhered everything to the Mini mat using a combination of Bearly Art Craft Glue, double sided adhesive, and double sided foam strips. I added the word "Joy" using the Loopy Letters Dies cut from red glitter paper. This created such a cute touch to balance out the red colors in the images. I also added some snowflakes with Stickles in the shade Unicorn. To finish off,  I placed red and white festive bakers twine to the top of the tag. 

Sunny Studio Stamps: Mini Mat & Tag Die Holiday Gift Tags by Marie Marco (featuring Snowman Kisses))

For tag number three, I used a combination of Mini Mat & Tag 2 Dies for the mat portion and Mini Mat & Tag 1 Die for the tag. I used the super adorable snowman image from the Snowman Kisses Stamps and cut it out using the Snowman Kisses Dies. I wanted to make a pastel themed tag so I added some pink snowflakes. I adhered the tag to the mat and added gold and white twine. 

That does it for this week's crafty Holiday Tag inspiration! I hope you are all enjoying the Holiday Season! Christmas is coming so fast it's unbelievable! May you all have a memorable holiday full of all things fun and crafty! Until next time, MERRY CHRISTMAS!!! Love and Peace!

Sunny Studio Supplies Used:

Loopy Letters Dies
Loopy Letters Dies
Shop at:
Sunny Studio
Rustic Winter Dies
Rustic Winter Dies
Shop at:
Sunny Studio
Stitched Arch Dies
Stitched Arch Dies
Shop at:
Sunny Studio
Slimline Nature Borders
Shop at:
Sunny Studio
Pristine Poinsettia Dies
Shop at:
Sunny Studio
Passionate Penguins Stamps
Shop at:
Sunny Studio
Passionate Penguins Dies
Shop at:
Sunny Studio
Reindeer Games Stamps
Shop at:
Sunny Studio
Reindeer Games Dies
Reindeer Games Dies
Shop at:
Sunny Studio
Snowman Kisses Stamps
Shop at:
Sunny Studio
Snowman Kisses Dies
Snowman Kisses Dies
Shop at:
Sunny Studio
Winter Wreaths Stamps
Shop at:
Sunny Studio
Winter Wreaths Dies
Winter Wreaths Dies
Shop at:
Sunny Studio
Mini Mat & Tag 2 Dies
Shop at:
Sunny Studio
Mini Mat & Tag 3 Dies
Shop at:
Sunny Studio