Showing posts with label Layered Snowflake Frame. Show all posts

Wednesday, December 25, 2019

Snowflake Frame Die Focused Cards with Franci and Ana

Hello crafty friends and Merry, merry Christmas!! Hope you're having a super happy Holiday time with all your loved one, it's Franci here and I'm so happy to pop in too today to wish you all the best and send Merry Wishes with this sweet Santa Claus Sunny Studio card.

Sunny Studio Stamps: Snowflake Frame Dies Hogs & Kisses Santa Claus Lane Christmas Cards by Franci Vignoli

First of all I created my card base out of white cardstock and I trimmed a coordinated white panel down to size too. I die cut this using the large Layered Snowflake Frame and I also die cut my "Merry" out of some silver sparkle cardstock using the Merry Christmas die included in the Christmas Garland Frame set. 

I inked the front of my card with Salty Ocean and Blueprint Sketch Distress Inks and I glued my window panel to the card. I also glued the "Merry" and stamped "Christmas" on the bottom. Then I stamped, colored with Copics and die cut some images from the Santa Claus Lane set and glued them down with some foam adhesive.

Sunny Studio Stamps: Snowflake Frame Dies Hogs & Kisses Santa Claus Lane Christmas Cards by Franci Vignoli

I added lots of details to all my little scene with a white gel pen, also added a little heart I stamped and die cut from the Hogs & Kisses set. Finally I added some little pearl embellishments here and there and I love how they looks so much!!

Hope you like my card and thank you so much for stopping by today! Now let's celebrate, shall we?! Merry, merry Christmas!

------------------------------------------------

Hello everyone and Merry Christmas! It is Ana here today with a water colored Christmas card featuring Layered Snowflake Frame dies and one of my favorite mini stamps Christmas Chapel.

Sunny Studio Stamps: Snowflake Frame Dies Christmas Garland Frame Dies Christmas Chapel Christmas Card by Ana Anderson

I absolutely adore the Snowflake frames and really wanted to combine it with Christmas Chapel and watercolor both panels for softer, winter wonderland look. I started with die cutting the front panel with larger Snowflake Frame die (I used Canson XL watercolor paper for both panels).  I added very light blue shades of color to the die cut panel and set it aside to dry.

I stamped the Christmas Chapel in Antique Linen Distress Ink (the lightest water-soluble ink I have) so I could do no line water coloring. I used Prima watercolors for both the front die cut snowflake frame panel, the chapel and the background/snow banks.

Sunny Studio Stamps: Snowflake Frame Dies Christmas Garland Frame Dies Christmas Chapel Christmas Card by Ana Anderson

To the chapel panel I added white (acrylic paint mixed with water) splatter. Once both my panels were dry, I stamped the sentiment - from Christmas Chapel set - to the front (snowflake frame) panel. I added foam tape to the snowflake frame pop it up and adhered both panel to A2 card base.

Thank you so much for spending time with us today! I really hope you like today’s winter wonderland project! Wishing you a blessed holiday season!

Sunny Studio Supplies Used:

Christmas Chapel Stamps
Shop at:
Sunny Studio
Christmas Chapel Dies
Shop at:
Sunny Studio
Santa Claus Lane Stamps
Shop at:
Sunny Studio
Santa Claus Lane Dies
Shop at:
Sunny Studio
Hogs & Kisses Stamps
Shop at:
Sunny Studio
Hogs & Kisses Dies
Hogs & Kisses Dies
Shop at:
Sunny Studio
Layered Snowflake Frame
Shop at:
Sunny Studio
Christmas Garland Frame
Shop at:
Sunny Studio

Monday, December 23, 2019

Scenic Route Cards with Eloise and Leanne

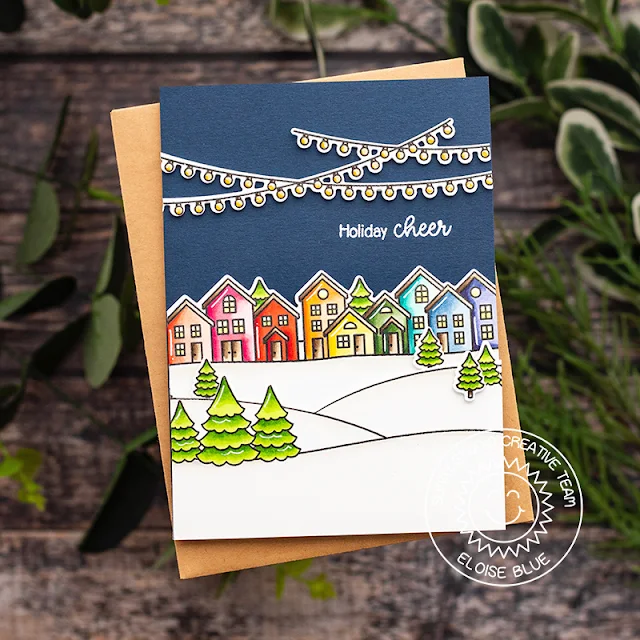
Hi friends, Eloise here and today I’m using the Scenic Route Stamp Set to create my last Christmas Card for the year.

Sunny Studio Stamps: Scenic Route Winter Themed Holiday Cards by Eloise Blue

I started off with stamping out the images from Scenic Route onto some white cardstock and colouring them in with Copic Markers. Once they were all coloured, I cut them out.

(Copic Markers Used: R30, R21, R22, R24 / RV10, RV13, RV25, RV19 / R14, R17, R27, R29 / YR00, YR02, YR12, YR18 / Y11, Y13, Y15, Y19 / YG61, YG63, YG67, G28 / BG10, BG11, BG13, BG49 / B91, B93, B95, B97 / BV01, BV02, BV04, BV08 / YG01, YG03, YG23, YG17 / E42, E43, E44, E47 / W00, W0, W1 / 0)

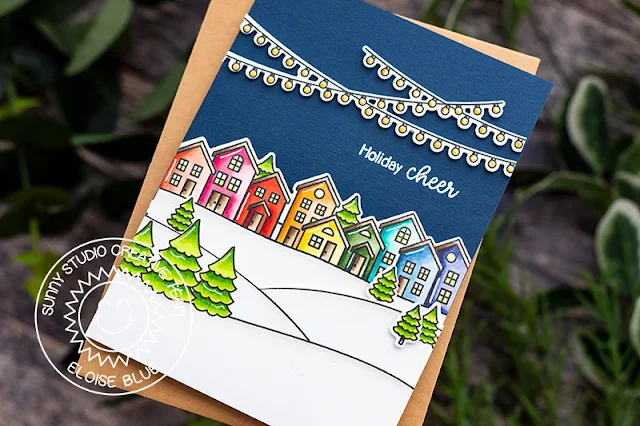
Sunny Studio Stamps: Scenic Route Winter Themed Holiday Cards by Eloise Blue

I then added foam tape onto the backs of all the pieces and adhered them onto a navy card base. Lastly, I white heat embossed the ‘Holiday Cheer’ sentiment onto the background and added white gel pen details onto the images.

Thanks so much for stopping by today and I’ll see you next week.

-------------------------------------------------

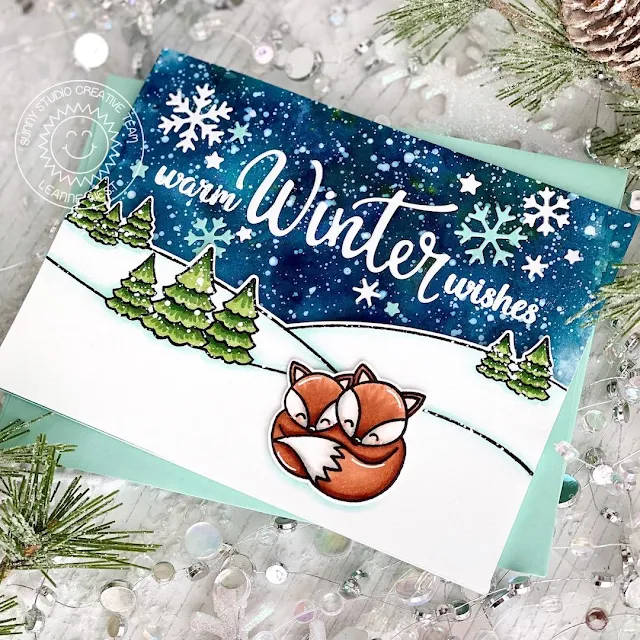
Happy Holidays everyone, Leanne here! Even though I'm officially done with Christmas projects, I still wanted to make some winter themed cards to have on hand. I've created a simple but sweet little scene on today's card. It couldn't have been easier with the help of the Scenic Route stamp set.  

Sunny Studio Stamps: Scenic Route Circle Snowflake Frame Dies Layered Snowflake Frame Dies Foxy Christmas Winter Themed Holiday Card by Leanne West

I love that with just one stamp, I can have the perfect landscape for my scene. I Copic colored the trees and added some light shading to the snowy hills. I wanted to include some cute critters to my wintery scene. I choose the adorable little foxes from Foxy Christmas

For the top half of this scene, I wanted to create a beautiful night sky. I used a combination of two Nuvo Shimmer Powders (Atlantis Burst & Meteorite Shower) to achieve this. I started with a panel of Bristol Smooth card stock and sprayed it with a little water. I then sprinkled the powders overtop. I used a paint brush to move the color around while adding more water where needed to cover the entire panel. After the panel was completely dry, I splattered it with thinned white paint.  

Sunny Studio Stamps: Scenic Route Circle Snowflake Frame Dies Layered Snowflake Frame Dies Foxy Christmas Winter Themed Holiday Card by Leanne West

I layered the snowy landscape over the sky panel with foam tape and then adhered the completed scene to an A2 size card base. I combined stamps and a die cut for the greeting. The stamped warm wishes is from Heartfelt Wishes. The winter die cut word is from the Layered Snowflake Frame set. To finish off the card I added a few die cut snowflakes scattered around the greeting.  

Sunny Studio Supplies Used:

Heartfelt Wishes Stamps
Shop at:
Sunny Studio
Foxy Christmas Stamps
Shop at:
Sunny Studio
Foxy Christmas Dies
Foxy Christmas Dies
Shop at:
Sunny Studio
Scenic Route Stamps
Scenic Route Stamps
Shop at:
Sunny Studio
Scenic Route Dies
Scenic Route Dies
Shop at:
Sunny Studio
Layered Snowflake Frame
Shop at:
Sunny Studio
Snowflake Circle Frame
Shop at:
Sunny Studio

Saturday, December 14, 2019

Guest Designer Spotlight: Cards with Keeway Tsao

Hello friends! It’s Keeway Tsao from Kiwi Koncepts and I’ll be sharing some fun holiday inspirations with you today! We’re less than a couple weeks away, but there’s still time to make some last minute cards!

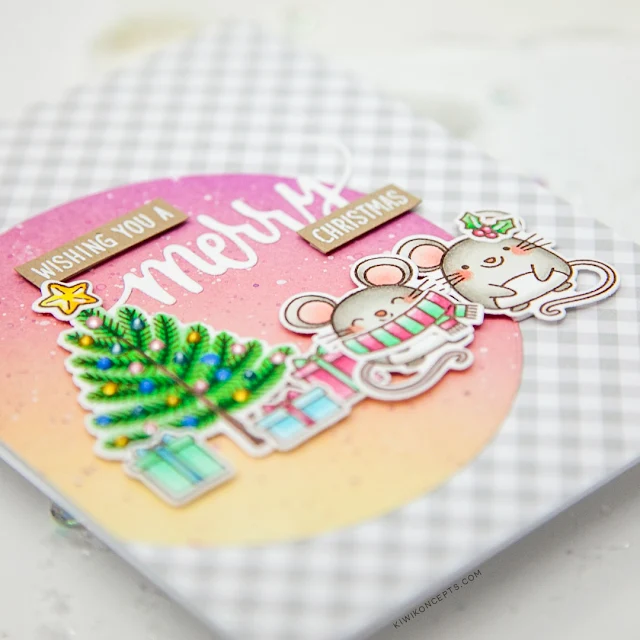
Sunny Studio Stamps: Merry Mice Santa Claus Lane Christmas Garland Frame Dies Layered Snowflake Frame Dies Winter Themed Holiday Cards by Keeway Tsao

I really love the Merry Mice set, the mice are so cute! When I saw those cheese trees, I knew I must create a winter scene with it. I stamped several images from the set in a dark brown hybrid ink and colored them up with Copic markers. I then used the matching dies to die cut the images out.

Sunny Studio Stamps: Merry Mice Santa Claus Lane Christmas Garland Frame Dies Layered Snowflake Frame Dies Winter Themed Holiday Cards by Keeway Tsao

Next, I worked on ink blending a snowy sky and used Pine Needles, Peacock Feathers, Cracked Pistachio, and Old Paper distress oxide inks. I splattered white acrylic paint generously. Then die cut some snow drifts out of white card stock and blended the edges with Broken China distress oxide ink.

Sunny Studio Stamps: Merry Mice Santa Claus Lane Christmas Garland Frame Dies Layered Snowflake Frame Dies Winter Themed Holiday Cards by Keeway Tsao

After adding my snow layers, I added my images onto the scene with foam tape. I used the large ‘winter wishes’ sentiment die cut from the Layered Snowflake Frame Die. It is die cut out of white card stock and adhered right on the background, and that completes the card!

Sunny Studio Stamps: Merry Mice Santa Claus Lane Christmas Garland Frame Dies Layered Snowflake Frame Dies Winter Themed Holiday Cards by Keeway Tsao

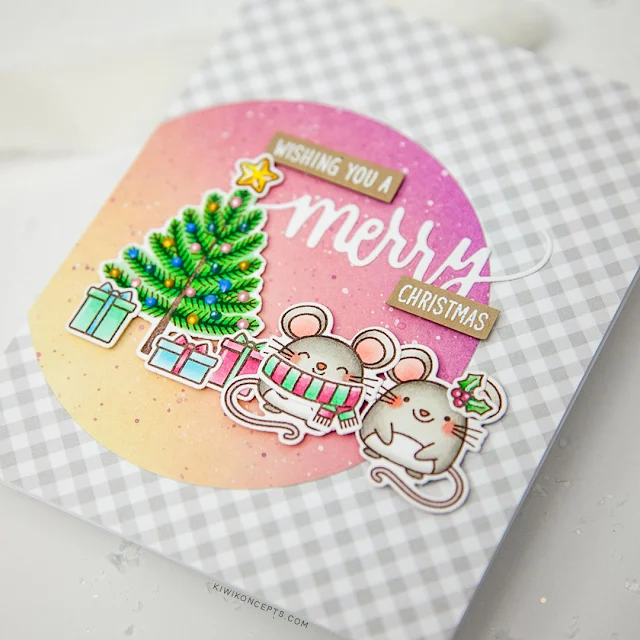
My next card once again uses the Merry Mice set, but I also borrowed some images from the Santa Claus Lane set. Again, I stamped my images in a dark brown hybrid ink and colored them with Copic markers. I die cut the images out with the matching dies.

Sunny Studio Stamps: Merry Mice Santa Claus Lane Christmas Garland Frame Dies Layered Snowflake Frame Dies Winter Themed Holiday Cards by Keeway Tsao

I ink blended a background with Wilter Violet, Victorian Velvet and Antique Linen and die cut it with a simple circle die. I offset this background on some grey plaid pattern paper from Subtle Grey Tones 6x6 Paper.

Sunny Studio Stamps: Merry Mice Santa Claus Lane Christmas Garland Frame Dies Layered Snowflake Frame Dies Winter Themed Holiday Cards by Keeway Tsao

I added my images thereafter with foam tape for dimension. For the sentiment, I die cut the ‘merry’ using the sentiment die found in the Christmas Garland Frame. I then heat embossed the ‘wishing you a’ and ‘christmas’ from the Santa Claus Lane set in white onto kraft card stock. I trimmed it down to thin strips and added it above and below the ‘merry’ with foam tape.

I hope you enjoy today’s inspiration. Happy holidays folks!

Sunny Studio Supplies Used:

Subtle Grey Tones Paper
Shop at:
Sunny Studio
Santa Claus Lane Stamps
Shop at:
Sunny Studio
Santa Claus Lane Dies
Shop at:
Sunny Studio
Merry Mice Stamps
Merry Mice Stamps
Shop at:
Sunny Studio
Merry Mice Dies
Merry Mice Dies
Shop at:
Sunny Studio
Layered Snowflake Frame
Shop at:
Sunny Studio
Christmas Garland Frame
Shop at:
Sunny Studio

Tuesday, December 10, 2019

Santa Claus Lane Cards with Juliana and Angelica

Hello Sunny Studio Friends! It's Juliana here to share a festive Christmas shaker card featuring the Santa Claus Lane Stamp Set.

Sunny Studio Stamps: Santa Claus Lane Layered Snowflake Frame Dies Fancy Frames Dies Merry Christmas Card by Juliana Michaels

I began by stamping and coloring some of the images from the Santa Claus Lane Stamp Set with Copic Markers. I then die cut them with the Santa Claus Lane Dies.

Next, I took the Layered Snowflake Frame Dies and die cut the large snowflake frame from white cardstock and trimmed it into a square. I then die cut the small snowflake frame from white cardstock and trimmed it the same size as the larger frame.

To create the shaker box, I adhered a piece of transparency film/acetate to the back side of the large frame. I then added thin strips of double sided foam tape to create the frame that will hold the sequins and beads.

Sunny Studio Stamps: Santa Claus Lane Layered Snowflake Frame Dies Fancy Frames Dies Merry Christmas Card by Juliana Michaels

For the backing of the shaker box, I cut a piece of white cardstock to just slightly larger than the frame and inked it with Distress Oxide in Blueprint Sketch and Chipped Sapphire. I then lightly spritzed it with some water to activate the ink and dabbed it dry revealing “snowflakes”.  Next, I adhered the small white snowflake frame to the center of this piece to finish off the backing. I then adhered Santa in his sleigh with the toys! To fill the shaker I used a mix of seed beads, sequins and Blue Snowflake Confetti. I usually carefully pour these on top of the image just to get a feel for how much to add.

I then carefully lined up the top of the shaker with the backing and adhered the layers together to complete the shaker card. To finish it all off, I added the sentiment, heat embossed with white embossing powder, onto a red die cut pennant from the Fancy Frames Rectangle Dies.

Thanks so much for stopping by today! I hope you enjoyed learning how to create a festive Christmas shaker card featuring the Santa Claus Lane Stamp Set.

---------------------------------------------------

Hi friends! Angelica here, I have a new Christmas card to share with you today, featuring the Santa Claus Lane stamp set

Sunny Studio Stamps: Santa Claus Lane Frilly Frame Dies Happy Word Die Christmas Card by Angelica Conrad

I stamped and Copic-colored images from the stamp set, then die-cut them with the coordinating dies. I die-cut white card stock with Happy word die three times, stacking and gluing the words together for height. For the background, I blended Blueberry and Blue Corn inks onto a panel of white card stock. I let the ink dry, then white heat-embossed the sentiment words at an angle. 

Sunny Studio Stamps: Santa Claus Lane Frilly Frame Dies Happy Word Die Christmas Card by Angelica Conrad

I splattered shimmer water and watered-down white acrylic paint onto the panel for snow, then trimmed the panel with the Frilly Frames Retro Petals stitched rectangle. I attached the panel to a card base with foam adhesive, and added the chimney, Santa’s sleigh, and die cut word. I finished the card by applying shimmer and shine to the word, using a shimmer brush and Crystal glaze.

I hope I have helped with ideas for the fun Santa Clause Lane Lane stamp set. Thanks so much for stopping by! 

Sunny Studio Supplies Used:

Fancy Frames- Rectangles
Shop at:
Sunny Studio
Happy Word Die
Happy Word Die
Shop at:
Sunny Studio
Frilly Frames Retro Petals Dies
Shop at:
Sunny Studio
Santa Claus Lane Stamps
Shop at:
Sunny Studio
Santa Claus Lane Dies
Shop at:
Sunny Studio
Layered Snowflake Frame
Shop at:
Sunny Studio

Saturday, December 7, 2019

Guest Designer Spotlight: Winter Themed Cards with Mona Toth

Hi crafty friends! It's Mona Toth here and I am super excited for be a guest on the Sunny Studio Blog! I have two cards for today what I made with the Merry Mice, Scenic Route and Cruising Critters stamp sets.

Sunny Studio Stamps: Merry Mice Scenic Route Frilly Frame Dies Winter Themed Holiday Card by Mona Toth

For my first card I started the cardmaking with stamping and coloring. I stamped the images from the Merry Mice and the Scenic Route stamp sets then I colored them with Copic Markers. After the coloring I die-cut the images with coordinating dies and added highlights with Signo Uniball white pen.

Sunny Studio Stamps: Merry Mice Scenic Route Frilly Frame Dies Winter Themed Holiday Card by Mona Toth

For the background added Frilly Frames Chevron Dies with Neenah Solar White cardstock then I cut a little smaller cardstock made ink blending on it with Spun Sugar and Tattered Rose Distress Oxide Ink. After the ink blending I stamped the "Merry Christmouse" sentiments with clear watermark ink and made a quick heat embossing on it.

Sunny Studio Stamps: Merry Mice Scenic Route Frilly Frame Dies Winter Themed Holiday Card by Mona Toth

To the background I added a beautiful red cardstock from Striped Silly 6x6 Paper Pad behind the background die-cut. In the end I styled my card and adhered everything together.

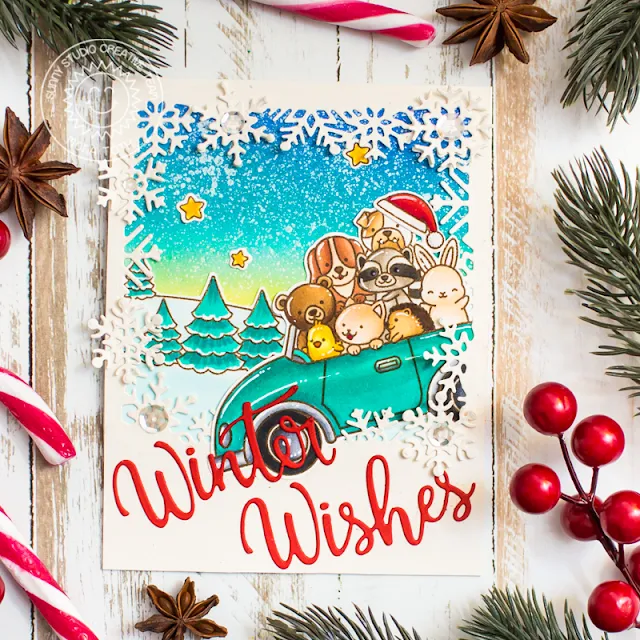
Sunny Studio Stamps: Scenic Route Cruising Critters Layered Snowflake Frame Dies Winter Themed Holiday Card by Mona Toth

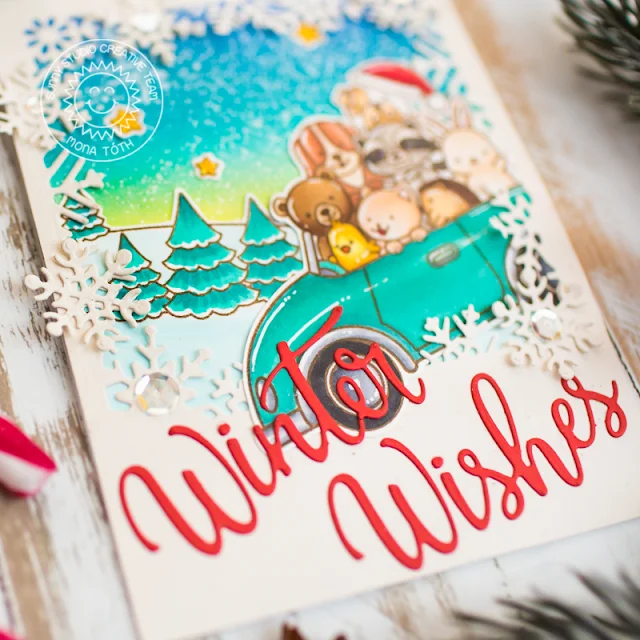
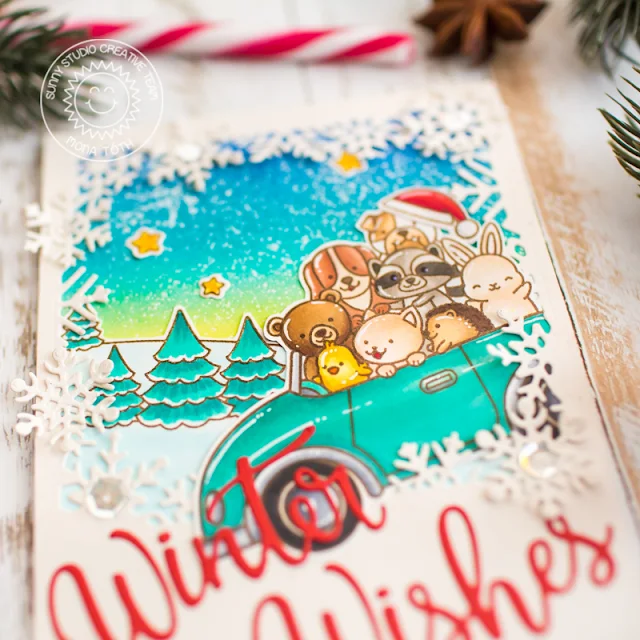
For my second card I made almost the same process, but this time I have used the Cruising Critters stamp set together with the Scenic Route set. I colored them with Copic markers as well.

Sunny Studio Stamps: Scenic Route Cruising Critters Layered Snowflake Frame Dies Winter Themed Holiday Card by Mona Toth

For the background I die-cut the Layered Snowflake Frame Die from a cream cardstock and created with it this sweet but festive scene.

Sunny Studio Stamps: Scenic Route Cruising Critters Layered Snowflake Frame Dies Winter Themed Holiday Card by Mona Toth

In the end I run the "Winter Wishes" sentiment through my die-cut machine with red cardstock, adhered to my card and it was ready. 

Thank you very much for reading through my post, I hope that you have enjoyed it, feel free to comment which one you like more. Feel free to check my Instagram for more inspiration. :)

Have an amazing day, big hugs, Mona!

Sunny Studio Supplies Used:

Striped Silly 6x6 Paper
Shop at:
Sunny Studio
Frilly Frames Chevron Die
Shop at:
Sunny Studio
Cruising Critters Stamps
Shop at:
Sunny Studio
Cruising Critters Dies
Shop at:
Sunny Studio
Merry Mice Stamps
Merry Mice Stamps
Shop at:
Sunny Studio
Merry Mice Dies
Merry Mice Dies
Shop at:
Sunny Studio
Scenic Route Stamps
Scenic Route Stamps
Shop at:
Sunny Studio
Scenic Route Dies
Scenic Route Dies
Shop at:
Sunny Studio
Layered Snowflake Frame
Shop at:
Sunny Studio

Tuesday, December 3, 2019

Snowflake Frame Dies Focused Cards with Angelica and Juliana

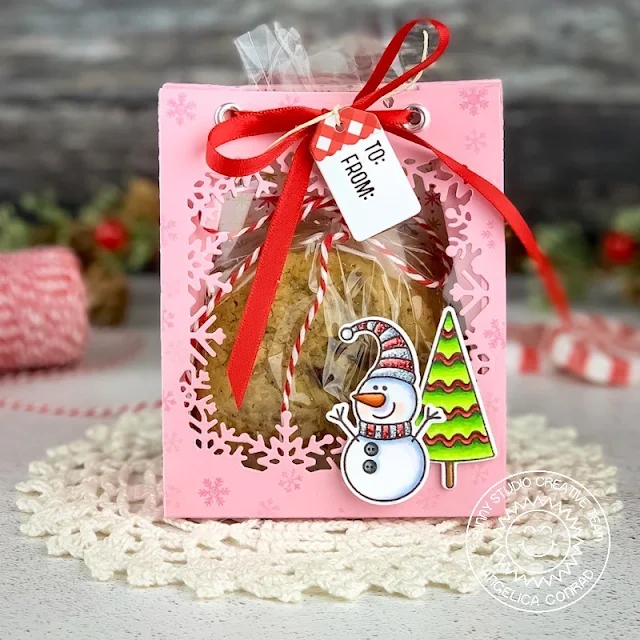
Hi friends! Angelica here. I made a cute treat bag to share today, featuring the Layered Snowflake Frame dies.

Sunny Studio Stamps: Layered Snowflake Frame Dies Circle Snowflake Frame Dies Sweet Treats Gift Bag Feeling Frosty Winter Holiday Gift Bag by Angelica Conrad

I used the Sweet Treat Bag die to die-cut pink card stock, then die cut a window from the bag with the smaller Snowflake Frame. I closed the window with acetate, and attached the bag together. I punched holes out for ribbon, added a cellophane bag of baked cookies, and closed the bag with a bow.

Sunny Studio Stamps: Layered Snowflake Frame Dies Circle Snowflake Frame Dies Sweet Treats Gift Bag Feeling Frosty Winter Holiday Gift Bag by Angelica Conrad

I added a Feeling Frosty snowman and tree with thin foam squares. I finished the bag with a small Sweet Treat Bag tag, using Holiday Cheer pattern paper to decorate the top, and stamps from Season's Greetings stamp set to add the words.

I hope you like my treat bag! That's all that I have for today. Thanks so much for stopping by!

------------------------------------------------------

Hello Sunny Studio Friends! It's Juliana here to share a wintery shadow box card created using the Layered Snowflake Frame Dies.

Sunny Studio Stamps: Layered Snowflake Frame Dies Circle Snowflake Frame Dies Sweet Treats Gift Bag Rustic Winter Card by Juliana Michaels

To get started, I took the Layered Snowflake Frame Dies the large snowflake frame from white cardstock and trimmed it into a square. I then die cut the small snowflake frame from silver cardstock and trimmed it the same size as the white piece. I layered this behind the white frame using strips of foam tape to pop it up. Next, I cut a piece of the wavy paper from the Subtle Grey Tones 6x6 Paper Pad and trimmed it to size of the white frame. I added another layer of foam tape to the edge of the silver snowflake frame before adhering it to the patterned paper to really add to the shadow box look.

I then took the Rustic Winter Dies and cut the deer and trees from white cardstock, and placed them inside the frame to create the wintery scene. To give it a bit of dimension I used double sided foam tape behind the deer. I then used the snowflake dies from the Layered Snowflake Frame Dies and the Snowflake Circle Frame Dies and added a few of them cut from silver cardstock to complete the scene.

Sunny Studio Stamps: Layered Snowflake Frame Dies Circle Snowflake Frame Dies Sweet Treats Gift Bag Rustic Winter Card by Juliana Michaels

I thought about adding a sentiment to the front of the card, but I love how pretty the card looks without it. I think it would make a beautiful display piece sitting out during the holidays and you can add the sentiment and well wishes easily enough on the inside of the card.

Thanks so much for stopping by today! I hope you enjoyed learning how to create a wintery shadow box card featuring the Layered Snowflake Frame Dies

Sunny Studio Supplies Used:

Holiday Cheer 6x6 Paper
Shop at:
Sunny Studio
Rustic Winter Dies
Rustic Winter Dies
Shop at:
Sunny Studio
Subtle Grey Tones Paper
Shop at:
Sunny Studio
Season's Greetings Stamps
Shop at:
Sunny Studio
Feeling Frosty Stamps
Shop at:
Sunny Studio
Feeling Frosty Dies
Feeling Frosty Dies
Shop at:
Sunny Studio
Layered Snowflake Frame
Shop at:
Sunny Studio
Snowflake Circle Frame
Shop at:
Sunny Studio
Sweet Treats Gift Bag
Shop at:
Sunny Studio