Showing posts with label Inside Greetings. Show all posts

Monday, August 7, 2023

City Streets Card with Bobbi

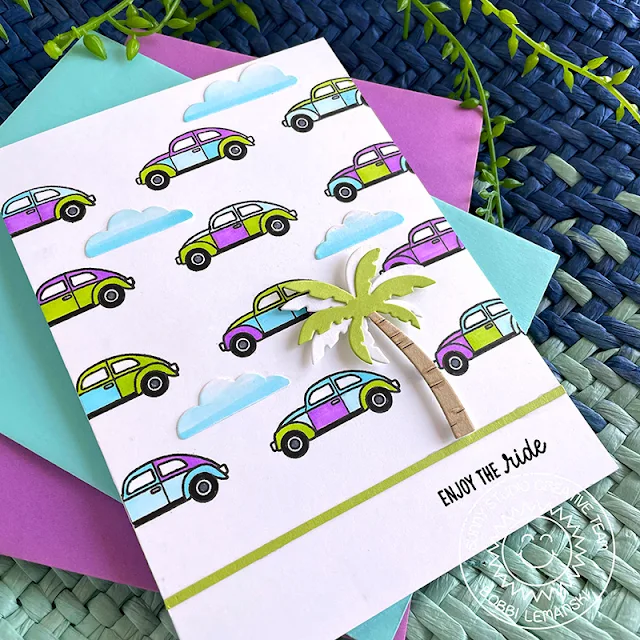
Hello Sunny friends, Bobbi here! Today I’m sharing a fun card using just one image from the City Streets stamp setI love the look of a retro VW bug or van. I have never owned one, but I just think they are interesting and scream summer-fun vibes! Whenever I see one in a stamp set, I’m immediately drawn to that particular image. No surprise, it happened again. I focused right in on the car included in this city-inspired set and made this card. It’s okay not to use every image in a set every time. Sometimes a card can be fun using just one design.

Sunny Studio Stamps: City Streets card by Bobbi Lemanski (featuring Tropical Trees Backdrop Dies, Inside Greetings)

For this card, I’m using the following products:

City Street stamp set (There is also a coordinating die set available for this set that I did not use.)

Tropical Trees background set

Country Carnival stamp set for the front panel sentiment (There is also a coordinating die set available for this set that I did not use.)

Inside Greetings Congrats stamp set for the inside sentiment


Sunny Studio Stamps: City Streets card by Bobbi Lemanski (featuring Tropical Trees Backdrop Dies, Inside Greetings)


To make this 5″ X 7″ card, I stamped the 
automobile repeatedly over a 5″ X  7″ front panel cut from white cardstock. I used my MISTI stamping tool to line up the bottom of the image to ensure a clean grid of cars. I kept some space at the bottom of the card front for a sentiment.  I colored the cars using four Copic colors: B01, B00, V04, YG23. I color-blocked the cars to make each one different. How cute are these cars?! This was a new color combo for me, too.

Using the Tropical Trees background set, I die cut a palm tree and four clouds in varying sizes. I used the two shades of blue to color the clouds and cut the tree from colored cardstock. The elements were added to the front panel. I used foam dots to attach the palm tree so that it stood out from the background. A thin green 1/8″ strip of cardstock was glued right under the tree to ground it. I stamped the sentiment, “enjoy the ride” underneath the strip.

Sunny Studio Stamps: City Streets card by Bobbi Lemanski (featuring Tropical Trees Backdrop Dies, Inside Greetings)

Inside the card, I stamped a phrase from the set, Inside Greetings Congrats stamp set. This card could be used for  many life changing adventures such as a retirement, change of job, graduation, wedding, and/or travel adventure. It’s just a fun summer card with a little unexpected twist! I’m gonna say it…. “Way to go, Bobbi!” Haha!

Thanks for stopping by today. If you want to see more ideas and inspiration from me, subscribe to my blog, BobbiHartDesign.com. I’ll send you updates on new posts! You can also find me on Instagram as @BobbiHartDesign and on Facebook as BobbiHartDesign.

Sunny Studio Supplies Used:

City Streets Dies
City Streets Dies
Shop at:
Sunny Studio
City Streets Stamps
City Streets Stamps
Shop at:
Sunny Studio
Country Carnival Stamps
Shop at:
Sunny Studio
Inside Greetings Congrats
Shop at:
Sunny Studio
Tropical Trees Backdrop
Shop at:
Sunny Studio

Tuesday, June 20, 2023

Turtley Awesome Card with Isha

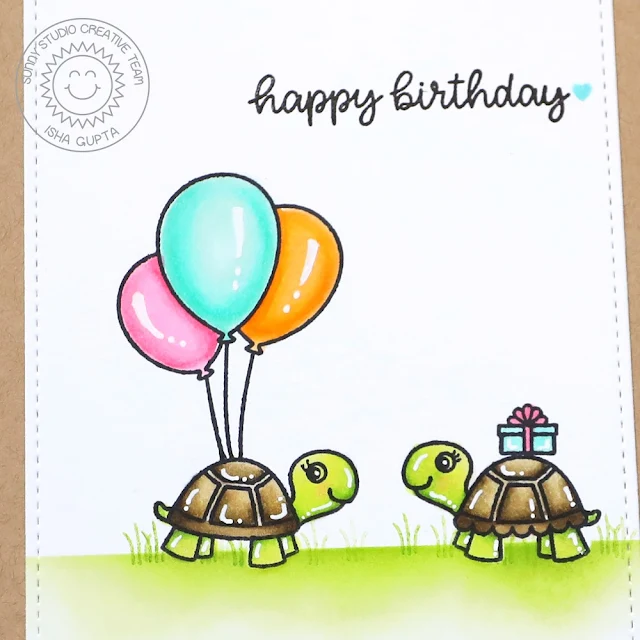
Hello everyone! Isha here today with a CAS one layer card using masking technique featuring the Turtley Awesome stamps. We can use masking paper to layer images to create a scene, still keeping it clean and simple.

Sunny Studio Stamps: Turtley Awesome Birthday Card by Isha Gupta (featuring Inside Greetings Birthday, Stitched Rectangle Dies)

I started by stamping the turtles and gift box onto masking paper. Fussy cut the images. Next I placed the images where I wanted them to be. First I stamped the gift box, put the mask on it. Now stamp the turtles, put masks on them. Now position a post-it to mask the sky area and sponge mowed lawn distress ink to create grass. Next stamp the grass from the Farm Fresh stamp set. I used 2nd. and 3rd generation stamping technique to keep them light.

Sunny Studio Stamps: Turtley Awesome Birthday Card by Isha Gupta (featuring Inside Greetings Birthday, Stitched Rectangle Dies)

Stamp the balloons from the Birthday Mouse stamp set onto the turtle back. Next remove all the masks. Stamp the sentiment from the Inside Greetings-Birthday stamp set. Die-cut the panel using the Stitched Rectangle dies. Color the images using copic markers. Adhere the panel to a kraft card base.

Thanks for dropping by and have a nice day!

Sunny Studio Supplies Used:

Turtley Awesome Dies
Shop at:
Sunny Studio
Turtley Awesome Stamps
Shop at:
Sunny Studio
Stitched Rectangle Dies
Shop at:
Sunny Studio
Inside Greetings Birthday
Shop at:
Sunny Studio
Birthday Mouse Stamps
Shop at:
Sunny Studio

Saturday, June 10, 2023

Guest Designer Spotlight: Scrumptious Cupcake Card with Leanne West

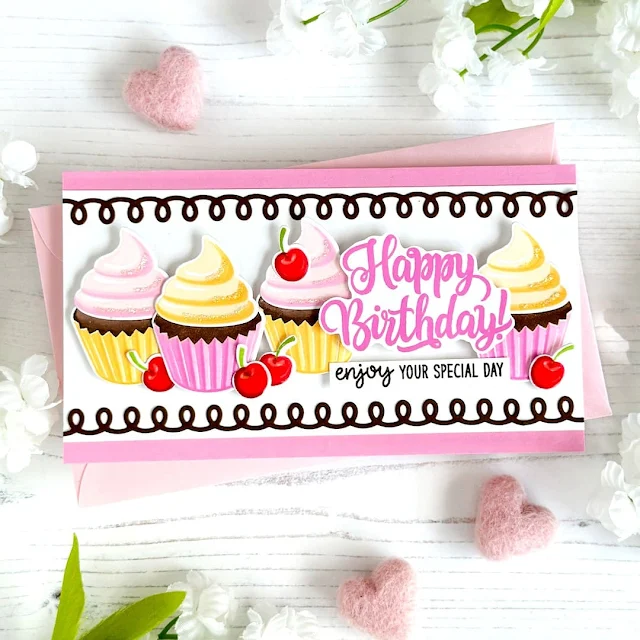
Hello everyone, Leanne West here with you! Can you believe it's almost summer? There are lots of summer birthdays in my family so I always like to restock my stash of birthday cards in June. I came up with a birthday card design using the fun images from Scrupmtious Cupcakes which I can duplicate easily. It's a mini slimline card which measures 6.25" long by 3.5" wide.  

Sunny Studio Stamps: Scrumptious Cupcakes Birthday Card by Leanne West (featuring Icing Border Dies, Inside Greetings)

For this sample, I have chosen pink as the primary color with yellow, chocolate brown, and red as the accent colors. I plan on making many more but change the pink out for other colors like aqua blue, lavender, or mint green. I figure I can use the recipients favorite color. Each card will have a row of four cupcakes, some cherries, and the Happy Birthday greeting across the length of the card. I've used one of the Icing Border dies to frame in this row. Even though the die only cuts a 5.5" long border piece, I was able to glue two together seamlessly to cover the full length of my mini slimline card.

Sunny Studio Stamps: Scrumptious Cupcakes Birthday Card by Leanne West (featuring Icing Border Dies, Inside Greetings)

To kick this card design up a notch, I've highlighted the swirls of cupcake icing with some Stickles Glitter Glue. Stickles is always such easy way to give anything a touch of sparkle. I've added Glossy Accents over the cherries to make them really shiny and fresh looking. And lastly I decided to add an additional sentiment below the big Happy Birthday greeting. You would't have to do this but I felt it balanced the design out nicely. This sentiment comes from the Inside Greetings Birthday stamp set.  

Ink colors used for stamping: Altenew Crisp Dye Ink - Baby Pink, Fuchsia, Buttercream, Warm Sunshine, Fresh Leaf, Pink Pearl, Coral Bliss, Heart Beat; brown ink color is Catherine Pooler Icing On the Cake

Sunny Studio Supplies Used:

Icing Border DIes
Icing Border DIes
Shop at:
Sunny Studio
Inside Greetings Birthday
Shop at:
Sunny Studio
Scrumptious Cupcakes Stamps
Shop at:
Sunny Studio
Scrumptious Cupcakes Dies
Shop at:
Sunny Studio

Monday, May 8, 2023

Grad Cat Card with Bobbi

Hello, Bobbi here! It’s graduation time. Whether it is a kindergarten or a college graduation, it’s that time of the year. Well this cute Grad Cat comes to the rescue. For a youngster or a young adult, Grad Cat can share appreciation and congratulatory wishes for the graduate in a clever and fun way. 

Sunny Studio Stamps: Grad Cat Graduation Card by Bobbi Lemanski (featuring Hayley Alphabet Dies, Crepe Paper Streamers, Inside Greetings)

I’m using the following products from Sunny Studio Stamps:
Grad Cat stamps and coordinating dies
Crepe Paper Streamers dies
Bright Balloons dies
Hayley Uppercase Alphabet dies
Inside Greetings Congrats stamp set 
Subtle Grey Tones 6″ X 6″ paper pack

To make this 5″ X 7″ card, I added a 5″ wide X 3-3/4″ tall neutral-striped pattern paper to the bottom section of my card base that measures 5″ wide X 6-1/4″ tall. Next, I stamped, colored and cut out the Grad Cat and a dozen books for the front. I colored the books using Copic Sketch Markers in the following colors: BG09, BG18, BG49, YR27, YR24, Y21, B93, B45, B41, R89, R39, YG67, YG17, YG03, Y28, and 100. I also used E09, E19, E53, E55, E43, R00, R20, 100, C7, and C5 for the graduate cat.

Sunny Studio Stamps: Grad Cat Graduation Card by Bobbi Lemanski (featuring Hayley Alphabet Dies, Crepe Paper Streamers, Inside Greetings)

I positioned everything in place on the card front, overlapping the books in random piles. I attached a balloon at the top, allowing the balloon to extend 3/4″ beyond the top edge of the card. The balloon extension plus the length of the card base equals 7″ total so it can still fit inside an A7-size envelope. Everything was glued in place, including the balloon’s string.

I stamped the meow sentiment from the Grad Cat set and the “congratulations” from the Inside Greetings Congratulations stamp set on the front. I cut the “GRAD” letters using the Hayley Uppercase Alphabet dies, added highlight marks to the teal letters, using my white Gelly Roll pen, and added the word to the card front.

Sunny Studio Stamps: Grad Cat Graduation Card by Bobbi Lemanski (featuring Hayley Alphabet Dies, Crepe Paper Streamers, Inside Greetings)

For graduations, I typically give money so inside, on the left panel, I added a leftover strip of the striped pattern paper to hold a gift card, cash or check so that the contents do not fall out when the card is opened. I also stamped more sentiments from the Inside Greetings Congrats stamp set and our cute cat to finish the card.

Thanks for stopping by today. If you want to see more ideas and inspiration from me, subscribe to my blog, BobbiHartDesign.com. I’ll send you updates on new posts! You can also find me on Instagram as @BobbiHartDesign and on Facebook as BobbiHartDesign.

Sunny Studio Supplies Used:

Subtle Grey Tones Paper
Shop at:
Sunny Studio
Grad Cat Stamps
Grad Cat Stamps
Shop at:
Sunny Studio
Grad Cat Dies
Grad Cat Dies
Shop at:
Sunny Studio
Inside Greetings Congrats
Shop at:
Sunny Studio
Hayley Uppercase Alphabet Dies
Shop at:
Sunny Studio
Bright Balloons Dies
Shop at:
Sunny Studio
Crepe Paper Streamers Dies
Shop at:
Sunny Studio

Saturday, April 29, 2023

Guest Designer Spotlight: A Cut Above Cards with Leanne West

Hello everyone! Leanne here and I'm excited to be here showcasing some the new stamps and dies from the summer release. I just love anything related to school and crafting supplies. So I was thrilled to see the new A Cut Above stamps, Notebook Photo Corners, and Notebook Tabs dies

Sunny Studio Stamps: A Cut Above & Notebook Die Focused Cards by Leanne West

I'm sharing three clean and fairly simple note cards which would be quick and easy to mass produce. With the end of the school year coming up, we will need lots of teacher thank you cards. These designs would also be great if you need thank you or birthday cards for any of your co-workers.  

First off, I'd like to talk about how I set up my Misti for mass producing layered stamped images. I die cut a bunch of blanks using the coordinating dies from A Cut Above. I then use a template overtop the black Misti pad. I find that I can position the stamps easily using the negative space of my die cut templates because I can clearly see the open area. I close the Misti door with the stamps perfectly placed. I then put the blank die cut pieces into the template and stamp the first layer. I repeat this process until all the layers have been stamped. I did this with different colors so I'd get many completed stamped images as you can see in my colorful scissors mini slimline card.  I love the little scissor image and could not resist stamping them in all the colors of the rainbow. 

Sunny Studio Stamps: A Cut Above & Notebook Die Focused Cards by Leanne West

I also really love the Notebook dies and line stamp to create realistic mini notebook pages. I simply used one notebook page on each of the A2 sized cards and a greeting plus a few stamped images. This design can be easily replicated and results in a very eye catching card especially with bright happy colors. 

Sunny Studio Stamps: A Cut Above & Notebook Die Focused Cards by Leanne West

On all my cards today, I have used the Lots of Dots Embossing Folder to create the textures backgrounds. I thought this was a great way to add interest to the cards without distracting from the focal images.  

Other Sunny Studio supplies used were the Thank You Word dies and Inside Greetings Birthday Stamps

Sunny Studio Supplies Used:

Thank You Words Die
Thank You Words Die
Shop at:
Sunny Studio
Lots of Dots Embossing
Shop at:
Sunny Studio
Inside Greetings Birthday
Shop at:
Sunny Studio
A Cut Above Stamps
A Cut Above Stamps
Shop at:
Sunny Studio
A Cut Above Dies
A Cut Above Dies
Shop at:
Sunny Studio
Notebook Photo Corners Dies
Shop at:
Sunny Studio
Notebook Tabs Dies
Notebook Tabs Dies
Shop at:
Sunny Studio

Thursday, March 16, 2023

Clucky Chickens Cards with Waleska and Marine

Hello Friends, Waleska here with you! The most recent release is full of cute stamps but the one I am featuring today in my card is one of my favorites, the Clucky Chicken Stamp Set, it is so much fun!

Sunny Studio Stamps: Clucky Chickens Card by Waleska Galindo

This card is kind of clean and simple I had to stop myself when adding all this chicks.  I started creating the front panel of my card, I cut a white 3 1/4 panel and cut two stripes from the red and white gingham paper from Joyful Holiday Cardstock and adhere it to a white card base.  I then cut a circle and used a cloud and a grass stencil to create the little scene, I used Oxide inks Tumbled Glass for the sky and Mowed Lawn and Lucky Clover for the grass. 

Sunny Studio Stamps: Clucky Chickens Card by Waleska Galindo

I stamped all the cute chicks, chickens and hen house, color and cut them with their coordinating dies and started assembling the scene.

To finish my card I stamped one of the funny sentiments on this set with Versafine Nocturne Ink. So cute and ready to make someone smile! Thanks for stopping by, have a great day!

-------------------------------------------

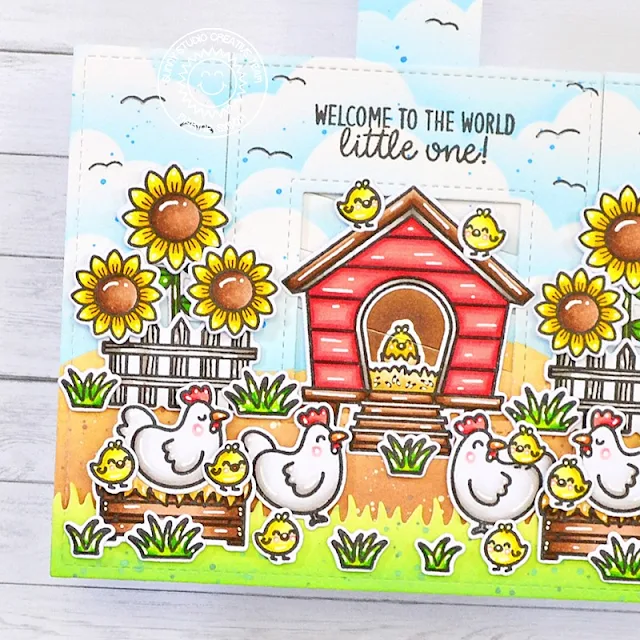
Hello crafty friends! Marine here! I'm thrilled to be back on the blog with this super cute and busy interactive scene showcasing the most adorable hens and chicks from Clucky Chickens. The moment I saw this stamp set I knew that I wanted to make a Magic Picture Changer card to make one of the eggs crack open and make a sweet little chick appear inside the chicken coop.

Sunny Studio Stamps: Clucky Chickens Card by Marine Simon (featuring Barnyard Buddies, Happy Harvest)

I started off with the background. I cut a 5,5 x 4,25 inches Strathmore bristol smooth panel, and did some stenciling to create a farm landscape. At the bottom of the panel, I created a muddy/sandy section using antique linen + vintage photo oxide inks. And on the top section, I used a cloud stencil from my stash along with tumbled glass + salty ocean oxide inks to create a lovely cloudy sky. Next I cut another 5,5 x 4,25 inches bristol panel, I cut a grass border out of it using a die from Picket Fence Border Dies, and I colored that border using shabby shutters + mowed lawn oxide inks.

Sunny Studio Stamps: Clucky Chickens Card by Marine Simon (featuring Barnyard Buddies, Happy Harvest)

Once my landscape elements were done, I centered and stamped my "Welcome to the world little one" greeting from Inside Greetings Congrats on top of the panel, and then I created the whole interactive mechanism. Please check the video down below to watch the process from start to finish.

Sunny Studio Stamps: Clucky Chickens Card by Marine Simon (featuring Barnyard Buddies, Happy Harvest)

Next I stamped a bunch of images that I picked from different sets:
most of the images from Clucky Chickens
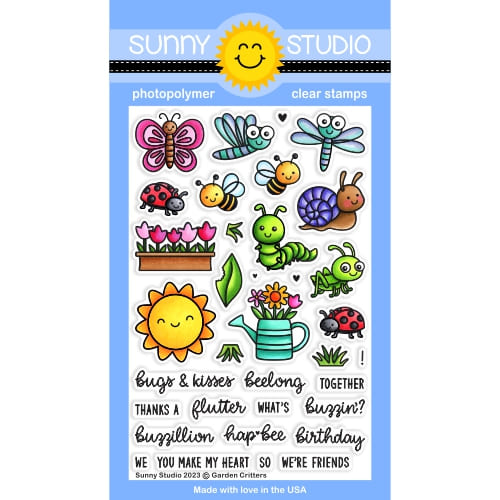
the grass from Garden Critters
the sunflowers from Happy Harvest
the fence from Barnyard Buddies
the small scalloped details from Spring Scenes + Country Scenes to create birds

Sunny Studio Stamps: Clucky Chickens Card by Marine Simon (featuring Barnyard Buddies, Happy Harvest)

As always I used the coordinating dies to cut them all, and then colored everything using my Spectrum Noir Illustrator markers + Graph'it Brush markers. And once all the images were done, I attached them on my panel using 1mm + 2mm foam squares mostly, as well as 3mm glue dots and liquid glue at some places. And finally I added highlights on the images using a white gel pen.

Sunny Studio Stamps: Clucky Chickens Card by Marine Simon (featuring Barnyard Buddies, Happy Harvest)

And that's it! Super cute and fun, I love those tiny chicks, they're just so adorable! And I love how Sunny Studio stamp sets can be combined to create little scenes! Well, I hope that you like this new card, don't forget to check the process video for more details! Thanks so much for stopping by, and see you next week!

Sunny Studio Supplies Used:

Picket Fence Border Dies
Shop at:
Sunny Studio
Barnyard Buddies Dies
Shop at:
Sunny Studio
Barnyard Buddies Stamps
Shop at:
Sunny Studio
Happy Harvest Stamps
Shop at:
Sunny Studio
Happy Harvest Dies
Happy Harvest Dies
Shop at:
Sunny Studio
Spring Scenes Stamps
Shop at:
Sunny Studio
Spring Scenes Dies
Spring Scenes Dies
Shop at:
Sunny Studio
Country Scenes Stamps
Shop at:
Sunny Studio
Country Scenes Dies
Country Scenes Dies
Shop at:
Sunny Studio
Inside Greetings Congrats
Shop at:
Sunny Studio
Joyful Holiday Paper
Shop at:
Sunny Studio
Clucky Chickens Stamps
Shop at:
Sunny Studio
Clucky Chickens Dies
Shop at:
Sunny Studio
Garden Critters Stamps
Shop at:
Sunny Studio
Garden Critters Dies
Shop at:
Sunny Studio

Tuesday, December 20, 2022

Holiday Gift Tags with Isha and Kavya

Hello everyone! Isha here and today we are sharing some gift tags with you. I decided to take the tag from the Mini Mat and Tag 3 dies and created four tags with different techniques.

Sunny Studio Stamps: Classy Christmas & Lacy Snowflakes Holiday Tags by Isha Gupta (featuring Mini Mat & Tag Dies)

For tag 1 and 2, I die-cut the tags using some light blue cardstock. Sponge distress inks salty ocean, chipped sapphire and black soot distress inks. On the first tag, I stamped the poinsettia from the Classy Christmas stamp set using versamark ink and then sprinkle WOW! metallic gold rich embossing powder, heat set. Add sparkle using Nuvo shimmer pen in midas touch. Flick gold paint to this. I added white pencil outline to the florals to pop them up a bit. Add the sentiment from the Inside Greetings - Holiday stamp set. Add a red bow for a pop of colour. 

For the next one, I die-cut some gold snowflakes using the Lacy Snowflakes dies. Adhere to the tag. Add gold splatters. Die-cut a tiny tag from the Window Quad Square die. Sponge salty ocean distress ink. Stamp the berries from the Winter Wreaths stamp, die-cut using the coordinating dies. Stamp the fir leaves from the Holiday Greetings stamp and die-cut using the coordinating dies. Stamp the sentiment and assemble everything together.

Sunny Studio Stamps: Classy Christmas & Lacy Snowflakes Holiday Tags by Isha Gupta (featuring Mini Mat & Tag Dies)

Tag 3 and 4: I die-cut some stripes of coloured cardstock and also a gold glitter paper. Adhere to the tag. Flick gold paint. Stamp the sentiment from the Holiday Express stamp set. Die-cut some snowflakes from the Lacy Snowflakes. Adhere to the tag.

For the next tag, I die-cut it twice. Die-cut the window from one of the tags. Sponge wilted violet distress ink to one piece. Flick gold paint and stamp the sentiment. Adhere the window tag using 3d foam to the sponged tag. Adhere the images.

Hope these gave you some ideas for those last moment tags for your gifts. Thank you for dropping by!

-----------------------------------------

Hi folks. Kavya here with another fun holiday project! If you are looking for some adorable gift tags this Christmas, this one is for you!  

Sunny Studio Stamps: Jolly Gingerbread Holiday Tags by Kavya (featuring Mini Mat & Tag DIes)

I started off by creating a base by die cutting patterned paper from  All Is Bright 6x6 Paper using Mini Mat & Tag 4 Dies. Then, I die cut the top of the tag using Rose Gold cardstock and used some embroidery floss as well!

Sunny Studio Stamps: Jolly Gingerbread Holiday Tags by Kavya (featuring Mini Mat & Tag DIes)

Then, I heat embossed the gingerbread houses from Jolly Gingerbread Stamp and later stamped and colored some gingerbread cookies from the same set. 

That’s it! I was done! I hope you liked this fun project ;) Happy Crafting!

Sunny Studio Supplies Used:

Holiday Express Stamps
Shop at:
Sunny Studio
Lacy Snowflakes Die
Lacy Snowflakes Die
Shop at:
Sunny Studio
Jolly Gingerbread Stamps
Shop at:
Sunny Studio
Jolly Gingerbread Dies
Shop at:
Sunny Studio
Window Quad Square Die
Shop at:
Sunny Studio
Classy Christmas Stamps
Shop at:
Sunny Studio
Inside Greetings-Holidays
Shop at:
Sunny Studio
All Is Bright Paper
All Is Bright Paper
Shop at:
Sunny Studio
Holiday Greetings Stamps
Shop at:
Sunny Studio
Holiday Greetings Dies
Shop at:
Sunny Studio
Winter Wreaths Stamps
Shop at:
Sunny Studio
Winter Wreaths Dies
Winter Wreaths Dies
Shop at:
Sunny Studio
Mini Mat & Tag 3 Dies
Shop at:
Sunny Studio
Mini Mat & Tag 4 Dies
Shop at:
Sunny Studio