Showing posts with label Fancy Frames. Show all posts

Thursday, January 26, 2023

Build-a-Birdhouse Die Focused Cards with Marine and Waleska

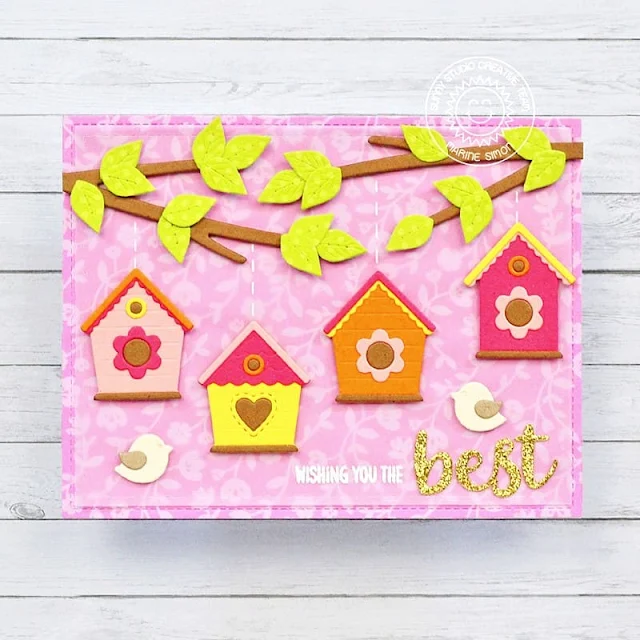
Hello crafty friends, Marine here with you today, I'm super happy to be back on the blog with a cute spring card showcasing the brand new and ever so cute Build-a-Birdhouse die set. It's not that usual for me to only use die cuts on my projects, I'm more of a busy-scene-with-critters kind of crafter, but I really enjoyed creating and assembling this lovely card!

Sunny Studio Stamps: Build-A-Birdhouse Missing You Card by Marine Simon (featuring Out On A Limb Dies)

I wanted the birdhouses to be super colorful, so I started off by cutting all the different elements and birds out of several plain colored cardstock. The Build-a-Birdhouse die set comes with a pole die to place the houses on, but I wanted them to be hanging from a tree, so I used the Out On a Limb die set to cut two branches out of some brown cardstock, and some leaves out of a green dotted pattern paper from the new Spring Fever paper pack.

Next I cut a 5,5" x 4,25" pink floral panel using another paper from the Spring Fever paper pack, as well as a slightly smaller vellum panel. I temporarily taped the vellum panel to the pink one using washi tape, I assembled the birdhouses, and glued them on the vellum along with the branches, leaves and birds using foam squares.

Sunny Studio Stamps: Build-A-Birdhouse Missing You Card by Marine Simon (featuring Out On A Limb Dies)

For my greeting, I first white heat embossed the words "Wishing you the" from Country Carnival, and I cut some gold glitter letters to form the word "Best" and finally read "Wishing you the best". Next I removed the washi tape that was keeping the pink panel and vellum panel together, I flipped the vellum panel over and applied liquid glue at the back of each die cut element, and then I attached that vellum panel to the pink floral one. And finally I added stitched lines above each birdhouse using a white gel pen to connect them to the branches.

And that's it! Feels like spring already, right? Thank you so much for stopping by, and see you next week!

------------------------------------------

Hey friends, Waleska here! I am excited to share today's card featuring the new Build-a-Birdhouse dies. They are perfect to create all kinds of scenes they can be spring, summer or even winter.  

Sunny Studio Stamps: Build-A-Birdhouse Birthday Card by Waleska Galindo (featuring Out On A Limb Dies)

I started my card die cutting and coloring the bird houses, I used oxide inks in colors Shaded Lilac, Kitsch Flamingo and Peacock Feathers, some details I leave them white and others I used copic markers to color them. I then started working on the background. I used a cloud stencil and the same colors I used for the bird houses. I mix the oxide inks with a little bit of water and splash the sky and the houses. I really wanted to incorporate the birds to this scene so I die cut two branches from the Out on a Limb dies with kraft cardstock as well as some leaves that I color with copic markers.

Sunny Studio Stamps: Build-A-Birdhouse Birthday Card by Waleska Galindo (featuring Out On A Limb Dies)

I started to assemble my card using all the elements, I also cut and color two birds and adhered them on the tree branches. I added a frame from the Fancy Frames Rectangle dies and cut a kraft base for my card and a white card as a base. The fun sentiment is from the A Bird's Life Stamp set. This is one of my favorite dies from the latest release. What dies were your favorite?

Thank you for stopping by! Enjoy the rest of your day!

Sunny Studio Supplies Used:

A Bird's Life Stamps
Shop at:
Sunny Studio
Fancy Frames- Rectangles
Shop at:
Sunny Studio
Out on A Limb Dies
Out on A Limb Dies
Shop at:
Sunny Studio
Country Carnival Stamps
Shop at:
Sunny Studio
Build-A-Birdhouse Dies
Shop at:
Sunny Studio
Spring Fever Paper
Spring Fever Paper
Shop at:
Sunny Studio

Monday, December 12, 2022

Reindeer Games Cards with Cathy and Bobbi

Hey friends! Cathy here today sharing some warm winter wishes featuring these sweeties from the Reindeer Games Stamps!

Sunny Studio Stamps: Reindeer Games Winter Themed Holiday Card by Cathy Chapdelaine (featuring Rustic Winter Dies, Fancy Frame Dies, Autumn Tree Dies)

To start this card, I die-cut a piece of white cardstock using the Fancy Frames Rectangle Dies. I used the center portion of this die-cut piece for my background and inked it with Speckled Egg Distress ink. I heat embossed a sentiment from the Alpaca Holiday Stamps with white embossing powder.

Next, I die-cut the Autumn Tree Dies from light gray cardstock and cut the branches off. I adhered them to the left and right sides of the background piece and trimmed them along the edges. I die-cut birch trees from white and dark gray cardstock using the Rustic Winter Dies, adhered them to the left side and trimmed the excess along the top edge. I also die-cut the cardinals using these dies for a little pop of red above the reindeer.

Sunny Studio Stamps: Reindeer Games Winter Themed Holiday Card by Cathy Chapdelaine (featuring Rustic Winter Dies, Fancy Frame Dies, Autumn Tree Dies)

For the snow along the bottom, I die-cut the Tropical Trees Backdrop Die from white cardstock and then die-cut the "sand" portion along the bottom edge using the Fancy Frames Rectangle Dies. I then adhered this to the bottom of the panel lining up the scalloped edges. I adhered the background panel to the center of a gray A2 card base.

To finish, I stamped the reindeer on Neenah Classic Crest 80lb solar white cardstock, colored them with Copics and die-cut them using the coordinating dies. I decided I wanted a white border, so I adhered the frame portion of the Fancy Frames Rectangle Dies to the card front.

I hope you enjoyed and thanks for stopping by today! For more inspiration, please visit my blog www.inkredibleadventures.com and you can also find me on Instagram as @cathy.chapdelaine.

-----------------------------------------------

Hello Sunny Studio friends! It’s Bobbi here with a card featuring the new Reindeer Games stamps and dies. Jolly Santa must feed the reindeer before their big night, flying in the sky. This herd loves all things sweet including candy canes, colorful gumdrops, and peppermints, too. This is food fit for Rudolph and all the reindeer!


Sunny Studio Stamps: Reindeer Games Winter Themed Holiday Card by Bobbi Lemanski (featuring Scenic Route, Gingerbread House Dies)

To make this 5″ X 7″ card, I created a simple background scene using the Scenic Route stamps. I blended on some blue ink at the top for the sky. I splattered on a little white paint for snow and added a few darker dots of blue in the sky. A little blue coloring was also added to the trees. I wanted to keep the background super simple so all the attention would be on the foreground scene. It’s Santa feeding the reindeer gang!


I stamped, colored and die cut the reindeer and Santa. For the candy, I used the candy cane, peppermint and gumdrop dies from the Gingerbread House dies. I put two candy canes in Santa’s hands. The reindeer on both sides of Santa are ready to take a few licks from these sweet treats! Gumdrops and peppermints, plus a broken candy cane cover the snowy hills.


Sunny Studio Stamps: Reindeer Games Winter Themed Holiday Card by Bobbi Lemanski (featuring Scenic Route, Gingerbread House Dies)

I stamped a few sentiments from the Reindeer Games stamps at the top and bottom and shaded around the elements to ground them and finish this card. I used the following Copic Marker colors to color in the elements:


Browns: E00, E04, E11, E42, E47, E44, E55, E57
Greens YG05, Yg07, YG02, Yg00
Reds: R89, R59, R29, R27, R14, R22, R20, R00
Cool Grays: 100, C7, C5, C3, C1, C00
Pinks: RV17, RV55, RV0
Blues: B000, B00, B02


I also used a Gelly Roll white ink pen for accents such as Santa’s beard and highlights on the candy pieces. Santa, the candy canes in his hands and the front-right side reindeer were attached using dimensional foam tabs.


You can shop all these wonderful products at Sunny Studio Stamps. Thanks for stopping by today. If you want to see more ideas and inspiration from me, subscribe to my blog, BobbiHartDesign.com. I’ll send you updates on new posts! You can also find me on Instagram as @BobbiHartDesign and on Facebook as BobbiHartDesign.


Sunny Studio Supplies Used:

Gingerbread House Dies
Shop at:
Sunny Studio
Fancy Frames- Rectangles
Shop at:
Sunny Studio
Alpaca Holiday Stamps
Shop at:
Sunny Studio
Rustic Winter Dies
Rustic Winter Dies
Shop at:
Sunny Studio
Scenic Route Stamps
Scenic Route Stamps
Shop at:
Sunny Studio
Scenic Route Dies
Scenic Route Dies
Shop at:
Sunny Studio
Tropical Trees Backdrop
Shop at:
Sunny Studio
Reindeer Games Stamps
Shop at:
Sunny Studio
Reindeer Games Dies
Reindeer Games Dies
Shop at:
Sunny Studio
Autumn Tree Die
Autumn Tree Die
Shop at:
Sunny Studio

Thursday, December 8, 2022

Winter Wreaths with Marine and Waleska

Hello crafty friends, Marine here, super happy to be back with this new shaker card showcasing the beautiful Winter Wreaths stamp set. As very often I went for non-traditional colors, and I started off by stamping the wreath using blue ink. I used blue shades to stamp the poinsettias, and a light grey ink to stamp the bow. And I added embossed details in silver on those elements to bring some shine.

Sunny Studio Stamps: Winter Wreaths Holiday Card by Marine Simon (featuring Comic Strip Speech Bubble Dies, Holiday Greetings)

Next I created the window. I cut a white Comic Strip Speech Bubble panel, a second one out of scrap paper, and an acetate panel. I temporarily taped the second frame to the acetate panel, and used white ink along with a sponge dauber to create a frosty look on the acetate. And I also added splatters of that same white ink all over the acetate.

Sunny Studio Stamps: Winter Wreaths Holiday Card by Marine Simon (featuring Comic Strip Speech Bubble Dies, Holiday Greetings)

Next I worked on the shaker panel. I first attached the white frame to the acetate using double sided tape. At the back of the panel, I added foam strips on the four edges and on the slim strips as well. I made the inside foam edges non sticky using my powder tool, added White Snowflake Confetti and iridescent confetti inside each small window, and closed the shaker panel using a pattern paper from the Very Merry paper pack.

I heat embossed my "Happy Holidays" greeting from Holiday Greetings in silver on black cardstock, cut it using the coordinating die and attached it below the wreath using foam squares. And finally I added a few clear droplets here and there to bring more shine to the card.

Sunny Studio Stamps: Winter Wreaths Holiday Card by Marine Simon (featuring Comic Strip Speech Bubble Dies, Holiday Greetings)

And that's it, this is the final result and I hope you like it. As always, you are welcome to check the process video for more details (click on the image above). Thank you so much for stopping by, and see you next time.

-------------------------------------------------

Hello there, Waleska here. Today I have card inspiration for you with two of my favorite elements, rainbow colors and inks! This colorful card is just so happy and bright I hope you like it!


Sunny Studio Stamps: Winter Wreaths Holiday Card by Waleska Galindo (featuring Gingerbread House Dies, Fancy Frame Dies)


For this card I started by creating the inky background I used some of my favorite Oxide Ink colors on Nina Solar White cardstock. The colors I used are Festive Berries, Mustard Seed, Spiced Marmalade, Mowed Lawn, Peacock Feathers and Wilted Violet. I added water splashes to this panel to add interest and for some shine I added glitter watercolor too. I then stamped the wreath from 
Winter Wreaths, I used the pine bough with white embossing powder and I inked it with the same colors I used for the background panel, I cut the wreath with the coordinating die and I adhere it to the center of my front panel.

I stamped the beautiful layered bow that comes in the stamp set trying to match the colors I previously used. I used Spectrum Noir Inks in tones: Red: bordeaux, orange and Chinese red; Yellow: honey pot, lemon tonic and straw bale; Purple: damson wine, crushed velvet and pale fig; Aqua: Lagoon, parakeet and Oasis. I love the 3D look of this bow.  

Sunny Studio Stamps: Winter Wreaths Holiday Card by Waleska Galindo (featuring Gingerbread House Dies, Fancy Frame Dies)

I cut some peppermint candies from the Gingerbread House dies and I started decorating the wreath with all this elements. Finally I added a frame from the Fancy Frame Rectangle dies with white cardstock and stamped the sentiment from the Jolly Gingerbread stamp set. Super fun and colorful card, thank you so much for stopping by, have a wonderful rest of your day!

Sunny Studio Supplies Used:

Gingerbread House Dies
Shop at:
Sunny Studio
Jolly Gingerbread Stamps
Shop at:
Sunny Studio
Fancy Frames- Rectangles
Shop at:
Sunny Studio
Comic Strip Speech Bubble Dies
Shop at:
Sunny Studio
Very Merry 6x6 Paper
Shop at:
Sunny Studio
Holiday Greetings Stamps
Shop at:
Sunny Studio
Holiday Greetings Dies
Shop at:
Sunny Studio
Winter Wreaths Stamps
Shop at:
Sunny Studio
Winter Wreaths Dies
Winter Wreaths Dies
Shop at:
Sunny Studio

Thursday, October 13, 2022

Mini Mat & Tag Die Focused Cards with Waleska and Marine

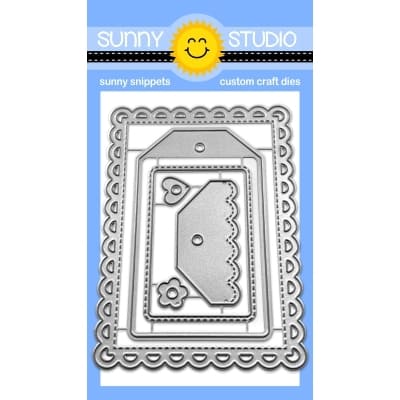
Hello Friends!! Waleska here with you. It is Thursday and that means I have a new Sunny Studio Stamps project for you! I am very excited to share the tags I created with the new Mini Mat and Tag #4 dies. I hope I can share inspiration that will get you excited to create!

Sunny Studio Stamps: Mini Mat & Tag Die Focused Holiday Card by Waleska Galindo (featuring Classy Christmas, Fancy Frame Dies)

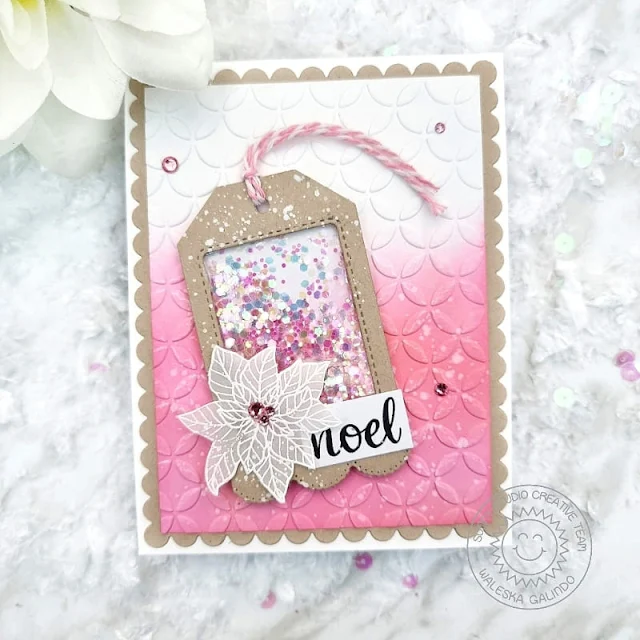
I love this tag dies, they are beautiful and very easy to use. I started this shaker tags by die cutting them with kraft cardstock, I wanted to use some non-traditional Christmas colors for them so, I decided to go with pink, purple and teal. To ink the inside of the shaker I used oxide inks in colors Kitsch Flamingo, Shaded Lilac and Peacock Feathers. I used matching glitter for the shakers. I added an embossed vellum poinsettia from the Classy Christmas Stamps.

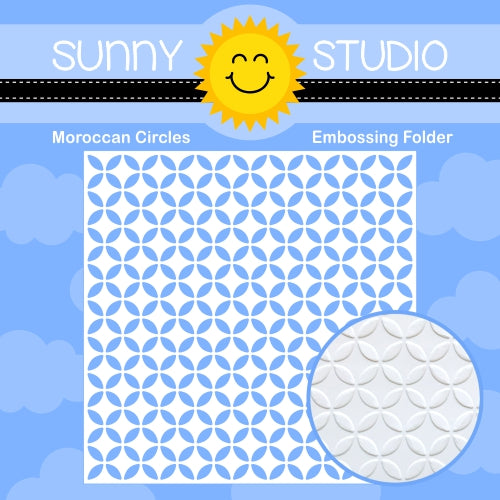
I wanted to create a card with one of the tags, to do that I used the Moroccan Circles Embossing folder for the front panel of the card inked with the same color I used for the shaker and I frame it with the Fancy Frames Rectangle Dies in kraft cardstock.

Sunny Studio Stamps: Mini Mat & Tag Die Focused Holiday Card by Waleska Galindo (featuring Classy Christmas, Fancy Frame Dies)

To finish the rest of the tags I added some Pastel Jewels Mix in the center, the sentiment Noel is also from the Classy Christmas stamps stamped with Versafine Clair Nocturne. Finally I mixed some white acrylic paint with water and splatter some onto the tags to simulate snow.

Thank you so much for stopping by today! I hope your day is full of crafty time!

-----------------------------------------------

Hello crafty friends, Marine here with you today! I'm thrilled to be back on the blog with this trio of spooky cute shaker tags I created using the new Mini Mat & Tag 3 die set, as well as a mix & match of images from different stamp sets.

Sunny Studio Stamps: Mini Mat & Tag Die Focused Holiday Tags by Marine Simon (featuring Garden Fairy, Too Cute to Spook)

As very often I started off by stamping the images using an alcohol marker friendly black ink, cut them all using the coordinating dies and then colored everything using traditional Halloween colors: green, orange, purple and black. The images are from:

Too Cute to Spook for the pumpkins and spiders
Garden Fairy for three fairies and wands
Farm Fresh for the crows

Sunny Studio Stamps: Mini Mat & Tag Die Focused Holiday Tags by Marine Simon (featuring Garden Fairy, Too Cute to Spook)

Once everything was colored, I cut all the different pieces to build the tags using dies from the Mini Mat & Tag 3 die set, as well as the star die from the Mini Mat & Tag 4 die set, and pattern papers from the Dots & Stripes Jewel Tones paper pack + Heroic Halftone paper pack.

I first attached a piece of clear acetate at the back of each black frame, as well as foam strips all around the opening. I added powder on the inside edges of the foam strips to make those edges non sticky, and then I poured a few spoons of sequins mix inside each frame. I closed the shaker tags using a plain tag panel at the back of each frame, and then I attached the topper pieces and stars.

Sunny Studio Stamps: Mini Mat & Tag Die Focused Holiday Tags by Marine Simon (featuring Garden Fairy, Too Cute to Spook)

I used black ribbon to create a handle at the top of each tag, and next I stuck the images on the tags. I also white heat embossed one "You're bewitching" and two "Trick or treat" sentiments from Bewitching on black cardstock, trimmed them into slim banners and attached them at the top of the tags. And finally I added sparkles to the fairies wings, and added highlights and details to the images using a white gel pen.

Sunny Studio Stamps: Mini Mat & Tag Die Focused Holiday Tags by Marine Simon (featuring Garden Fairy, Too Cute to Spook)

And that's it! I hope that you like those fun, cute and colorful Halloween shaker tags. As always you will find more details and information in the process video so feel welcome to check it out (click on the image above). Thank you so much for stopping by, and see you next time! 

Sunny Studio Supplies Used:

Bewitching Stamps
Bewitching Stamps
Shop at:
Sunny Studio
Fancy Frames- Rectangles
Shop at:
Sunny Studio
Dots & Stripes Jewel Tones 6x6 Paper
Shop at:
Sunny Studio
Heroic Halftones 6x6 Paper
Shop at:
Sunny Studio
Moroccan Circles Embossing
Shop at:
Sunny Studio
Classy Christmas Stamps
Shop at:
Sunny Studio
Farm Fresh Stamps
Farm Fresh Stamps
Shop at:
Sunny Studio
Farm Fresh Dies
Farm Fresh Dies
Shop at:
Sunny Studio
Garden Fairy Stamps
Garden Fairy Stamps
Shop at:
Sunny Studio
Garden Fairy Dies
Garden Fairy Dies
Shop at:
Sunny Studio
Too Cute To Spook Stamps
Shop at:
Sunny Studio
Too Cute To Spook Dies
Shop at:
Sunny Studio
Mini Mat & Tag 3 Dies
Shop at:
Sunny Studio
Mini Mat & Tag 4 Dies
Shop at:
Sunny Studio

Thursday, October 6, 2022

Autumn Tree Die Focused Cards with Waleska and Marine

Hello Friends, Waleska here with you. I'm back today for more Sunny Studio Stamps inspiration from their most recent release! Today's card features the beautiful Autumn Tree dies.


Sunny Studio Stamps: Autumn Tree Die Focused Card by Waleska Galindo (featuring Fall Friends, Fancy Frame Dies)

For my card today I started with the focal point which is the Autumn Tree die, I die cut the tree with kraft cardstock, I added some shading with Oxide Ink Vintage photo. When you add a little of ink to the edges of your die cut images you create dimension and a better look. I die cut a bunch of leaves and color them with copic markers. I then adhere all the colorful leaves to the tree. I decided to use the cute fox from the Fall Friends Stamps at the bottom of my card and color them I used copic markers YR18 YR09 YR04.


Sunny Studio Stamps: Autumn Tree Die Focused Card by Waleska Galindo (featuring Fall Friends, Fancy Frame Dies)

I finally used a teal colored cardstock for the background on my card, the Fancy Frames Rectangle dies and the Critter Country paper to match the colors of the leaves.

I hope you enjoy it!  Thanks for visiting!

--------------------------------------------

Hello crafty friends, Marine here with you today! I'm thrilled to be back with this new edge to edge or infinity shaker card showcasing the gorgeous Autumn Tree die, and some Squirrel Friends that I turned into skunks.

Sunny Studio Stamps: Autumn Tree Die Focused Card by Marine Simon (featuring Squirrel Friends, Scalloped Circle Mat Dies)

I started off by stamping a few images using an alcohol marker friendly black ink: some apples and the bucket from Fall Friends, as well as three cute Squirrel Friends. I also cut some Autumn Tree pieces: the tree trunk out of kraft cardstock, and some apples & leaves out of the same paper I stamped my images on. And I colored all those elements using my alcohol markers, starting with the squirrels that I colored in black & white to turn them into skunks.

Sunny Studio Stamps: Autumn Tree Die Focused Card by Marine Simon (featuring Squirrel Friends, Scalloped Circle Mat Dies)

Next I created the foliage. I cut a Scalloped Circle Mat 1 out of a Critter Country pattern paper, and added some texture: mowed lawn & rustic wilderness distress inks on the edges, splatters of rustic wilderness distress ink mixed with water, and splatters of copic opaque white ink mixed with water.

I cut a 5,5" x 4,25" bristol panel, and used stencils to create the background of my cute little scene. A hill stencil along with mowed lawn & rustic wilderness distress inks to create a hill border at the bottom, and a cloud stencil along with tumbled glass & salty ocean distress inks to create a simple sky on the upper part. I also cut a grass border using a die from the Picket Fence Border die set and colored it using the same inks as the hill border.

Sunny Studio Stamps: Autumn Tree Die Focused Card by Marine Simon (featuring Squirrel Friends, Scalloped Circle Mat Dies)

Next I created the shaker, and I invite you to watch the process video (linked down below) to see exactly how it was done, it's always easier to understand with images ^^ And once my shaker panel was done, I assembled everything on top of it. I white heat embossed the "So happy we're friends" sentiment from Fall Friends on the grass border, and attached that border at the bottom of the panel, directly on the plastic, using double sided tape. And next I built the tree, with the foliage, the tree trunk, and the apples & leaves, and added the skunks at the bottom of the card.

Sunny Studio Stamps: Autumn Tree Die Focused Card by Marine Simon (featuring Squirrel Friends, Scalloped Circle Mat Dies)

And that's it! I love this beautiful bright apple tree, and those skunks are super cute! Again, feel welcome to check the video for more details and information about this shaker card. Thanks so much for stopping by, and see you next time!

Sunny Studio Supplies Used:

Picket Fence Border Dies
Shop at:
Sunny Studio
Fall Friends Stamps
Fall Friends Stamps
Shop at:
Sunny Studio
Fall Friends Dies
Fall Friends Dies
Shop at:
Sunny Studio
Fancy Frames- Rectangles
Shop at:
Sunny Studio
Scalloped Circle Mat 1 Dies
Shop at:
Sunny Studio
Squirrel Friends Stamps
Shop at:
Sunny Studio
Squirrel Friends Dies
Shop at:
Sunny Studio
Autumn Tree Die
Autumn Tree Die
Shop at:
Sunny Studio
Critter Country Paper
Shop at:
Sunny Studio