Monday, November 11, 2019

Snowflake Frame Dies Focused Cards with Leanne and Eloise

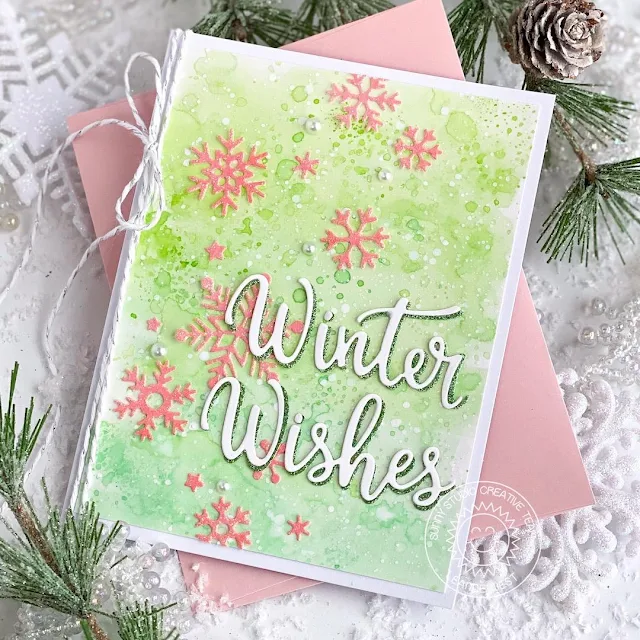
Hello crafty friends, Leanne here! I been inspired by some recent early winter weather here in my area. We had our first snow of the season. So I decided to play around with dies from the Snowflake Circle Frame and Layered Snowflake Frame to create the feeling of a winter party on a card. 

Sunny Studio Stamps: Snowflake Circle Frame Dies Layered Snowflake Frame Dies Winter Themed Holiday Card by Leanne West

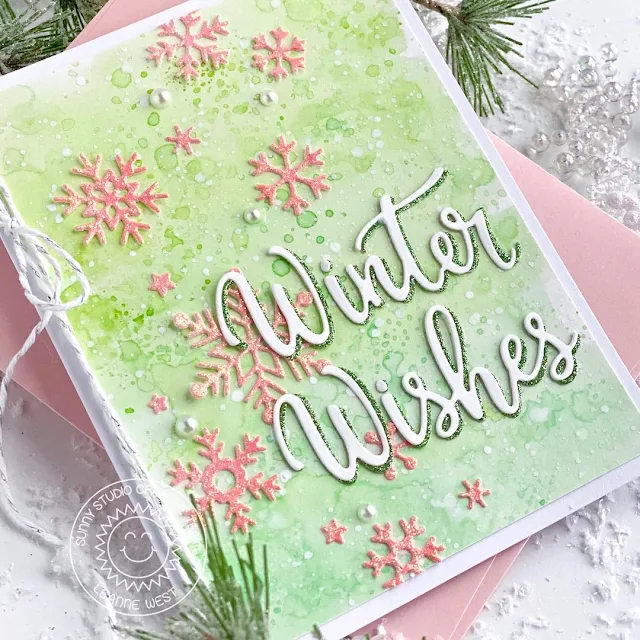
I wanted to make a unique background. I used two shades of green (CP Mint To Be & Garden Party ink) to create a splotchy watercolor look. I simply smooshed the ink pads onto a craft mat, spritzed with water, and then pressed a panel of Bristol Smooth card stock into the wet ink.  I dried the panel and repeated the process a few times. I then splattered thinned white paint over the entire panel. 

Sunny Studio Stamps: Snowflake Circle Frame Dies Layered Snowflake Frame Dies Winter Themed Holiday Card by Leanne West

I made my own glitter card stock to die cut the snowflakes out of. I blended Tattered Rose and Candied Apple Distress Oxide Ink onto a panel of card stock. I then applied a thin coat of Nuvo Moonstone Glitter Paste over the inked panel. Once dry, I die cut the snowflakes from the area of the panel with the shade of pink I wanted.

Sunny Studio Stamps: Snowflake Circle Frame Dies Layered Snowflake Frame Dies Winter Themed Holiday Card by Leanne West

I trimmed the background panel slightly smaller than A2 size and adhered to a white card base. I added the snowflakes cascading down towards the left side. I also added some white pearls as a little extra embellishment. Next I adhered the greeting towards the lower right corner. I die cut the Winter Wishes greeting from white and green glitter card stock and then layered the two slightly offset. Lastly I tied white and silver twine around the folded side of the card. 

----------------------------------------------------

Hi friends, Eloise here and today I’m using the Layered Snowflake Frame Die to create a Christmas Card. I also pulled in Feeling Frosty for some images and Santa Claus Lane for a sentiment.

Sunny Studio Stamps: Layered Snowflake Frame Dies Feeling Frosty Winter Themed Holiday Card by Eloise Blue

I started off with stamping and colouring my images from Feeling Frosty and cutting them out. I then took two pieces of watercolour cardstock, cut them down to 4 1/4” to 4 1/4” and ink blended some blue Distress Inks on the bottom of each of them, fading to white. I then cut the Layered Snowflake Frame Die from one of them.

(Copic Markers Used: BG70, BG72, BG75, BG78 / W00, W0 / W1, W5 / 0 / B000, B00 / YR00, YR02, YR12, YR18 / YG61, YG63, YG67, G28 / V91, V93, V95, V97 / E53, E55, E57 / R000, R00)

Sunny Studio Stamps: Layered Snowflake Frame Dies Feeling Frosty Winter Themed Holiday Card by Eloise Blue

I then added foam tape to the back of the snowflake frame and also my images. I adhered the snowflake frame on top of the other distress inked piece and then adhered my images on top. For my sentiment I used the ‘Have A Magical Christmas’ sentiment from Santa Claus Lane onto a strip of black cardstock. Tied some twine to the side of it and adhered it onto my card.

Thanks so much for stopping by today and I’ll see you all next week. 

Sunny Studio Supplies Used:

Santa Claus Lane Stamps
Shop at:
Sunny Studio
Feeling Frosty Stamps
Shop at:
Sunny Studio
Feeling Frosty Dies
Feeling Frosty Dies
Shop at:
Sunny Studio
Layered Snowflake Frame
Shop at:
Sunny Studio
Snowflake Circle Frame
Shop at:
Sunny Studio

Sunday, November 10, 2019

25 Days of Christmas Tags


Hello and welcome to day 7 of Tracey McNeely's 25 Days of Christmas Tags!  We're so excited to be playing along today showcasing our take on holiday tags using our line of products!

Tag Set #1:  For my first set of tags today I used our Build-A-Tag #1 dies which I cut from a red heart print from our Very Merry Paper pack and a candy cane stripe from our Holiday Cheer Paper pack.  I decorated the one of the left with our Santa Claus Lane Stamps and a banner from our Little Angels Stamps.  For the Snowman I turned to our Feeling Frosty Stamps and the little companion snowflake from our Warm & Cozy Dies.
Sunny Studio Stamps Santa & Snowman Gift Tags by Mendi Yoshikawa (using Santa Claus Lane & Feeling Frosty Stamps, Build-a-Tag #1 dies and Holiday Cheer 6x6 Paper)

Tag Set #2:  For my next set of tags I used the new mini scalloped die from our 2-piece stitched Scalloped Tag Circle Dies set which I cut from white cardstock.  I then punch out 1.5" circle from various papers from our Holiday Cheer Paper pack and stamped with the "to" and "from" using our Season's Greetings Stamps.  To embellish my tags I used the companion garland sprigs from that same Season's Greetings stamp set and then topped them with a layered bow from our Holiday Style Stamps.
Sunny Studio Stamps Mini Red and Green Bow Gift Tags by Mendi Yoshikawa (using Season's Greetings and Holiday Style Stamps, Scalloped Circle Tag dies and Holiday Cheer 6x6 Paper)

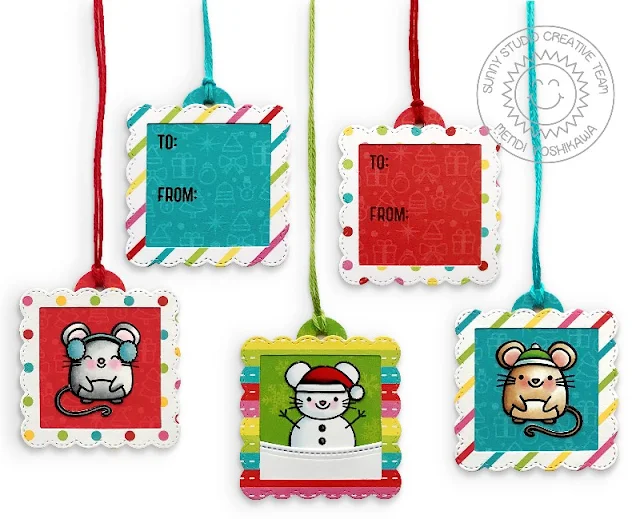
Tag Set #3: For my last tag set of the day I used the another mini tag from our new set of Scalloped Square Tag Dies.  I started by cutting two of each from tone-on-tone prints from our Very Merry Paper pack which I then adhered together so that I could embellish one side and add my "to" and "from" on the reverse side with our Season's Greetings Stamps.  I then die-cut fun prints from that same Very Merry Paper pack using our coordinating Fancy Frames Square dies which were designed to perfectly coordinate with our new tag sets and layered them over the base of my tags.  For my little critters I colored mouse images from our new Merry Mice stamps and used a stitched snowy hillside from our Woodland Border dies.
Sunny Studio Stamps Mini Mouse Gift Tags by Mendi Yoshikawa (using Merry Mice Stamps, Scalloped Square Tag dies and Very Merry 6x6 Paper)

Tag Set #4:  For this adorable winter tag set Angelica cut sets of mittens and hats to match using our Warm & Cozy dies, together with our stitched Scalloped Square Tag Dies and a red gingham print from our Holiday Cheer Paper pack.
Sunny Studio Stamps: Hats & Mittens Holiday Gift Tags by Angelica Conrad (using Warm & Cozy Dies, Scalloped Square Tag Dies and Holiday Cheer 6x6 Paper)

Thank you for joining us today!  Make sure to stop by Tracey's blog to see more tags today using our products and for details on how you can win a $25 gift code to our store.  :)

Here's a list of all the companies participating in the 25 days of Christmas Tags event with a new company featured each day with lots of prizes up for grabs.  :)

Sunny Studio Supplies Used:
Holiday Style Dies
Holiday Style Dies
Shop at:
Sunny Studio
Holiday Style Stamps
Shop at:
Sunny Studio
Little Angels Dies
Little Angels Dies
Shop at:
Sunny Studio
Little Angels Stamps
Shop at:
Sunny Studio

Woodland Borders Dies
Shop at:
Sunny Studio
Holiday Cheer 6x6 Paper
Shop at:
Sunny Studio
Build-A-Tag #1 Dies
Build-A-Tag #1 Dies
Shop at:
Sunny Studio
Build-A-Tag #2 Dies
Build-A-Tag #2 Dies
Shop at:
Sunny Studio
Very Merry 6x6 Paper
Shop at:
Sunny Studio
Season's Greetings Stamps
Shop at:
Sunny Studio
Season's Greetings Dies
Shop at:
Sunny Studio
Santa Claus Lane Stamps
Shop at:
Sunny Studio
Santa Claus Lane Dies
Shop at:
Sunny Studio
Feeling Frosty Stamps
Shop at:
Sunny Studio
Feeling Frosty Dies
Feeling Frosty Dies
Shop at:
Sunny Studio
Merry Mice Stamps
Merry Mice Stamps
Shop at:
Sunny Studio
Fancy Frames-Square Dies
Shop at:
Sunny Studio
Merry Mice Dies
Merry Mice Dies
Shop at:
Sunny Studio
Scalloped Tags-Circle
Shop at:
Sunny Studio
Scalloped Tags-Square
Shop at:
Sunny Studio

Saturday, November 9, 2019

Feeling Frosty Cards & Video Tutorial with Guest Laura Sterckz

Hi crafters! It's Laura Sterckx here from Making Cards Is Fun and I'm thrilled to be a Holiday Guest Designer for Sunny Studio. I decided to create two adorable winter cards featuring the Scenic Route and Frosty Friends Stamp Set. Make sure to watch the video tutorial for more information, tips and tricks! 

Sunny Studio Stamps: Feeling Frosty Scenic Route Sliding Window Dies Winter Themed Cards by Laura Sterckx

For my first card, I created an interactive panel using the Sliding Window dies. I assembled the slider and used patterned paper from the Very Merry 6x6 Paper Pad. I just love these designs and the winter scene paper I used is perfect to create quick and easy cards! 


I stamped, colored and die cut the adorable snowmen from the Frosty Friends Stamp Set. For my second card, I combined it with one of the little kids from the Fall Kiddos Stamp Set to make it look like the girl built the snowmen on the card. 

Sunny Studio Stamps: Feeling Frosty Scenic Route Sliding Window Dies Winter Themed Cards by Laura Sterckx

For the second card, I did quite a lot of fussy cutting and masking to create a fun winter village scene. This technique takes some time and effort but it's so worth it! I created an ink blended winter sky with Distress Oxide Inks and finished off both cards with heat embossed snowflakes. 

Sunny Studio Stamps: Feeling Frosty Scenic Route Sliding Window Dies Winter Themed Cards by Laura Sterckx

That's it for now! Thank you so much for stopping by. Sending big hugs! 

Sunny Studio Supplies Used:

Fall Kiddos Stamps
Fall Kiddos Stamps
Shop at:
Sunny Studio
Fall Kiddos Dies
Fall Kiddos Dies
Shop at:
Sunny Studio
Sliding Window Dies
Sliding Window Dies
Shop at:
Sunny Studio
Feeling Frosty Stamps
Shop at:
Sunny Studio
Feeling Frosty Dies
Feeling Frosty Dies
Shop at:
Sunny Studio
Scenic Route Stamps
Scenic Route Stamps
Shop at:
Sunny Studio
Scenic Route Dies
Scenic Route Dies
Shop at:
Sunny Studio

Friday, November 8, 2019

Embossing Folder Focused Cards with Candice and Rachel

Hello and happy Friday to you!  It's Candice here with you sharing a subtle use of the new Buffalo Plaid embossing folder to create a soft background!

Sunny Studio Stamps: Embossing Folders Merry Mice Season's Greetings Snowflake Frame Dies Christmas Garland Frame Dies Winter Holiday Card by Candice Fisher

My card uses all new products from the Sunny Studio Stamps new release:
I wanted a subtle embossed background to create a very soft card.  I achieved this effect by using embossing pads (both of them) on top of the buffalo plaid embossing folder and using Tab 1 on my Big Shot.  

I first die cut multiples of the circle and merry and layered them for a thick dimensional effect. Next, I stamped the mice, colored with Copic markers, cut out with the coordinating dies, gluing under the glitter circle and trimmed off the bottoms.

Sunny Studio Stamps: Embossing Folders Merry Mice Season's Greetings Snowflake Frame Dies Christmas Garland Frame Dies Winter Holiday Card by Candice Fisher

I then heat embossed the pine needles in green and cut out using the coordinating dies placing them under the circle frame with glue dots.

To finish the card, I created a banner by heat embossing the sentiment in white, inking with shabby shutters and placing the merry above. I added a few pink pearls for a pop of color.
Thank you for visiting with me and just a heads up, Sunny Studio Stamps is participating in the 25 Days of Christmas Tags and you can visit Tracey McNeely's blog to see the amazing tags created by the talented Sunny Studio Design Team on Sunday, November 10th!

----------------------------------------------

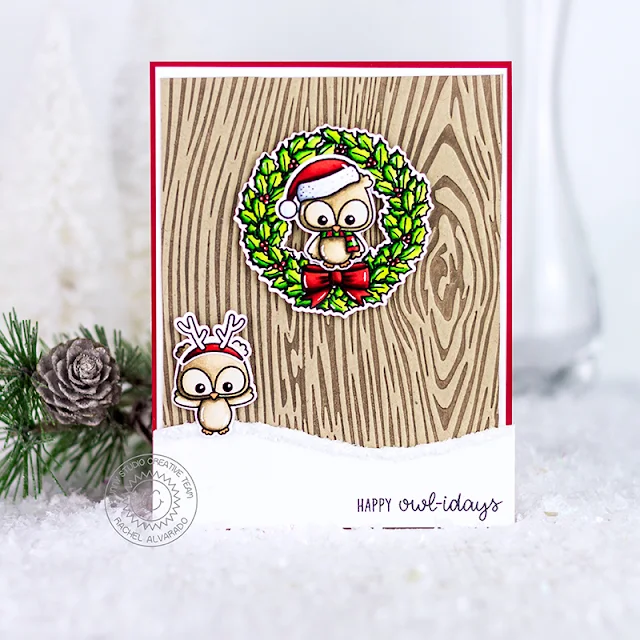
Hello friends! It's Rachel here and I have a Christmas card to share with you today that features the new Woodgrain Embossing Folder. This embossing folder is amazing! I love the texture that it provides. 

Sunny Studio Stamps: Embossing Folders Merry Mice Woodland Border Dies Winter Holiday Card by Rachel Alvarado

To get the two-toned look that I have on my card today, I stamped some brown ink onto the inside (smooth side) of my embossing folder. I then ran it through my machine once using a 4" x 5.25" of Kraft Card Stock. I then stamped my images from the Happy Owlidays Set with Memento Tuxedo Black Ink onto a sheet of Neenah Solar White 110lb Card Stock. I used the coordinating Happy Owlidays Die Set to cut them out.

Sunny Studio Stamps: Embossing Folders Merry Mice Woodland Border Dies Winter Holiday Card by Rachel Alvarado

I die cut a piece of white card stock using one of the Woodland Border Dies to create a snow border. Prior to attaching it to my card, I stamped my sentiment in the lower right corner and then added some sparkly white glitter to the top of this snow drift with some liquid adhesive. Although it doesn't photograph well, it gives the snow some gorgeous texture. Lastly, I adhered my images to the front of my card using some 3D Foam Adhesive Squares.

I hope you enjoyed my card today! Thanks so much for stopping by!

Sunny Studio Supplies Used:

Woodland Borders Dies
Shop at:
Sunny Studio
Happy Owlidays Stamps
Shop at:
Sunny Studio
Happy Owlidays Dies
Happy Owlidays Dies
Shop at:
Sunny Studio
Buffalo Plaid Embossing
Shop at:
Sunny Studio
Woodgrain Embossing
Woodgrain Embossing
Shop at:
Sunny Studio
Season's Greetings Stamps
Shop at:
Sunny Studio
Season's Greetings Dies
Shop at:
Sunny Studio
Merry Mice Stamps
Merry Mice Stamps
Shop at:
Sunny Studio
Merry Mice Dies
Merry Mice Dies
Shop at:
Sunny Studio
Snowflake Circle Frame
Shop at:
Sunny Studio
Christmas Garland Frame
Shop at:
Sunny Studio