Saturday, December 5, 2015

Sunny Saturday: Bundled Up Hats, Scarves & Mittens Winter Cards


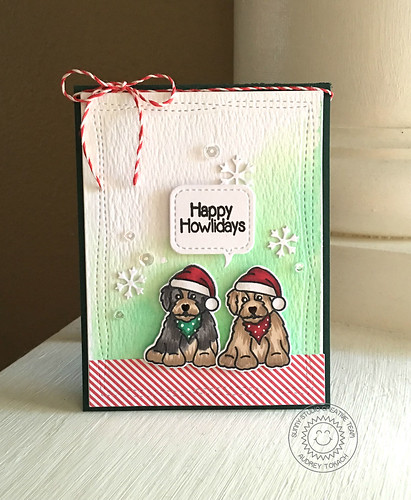
Hello there!  I hope you are enjoying your Saturday!  Today I'm excited to share a beautiful card created by our talented customer Kimberly Rendino using our Bundled Up stamp set.


I had to giggle when I came across her card on instagram because it just so happens I had created a nearly identical card myself the previous week.   I think it's funny that we also both added dots to our background, hers with a Pico Embellisher and mine with some Stardust Stickles.  ;)

Pico embellisher
Pico embellisher


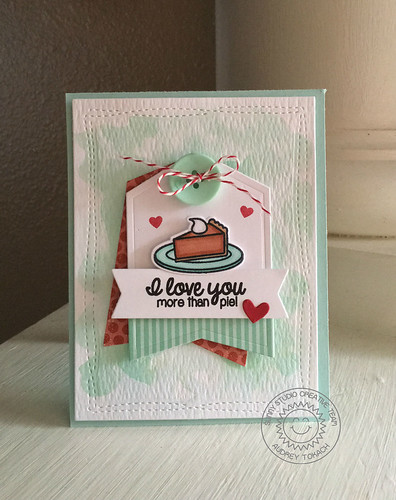
If that wasn't funny enough, I really got a really good chuckle when I received an email from Nina-Marie Designs sharing these adorable tags she created.  Instead of snowflakes, she stamped some cute little hearts to fill in the small spaces of her design and added highlights with a white gel pen.  I love that little detail!


You can see a wonderful video on how she created these on her YouTube channel HERE--I just love watching her work.  She used our popular Fishtail Banner dies to create the "V' along the bottom of her tag, using one to cut and another to emboss.  :)


These projects just go to show that great minds think alike, right?  I love the idea of stretching the stamp set to create a card without the penguin focal point. ;) 

I hope you have a wonderful time this weekend!  I can't believe how quickly Christmas is approaching already.  ;)

Friday, December 4, 2015

Bundled Up Penguin Cool Christmas Card with Marion

Hello, it's Marion here. Today I'm sharing a card using the super cute and adorable penguin set called Bundled Up and its coordinating dies. The great thing about this set is that you can have so much fun dressing these guys up with cute hats, scarves, mittens, ear muffs etc. 


The snowflakes in the background were heat embossed in white onto a blue card base. This created the perfect backdrop for this cute couple having fun in the snow. 


Sunny Studio products used:
Thanks for visiting today,

Marion 

Thursday, December 3, 2015

Bundled Up Penguin Holiday Gift Tags with Elise

Hello! It's Elise again with some super cute and easy Christmas tags that feature the Bundled Up and Snow Kissed stamp sets and dies.


I starting by stamping and coloring the penguins with Prismacolor pencils and die-cutting them with the coordinating dies. I also stamped and colored the ice slab with the coordinating colors to give them a little bit of shading along the bottom edge. The images are also all attached with foam tape. This close up on the pink tag shows some of the details that I added to the penguins with a white gel pen.


I also added clear stickles on the ice slab, but it's hard to see in the picture. I finished the tag with some white ribbon and a twine bow in coordinating colors. These will look so cute on Christmas gifts!

Thanks for stopping by today, and don't forget to come back tomorrow to see some more inspiration! :)

Wednesday, December 2, 2015

Bundled Up in Blue Christmas Card with Audrey


Hello there!  Audrey here!  Today I have a watercolor card to share with you using the Bundled Up and Snow Kissed stamp sets!  

I watercolored a piece of Tim Holtz Distress Watercolor paper with my $5 Artist Loft watercolors from Michaels.  When it was dry, I added a decorative edge.  Then I stamped and fussy cut the penguin and his accessories from the Bundled Up stamp set, and the piece of ice from the Snow Kissed stamp set. 

It's a bit hard to tell in the pictures,  but I glittered the iceberg and it is so sparkly in real life!  I popped him up on the watercolor panel with foam tape, and stamped a few snowflakes around him, which are also included in the Bundled Up stamp set.  Finally, I stamped a sentiment from the Bundled Up set on a die-cut and popped that up with foam tape before adhering the entire panel to a white card base.


That's all for me today!  Be sure to stop back by tomorrow for lots more inspiration from the design team! :)

Tuesday, December 1, 2015

Bundle Up Winter Penguin Holiday Gift Tags With Heidi

Hello everybody! Welcome to the Sunny Studio Stamps blog!  It's Heidi here and I hope you are having a super nice day! This week we are introducing the "Bundle Up" stamp and coordinated die set.  I love this set--It's like playing with paper dolls and getting to dress them up.  You can customize the stamp image or even paper-piece them.  To showcase this adorable stamp set I made these Christmas tags. I hope you'll enjoy them!


I inked some white tags using distress inks and them added the snow using s stencil and embossing paste. I colored the stamped images using Copic Markers, then die cut them, dressed up the penguins using some liquid glue and then adhered the penguins to the tags using foam adhesive.


To finish the tags I attached some bows made of ribbon and some little jingle bells with twine.

The "Bundle Up" stamp set is available at the Sunny Studio Stamp Shop.  We are enjoying seeing your creations using our stamps, keep them coming using the #SunnyStudioStamp

Have a lovely day!

Monday, November 30, 2015

Bundled Up Cool Christmas Kraft Christmas Card by Melissa

Hello everyone, Melissa here. Today I have a card to share with you using the Bundled Up stamp set. I love how this set comes with a bunch of different accessories for the little penguin so you can dress him up just how you like! 


To create this card I first got out a piece of Neenah desert storm card stock. I created the background by stamping and heat embossing snowflakes using white embossing powder and added little dots with a white gel pen. I then die-cut a white hill out of card and adhered it to the bottom. For the sentiment I cut a piece of patterned paper into a banner and heat embossed the greeting on with white embossing powder. 

Last but not least I needed to stamp and color the little penguin. After he was colored I fussy cut him out and added him to the card. To finish it off I mounted the card onto white and black card stock and added a shadow under the penguins feet.  


I hope you enjoyed the card for today! Thanks for stopping by!

Saturday, November 28, 2015

Sunny Studio Small Business Saturday & Cyber Monday 30% off Sale!


In honor of Small Business Saturday and Cyber Monday coming up we are offering our best prices of the year for three days only in our ONLINE STORE.  Get 30% off using the code "SmallBusiness".  

Stock up on gifts for our crafty friends and maybe a few gifts for yourself.  ;)  Sale expires on November 30, 2015 at Midnight.
 

Sunny Saturday Share: Penguin Birthday & Christmas Cards


Hello there!  How was your Thanksgiving?!  Did you brave the crowds and do some holiday shopping afterwards?  I traditional head out with one or more of my sisters and I gotta say it was pretty wonderful this year.  It must have something to do with more retailers offering their deals online to thin out the stores a bit.  Of course I did both types of shopping so I'm feeling pretty spent in every sense of the word.  ;)

Today we have some cute cards to share all using our penguin images from our Bundled Up and Snow Kissed stamp sets.

Up first is a super clever card by Angel Johns combining our Bundled Up and Birthday Smiles stamp sets.  I just love how she took the ice cream cone and turned it into a party hat using one of the pom-poms from the hats in the set!


For our second share we have an adorable card by Photcrafter posted to our Flickr group.  I am in love the colors of her card and the cute way she has the penguins peeking out from the circle windows!


Up next is a darling card by Cindy Horvath from over at the Mod Squad Challenge Blog using our Snow Kissed Stamp Set.  I love her use of patterned paper and how she colored her image to match.  So adorable!  


Our last card features that same penguin image in a soft and sweet snowy scene from Cards By Nicola.  So cute!


I hope you will join these ladies by sharing your darling creations with us on our Facebook page, in our Flickr group or by tagging us with the hashtag #SunnyStudioStamps on instagram.  

I hope you enjoy the rest of your holiday weekend!  :)

Friday, November 27, 2015

Santa's Helpers Merry Puppy Dog Card with Marion

Hello. Marion here with a simple Christmas card using the Santa's Helpers stamp set, along with the coordinating die set.


I coloured in this cute little guy with Copic markers and popped him up on some foam squares to add some dimension to the card. To create the sentiment, I adhered four layers of the word merry together to form a thicker die sentiment from red cardstock.

The holly berries are covered in Glossy Accents and there is a little bit of shimmer on the Santa hat with some clear Wink of Stella Glitter brush pen.


Sunny Studio products used:
How is your Christmas card making going? Hopefully this week the DT has inspired you with some new ideas.

Thanks for visiting today,

Marion

Thursday, November 26, 2015

Merry & Bright Holiday Christmas Card with Elise

Hello there! It's Elise again to share a fun Christmas card with you today that features the Santa's Helpers coordinating dies!

I really wanted to focus on using some of the extra dies that are included in the die set, such as the merry & bright sentiment, as well as the holly leaves and berries!


I die cut the sentiment from gold glittery paper as well as black card stock. I offset the black die cut to give the sentiment a shadowy look to help it stand out against the white background. Here is a close up on the sentiment:


Next, I die cut the holly leaves and berries from green and red striped patterned paper, and arranged them around the sentiment. I finished the card by adding some gold enamel dots, red patterned paper for some more color, and a large green bow on the side!

Thanks for stopping by today! Have a great Thanksgiving!  :)

Wednesday, November 25, 2015

Santa's Helpers: Happy Howlidays Christmas Card with Audrey


Hello there! Audrey here with a card featuring the Santa's Helper's stamp set.  It was difficult trying to decide which images to use for my project today, but then as I was coloring them, I had a lightbulb moment.  At first when looking at this image I didn't see a cocker spaniel, but then I decided to color the patch of hair under their chin like a bandanna and suddenly I thought they started looking like my babies!  I'm so excited to finally have a stamp that looks like them!

I started off by watercoloring a piece of Tim Holtz watercolor paper with my Artist's Loft watercolor set from Michaels.  When it was dry, I ran it through my die-cut machine to give it a stitched edge. I wanted to bring in a bit of red to coordinate with the Santa's hats so I pulled out a piece of red and white striped patterned paper from my stash.  I popped the dogs up using foam tape after die-cutting them with their coordinating dies.  I stamped a sentiment from the set on a speech bubble die-cut and then added some diecut snowflakes which are also included in the Santa's Helpers die set.  To add a bit of sparkle around the snowflakes, I added some sparkling clear sequins, and then mounted the panel on a dark green card base using foam tape.  Finally, I added a bow with my favorite red and white bakers twine.

Santa's Helpers

That's all for me today!  I hope you like my card!  Be sure to stop back by tomorrow with more inspiration from the design team!  Happy Thanksgiving to you!!

Tuesday, November 24, 2015

Santa's Helpers Purrfect Kitty Cat Christmas Card with Heidi

Hello everybody, welcome back to the Sunny Studio Stamp blog!  This week we are introducing the Santa's Helpers stamps and coordinated die set. This stamp set is perfect for all you cat and dog lovers out there. Here is my card that I created to share with you today.  I hope you'll enjoy it!


For this card I stamped and colored the images using Copic Markers.   I then created a brick background on a piece of red cardstock using a stencil.  I added a scalloped glittery green border and hung the stockings with the kittens on top using some festive colored bakers twine. 


I stamped the sentiment directly onto the card base along with a little paw print from the set. I also added some detail with a white gel pen on the stockings. 

The "Santa's helpers" stamp and die set are available at the Sunny Studio Stamp shop.  We can't wait to see what you create with them!   Have a lovely day!

A Santa's Helpers Kitty Card with Free Fireplace Cutting File

I just wanted to pop in and share a peek of a card using our Santa's Helpers stamps that's being featured over on the CardMaker​ blog today.  


I hope you will visit for a closer look and to get a free download of the fireplace shaped card cutting file.  ;)

Monday, November 23, 2015

Santa' s Helpers Cat Tangled In Christmas Lights Card by Melissa

Hello everyone, Melissa here. Today I have a card to share with you using the Santa’s Helpers stamp set. I love all the cute critters in the set but my favorite has to be this little kitty dressed up as a Christmas tree. He is too cute! 


To create this card I first stamped the cat image onto a piece of blank cardstock and then masked him off with masking paper. I then die cut a hill border with masking paper and placed that over the bottom portion of the card, this would become the snowy hill. I then worked on inking up the sky. This time I used Simon Says Stamp inks and they worked perfectly! I added a light yellow around the cat to make him look like he was glowing and worked my way out to the edges of the card using darker blues. 

To finish off the sky I stamped a Santa and reindeer flying over head and added some dots of white gel pen for the stars. I then removed the masks from the cat and the hill. I colored the cat with Copic markers and added some shadow to the snowy hill. To finish off the card I embossed the greeting with red embossing powder and mounted the card on top of some white and red papers. 


I hope you enjoyed the card for today!   Don't forget that the Sunny Studio Online Store is having a 20% off sale that ends tonight at Midnight (using the code: SCTMagazine).

Thanks for stopping by!

Saturday, November 21, 2015

Sunny Saturday Share: Birthday Smiles Ice Cream & Cupcake Cards


Hello there!  For today's Sunny Saturday share I have some special cards created by my good friend Cara Goedeking using our Birthday Smiles Stamps.

Cara Says...

For my first card I paper-pieced the cupcakes and used dimensional magic on the cherries with Mr. Huey's mist on the background."


For my second card I wanted to keep it really simple. I used the balloon string to do the wave effect...I used 2 different colored stamp pads on each string and then used a glue pen and sprinkled with prism glitter. I stamped the cone on cork patterned paper and used some more dimensional magic on the heart "nose".  I love this set...it's so much fun to play with!


Didn't Cara do a great job?!  I love her creative touches with the balloon string and heart nose.  I also love how she mixed things up with her cupcakes! 

While we're on the topic of ice cream cones and cupcakes, I have another darling card  shared with us on our Flickr group last week by Graciellie Design.  


I think Graciellie's card is so fun mixing the birthday icons with a holiday spin and I love her color scheme!  :)

I hope you enjoy the rest of your Saturday and that you see some sun in your neck of the woods.  :)


Friday, November 20, 2015

Harvest Happiness I Love You Tag with Marion + Sale & Giveaway

Hello, it's Marion here with a very different and unexpected way to use the Happiness Harvest stamp set.

When I looked at the turkey in the stamp set, I thought that without the tail feathers, I could create some chickens!   I had to create a tiny little mask out of a post it note to mask off the little bit of skin that hangs down from the side of the beak (and I had to Google it to find out that flap of skin is called a snood!) I then hand drew the chicken's combs with a black marker and added a bow tie, then coloured the whole scene in with Copic Markers.


Again, with a little bit of masking, I partially stamped the sentiment, leaving off the 'more than pie' words. This tag just goes to show that with some masking and a little creativity, you can get a whole lot more from your stamp sets!


Sunny Studio Products used:
I hope you will take another look at your stamps and see how you can stretch them a little further.

Before you go, I also want to let you know to check out the Scrapbook & Cards Today Blog today for your chance to win two more stamp sets and to get a special discount code to the Sunny Studio online store for this weekend only.  ;)

Thanks for stopping by,
Marion

Thursday, November 19, 2015

Harvest Happiness Happy Thanksgiving Card with Elise

Hi everyone! It's Elise here to share a cute Thanksgiving card with you that features the Harvest Happiness stamps and dies!

I stamped and die cut all of the images from white card stock, and colored them with Prismacolor pencils. The images are all attached with foam tape to help them stand out against the background. I finished the card off by adding a few clear sequins around the images. 


Here is a close up on the images that are included on this card. That turkey looks like he has his eye on that pumpkin pie!!


Thanks for stopping by to see this card featuring the Harvest Happiness stamp set!  Don't forget to stop by again tomorrow for some more inspiration! :)

Wednesday, November 18, 2015

Harvest Happiness I Love You More the Pie Card by Audrey

Hello there! Audrey here! Today I have a fun pie themed card using the Harvest Happiness stamp set!  Just because this stamp set is full of fall and Thanksgiving images, you can do so much more with it!  I love this image and sentiment.

I started by watercoloring a very subtle background using Cracked Pistachio distress ink.  Then I die-cut a stitched frame around the edge of the watercolor piece when it was dry.  I love using tag dies for the base of my focal point on cards.  I die-cut this tag three different times from cardstock, and patterned papers.  I then adhered the striped paper to the bottom of the white tag and popped that tag up on the polka-dot tag behind it with foam tape.  I tilted the top tag slightly to show a little snippet of the polka-dot patterned paper.  

I stamped, colored and die cut the pie slice image from the Harvest Happiness stamp set, using the coordinating dies, and then stamped a sentiment from the same set on a banner die-cut to put below it. I stamped a few hearts from the Happy Home stamp set on the tag, and added a bigger die-cut heart to the banner to create a visual triangle.  After I adhered to the watercolor piece, I threaded an aqua button with some bakers twine to cover up the tag hole, and then adhered the whole panel to an aqua care base with foam tape.

I love you more than pie

Here is a closer shot of the focal point:


That's all for me today!  Be sure to stop back by tomorrow for  more inspiration from the design team!  Have a great day! :)

Tuesday, November 17, 2015

Harvest Happiness Thanksgiving Fall Card with Heidi

Hello everybody! Heidi here.  Today I am sharing more inspiration using the "Harvest Happiness" stamp set.  With the Thanksgiving celebrations approaching, this stamp and coordinated die set are a must have for all your card and projects.  I hope you'll enjoy the card that I created to share with you today.


I stamped and colored the cute little owls and the pumpkin pie with Copic markers and I die cut them using the coordinated dies. Then I die cut some frames using some dies that I have on hand to set the scene for my images and sentiment.


I used distress inks to blend a subtle background, and place all of the images using foam adhesive.

The Harvest happiness stamp and coordinated dies are available at the Sunny Studio Stamps shop.   We love to see your creations using Sunny Studio Stamps so don't forget to tag your work using the #SunnyStudioStamps

Have a lovely day! 

Monday, November 16, 2015

Harvest Happiness Thanksgiving Owl Card by Melissa + Winners

Hello everyone, Melissa here. Today I have a card to share with you using the Harvest Happiness stamp set! I decided to make a fairly simple card today to really make these two cute little owls stand out. 


To make this card I first die cut a circle out of a white square of cardstock. On another piece of square cardstock I marked out where the circle was when I placed it behind the die cut panel. This would be the area that would be peeking through. 

I stamped the owls where I wanted them and masked them off. I then masked off the area of the grass and colored the rest with distress inks - this would be the sky. I did the same again by masking off the sky and applying ink to the grassy hill. I then unpeeled all the masks and colored the owls with Copic Markers. I then stuck the colored panel to the back of the white piece with the die cut circle and adhered both of those to a card base with a piece of patterned paper. 

To finish off the card I made a little banner by die cutting the ends of a strip of card stock with the Fishtail Banners die. I then stamped the sentiment and heat embossed that. I added some green and yellow distress inks to the banner and adhered it to the card. 


That completes the card for today, but before I go we have two winners to announce from our blog hop last week!   Congratulations Nathalie Paquette and Denise WardWe've emailed you.  ;)  Thank you to everyone who stopped by and for all the sweet comments left.    

Be sure to check back this week to see what the other talented design team members created!  Thanks for stopping by.