Friday, March 20, 2020

Spring Showers Cards with Juliana and Candice

Hello Sunny Studio friends! It's Juliana here and today I have a spring themed card to share with you featuring the Spring Showers Stamp Set.

Sunny Studio Stamps: Spring Showers Staggered Circle Dies Fancy Frame Dies Friendship Card by Juliana Michaels

I began by stamping the images from the Spring Showers Stamp Set. I then colored them with Copic Markers and die cut them using the coordinating Spring Shower Dies. I used colored pencils to add more detail to the hair and a white gel pen for highlights on the kite and umbrella.

For the background, I die cut a 3.75 x 5” piece of white cardstock using the Staggered Circle Die. I then backed it with a piece of yellow paper from the Spring Fling Paper Pad. I then layered the entire piece onto another piece of white cardstock die cut using the Fancy Frames Rectangle Die.

Sunny Studio Stamps: Spring Showers Staggered Circle Dies Fancy Frame Dies Friendship Card by Juliana Michaels

I then went about adhering each of the Spring Shower images using double sided foam adhesive, making sure to leave a space to stamp the sentiment. For a fun touch, I added a bit of black thread to the kite to act like a string.

I hope you enjoyed the bit of inspiration featuring the Spring Showers Stamp Set. Thanks so much for stopping by today!

-----------------------------------------------

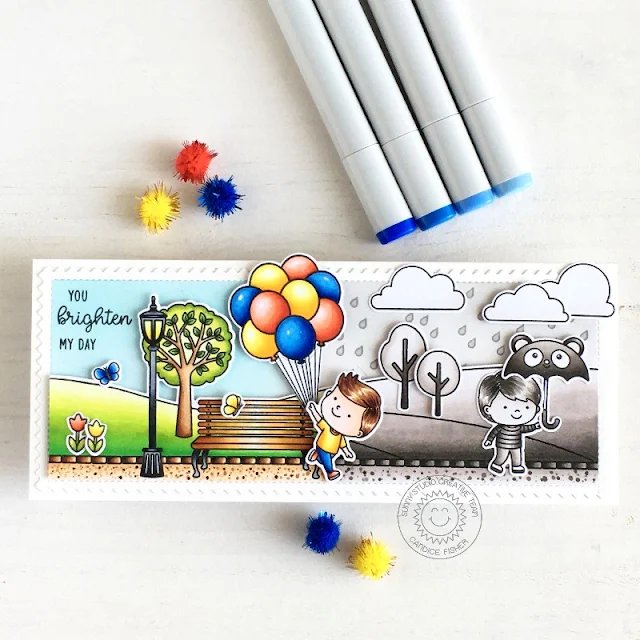
Hello crafty friends! Candice with you again and I have an unique card for you today highlighting the Spring Showers stamp set! I love the contrast as he runs and changes the grey to color!

Sunny Studio Stamps: Spring Showers Floating By Spring Scenes Friendship Card by Candice Fisher

I used a few Sunny Studio Stamps products for my card:
I began my card with an 8 1/2 3 1/2 card base that fits perfectly into a standard size envelope. For the background, I first created the pointed edge frame using the partial die cut method and then taped off the edges and inked the left side with tumbled glass and the right side with hickory smoke. On the grey side, I stamped some raindrops using the hickory smoke and stamped the sentiment in the top left corner.

Sunny Studio Stamps: Spring Showers Floating By Spring Scenes Friendship Card by Candice Fisher

Next, I stamped the the long hill scene, repeating the bricks on either side and extended the hills using a Copic friendly marker and cut out using the coordinating dies. I then stamped the treesballoonsboys, umbrella, clouds, flowers & butterflies, colored them with Copic markers and used the coordinating dies listed above.  

To put the card together, I used foam tape on the hill scene along with all the other accessories. Thank you so much for visiting today!

Sunny Studio Supplies Used:

Fancy Frames- Rectangles
Shop at:
Sunny Studio
Staggered Circles Die
Shop at:
Sunny Studio
Frilly Frames Chevron Die
Shop at:
Sunny Studio
Floating By Stamps
Floating By Stamps
Shop at:
Sunny Studio
Floating By Dies
Floating By Dies
Shop at:
Sunny Studio
Spring Scenes Stamps
Shop at:
Sunny Studio
Spring Scenes Dies
Spring Scenes Dies
Shop at:
Sunny Studio
Spring Showers Stamps
Shop at:
Sunny Studio
Spring Showers Dies
Spring Showers Dies
Shop at:
Sunny Studio
Spring Fling Paper
Spring Fling Paper
Shop at:
Sunny Studio

Thursday, March 19, 2020

Pink Peonies Cards with Vanessa and Anja

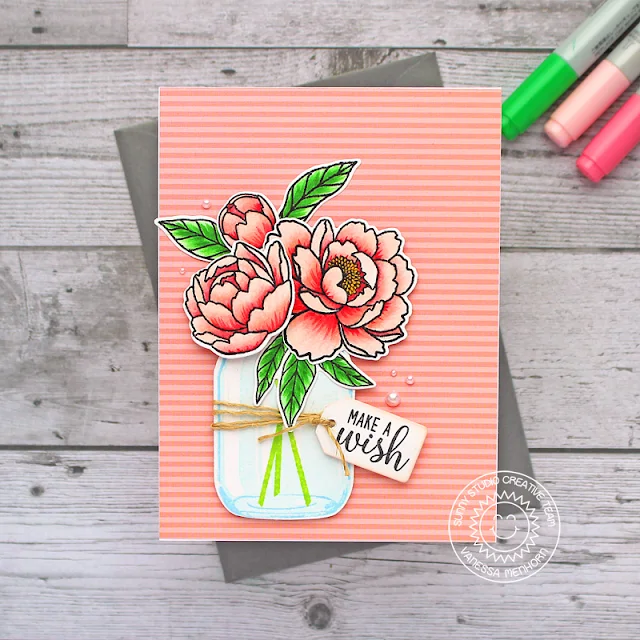
Hello to you! Vanessa here with a card using the gorgeous Pink Peonies Stamps. Peonies are one of my favorite flowers, I can't wait for them to bloom! Now I can put some onto paper whenever I want them.

Sunny Studio Stamps: Pink Peonies Vintage Jar Daffodil Dreams Make A Wish Everyday Cards by Vanessa Menhorn

First, I covered my card base with coral patterned paper from the Dots & Stripes Pastels Paper pad. Now I stamped the Vintage Jar onto white cardstock, stamped the stems from Daffodil Dreams and die-cut the jar with the matching die. I die-cut a small tag from the Sweet Treat Bag Dies, stamped the sentiment from Make A Wish, tied the tag to the jar with rustic twine and adhered the jar to the card with foam tape.

Sunny Studio Stamps: Pink Peonies Vintage Jar Daffodil Dreams Make A Wish Everyday Cards by Vanessa Menhorn

Then I stamped the peonies and leaves, colored the images with Copics, die-cut the elements with the matching dies and adhered everything to the card. Finally, I added white pearls to finish the card off.

I so love these stamps, they make me happy! Thanks for visiting!

---------------------------------------------------

Hi everyone, Anja here today with a floral thank you card highlighting the beautiful Pink Peonies Stamps.

Sunny Studio Stamps: Pink Peonies Sunflower Fields Everyday Card by Anja Bytyqi

This time I tried some no-line watercoloring with Tombow Dual Brush Pens. I stamped the images with Ink On 3 Fadeout No Line Coloring Ink and cut out some masks to create my floral cluster. I added a light grey shadow around it.

The 'thanks' sentiment is from the Sunflower Fields set. I stamped it in VersaMark Ink and heat embossed it with Ranger Liquid Platinum embossing powder. To finish off my card, I adhered some self made pink droplets and clear crystals.

Thank you so much for stopping by! Take care everyone!

Sunny Studio Supplies Used:

Daffodil Dreams Stamps
Shop at:
Sunny Studio
Vintage Jar Dies
Vintage Jar Dies
Shop at:
Sunny Studio
Vintage Jar Stamps
Vintage Jar Stamps
Shop at:
Sunny Studio
Dots & Stripes Pastels 6x6 Paper
Shop at:
Sunny Studio
Make A Wish Stamps
Make A Wish Stamps
Shop at:
Sunny Studio
Sunflower Fields Stamps
Shop at:
Sunny Studio
Sweet Treats Gift Bag
Shop at:
Sunny Studio
Pink Peonies Stamps
Pink Peonies Stamps
Shop at:
Sunny Studio
Pink Peonies Dies
Pink Peonies Dies
Shop at:
Sunny Studio

Wednesday, March 18, 2020

Border Die Focused Cards with Franci and Ana

Hi there! Franci here with you with a colorful Spring themed card today! 

Sunny Studio Stamps: Heartstrings Border Dies Chickie Baby Spring Themed Card by Franci Vignoli

I started by making my card base out of white cardstock and cut out a matching white panel. Then I covered the front bottom of my card base with this colorful stripy rainbow patterned paper included in the Spring Fling set and I die cut my panel using this lovely hearts border die included in the Heartstrings Border dies set.

Then I stamped all my images from the Chickie Baby set, colored them with Copics, added some details with a white gel pen and die cut them with their coordinated dies. I assembled all the elements into this little cute scene, glued them down with a combo of liquid glue and foam adhesive and stamped my sentiment from the Cheerful Daisies set at the bottom.

Sunny Studio Stamps: Heartstrings Border Dies Chickie Baby Spring Themed Card by Franci Vignoli

Finally I mounted my decorated panel onto my card with more foam adhesive, I added some little sparkling clear sequins and a little red heart (I die cut this with one of the other border dies included in the set out of white cardstock and colored with my Copics!).

Hope you like this new happy Spring themed card and thank you so much for stopping by today!

-----------------------------------------------------

Hello crafties! It’s Ana here today with a pastel floral card featuring beautiful Eyelet Lace Border dies and Botanical Backdrop die cut flowers.

Sunny Studio Stamps: Eyelet Lace Border Dies Botanical Backdrop Dies Spring Themed Card by Ana Anderson

I started by choosing my cardstock in pastel colors and die cutting Eyelet Lace borders. I die cut the flower pieces (from Botanical Backdrop) next, and started layering/adhering them together.

For the background I die cut white stitched rectangle mat with outline Frilly Frames Retro Petals die, then embossed two thirds of the top part of the panel with Quilted Hearts embossing folder.

Sunny Studio Stamps: Eyelet Lace Border Dies Botanical Backdrop Dies Spring Themed Card by Ana Anderson

I adhered Eyelet Lace borders below embossed part of the panel, then stamped the sentiment (from Timeless Tulips stamp set) with light pink ink. I adhered the die cut flowers and added rhinestones (from Rainbow Rhinestones pack) to the centers of each flower and my card was finished!

Thank you for taking the time to stop by today – I really hope you like today’s card and got inspired! I’ll see you next time, and until then I wish you a wonderful rest of your week!

Sunny Studio Supplies Used:

Timeless Tulips Stamps
Shop at:
Sunny Studio
Quilted Hearts Embossing
Shop at:
Sunny Studio
Botanical Backdrop Die
Shop at:
Sunny Studio
Frilly Frames Retro Petals Dies
Shop at:
Sunny Studio
Cheerful Daisies Stamps
Shop at:
Sunny Studio
Chickie Baby Stamps
Chickie Baby Stamps
Shop at:
Sunny Studio
Chickie Baby Dies
Chickie Baby Dies
Shop at:
Sunny Studio
Eyelet Lace Borders
Eyelet Lace Borders
Shop at:
Sunny Studio
Heartstrings Border Dies
Shop at:
Sunny Studio
Spring Fling Paper
Spring Fling Paper
Shop at:
Sunny Studio

Tuesday, March 17, 2020

Alphabet Stamp Focused Cards with Angelica and Mindy

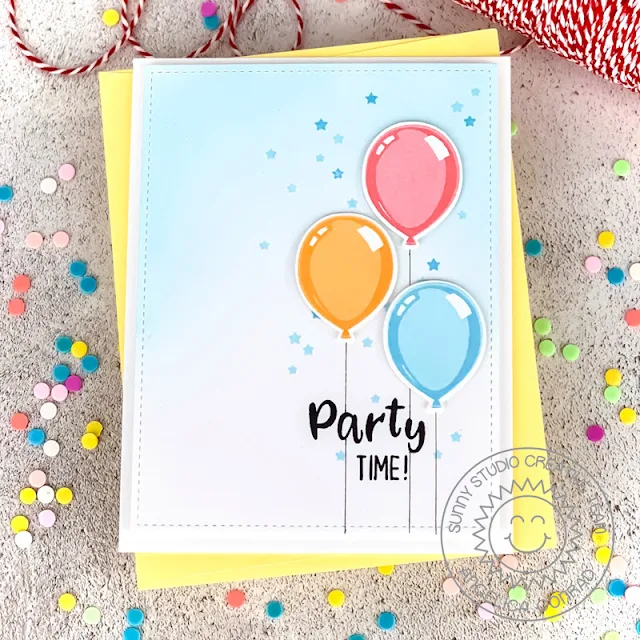
Hi friends! This is Angelica, and today I have a clean and simple birthday card to share. 

Sunny Studio Stamps: Kinsley Alphabet Phoebe Alphabet Birthday Balloon Frilly Frame Dies Birthday Card by Angelica Conrad

I love to use Birthday Balloon stamp set every chance I get. It's such an easy layering set to work with. I picked out my colors and stamped three balloons. I used Pinkfresh Studio inks in the following colors: Coral Reef, and Passion Fruit (Red), Apricot, and Clementine (Orange), Sky Blue, and Summer Shower (Blue)

Sunny Studio Stamps: Kinsley Alphabet Phoebe Alphabet Birthday Balloon Frilly Frame Dies Birthday Card by Angelica Conrad

I used stars from Super Duper stamp set for the background, and made my own sentiment, using letters from Phoebe and Kinsley Alphabet. I used Frilly Frames Retro Petal stitched rectangle to trim the ink-blended panel, and attached it to a card base with with foam adhesive. I added the balloons with thin foam squares to finish the card.

That's all that I have for today. Thanks for stopping by!

--------------------------------------------------------

Hello! It’s Mindy from My Creative ScoopToday I’m sharing a card using Kinsley Alphabet Stamp Set. Alphabet stamp sets are great so you can create any type of card sentiment. I can always use the extra Happy Birthday cards. Staggering the letters instead of trying to place them evenly is so much easier – just an FYI!

Sunny Studio Stamps: Kinsley Alphabet Birthday Balloon Frilly Frame Dies Fluffy Cloud Border Dies Birthday Card by Mindy Baxter

I used my Fluffy Cloud Border Dies to create the clouds that in front of my Frilly Frames Striped die. Before I cut out the frame I used my Distress Oxide Inks to create this rainbow on my cardstock.

Inks used: Picked Raspberries, Dried Marigold, Squeezed Lemonade, Cracked Pistachio, Peacock Feathers and Shaded Lilac.

Sunny Studio Stamps: Kinsley Alphabet Birthday Balloon Frilly Frame Dies Fluffy Cloud Border Dies Birthday Card by Mindy Baxter

I glued some tiny gold stars all over my card for some extra details. Thank you so much stopping by. Have a great day!

Sunny Studio Supplies Used:

Birthday Balloon Stamps
Shop at:
Sunny Studio
Birthday Balloon Die
Shop at:
Sunny Studio
Frilly Frames Stripes Die
Shop at:
Sunny Studio
Super Duper Stamps
Super Duper Stamps
Shop at:
Sunny Studio
Fluffy Clouds Border Dies
Shop at:
Sunny Studio
Frilly Frames Retro Petals Dies
Shop at:
Sunny Studio
Kinsley Alphabet Stamps
Shop at:
Sunny Studio
Phoebe Alphabet Stamps
Shop at:
Sunny Studio

Monday, March 16, 2020

Cheerful Daisies Cards with Lynn and Ashley

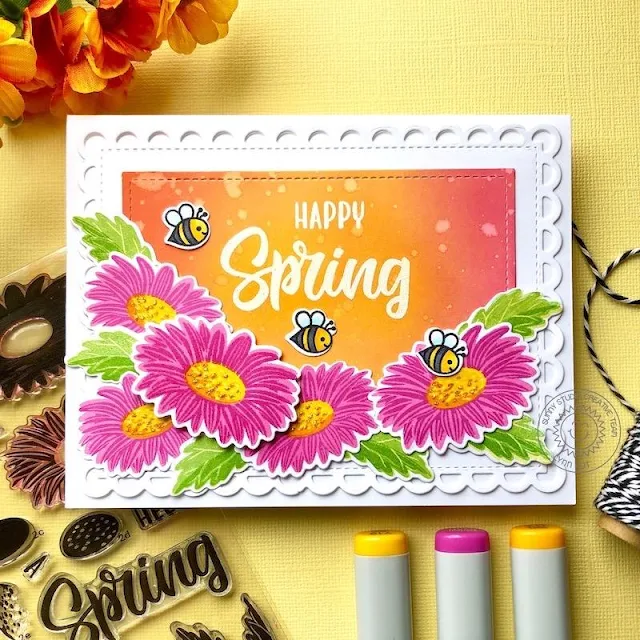
Hello! Happy Monday! It’s Lynn here, today I’m happy to be sharing a card that I created featuring the Cheerful Daisies stamp set and Cheerful Daisies dies.

Sunny Studio Stamps: Cheerful Daisies Frilly Frame Dies Sunny Sentiments Spring Themed Card by Lynn Put

To create my Cheerful Daisies card, I started out by die cutting a bunch of the daisies and leaves from white card stock using the Cheerful Daisies dies. After that I used hibiscus burst and raspberry fizz inks to stamp the daisies and daffodil delight and summer sun ink for the center of the daisies. The leaves were stamped in limeade ice and new leaf inks. The amount of detail in these stamps is fantastic and with each layer of stamping the daisies and leaves look realistic.

Once I had my daisies and leaves stamped, I worked on my background. I used Frilly Frames Lattice die with some white card stock for the first layer of my background. Then I die cut a rectangle of white card stock and blended on some Spiced Marmalade and Picked Raspberry Distress Oxide ink. Once that was done I added some splatters of water and blotted them up with paper towel. 

Sunny Studio Stamps: Cheerful Daisies Frilly Frame Dies Sunny Sentiments Spring Themed Card by Lynn Put

Next I heat embossing my Happy Spring sentiment with white embossing powder and adhered my ink blended rectangle to the Frilly Frames Lattice piece and then onto my card front. After that I adhered all of my daisies, popping up one of the larger daisies with foam tape. For a finishing touch, I stamped three little bees from the Sunny Sentiments stamp set and coordinating dies and colored them using Copic markers and added some yellow glitter to the centers of the daisies.

--------------------------------------------------

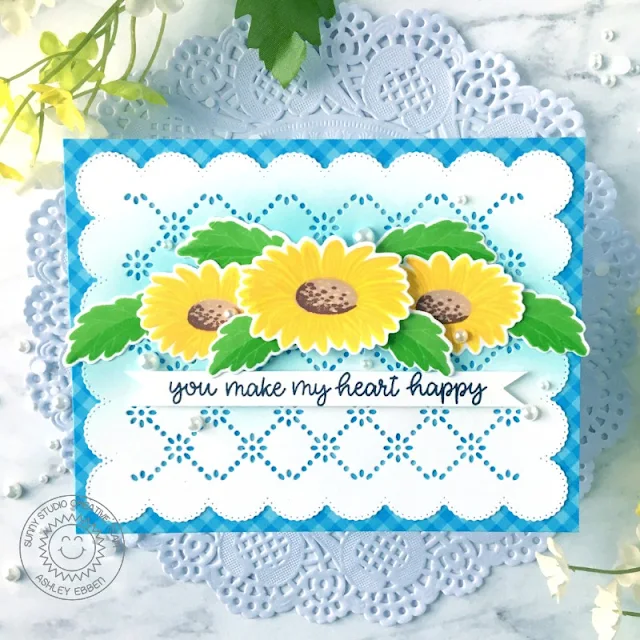
Hello friends! It's Ashley with a happy spring card featuring the newest layering stamp set from Sunny Studio - Cheerful DaisiesDoesn't it just make you smile? Nothing says spring like yellow daisies, blue gingham, and white eyelet lace!

Sunny Studio Stamps: Cheerful Daisies Frilly Frame Dies Happy Thoughts Everyday Card by Ashley Ebben

I started by blending a bit of Tumbled Glass Distress Oxide ink around the spot where I planned to place my daisies. Once I had a bit of color on the white cardstock, I die cut the piece using the Frilly Frames Eyelet Lace background die and adhered it to a piece of light blue gingham paper from the Gingham Pastels paper pack.

I then took out my Cheerful Daisies stamps and my Misti to do some layered stamping! I admit, I am very new to layered stamping, so I had to test out a few color combinations before I settled on my final picks. I went with Lawn Fawn Lemonade and Hero Arts Butter Bar for the petals, and Hero Arts Green Hills, Lawn Fawn Freshly Cut Grass, and Lawn Fawn Jalapeno for the leaves. Once I had several flowers and leaves completed, I used the Cheerful Daisies dies to cut everything out and added them to my card. I popped the larger middle flower and a couple of leaves up with foam squares for a bit of dimension.

Sunny Studio Stamps: Cheerful Daisies Frilly Frame Dies Happy Thoughts Everyday Card by Ashley Ebben

I stamped my sentiment from Happy Thoughts in Lawn Fawn Jet Black ink on a strip of white cardstock and cut the ends in a fishtail shape for a banner. I added the sentiment strip to the card with foam tape so it was popped up like the large flower. To finish, I scattered a few white pearls around the flowers for a pretty final touch.

Thank you so much for stopping by! I hope you have a cheery day!

Sunny Studio Supplies Used:

Sunny Sentiments Dies
Shop at:
Sunny Studio
Sunny Sentiments Stamps
Shop at:
Sunny Studio
Happy Thoughts Stamps
Shop at:
Sunny Studio
Gingham Pastels 6x6 Paper
Shop at:
Sunny Studio
Frilly Frames Lattice Dies
Shop at:
Sunny Studio
Cheerful Daisies Stamps
Shop at:
Sunny Studio
Cheerful Daisies Dies
Shop at:
Sunny Studio
Frilly Frames-Eyelet Lace
Shop at:
Sunny Studio