Saturday, January 18, 2020

Guest Designer Spotlight: Spring Showers Cards with Nicky Meek

Hello everybody, Nicky Meeks here! Today I am so happy to be guest designing for Sunny Studio Stamps. I've created two cards using the super sweet Spring Showers stamp set and coordinating dies. This first card also features the new Spring Scenes stamps and coordinating dies

Sunny Studio Stamps: Spring Scenes Spring Showers Everyday Cards by Nicky Meek

To create this card I ink blended the background and used a stencil from my collection to subtly stencil in the sunshine. I distressed the background by splattering water droplets and blotting them up and then splashing on some paint. I attached this to a 110lb white cardstock base which is lovely and sturdy for supporting such a dimensional card.

On Copic friendly cardstock I stamped the image from Spring Scenes and coloured it with Copic markers. The sentiment was stamped and it was die cut, backed with foam tape and applied to the background.

Sunny Studio Stamps: Spring Scenes Spring Showers Everyday Cards by Nicky Meek

On more Copic friendly cardstock the kids from Spring Showers were stamped with Memento Ink in Rich Cocoa and then also coloured with Copics. They were die cut and applied to the scene with yet more foam tape. Points were highlighted with a white gel pen.

Sunny Studio Stamps: Spring Scenes Spring Showers Everyday Cards by Nicky Meek

To finish up the card I die cut the clouds using the Spring Showers dies (without stamping them first), backed them with foam tape and applied them. I also added in some flowers and butterflies making sure that the eye goes around the card.

Hope you like this card but now for something completely different using other images from Spring Showers.

Sunny Studio Stamps: Spring Scenes Spring Showers Everyday Cards by Nicky Meek

This is basically a background card with some clouds and raindrops popped up on top. To create it I took an A2 panel of white Copic friendly cardstock. I stamped the three umbrella images randomly using Memento Ink in Rich Cocoa. 

Sunny Studio Stamps: Spring Scenes Spring Showers Everyday Cards by Nicky Meek

I used Copic marker to colour them and used a couple of pale blue colours to edge around them. Points were highlighted with a white gel pen and I used a simple stitched edge die from my stash to define the edges a little. The background panel was applied to a 110lb white cardstock base.

Sunny Studio Stamps: Spring Scenes Spring Showers Everyday Cards by Nicky Meek

I die cut the clouds again without stamping them first. I stamped the sentiments on some of them and then popped them up on different amounts of foam tape so that they appear to float. The final touch was to glue the raindrop embellishments in place.

Thank you so much for stopping by to read today.

Sunny Studio Supplies Used:

Spring Scenes Stamps
Shop at:
Sunny Studio
Spring Scenes Dies
Spring Scenes Dies
Shop at:
Sunny Studio
Spring Showers Stamps
Shop at:
Sunny Studio
Spring Showers Dies
Spring Showers Dies
Shop at:
Sunny Studio

Friday, January 17, 2020

Chickie Baby Cards with Rachel and Candice

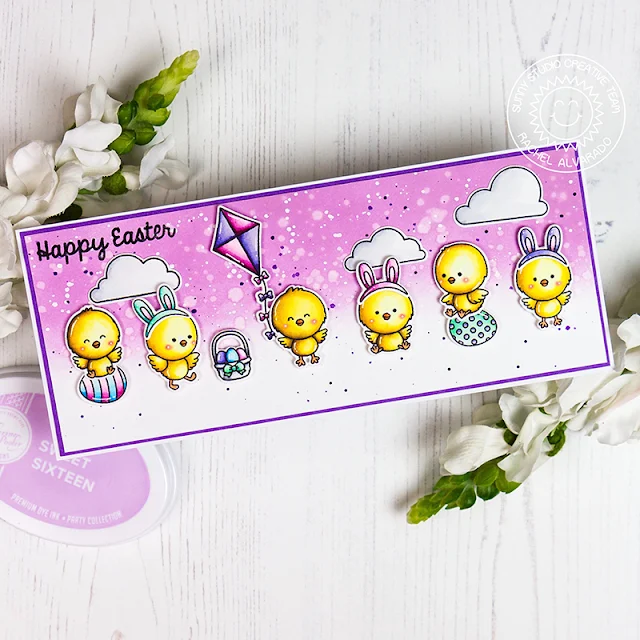
Hello friends! It's Rachel here and I have a Slimline Card to share with you that showcases the new and adorable Chickie Baby Stamp Set. I just love these sweet little peeps and their accessories! To start my card, I first stamped all of my images onto a sheet of Neenah Solar White 110lb Card Stock with Memento Tuxedo Black Ink. I then used Copic Markers to color everything and the coordinating dies to cut them out.

Sunny Studio Stamps: Chickie Baby Spring Showers Chubby Bunny Easter Card by Rachel Alvarado

I also added a few other images from separate stamp sets. I stamped a few clouds and a kite from the new Spring Showers Set and a cute little Easter basket from the Chubby Bunny Stamp Set.

Sunny Studio Stamps: Chickie Baby Spring Showers Chubby Bunny Easter Card by Rachel Alvarado

For my background, I cut a piece of Smooth White Card Stock to 3.25" x 8.25" and blended the top portion with some Sweet Sixteen Catherine Pooler Ink. I then splattered this piece with both water and diluted purple and white inks for some added interest. I then stamped my sentiment from the A Good Egg Stamp Set onto the top left corner and added all of my images with some 3D Foam Adhesive Squares. Lastly, I layered my card with both purple and white card stock for a final card size of 3.5" x 8.5".

Thanks so much for dropping by! Wishing you all a wonderful day!

----------------------------------------------------

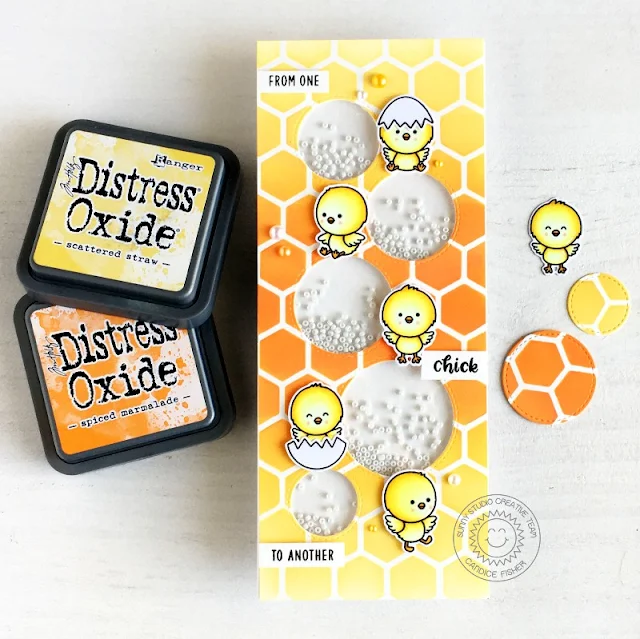
Welcome crafty friends!  It's Candice here today and I am sooo excited to share with you this fabulous new Spring release from Sunny Studio Stamps! Today I am sharing a fun card using the adorable Chickie Baby stamp set!

Sunny Studio Stamps: Chickie Baby Frilly Frame Dies Staggered Circle Dies Girlfriend Card by Candice Fisher

I used these fantastic Sunny Studio Stamps products:
For the background, I created a stencil from the hexagon die and used it to ink over with ripe persimmon, spiced marmalade, fossilized amber & scattered straw to make the chicken wire. Another great way to extend your dies! Next, I stamped the chickies and egg shells, colored with Copic markers and cut out using the coordinating dies.

Sunny Studio Stamps: Chickie Baby Frilly Frame Dies Staggered Circle Dies Girlfriend Card by Candice Fisher

To make the shaker element, I first die cut the stitched circles at once from the one die (love that!) and adhered a strip of acetate behind them. I then used foam tape around each circle to hold in the beads and placed the card front over it. 

To finish the card, I stamped the sentiments in black, trimmed to banners and used foam tape to add dimension. I added a few white & orange pearls for a little shine.

Thank you for visiting today!

Sunny Studio Supplies Used:

A Good Egg Stamps
A Good Egg Stamps
Shop at:
Sunny Studio
Chubby Bunny Stamps
Chubby Bunny Stamps
Shop at:
Sunny Studio
Chubby Bunny Dies
Chubby Bunny Dies
Shop at:
Sunny Studio
Staggered Circles Die
Shop at:
Sunny Studio
Frilly Frames Hexagon Dies
Shop at:
Sunny Studio
Chickie Baby Stamps
Chickie Baby Stamps
Shop at:
Sunny Studio
Chickie Baby Dies
Chickie Baby Dies
Shop at:
Sunny Studio
Spring Showers Stamps
Shop at:
Sunny Studio
Spring Showers Dies
Spring Showers Dies
Shop at:
Sunny Studio

Thursday, January 16, 2020

Prancing Pegasus Cards with Vanessa and Anja

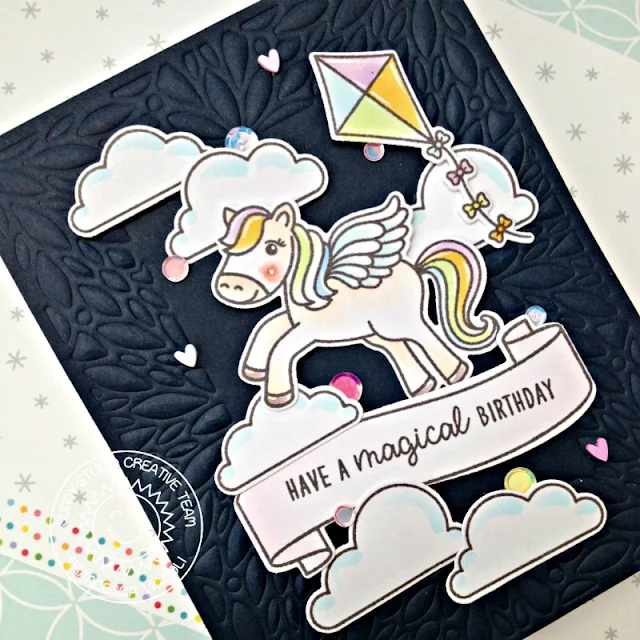
Hello to you! Vanessa here today with a card using the new Prancing Pegasus set. I am so excited about the new release, it's fantastic again! So let's start with my first card using it:

Sunny Studio Stamps: Prancing Pegasus Fluffy Clouds Border Dies Magical Pegasus Birthday Card by Vanessa Menhorn

I first inked the front of my white card base with yellow and violet Distress Oxide inks. Then I die-cut the Fluffy Clouds Border Dies from vellum and white cardstock and adhered them to the card. Now I stamped the pegasus onto white cardstock, colored it with Copics, added highlights with a white gel pen, die-cut it with the matching die and adhered it to the card with foam tape.

Sunny Studio Stamps: Prancing Pegasus Fluffy Clouds Border Dies Magical Pegasus Birthday Card by Vanessa Menhorn

I stamped the sentiment onto a strip of violet cardstock, heat-embossed it with white embossing powder, trimmed the strip and adhered it to the card with foam tape. Finally, I added sequins from the Iridescent Pastel Confetti.

This little pegasus is the cutest creature, don't you agree? Can't wait to play with all the other sets of the new release! See you next week, thanks for visiting!

----------------------------------------------------------

Hi everyone, Anja here and I'm excited to share my first card using some of the brand new Spring Release products. Today I'm featuring the adorable Prancing Pegasus Stamps.

Sunny Studio Stamps: Prancing Pegasus Floating By Fluffy Clouds Border Dies Magical Pegasus Birthday Card by Anja Bytyqi

I started off with a white card base and picked the gorgeous rainbow colors/white heart pattern from the Spring Fling Paper pack. At the bottom, I adhered three layers of white Fluffy Clouds Border die-cuts.

Next, I stamped the pegasus and also the pile of balloons from the Floating By set in Memento Tuxedo Black Ink and colored them with Copic Markers. Is used the coordinating dies to cut out the images. I thought it would be fun to let the pegasus fly over the clouds with the help of the colorful balloons. I had to stamp the balloon strings again (because the die only cuts out the balloons), but this time onto the patterned paper.

Sunny Studio Stamps: Prancing Pegasus Floating By Fluffy Clouds Border Dies Magical Pegasus Birthday Card by Anja Bytyqi

Finally, I stamped the sentiment in VersaMark Ink onto a purple cardstock banner and white heat embossed it. I popped it up with foam tape and added some Iridescent Pastel Confetti and Diamond Stickles dots.

Thank you so much for stopping by! Wishing you a magical day!

Sunny Studio Supplies Used:

Fluffy Clouds Border Dies
Shop at:
Sunny Studio
Floating By Stamps
Floating By Stamps
Shop at:
Sunny Studio
Floating By Dies
Floating By Dies
Shop at:
Sunny Studio
Prancing Pegasus Stamps
Shop at:
Sunny Studio
Prancing Pegasus Dies
Shop at:
Sunny Studio
Spring Fling Paper
Spring Fling Paper
Shop at:
Sunny Studio

Wednesday, January 15, 2020

Blooming Frame Cards with Franci and Ana

Hello there! Franci here with you today and I'm super excited to share some new release inspiration! I made a card featuring a bunch of new products and ... it's a magical one!
First of all I created my card base out of white cardstock, then I cut a piece of dark blue cardstock to size and embossed it with the new Blooming Frame die, using my die cutting machine and an embossing mat. I glued it down to the front of my card and moved on to my images. 

Sunny Studio Stamps: Blooming Frame Dies Prancing Pegasus Spring Showers Banner Basics Happy Birthday Card by Franci Vignoli

I stamped, colored with Copics and die cut lots of images from these sets: Prancing Pegasus set coordinated diesBanner Basics coordinated diesSpring Showers set + coordinated dies.

Sunny Studio Stamps: Blooming Frame Dies Prancing Pegasus Spring Showers Banner Basics Happy Birthday Card by Franci Vignoli

I also added some details to all the images with a white gel pen, created my design and glued everything down with liquid glue and foam adhesive. Finally I added some embellishments from the Iridescent Pastel confetti and the Pink and Purple Heart confetti mix to finish my design.

It's such a happy and girly card, hope you like it and thanks a lot for stopping by today!

--------------------------------------------------

Hello crafty friends! It’s Ana here today with a birthday card showcasing brand new gorgeous Blooming Frame Dies and amazing Spring Fling Paper pack

Sunny Studio Stamps: Blooming Frame Dies Happy Birthday Card by Ana Anderson

I had so many ideas for this beautiful Blooming Frame (I am sure I will be using it again very soon) however I went with a rainbow birthday card idea since I just couldn’t resist this delicious paper!

To create the card, I die cut the Blooming Frame from heavy weight white cardstock and backed it with a piece of Spring Fling paper. I masked the frame petal part and added splatter to the white background in the center with coordinating rainbow colors using Distress Oxide inks mixed with water.

Out of leftover patterned paper, I die cut 8 flowers using a flower die, and out of white cardstock I die cut 8 white flower centers and Happy Birthday sentiment three times. I stacked the sentiment die cuts and adhered them together with liquid glue creating dimension.

Sunny Studio Stamps: Blooming Frame Dies Happy Birthday Card by Ana Anderson

The flower, flower center and the sentiment dies are all included in Blooming Frame die set! Once the rainbow splatter was dry, I adhered the sentiment to the center and added flowers in the four corners, popping a few up with foam tape.

To embellish the card, I added glitter drops to each flower center and several around the sentiment, and Wink of Stella to the petals and the sentiment for some extra sparkle and shine!

Thank you so much for spending time with us today! I will see you next week and until then I wish Happy Crafting!

Sunny Studio Supplies Used:

Banner Basics Stamps
Shop at:
Sunny Studio
Banner Basics Dies
Banner Basics Dies
Shop at:
Sunny Studio
Prancing Pegasus Stamps
Shop at:
Sunny Studio
Prancing Pegasus Dies
Shop at:
Sunny Studio
Spring Showers Stamps
Shop at:
Sunny Studio
Spring Showers Dies
Spring Showers Dies
Shop at:
Sunny Studio
Blooming Frame Die
Blooming Frame Die
Shop at:
Sunny Studio
Spring Fling Paper
Spring Fling Paper
Shop at:
Sunny Studio

Tuesday, January 14, 2020

Spring Showers Cards with Leanne and Mindy

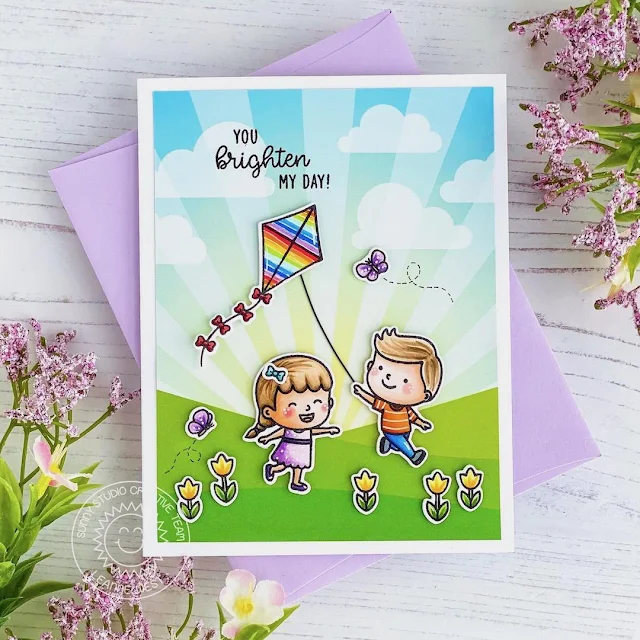
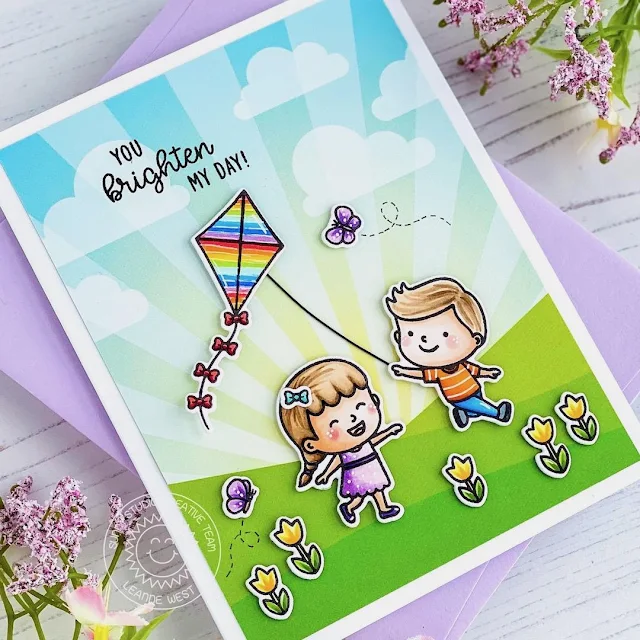
Hello friends, Leanne here! I'm happy to be sharing my first Sunny Studio blog post of 2020 by showcasing one of the cutest stamp sets from the new release. The Spring Showers set is right up my alley and I've used it to create a playful spring scene.  

Sunny Studio Stamps: Spring Showers Everyday Card by Leanne West

I started with the background which was already done for me. It's a pattern from the new Spring Fling Paper Pad. I trimmed it down about a quarter inch smaller than A2 size and adhered it flat to the card base. So quick and easy! I knew where I wanted to place the greeting from the Spring Showers set so I went ahead and stamped it in black ink directly onto the background.  

Sunny Studio Stamps: Spring Showers Everyday Card by Leanne West

I picked out two of the adorable kids and several supporting images from the Spring Showers set to Copic color. I adhered them onto the background with dimensional foam squares. For the kite string that the little boy is holding, I cut a very skinny strip of black card stock. I felt this was much easier to do and add than hand drawing a line. I hand drew in the butterfly trails to complete the scene. 

--------------------------------------------------------

Hello! It’s Mindy from My Creative Scoop. Today I’m sharing a fun card using the umbrellas from the new stamp set, Spring Showers along with the Spring Showers Coordinating Die Set. I’m also using the new Eyelet Lace Borders which I cut out in black, which really makes this card pop. The Fluffy Cloud Border Dies are from a previous release which goes perfect with this Spring Showers Stamp Set.

Sunny Studio Stamps: Spring Showers Eyelet Lace Border Dies Fluffy Clouds Border Dies Everyday Card by Mindy Baxter

I sponged my background using Chipped Sapphire, Salty Ocean and Shaded Lilac Distress Oxide inks. The rain is down freehand using a white gel pen.

Sunny Studio Stamps: Spring Showers Eyelet Lace Border Dies Fluffy Clouds Border Dies Everyday Card by Mindy Baxter

I’ve stamped my images in Memento Black Ink and stamped onto my Copic Xpress it Blending Card – which is my favorite paper to use when coloring with Copic Markers.

Panda – N0, N1, N3, N5, N7, R30, R32; Chick – Y21, Y26, Y28, YR04; Cow - N0, N1, N3, N5, N7, R30, R32, E11, E000, B00

I hope you feel inspired to create some new cards – this stamp set is perfect for Spring. Thank you so much stopping by. Have a great day!

Sunny Studio Supplies Used:

Fluffy Clouds Border Dies
Shop at:
Sunny Studio
Spring Showers Stamps
Shop at:
Sunny Studio
Spring Showers Dies
Spring Showers Dies
Shop at:
Sunny Studio
Eyelet Lace Borders
Eyelet Lace Borders
Shop at:
Sunny Studio
Spring Fling Paper
Spring Fling Paper
Shop at:
Sunny Studio