Monday, October 15, 2018

Simon Says Stamp Guest Blogger Sneak Peek

Sunny Studio: Simon Says Stamp Guest Post with 4 Holiday Christmas Cards by Mendi Yoshikawa

Today I'm excited to be a guest over on the Simon Says Stamp blog and I have some sneak peeks to share...

Card no.1: Christmas Trimmings Season's Greetings Card


Sunny Studio Stamps: Christmas Trimmings Season's Greetings Pinecones & Holly Holiday Card by Mendi Yoshikwa

Sunny Studio Supplies:
Festive Greetings Stamps
Shop at:
Sunny Studio
Dapper Diamonds Embossing
Shop at:
Sunny Studio
Christmas Trimmings Stamps
Shop at:
Sunny Studio
Christmas Trimmings Dies
Shop at:
Sunny Studio

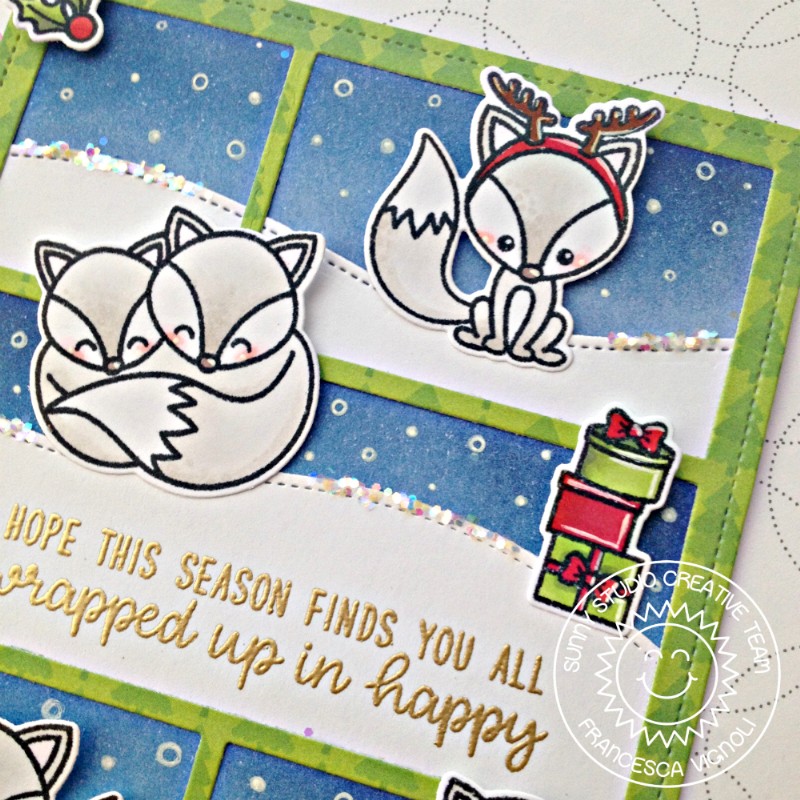
Card no.2: Foxy Christmas Card


Sunny Studio Stamps: Foxy Christmas Rainbow Circle Holiday Card by Mendi Yoshikawa

Sunny Studio Supplies:
Tsukineko Jumbo Dauber
Shop at:
Sunny Studio
Versafine Onyx Black Ink
Shop at:
Sunny Studio
Foxy Christmas Stamps
Shop at:
Sunny Studio
Foxy Christmas Dies
Foxy Christmas Dies
Shop at:
Sunny Studio

Card no.3: Happy Owlidays card


Sunny Studio Stamps: Happy Owlidays Owl I Want For Christmas is You holiday card by Mendi Yoshikawa

Sunny Studio Supplies:

Stitched Scallop Dies
Shop at:
Sunny Studio
Sliding Window Dies
Sliding Window Dies
Shop at:
Sunny Studio
Holiday Cheer 6x6 Paper
Shop at:
Sunny Studio
Happy Owlidays Stamps
Shop at:
Sunny Studio
Happy Owlidays Dies
Happy Owlidays Dies
Shop at:
Sunny Studio

Card no.4: Alpaca Holiday Winter Card


Sunny Studio Stamps: Alpaca Holiday Warm & Cozy Wishes Winter Card by Mendi Yoshikawa

Sunny Studio Supplies:
Versafine Onyx Black Ink
Shop at:
Sunny Studio
Alpaca Holiday Stamps
Shop at:
Sunny Studio
Alpaca Holiday Dies
Alpaca Holiday Dies
Shop at:
Sunny Studio
VersaMark Watermark Ink
Shop at:
Sunny Studio

I hope you will join me on their blog for the full reveals and more details about each card!

Also, make sure to scroll down for Eloise's darling project for the day. ;)

Here Comes Santa Snowy Hill Forest Scene Card with Eloise

Hi everyone, Eloise here and today I'll be using the Here Comes Santa along with Rustic Winter dies and Foxy Christmas to create a forest scene card.

Sunny Studio Stamps: Here Comes Santa Foxy Christmas Rustic Winter Dies Snowy Hill Forest Scene Card by Eloise Blue

First, I stamped out the trees from Here Comes Santa onto a piece of watercolour cardstock. I curved the image on my block to make it seem like they were on a snowy hill. I clear heat embossed over them so it was easier to blend Distress Inks over top. I then used various shades of blue to ink blend a sky. I flicked on some water and dried it off with a heat tool. I then used the Rustic Winter dies and cut a deer and the birch trees from more watercolour cardstock and used some browns to ink blend on those as well. For my snow hills I trimmed them myself with scissors. 

Sunny Studio Stamps: Here Comes Santa Foxy Christmas Rustic Winter Dies Snowy Hill Forest Scene Card by Eloise Blue

I used the Foxy Christmas stamp set for the sentiment and stamped it on the bottom snow drift. I adhered all my pieces together using foam tape and then popped them up onto a piece of patterned paper from the Holiday Cheer paper pack. 

Thanks so much for stopping by today and I'll see you all next week. 

Sunny Studio Supplies:

Holiday Cheer 6x6 Paper
Shop at:
Sunny Studio
Foxy Christmas Stamps
Shop at:
Sunny Studio
Here Comes Santa Stamps
Shop at:
Sunny Studio
Rustic Winter Dies
Rustic Winter Dies
Shop at:
Sunny Studio

Friday, October 12, 2018

Happy Owlidays Punny Holiday Card with Lexa

Hi everyone! Lexa here today with a holiday card featuring the brand new Happy Owlidays Stamps and the coordinating dies. I'm head over heels over this set, with three adorable owls and all the punny sentiments. No one can resist this one. Let's get started right away.

Sunny Studio Stamps: Happy Owlidays Holiday Cheer Paper Pad Punny Holiday Card by Lexa Levana

First, I stamped all of the images with Versafine ink and watercolored them with Distress markers. I couldn't decide which one was my favorite, so I used three of them together in one card. As I wanted to play with patterned paper today, I colored the owls with candy colors that coordinate well with the Holiday Cheer 6x6 Paper Pad

Sunny Studio Stamps: Happy Owlidays Holiday Cheer Paper Pad Punny Holiday Card by Lexa Levana

I created a little scene with the blue snowflakes background with the colorful stripes as accents. One of the owls looks like he popped up out of a gift box, isn't he so adorable? Some ornaments are hanging on a snowy tree branch. 

Sunny Studio Stamps: Happy Owlidays Holiday Cheer Paper Pad Punny Holiday Card by Lexa Levana

Of course I won't forget the jewels from Pretty Pink Posh to add sparkle to my holidays card. Since I always love puns I'm super excited with this Happy Owlidays Stamps, since I have a lot of choices! Yay!

That's all for today, thank you so much for stopping by today. I hope you all have an amazing day!

Sunny Studio Supplies Used:

Holiday Cheer 6x6 Paper
Shop at:
Sunny Studio
Happy Owlidays Stamps
Shop at:
Sunny Studio
Happy Owlidays Dies
Happy Owlidays Dies
Shop at:
Sunny Studio

Thursday, October 11, 2018

Rustic Winter Dies Christmas Luminary Card with Vanessa

Hi everybody! Vanessa here today with a luminary card using the Rustic Winter Dies. My card might look quite simple on first sight, but once you open it, it can be used as a pretty Christmas luminary.

Sunny Studio Stamps: Rustic Winter Dies Woodland Borders Christmas Luminary Card with Vanessa Menhorn

I started with a Kraft card base and decorated the front with the white die-cut silhouettes from Rustic Winter and Woodland Borders. Then I added gold foil stars. 

Sunny Studio Stamps: Rustic Winter Dies Woodland Borders Christmas Luminary Card with Vanessa Menhorn

To keep the card closed, I tied-on gold baker's twine and added an die-cut oval from the Stitched Oval Dies with a sentiment from Holiday Style.

Sunny Studio Stamps: Rustic Winter Dies Woodland Borders Christmas Luminary Card with Vanessa Menhorn

Now let's open the card to see the inside. I trimmed a piece of white cardstock slightly smaller than the card base and scored it to have four sections of the same size. 

Sunny Studio Stamps: Rustic Winter Dies Woodland Borders Christmas Luminary Card with Vanessa Menhorn

Now I die-cut a rectangle from the middle sections and attached the vellum and the silhouettes behind it. Then I adhered the piece, only applying tape to the two outer sections.

Sunny Studio Stamps: Rustic Winter Dies Woodland Borders Christmas Luminary Card with Vanessa Menhorn

Finally, I adhered the lying deer and more silhouettes to the open space behind the vellum window.

Sunny Studio Stamps: Rustic Winter Dies Woodland Borders Christmas Luminary Card with Vanessa Menhorn

Now you can put an electric tealight into the square and will have a cozy decoration that looks like this.

A very photo-heavy post today, but I hope you liked it! Thank you for stopping by!

Sunny Studio Supplies Used:

Holiday Style Stamps
Shop at:
Sunny Studio
Woodland Borders Dies
Shop at:
Sunny Studio
Rustic Winter Dies
Rustic Winter Dies
Shop at:
Sunny Studio
Stitched Oval Dies
Stitched Oval Dies
Shop at:
Sunny Studio

Wednesday, October 10, 2018

Foxy Christmas Arctic Fox Winter Themed Cards with Franci

Hi there, Franci here with you today showcasing the new Foxy Christmas set! I'm totally in love with these cuties. Foxes are some of my favorite wild animals and I especially love arctic foxes, which is why all my cuties here are white! 

Sunny Studio Stamps: Foxy Christmas Rustic Winter Stitched Ovals Arctic Fox Winter Themed Cards by Franci Vignoli

For my first card I went for a kind of vintage look. I created a frame out of dark kraft cardstock using the new Stitched Oval dies and I also die cut some snowy hills and some tree trunks, using the Woodland Borders dies and the Rustic Winter set.

Sunny Studio Stamps: Foxy Christmas Rustic Winter Stitched Ovals Arctic Fox Winter Themed Cards by Franci Vignoli

I created my card base out of white cardstock and I inked it up with some Distress inks. I glued all of the elements with liquid glue behind the frame and I adhered everything onto my card. I drew some snowflakes here and there to create a snowy effect and then I die cut, assembled, and glued down the little bow included in the new Santa's Stocking set.

Sunny Studio Stamps: Foxy Christmas Rustic Winter Stitched Ovals Arctic Fox Winter Themed Cards by Franci Vignoli

I stamped, colored, and die cut this cute foxy couple and I adhered them onto my card with foam tape. I colored a little strip of white cardstock red to coordinated with my bow, and I embossed my "Hello" sentiment and I stuck it in front of my snowy hills. Finally, I added some more details to my little scene with the white gel pen.

Sunny Studio Stamps: Foxy Christmas Rustic Winter Stitched Ovals Arctic Fox Winter Themed Cards by Franci Vignoli

For my second project I created a happy card with a traditional Christmas color scheme -  lots of white, greens and reds makes everything so festive! First, I die cut my frame out of this beautiful green pattern paper included in the new Holiday Cheer 6x6" paper pack using the Comic Strip Everyday die set. Then I die cut more snowy hills (like I did before) and I embossed my sentiment in gold on the center one. 

Sunny Studio Stamps: Foxy Christmas Rustic Winter Stitched Ovals Arctic Fox Winter Themed Cards by Franci Vignoli

I created my card base and inked the background with some blues, before gluing all of the snowy hills behind the frame and adhering everything onto my card. I stamped, colored and die cut lots of images and I started composing my scene. Once I was happy with the placement I glued everything down with a combo of liquid glue and foam tape.

Sunny Studio Stamps: Foxy Christmas Rustic Winter Stitched Ovals Arctic Fox Winter Themed Cards by Franci Vignoli

Finally, I drew my snow on the background, adding lots of details and some glitters here and there on the snow and on the little Santa's hat.

I hope you like my projects and thank you so much for stopping by today. I will see you soon with a new project featuring the new release!

Sunny Studio Supplies Used:

Comic Strip Everyday Dies
Shop at:
Sunny Studio
Woodland Borders Dies
Shop at:
Sunny Studio
Holiday Cheer 6x6 Paper
Shop at:
Sunny Studio
Foxy Christmas Stamps
Shop at:
Sunny Studio
Foxy Christmas Dies
Foxy Christmas Dies
Shop at:
Sunny Studio
Rustic Winter Dies
Rustic Winter Dies
Shop at:
Sunny Studio
Santa's Stocking Dies
Shop at:
Sunny Studio
Stitched Oval Dies
Stitched Oval Dies
Shop at:
Sunny Studio

Tuesday, October 9, 2018

Santa's Stocking Dies Felt Stitched Christmas Ornaments with Juliana

Hello friends! It's Juliana Michaels and today I'm going outside the paper crafting box a bit and using the brand new Santa's Stocking dies with felt to create a stocking Christmas ornament. 

Sunny Studio Stamps: Santa's Stocking Dies Fancy Frames Felt Stitched Christmas Ornaments by Juliana Michaels

It's been forever since I did any stitching or embroidery, but the Santa's Stocking dies inspired me to pull them out to create a festive handmade Christmas ornament. Every year, I love to create handmade ornaments as gifts and I know I'll be making quite a few more of these over the next few weeks!

Sunny Studio Stamps: Santa's Stocking Dies Fancy Frames Felt Stitched Christmas Ornaments by Juliana Michaels

The first thing I did was to die cut all the shapes from felt purchased at my local craft supply store. I also got matching embroidery thread for each color of felt. I die cut 2 of the main stocking piece and then one of the trim, toe and heel pieces. I also die cut some holly leaves and berries to embellish it. For the hanger, I used the ribbon slider die from the Fancy Frames Rectangles die set. I just trimmed off the holes, but you could also just cut a rectangle from the felt to use for your hanger.

Sunny Studio Stamps: Santa's Stocking Dies Fancy Frames Felt Stitched Christmas Ornaments by Juliana Michaels

Begin by adding stitching to the holly leaves and then sew them to the trim. Next, stitch the berries to the trim piece using french knots. Now it's time to stitch on the other pieces. The dies for the trim, heel and toe all have a stitched edge to them, so I used this as a guide to sew these pieces to one of the die cut stockings. Only stitch those edges to begin with.


Sunny Studio Stamps: Santa's Stocking Dies Fancy Frames Felt Stitched Christmas Ornaments by Juliana Michaels

Once that is completed, start stitching the two stockings together. Remember not to sew across the top of the stocking! I'll admit to forgetting this at first, so I had to remove a few stitches! For the final bit of sewing add the hanger to the back of the stocking.

Sunny Studio Stamps: Santa's Stocking Dies Fancy Frames Felt Stitched Christmas Ornaments by Juliana Michaels

I hope you enjoyed learning how to create this felt Christmas stocking ornament and how to use your dies for more than just paper crafting. I can't wait to create a few more of these and give them as gifts to my family and friends this Christmas. I'm pretty sure they'll be even more special when filled with some candy or even a gift card!


Sunny Studio Supplies Used:

Fancy Frames- Rectangles
Shop at:
Sunny Studio
Santa's Stocking Dies
Shop at:
Sunny Studio

Monday, October 8, 2018

Build A Tag Alpaca Christmas Tags with Eloise

Hi everyone, Eloise here and today I have some Christmas tags to share with you all. I used the new Build A Tag #1 Dies along with my favourite Alpaca Holiday stamp set.

Sunny Studio Stamps: Build A Tag Alpaca Holiday Christmas Tags by Eloise Blue

I started off by cutting the main tag shape from a piece of blue glitter cardstock. I then cut the toppers and bottom of the tags using some plain white cardstock. I adhered all the pieces together using foam tape. 

Next, I stamped out the images from Alpaca Holiday and coloured them in with Copic Markers. Since I tend to always use similar colour schemes, I decided to use a new one I found on Pinterest as inspiration. 


(Copic Markers Used: V15, V17, V09 / BV02, BV04, BV08 / YG01, YG23, YG17 / E40, E41, E42, E43, E44, E47 / R14, R24, R46 / E000, E00, E21 / R20 / Y13, Y35, YR24)

Sunny Studio Stamps: Build A Tag Alpaca Holiday Christmas Tags by Eloise Blue

Once the images were coloured, I used the coordinating dies to cut them out. I added foam tape onto the backs of each of the images and adhered them into place on each of the tags. 

For the sentiment, I white heat embossed the 'Winter Wishes' from Alpaca Holiday onto some black cardstock and cut them into banners. I threaded them through using some twine on the top of the tag and finished them off with a little yellow bow of twine as well. 

Thanks so much for stopping by today, I hope you enjoyed my tags today. See you next week.

Sunny Studio Supplies Used:

Alpaca Holiday Stamps
Shop at:
Sunny Studio
Alpaca Holiday Dies
Alpaca Holiday Dies
Shop at:
Sunny Studio
Build-A-Tag #1 Dies
Build-A-Tag #1 Dies
Shop at:
Sunny Studio