Wednesday, September 27, 2017

Inspiration Week: Introducing Polar Playmates & Playful Polar Bears

Hello there!  Welcome to Day four of our Winter Release Sneak Peeks!  We're only a couple more days from getting to ship these fun sets out to you!  Are you getting excited?  Today I have several happy sets for Winter that mix and match with each other beautifully! 

Card No. 1:  Up first I have a a fun red, white and blue card using our Playful Polar Bears.  For my background I started by stamping it with our Snow Flurries mini stamps using white pigment ink (without any embossing powder).  When it was dry, I inked on Mermaid Lagoon, Blueprint Sketch, Chipped Sapphire and Black Soot distress inks.  When that layer was dry, I then stamped the new Frosty Flurries and heat embossed them with white embossing powder.  As a final detail I used out new mini complimentary snowflake die that will be coming in all orders that ship out on Friday (including pre-orders)--More details coming on Friday.  ;)

The dies for these stamps are cool because they cut out the hands of the standing and sitting bears so they can hold the candy cane, mug, present or stocking (or endless other items from our other sets).  I completed my card by cutting a window with a circle die and heat embossing a sentiment from our Bundled Up stamps.
Sunny Studio Stamps Playful Polar Cool Yule Sledding Christmas Card by Mendi Yoshikawa

Card No. 2:  For my next card I used the darling walrus and seal from Polar Playmates Stamps, together with the penguin from Bundled Up.  The dies for this set are also unique in that the fishing hole doesn't cut the outside edge like a normal die, but was designed to have you stamp the image directly onto your card panel and then use the coordinating die to cut the inside edge to slip in critters, fish and fishing poles.  :)  Sunny Studio Stamps: Polar Playmates Seal, Penguin & Walrus Let's Chill Card by Mendi Yoshikawa

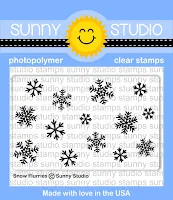
Card No. 3:  For this card I stared by stamping the Snow Flurries stamps on a piece of red cardstock and heat embossed them with white embossing powder.  These affordable background stamps are sized 2.75" wide which is exactly half the width of an A2 card.  The patterns have been created to quickly and easily repeat for perfect placement every time.  I know I created them, but I must say I've really fallen in love!  ;)

For my little scene I borrowed a fish for the stocking from the Polar Playmates set and the ice block from Snow Kissed.  For the sentiment I borrowed the "Merry Christmas" portion for Jolly Gingerbread set which I'll be sharing tomorrow.  I love how easy it is to mix and match the sentiments from our different sets.  
Sunny Studio Stamps Playful Polar Bears Beary Merry Christmas Card by Mendi Yoshikawa

Card No. 4: Up next is a card using the sweet walrus and igloo from Polar Playmates.  I used the coordinating die to make it look like my fish is being pulled up through the ice hole.  I once again borrowed the little Santa hat from the new Jolly Gingerbread set.  

I used an emboss resist technique for my snowy background by first heat embossing the Frosty Flurries stamps and then sponging on the ink.  There's a subtle difference in the look vs. stamping after inking up the background.  It sort of adds a subtle darker shadow around the dots for extra dimension.

I finished off my card with a sentiment from our Bundled Up Stamps and die-cut the end of my pennant using our Fishtail Banner Dies
Sunny Studio Stamps: Polar Playmates Santa Walrus Cool Christmas Card by Mendi Yoshikawa

Card No. 5:  This card utilized THESE awesome mirror block stamps together with my MISTI tool to flip one of the polar bears to created a bear couple (Jennifer McGuire shared a great tutorial on this technique HERE).  

I heat embossed my background with the Frosty Flurries stamps, inking only the center behind the bears and fading it to white.  I then added mittens from Bundled Up and a banner from our Sunny Borders set.  Some clear round drops by Studio Katia were the perfect finishing touch.
Sunny Studio Stamps Playful Polar Bears Life Without You is Unbearable Card by Mendi Yoshikawa

Card No. 6:  For this sweet card I did an emboss resist technique again with the Snow Flurries set, fading my Lilac ink to white before cutting the edge with our Stitched Scallop border dies.  For my little critters, I borrowed the hats from Jolly Gingerbread, the earmuffs from Bundled Up and the ice blocks from Snow Kissed.
Sunny Studio Stamps Polar Playmates Seal, Husky & Walrus Winter Birthday Card by Mendi Yoshikawa

Card No. 7:  I am so excited to share this last card!  I used those same Mirror Block stamps to stamp the reflection of my penguin from Snow Kissed with the bear from Playful Polar Bears using a grey ink.  I then used my Copic markers to color a lighter version of my critters and to add quick strokes, flicking on my icy colors from each side of my card to give the illusion of a reflective icy surface.  To help the ice standout again my sky, I then added a little snowy bank between the layers.  

My background was stamped with white pigment ink on white cardstock and then I inked up the entire background over the top with Tumbled Glass distress ink.  It's a great way to have a subtle print that doesn't compete so much with the rest of the images in your card.  A sentiment from Snow Kissed and an edge cut with our Fishtail Banners was a great finish to my little card.
Sunny Studio Stamps: Playful Polar Bears & Snow Kissed Penguin Ice Skating Christmas Card by Mendi Yoshikawa

I hope you've enjoyed today's look at the Playful Polar Bears, Polar Playmates, Frosty Flurries and Snow Flurries stamps.  Here's a full look at the new sets that will start shipping on Friday.  As part of our second birthday festivities this week, you can reserve yours today in our store HERE.  Plus use the promo code CELEBRATE to save 15%!

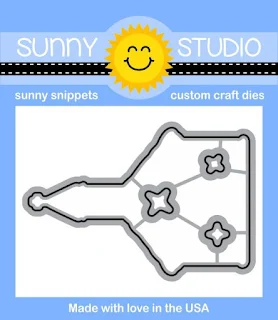
Please note:  The coffee mug die in this set was originally designed backwards by accident, but all dies have been repackaged to include a second mini cup die flipped the correct way.


Sunny Studio Stamps: Playful Polar Bears Winter 4x6 Clear Photopolymer Stamp Set     Sunny Studio Stamps: Playful Polar Bears Winter 4x6 Steel Rule Die Set

Sunny Studio Stamps: Polar Playmates Winter Seal & Walrus 4x6 Clear Photopolymer Stamp Set      Sunny Studio Stamps: Polar Playmates Winter 4x6 Steel Rule Die Set

Sunny Studio Stamps: Frosty Flurries Snow Mini 2x3 Background Stamp Set     Sunny Studio Stamps: Snow Flurries Mini Snowflake 2x3 Background Stamp Set

Other Sunny Studio Supplies Used:
Bundled Up Dies
Bundled Up Dies
Shop at:
Sunny Studio
Bundled Up Stamps
Bundled Up Stamps
Shop at:
Sunny Studio
Fishtail Banner Dies
Shop at:
Sunny Studio
Little Angels Dies
Little Angels Dies
Shop at:
Sunny Studio
Little Angels Stamps
Shop at:
Sunny Studio
Snow Kissed Dies
Snow Kissed Dies
Shop at:
Sunny Studio
Snow Kissed Stamps
Snow Kissed Stamps
Shop at:
Sunny Studio
Stitched Scallop Dies
Shop at:
Sunny Studio

Tuesday, September 26, 2017

Inspiration Week: Introducing Christmas Home & Christmas Chapel

Hello & Welcome to Day 3 of our Holiday Sneak Peeks!  Today I'm exited to be sharing ideas using our new Christmas Home and Christmas Chapel stamp sets.  I am a huge sucker for cute house images so I could resist creating a holiday companion to our previously released Happy Home and City Streets sets.  In fact this set comes with some lights and garlands that can be added to those sets to expand their versatility.  ;)

Card No. 1: For my first card I wanted to experiment with the beautiful snowy glow of a scene at twilight.  For my background, I started by stamping my fence and then masked it off before inking on some Lawn Fawn Butter ink, followed by Spun Sugar, Tumbled Glass and Shaded Lilac distress inks.  I then remove the masks and filled in the small spaces around my fence posts using a copic marker to match the inking. To add a little interest to my scene, I popped up center on a stitched die-cut frame and I love the results!
Sunny Studio Stamps: Christmas Home From Our House To Yours Card by Mendi Yoshikawa

Card No. 2: For this card our new mini Christmas Chapel stamps take center stage. My church windows were colored with my Copic markers to create the appearance of lights turned on inside.  I wanted to cast that same glow to the sky the little chapel by inking the surrounding background with more of the Lawn Fawn Butter ink.    Next I stamped my sentiment in Verafine Black Onyx ink using our new Festive Greetings set.  I really wanted it to fit my vertical space though so I carefully cut the sentiment apart to stack together in this new way. ;)

I cut two slopes from white cardstock and stamped my entire background with our new Frosty Flurries stamps and heat embossed the flakes with a clear glittery embossing powder, making sure to wipe off my stamp around my sentiment. I then added liquid applique sprinkled with clear glitter to the edges of my slopes.  For those not familiar, this product dries and puff up to look like snow when heated with a heat gun.

As a final finishing touch I stamped the tree branches from Holiday Style to put in the foreground.  I then quickly fussy cut the edge and inked up the the spaces between with Tumbled Glass distress ink to match my sky.  :)


Sunny Studio Stamps: Christmas Chapel Joy To The World Snowy Church Card by Mendi Yoshikawa

Card No. 3: For my next card I was inspired by a customer's gorgeous card using our Happy Home set which was shared HERE.  I loved the idea of creating a colored focal point!  I used my MISTI tool to stamp portions of my scene twice so that I could simply punch out the circle, color the scene and add it over the top of the B&W portion.  I then used my W1 and W0 Copic Markers to add some simple shading to the monochromatic portions of my scene.
Sunny Studio Stamps: Christmas Home "At Christmas, All Roads Lead Home" Card by Mendi Yoshikawa

Card No. 4:  For this card I used our Sunny Semi Circle Dies to create an arched frame around my Christmas Chapel.  I inked up my sky using Salty Ocean, Blueprint Sketch, and Chipped Sapphire distress inks.  When they were really dry, I randomly stamped and heat embossed the three little stars from the set, adding Diamond Stickles to some of the larger ones.  My sentiment stamped on the banner from our Sunny Borders stamp set completes my card.
Sunny Studio Stamps: Christmas Chapel Blessings Church Card by Mendi Yoshikawa

Card No. 5:  For this last card I just really wanted to create a scene with cool tones and small pops of red.  I stamped my snowy background using our Frosty Flurries stamps and then added Stardust Stickles to my snowy portions on the trees and house rooftops for a bit of sparkle.
Sunny Studio Stamps: Christmas Home Neighborhood Home For The Holidays Card by Mendi Yoshikawa

Card No. 6:  For my last card I created a little gift enclosure for a small card to include with some baked goodies for our neighbors at the holidays.  I paired the Christmas Home images with a darling 3-3/4" x 3-3/4" scalloped card die set by Papertrey Ink (found here).  When I was done I slipped some chiffon ribbon through one of the holes so that it can be tied onto the gift.


Sunny Studio Stamps: Christmas Home Neighbor Gift Enclosure Holiday Card

I hope you've enjoyed today's look at the Christmas Home and Christmas Chapel stamps and dies.  Here's a full look at the new sets that will start shipping on July 29th.  As part of our second birthday festivities this week, you can reserve yours today in our store HERE.  Plus use the promo code CELEBRATE to save 15%!


Sunny Studio Stamps: Christmas Home house themed winter holiday 4x6 clear photopolymer stamps      Sunny Studio Stamps: Christmas Home house themed winter holiday steel rule dies

Sunny Studio Stamps: Christmas Chapel church themed winter holiday 2x3 clear photopolymer stamp set      Sunny Studio Stamps: Christmas Chapel church themed winter holiday steel rule dies

Other Sunny Studio Supplies Used:
City Streets Stamps
City Streets Stamps
Shop at:
Sunny Studio
Fishtail Banner Dies
Shop at:
Sunny Studio
Happy Home Stamps
Happy Home Stamps
Shop at:
Sunny Studio
Holiday Style Stamps
Shop at:
Sunny Studio
Sunny Borders Stamps
Shop at:
Sunny Studio
Sunny Semi Circles Dies
Shop at:
Sunny Studio
Festive Greetings Stamps
Shop at:
Sunny Studio
Frosty Flurries Stamps
Shop at:
Sunny Studio

Monday, September 25, 2017

Inspiration Week: Introducing Petite Poinsettis & Festive Greetings

Hello there!  Thank you to everyone who joined us for our birthday blog hop this weekend.  For any of you who haven't had a chance to hop, there's still time to leave comments at each of the blogs today for your chance to win one of twelve $25 gift codes to our online store.  :)

I'm so excited to continue our inspiration week all this week leading up to our official release on September 29th!  Today I'm showcasing our new color layering Petite Poinsettias stampsdies and the companion 3x4 Festive Greetings sentiment stamps

Card No. 1: For my first card I combined a mixture of pink and red poinsettias to form a wreath on my 5" wide circular card base. After all my flowers were adhered, I heat embossed my sentiment in center with white embossing powder and added thin lines of stardust Stickles glitter glue down the veins of my flowers for a bit of extra sparkle.  I love the way the flowers pop against the black cardstock!
Sunny Studio Stamps: Petite Poinsettias & Festive Greetings Poinsettia Christmas Card by Mendi Yoshikawa

Card No. 2: For my next card I went more traditional, adding some greenery behind my poinsettias using the branch from Holiday Style.  I then sponged in some tumbled glass distress ink behind it and added a white machine stitched band over the top which had been stamped with my sentiment.  For my poinsettias, I used different brands of red glitter embossing powder for the last detailed layer.  Some scattered clear sequins completed my card.
Sunny Studio Stamps: Petite Poinsettias & Festive Greetings Poinsettia Christmas Card by Mendi Yoshikawa

Card No. 3: For this card my design was inspired by a beautiful card by Dawn McVey shared here. I love how she created an arc to hug her sentiment using the flowers!  I started by stamping my sentiment just above the center mark on the right side of my card.  For my leaves, I loosely laid out my flowers and then stamped the leaves directly onto my card base which made my card come together so much quicker. After I was done adhering my flowers I topped the centers with some glossy accents and set them aside to dry.  A simple scalloped border along the bottom of my card using our Stitched Scallop Border dies was the perfect finishing touch to dress up this clean and simple card.
Sunny Studio Stamps: Petite Poinsettias & Festive Greetings Poinsettia Christmas Card by Mendi Yoshikawa

Card No. 4:  I thought it would be fun to experiment with colors so for this card I went with sort of a rose gold look with my Poinsettias.  I must confess... I attend a monthly club at my local craft store and I created this for a card challenge where I was asked to create a card using the Pink Paislee star print vellum and the wood letter "W" so those items inspired my color scheme and design.  With that in mind I used our Heartfelt Wishes stamps to complete my sentiment with my designated letter and covered the letter with glittery embossing powder.
Sunny Studio Stamps: Petite Poinsettias & Heartfelt Wishes Christmas Card by Mendi Yoshikawa

For my last card of the day I turned to the same tree bough stamp from Holiday Style, taking turns to mask off the spot under my flowers so that I could stamp the branch from both the top and bottom.  I trimmed my panel down to be 5-1/4" wide x 4" high and stitched around the edge before adding them to a red A2 sized card base.

I then added some berries from our Autumn Splendor set and placed my three poinsettias on top.  When everything had been adhered, I used my MISTI tool to stamp my sentiment using VersaFine Black Onyx ink because I wasn't taking any chances at messing it up. ;)

As a final finishing touch, I added some glossy accents to my berries and set it aside to dry.  I love the shine it gave them!  As an added bonus it also made the berry color deeper and richer so they would pop behind my red poinsettia stamped in the same colors.
Sunny Studio Stamps: Petite Poinsettias & Festive Greetings Poinsettia Christmas Card by Mendi Yoshikawa

I hope you've enjoyed this closer look at our new Petite Poinsettias set.  You can download a printable PDF layering guide to help you line up your stamps HERE.

I frequently am asked which ink colors I used for my layered images.  While I think there are so many great options out there that can provide good results, these are the colors I used today for my stamped images...

Pink Poinsettias
Colorbox Bubblegum
Hero Arts Cotton Candy
Hero Arts Pale Tomato

Pink and Red Poinsettias
Hero Arts Cotton Candy
Hero Arts Pale Tomato
Colorbox Fireberry


Red Poinsettias
Hero Arts Pale Tomato
Colorbox Blossom
Colorbox Cranberry


Gold Poinsettias
Hero Arts Soft Sand
Papertrey Ink Fine Linen
Papertrey Ink Classic Kraft
Umbrella Crafts Tanned Leather (for centers)


Green Leaves
Colorbox Kiwi
Colorbox Grasshopper


Sage Leaves
Hero Arts Field Greens
Colorbox Golf Course


Here's a full look at the new 4x6 Petite Poinsettias & 3x4 Festive Greetings sets featured today.  These will begin shipping on July 29th, but in honor of our second birthday festivities this week, you can reserve yours today in our store HERE.  Don't forget to use the code "CELEBRATE" to save 15% off on all your orders too.


Other Sunny Studio Supplies Used:


Autumn Splendor Dies
Shop at:
Sunny Studio
Autumn Splendor Stamps
Shop at:
Sunny Studio
Heartfelt Wishes Stamps
Shop at:
Sunny Studio
Holiday Style Dies
Holiday Style Dies
Shop at:
Sunny Studio
Holiday Style Stamps
Shop at:
Sunny Studio