Wednesday, July 6, 2016

Baby Bear Baby Shower Card with Lindsey

Hi, Lindsey here today and I am so happy to be sharing a baby card using one of the adorable new stamp sets, Baby Bear. This set is just too cute! It has tons of precious little baby accessories and of course, little baby bears!  Let's get started on how I created this card.
Sunny Studio Stamps: Baby Bear & Rain or Shine Baby Bundle & Umbrella Card by Lindsey Sams

To begin, I cut a few A2 stitched rectangles. I used one as my card base and used a couple of others to create the clouds. I cut three layers of clouds, each one shorter than the next. On my card base rectangle, I blended some light pink ink coming out from behind the clouds. I thought this would be sweet since this is a baby girl card. 

I stamped the little bear in the blanket and an umbrella from an older set, Rain or Shine. I colored them both with Copic markers and added some details with at white gel pen. I cut the bear out using the coordinating Baby Bear dies, and I fussy cut the umbrella. I adhered the two of them together. I just thought it was so cute to have the umbrella dropping the baby bear into the clouds. 

I used one of the many sentiments from the baby bear set and stamped it on the front cloud in the same pink I had blended in the background. Then it was time to put the card pieces together. I popped the bear and umbrella up with a little foam tape. Finally I added some stars from the Star Border Die and some sequins for a little sparkle.

Sunny Studio Stamps: Baby Bear & Rain or Shine Baby Bundle & Umbrella Card by Lindsey Sams

That's it for me today. I hope you'll continue checking back to the blog for more inspiration using this adorable new release. Thanks for reading and have a great day!


Tuesday, July 5, 2016

Sweet Shoppe: Sweet Birthday Wishes by Anni

Hey stampers, Anni here! 

Isn't the new release F-A-B-U-L-O-U-S? And I am starting with my absolute favorite stamp set of all time: Sweet Shoppe! I LOVE LOVE LOVE the images in this set! So much fun to color... And the Sweet word die is just the perfect addition.


Sunny Studio Stamps: Sweet Shoppe Sweet Birthday Wishes Ice Cream Cone Card by Anni.

A few days ago I bought some cardstock. I just grabbed the colors I liked but when I stood in the line to pay I just realized what a great color combo it was. That was the inspiration for today's card.

I started with stamping the images on Strathmore 300 Bristol Smooth cardstock - the perfect paper for coloring with colored pencils. I use Prismacolors and Polychromos, I like them both and can't choose a favorite. I colored the images and added some highlights with a white gel pen.

Then I fussy cut the images (there are matching dies available too - I am just one of the weird persons that like to fussy cut).


Sunny Studio Stamps: Sweet Shoppe Sweet Birthday Wishes Ice Cream Cone Card by Anni.

For the sentiment I die cut the Sweet word from cream cardstock several times and stacked them up for more dimension.  For my card base I choose some patterned paper. I don't use that much patterned paper but this one fits perfectly I think. It was subtle enough to stamp the rest of the sentiment directly on it.  I finished the card by adding some Wink of Stella to the die cut word.

Thanks for stopping by and have a sunny week.


Monday, July 4, 2016

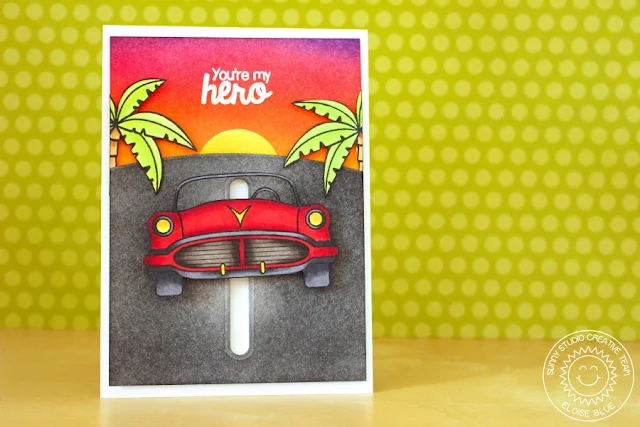
Interactive Slider Car Father's Day Card with Eloise

Hello everyone, Eloise here and today I have a fun slider Father's Day card featuring the new Sock Hop stamp set along with a couple of stamps sets from the past release - Island Getaway and Stars and Stripes. I was really inspired to make this card for my Dad for Father's Day, since he loves old cars and I think this car image is perfect for a interactive card. 

Sunny Studio Stamps: You're My Hero Slider Car Card by Eloise Blue (using Sock Hop, Stars & Stripes & Island Getaway)

To begin my card today I stamped out my images from the Sock Hop and Island Getaway stamp sets and used my Copic Markers to colour them in. I then fussy cut out the images with some scissors right along the black line.

I then moved on to creating my scene. For my background I used various colours of Distress Inks to create a sunset, I like to blend on watercolour cardstock because I find it gives a nicer blend. Once I blended the sunset, I used a yellow Distress Ink to make a sun on a separate bit of watercolour paper and then used the circle die from the Fresh and Fruity Coordinating Dies to cut it out. Once that bit was done I cut another piece of watercolour cardstock down and used a curved die to cut the curve on the top of the piece of paper - you could use scissors to do that too. I then took a grey and black Distress Ink to colour the curved piece to look like a road.


Sunny Studio Stamps: You're My Hero Slider Car Card by Eloise Blue (using Sock Hop, Stars & Stripes & Island Getaway)

Once my ink blending was complete it was time to make the interactive portion of my card. I used a die to cut the the strip in the center of my black ink blended panel, but you could also use a exacto knife and a ruler to create the opening also - I just had a die so I used it. Once that was cut out of the panel I cut some squares of cardstock, adhered and layered them all up to create high enough block to allow my car to slide through - you could also use a coin or something else to do this, but I didn't want my car to slide without actually physically moving it myself. I then took the 'You're My Hero' sentiment from the Stars and Stripes stamp set and white heat embossed it onto my sunset panel in the center towards the top. Now it was time to put my card together.

I started off with adhering the sun flat onto the background also in the center. I then took the two palm trees I stamped, coloured and cut and then foam mounted them onto each sides of the card and cut off the excess. I then used some foam adhesive to pop up my black ink blended panel. But before I adhered it down to my card I cut a strip of white cardstock and placed it under the ink blended panel between the foam adhesive but so I could see it through the die cut strip in the cardstock. I then adhered down my square block onto that white strip and then adhered my coloured car on top of that square block piece. Now I could adhere down the black ink blended piece onto the card base and that finished up my card for today.

I hope you enjoyed my card today and got inspired to create an interactive card, they are so super fun to make! Make sure you check out the blog the rest of the week for more fabulous cards by the design team!

- Eloise

Sunny Studio Products Used:

Saturday, July 2, 2016

Sunny Studio Share: Customer Fruity Summer Cards


Hello everyone!  Thank you so much for making our release week so fun!  I appreciate all the sweet comments that were left--They truly mean so much to me!  Make sure to check out my post below to see if you're a winner of one of the $20 gift certificates.  :)

I thought I would pop in and share a handful of beautiful customer cards that caught my eye this week...  

Tropical Paradise Card by Vanessa (@vanessa.amann on instagram)


Sunny Studio Stamps: Tropical Paradise Card by Vanessa

Fresh & Fruity Cards by Gracie (@gracielliedesign on instagram)


Sunny Studio Stamps Fresh & Fruity Strawberry Card by Graciellie Design

Sunny Studio Stamps Fresh & Fruity Card by Graciellie Design

Sunny Studio Stamps Fresh & Fruity Watermelon Card by Graciellie Design

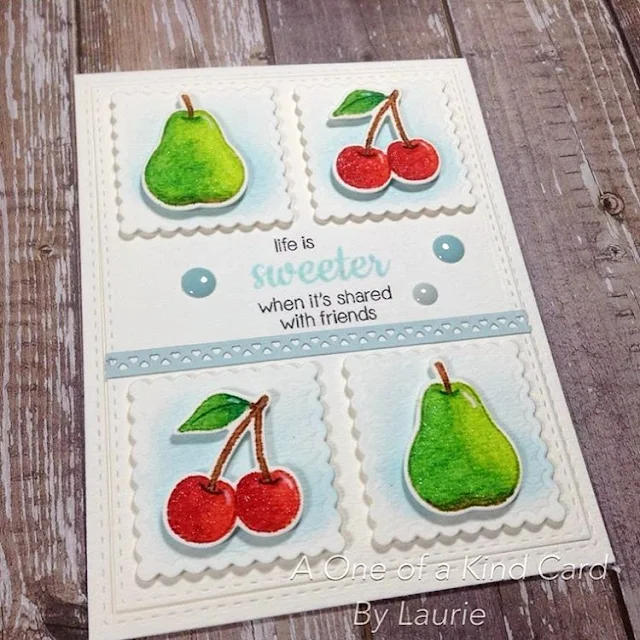
Fresh & Fruity Card by Laurie C. (@crazycardlady on instagram)


Sunny Studio Stamps: Fresh & Fruity Card with no line coloring by Laurie C.

Tropical Paradise Pineapple Card by Rachel Bergfeld (@rbergfeldcarddesigns on instagram)


Sunny Studio Stamps: Tropical Paradise Pineapple Card by Rachel Bergfeld

Tropical Paradise Flamingo Card by Rachel Bergfeld (@rbergfeldcarddesigns on instagram)

Sunny Studio Stamps: Tropical Paradise Flamingo Card by Rachel Bergfeld

Thank you ladies for sharing your talents with us!

I can't wait to see what you all create with our newest stamps and dies!!!  Don't forget to tag us with the hashtag #sunnystudiostamps and share your beautiful projects with us on Instagramour facebook page or in our flickr group!  

July Inspiration Week Winners!

Rafflecopter has randomly selected the following five winners from each of our giveaways this past week:  

  • Kimberly Bliss Rendino
  • Julene VanKleeck
  • Iris Esther Lopez Bartolomei
  • Kelli Horger
  • Lisa Bankes-Lahiff

Thank you to everyone who stopped by and left comments for here, at instagram and on our facebook page.  I read each and every one of them.  Your sweet support truly brightened my week and means so much to me!  <3