Showing posts with label Woodland Borders. Show all posts

Saturday, November 14, 2020

Holy Night Card with Juliana

Hello Sunny Studio friends! It's Juliana and happy to be here with you today as a guest on the Sunny Studio Blog. Today I'm sharing a Christmas card I created using the Holy Night Stamp Set.

Sunny Studio Stamps: Holy Night Stitched Semi-Circle Dies Woodland Borders Christmas Card by Juliana Michaels

To get started, I stamped and colored all of the images I wanted to use from the Holy Night Stamp Set using Copic Markers. I then die cut them using the coordinating die set.

For the background behind the nativity scene, I ink blended a piece of white cardstock using Distress Ink in Blueprint Sketch going darker toward the edges and lighter toward the center. Next, I die cut another piece of white cardstock using the largest of the Stitched Semi-Circle Dies. I layered this on top of the ink blended background and then began laying out the images to create the scene.

Sunny Studio Stamps: Holy Night Stitched Semi-Circle Dies Woodland Borders Christmas Card by Juliana Michaels

At this point, I felt like the design needed a little more interest, so I die cut some trees from black cardstock using the Woodland Border Dies. Then I die cut a piece of white cardstock using the grass die from the Comic Strip Everyday Dies and colored it with Copic Markers to look like straw. I adhered this behind the creche and then began layering the stamped images to complete the Nativity scene.

For the final step I stamped the sentiment onto a strip of white cardstock and tucked it behind the animals.

Thanks so much for stopping by today and I hope you enjoyed this bit of inspiration using the  Holy Night Stamp Set.

Sunny Studio Supplies Used: 

Comic Strip Everyday Dies
Shop at:
Sunny Studio
Woodland Borders Dies
Shop at:
Sunny Studio
Stitched Semi-Circle Dies
Shop at:
Sunny Studio
Holy Night Stamps
Holy Night Stamps
Shop at:
Sunny Studio
Holy Night Dies
Holy Night Dies
Shop at:
Sunny Studio

Wednesday, August 5, 2020

Sealiously Sweet Cards with Tammy and Ana

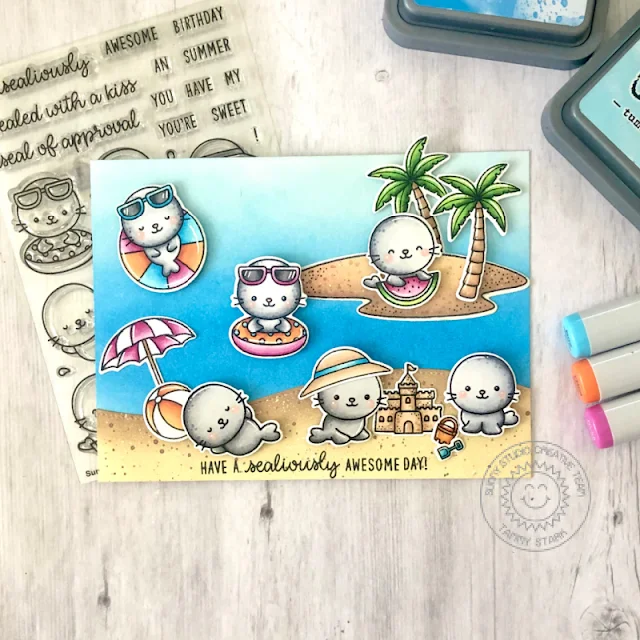
Hi Friends! Tammy here sharing this sweet card, featuring the cuties from the adorable Sealioulsy Sweet Stamp Set.

Sunny Studio Stamps: Sealiously Sweet Tropical Scenes Beach Babies Summer Themed Card by Tammy Stark

To begin, I created an A6 card, so I cut my Bristol smooth cardstock to 4 1/2 X 6 1/4". I ink blended the background with Salty Ocean and Tumbled Glass Distress Oxide inks. Next, I cut a border using the Woodland Borders Dieand used Antique Linen and Vintage Photo Distress Oxide inks to create a sandy beach. I splattered some watered down brown and white acrylic paints onto it with a paintbrush to add some interest to the sand, and attached it to the inked background.


Next, I stamped, colored with Copic markers, and die cut images from the following sets:
Sealiously SweetCoordinating Dies

Tropical ScenesCoordinating Dies

Beach BabiesCoordinating Dies


Sunny Studio Stamps: Sealiously Sweet Tropical Scenes Beach Babies Summer Themed Card by Tammy Stark


I stamped the sentiment from Sealiously Sweet in black ink along the bottom of my card. I then arranged the images onto my card, attaching some with foam adhesive for dimension. To finish my card, I adhered the completed card front to a white 4 1/2 X 6 1/4" card base.


Thanks so much for stopping by today! See you next time!!


--------------------------------------------------------

Hello friends! It’s Ana today sharing a summer card featuring super adorable Sealiously Sweet stamps and coordinating dies and Stitched Semi-Circle dies.

Sunny Studio Stamps: Sealiously Sweet Stitched Semi-Circle Dies Summer Themed Card by Ana Anderson

I wanted to create 3 summer pools for these sweet seals and decided to use the smallest Stitched Semi-Circle die for the 3 openings. I couldn’t fit all 3 on standard A2 size card, so I customized the size to fit the design. The card base measures 7.5” x 3.75” and background is about 1/8” smaller.

Once I cut the openings, I backed them with wave patterned paper from Summer Splash paper pack. I stamped the adorable seals from Sealiously Sweet set and colored them with Copic markers, then used coordinating dies to cut them out.

Sunny Studio Stamps: Sealiously Sweet Stitched Semi-Circle Dies Summer Themed Card by Ana Anderson

On a piece of black cardstock, I white heat embossed the sentiments and trimmed them into strips the same length as the width of the background. I added the embossed sentiments with foam tape, then adhered the seals also using foam tape. To embellish the card, I added Clear droplets and highlights with white gel pen and my card was finished.

Aren’t these little seals playing in the water just the cutest ever!? I just love how cute this card turned out and I hope I’ve inspired you to create little seal triple pool party as well!

Thank you so much for spending time with us today! I hope you have a wonderful week!

Sunny Studio Supplies Used:

Beach Babies Stamps
Beach Babies Stamps
Shop at:
Sunny Studio
Beach Babies Dies
Beach Babies Dies
Shop at:
Sunny Studio
Woodland Borders Dies
Shop at:
Sunny Studio
Summer Splash 6x6 Paper
Shop at:
Sunny Studio
Sealiously Sweet Stamps
Shop at:
Sunny Studio
Sealiously Sweet Dies
Shop at:
Sunny Studio
Tropical Scenes Stamps
Shop at:
Sunny Studio
Tropical Scenes Dies
Shop at:
Sunny Studio
Stitched Semi-Circle Dies
Shop at:
Sunny Studio

Tuesday, July 28, 2020

Crusin' Cuisine Cards with Angelica and Juliana

Hi friends. This is Angelica, and today I have a fun summer card, featuring the Cruisin' Cuisine stamp set.

Sunny Studio Stamps: Cruisin' Cuisine Sliding Window Dies Heartstrings Border Dies Summer Themed Card by Angelica Conrad

I started by coloring the stamped images with Copic Markers, then used the coordinating dies to die-cut them. Next, I made a panel to hold a gift card. I used the Sliding Window Die to die-cut Gingham Pastels Pattern Paper. I put the panel together, following a Jennifer McGuire YouTube tutorial. I used a small Stitched Arch die cut for my pull tab, and added a cute pink Heartstrings Border Dies heart for a fun detail. 

Sunny Studio Stamps: Cruisin' Cuisine Sliding Window Dies Heartstrings Border Dies Summer Themed Card by Angelica Conrad

The sentiment comes from Radiant Plumeria stamp set. I white heat-embossed the sentiment onto white card stock, and blended Spun Sugar and Crushed Pistachio Distress oxide inks onto the panel.

Thanks so much for joining me today. I hope I have passed on some crafty inspiration!

---------------------------------------------------------------

Hello Sunny Studio friends! It's Juliana and today I'm sharing a card featuring the Cruisin' Cuisine Stamp Set. I couldn't help but to combine it with the Beach Babies Stamp Set to create a fun summer themed card.

Sunny Studio Stamps: Cruisin' Cuisine Beach Babies Sunny Sentiments Fluffy Cloud Border Dies Summer Themed Card by Juliana Michaels

I began by stamping and die cutting images from the Cruisin' Cuisine, Sunny Sentiments and Beach Babies Stamp Sets. I colored them with Copic Markers and then die cut them using the coordinating die sets.

Sunny Studio Stamps: Cruisin' Cuisine Beach Babies Sunny Sentiments Fluffy Cloud Border Dies Summer Themed Card by Juliana Michaels

For the background, I die cut a piece of green grass patterned paper from the Spring Fling Paper Pad using one of the Woodland Border Dies. For the clouds, I die cut 3 pieces of cardstock using the Fluffy Clouds Border Dies and used them as a mask. I used Tumbled Glass Distress Ink with a foam blending tool to ink a piece of Bristol Smooth Paper. I then die cut this entire piece using the stitched frame from Frilly Frames Retro Petal Die and layered this entire piece onto a piece of pink patterned paper from the Summer Splash Paper Pad.

I hope you enjoyed this bit of inspiration using the Cruisin' Cuisine Stamp Set and how I created a fun summer scene with it. Thanks so much for stopping by today!

Sunny Studio Supplies Used:

Sunny Sentiments Dies
Shop at:
Sunny Studio
Sunny Sentiments Stamps
Shop at:
Sunny Studio
Beach Babies Stamps
Beach Babies Stamps
Shop at:
Sunny Studio
Beach Babies Dies
Beach Babies Dies
Shop at:
Sunny Studio
Sliding Window Dies
Sliding Window Dies
Shop at:
Sunny Studio
Woodland Borders Dies
Shop at:
Sunny Studio
Gingham Pastels 6x6 Paper
Shop at:
Sunny Studio
Summer Splash 6x6 Paper
Shop at:
Sunny Studio
Fluffy Clouds Border Dies
Shop at:
Sunny Studio
Frilly Frames Retro Petals Dies
Shop at:
Sunny Studio
Heartstrings Border Dies
Shop at:
Sunny Studio
Spring Fling Paper
Spring Fling Paper
Shop at:
Sunny Studio
Cruisin' Cuisine Stamps
Shop at:
Sunny Studio
Cruisin' Cuisine Dies
Shop at:
Sunny Studio
Radiant Plumeria Stamps
Shop at:
Sunny Studio

Wednesday, July 22, 2020

Radiant Plumeria Cards with Tammy and Ana

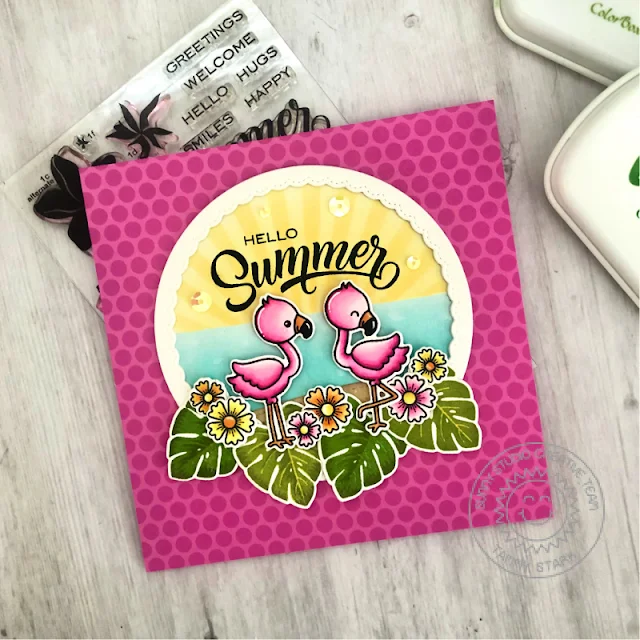
Hi friends! Tammy here! Today, I'm sharing this fun and bright card (grab your sunglasses), featuring Radiant PlumeriaI used the gorgeous plumeria leaves from the set and paired it with the Fabulous Flamingos for a tropical vibe that screams summer...where's my cocktail? Lol.

Sunny Studio Stamps: Radiant Plumeria Fabulous Flamingos Fancy Frame Dies Woodland Border Dies Summer Themed Card by Tammy Stark

My card is a 5 1/2" square card, so I began by cutting the bright pink paper from the Polka-Dot Parade 6X6 Paper and adhering it it a 5 1/2" white card base. Next, using the Fancy Frames Circle DiesI cut a frame from white cardstock three times, stacking together for dimension. I then cut a 4" circle from Bristol Smooth cardstock, and inked the top with Scattered Straw Distress Oxide ink. The rays were created by lightly inking Wild Honey Distress Oxide with a stencil. 

Next, I masked off the top of the circle, and ink blended Tumbled Glass and Peacock Feathers to create the water. Using the Woodland Borders DieI cut some kraft cardstock, and lightly inked the top with Vintage Photo ink to create the sand. I cut that to fit along the bottom of the circle background, attached the frame on top of it, and adhered to the card front.

Sunny Studio Stamps: Radiant Plumeria Fabulous Flamingos Fancy Frame Dies Woodland Border Dies Summer Themed Card by Tammy Stark

Next, I stamped, colored with Copic markers, and die cut images from the following sets:
Fabulous FlamingosCoordinating Dies

Copic Colors: Flamingos: RV000, RV10, RV02, RV04, RV09, YR15, YR12; Flowers: (pink) RV04, RV02, RV10, RV000, (yellow) Y15, Y13, Y11, Y00, (orange) YR04, YR15, YR12; Plumeria Leaves: various green ink pads

I stamped the Hello Summer sentiment from Radiant Plumeria onto the framed circle with black ink, then arranged the stamped images, attaching with foam tape for dimension. To finish my card, I added some yellow sequins from the Summer Fusion Sequins to add a bit of sparkle!

Thanks so much for stopping by! Have a wonderful day!

-------------------------------------------------------------

Hi friends! It’s Ana today sharing a card showcasing Radiant Plumeria stamps and coordinating dies as well as Stitched Semi Circle dies and Summer Splash paper pack.

Sunny Studio Stamps: Radiant Plumeria Stitched Semi Circle Dies Summer Themed Card by Ana Anderson

I started by choosing patterned papers for the background, die cut the stitched semi-circle window opening (using Stitched Semi Circle die), then white heat embossed the sentiment from Radiant Plumeria set to the bottom. I inked a piece of white cardstock with Broken China distress ink and adhered it to the back of the semi-circle opening.

I stamped the plumerias next, starting with pink layers first starting with Sparkling Rose and Ballet Slipper mini inks (from Pink Fresh Studio Fairy dust set), then continued with yellow layers Lemon Whip, Sunshine and Sweet Mustard inks (from PFS Rise and Shine ink cube set), then used PFS Over the Hills ink cube set for the leaves.

Sunny Studio Stamps: Radiant Plumeria Stitched Semi Circle Dies Summer Themed Card by Ana Anderson

Once the images were stamped and dry, I die cut them with Radiant Plumeria coordinating dies, then arranged them inside the semi-circle window opening. I embellished with glass droplets from Clear Drops Mix and my card was finished!

I just love all tropical florals and these beautiful plumerias are my very favorite. Thank you so much for stopping by today, I'll see you next week and until then I wish you all happy crafting!

Sunny Studio Supplies Used:

Fancy Frames-Circle Dies
Shop at:
Sunny Studio
Polka-dot Parade 6x6 Paper
Shop at:
Sunny Studio
Woodland Borders Dies
Shop at:
Sunny Studio
Fabulous Flamingos Stamps
Shop at:
Sunny Studio
Fabulous Flamingos Dies
Shop at:
Sunny Studio
Summer Splash 6x6 Paper
Shop at:
Sunny Studio
Radiant Plumeria Stamps
Shop at:
Sunny Studio
Radiant Plumeria Dies
Shop at:
Sunny Studio
Stitched Semi-Circle Dies
Shop at:
Sunny Studio

Wednesday, July 8, 2020

Designers Choice Cards with Tammy and Ana

Hi friends! Tammy here sharing this fun under the sea card. I LOVE underwater themed cards, so I combined some of my favorites, Best Fishes and Sea You Soon to create today's card.

Sunny Studio Stamps: Best Fishes Sea You Soon Stitched Arch Dies Woodland Border Dies Summer Themed Card by Tammy Stark

To begin, I cut a rectangle from the Summer Splash Paper. I then cut out a window using the largest die from the Stitched Arch Dies. Next, I created my background by ink blending Blueprint Sketch, Mermaid Lagoon, Peacock Feathers, and Tumbled Glass Distress Oxide inks. I splattered some water droplets onto my background and blotted up to create some interest to the water. I created the sandy border by cutting a piece of Bristol cardstock with the Woodlands Borders Die, ink blending with Antique Linen and Vintage Photo Distress Oxide inks, and attached to my inked background. Next, I adhered my wave patterned paper over my background, using foam tape for dimension.

I stamped, colored with Copic markers, and cut out the images from the following sets: Best FishesCoordinating Dies, Beach BabiesCoordinating Dies, Sea You SoonCoordinating Dies

Sunny Studio Stamps: Best Fishes Sea You Soon Stitched Arch Dies Woodland Border Dies Summer Themed Card by Tammy Stark

I arranged my under the sea critters onto my card and attached some with foam tape for dimension and stamped the sentiment from Best Fishes along the bottom of my card with black ink. To complete my card, I added some Sparkling Clear Crystals to create some bubbles. Finally, I attached my completed card front to a white A2 card base.

Thanks so much for stopping by...SEA you next time! ;)

---------------------------------------------------------

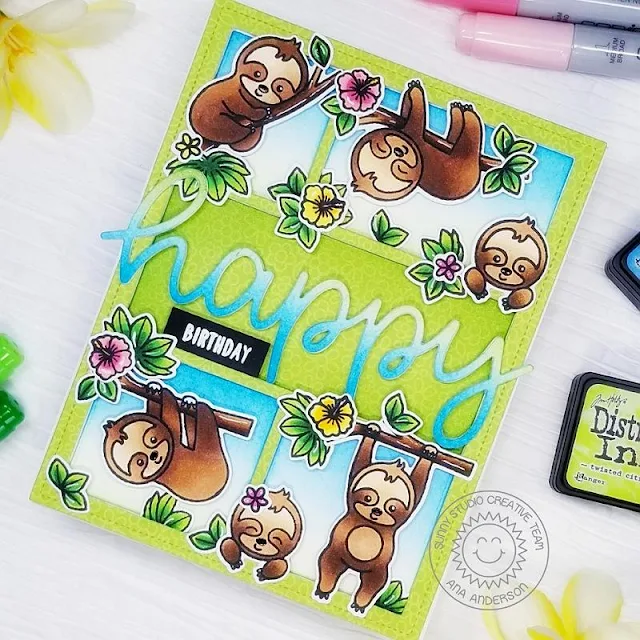
Hello crafty friends! It’s Ana today with a super sweet birthday card featuring Silly Sloths stamps and diesComic Strips Everyday dies as well as Happy word die and Flirty Flowers paper pack.

Sunny Studio Stamps: Silly Sloths Comic Strip Everyday Dies Happy Word Die Birthday Card by Ana Anderson

I started with die cutting green floral paper (from Flirty paper pack) with Comic Strip Everyday dies, then die cut another frame/background from white cardstock. I die cut the word happy 4 times out of white cardstock, layered them, then inked the sentiment and the background with Salty Ocean and Twisted Citron distress inks. I white heat embossed the word birthday on a piece of black cardstock, then trimmed the strip.

I stamped the sloths and foliage with Memento Tuxedo black ink, colored them with Copic markers, cut them with coordinating dies then started assembling the card. I popped the frame with thin strips of foam tape, then inserted inked background pieces.

Sunny Studio Stamps: Silly Sloths Comic Strip Everyday Dies Happy Word Die Birthday Card by Ana Anderson

I added the happy word dies cut to the center and adhered the sloths and foliage with liquid glue and foam tape. To finish the card, I added a few highlights with white gel pen!
I hope you have enjoyed today’s post and that this slothy card put a smile on your face. Have a wonderful day and I’ll see you next week!

Sunny Studio Supplies Used:

Beach Babies Stamps
Beach Babies Stamps
Shop at:
Sunny Studio
Beach Babies Dies
Beach Babies Dies
Shop at:
Sunny Studio
Comic Strip Everyday Dies
Shop at:
Sunny Studio
Happy Word Die
Happy Word Die
Shop at:
Sunny Studio
Woodland Borders Dies
Shop at:
Sunny Studio
Flirty Flowers 6x6 Paper
Shop at:
Sunny Studio
Best Fishes Stamps
Best Fishes Stamps
Shop at:
Sunny Studio
Best Fishes Dies
Best Fishes Dies
Shop at:
Sunny Studio
Silly Sloths Stamps
Silly Sloths Stamps
Shop at:
Sunny Studio
Silly Sloths Dies
Silly Sloths Dies
Shop at:
Sunny Studio
Summer Splash 6x6 Paper
Shop at:
Sunny Studio
Sea You Soon Stamps
Sea You Soon Stamps
Shop at:
Sunny Studio
Sea You Soon Dies
Sea You Soon Dies
Shop at:
Sunny Studio
Stitched Arch Dies
Stitched Arch Dies
Shop at:
Sunny Studio