Showing posts with label Stitched Ovals. Show all posts

Tuesday, September 5, 2023

Brilliant Banner Die Focused Card with Isha

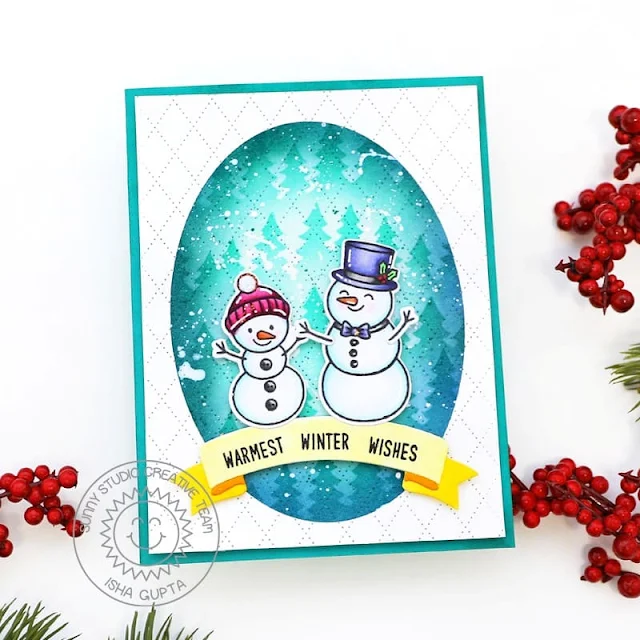
Hello everyone! Isha here with a winter-themed CAS card featuring the Brilliant Banner 2 die. I love how easy it is to match the new products with the older releases. The new banner dies give a beautiful 3d look.

Sunny Studio Stamps: Brilliant Banner Die Focused Winter Themed Card by Isha Gupta (featuring Feeling Frosty, Forest Tree Stencils, Dotted Diamond Dies, Stitched Oval Dies)

I started by die-cutting a white panel using the 
Stitched Oval 2 die. Take a white piece sponge the pine trees using the Forest Trees Stencils with evergreen bough and blueprint sketch distress inks. Next flick white paint, Adhere this panel behind the white panel. Use the Dotted Diamond Portrait die and add the gorgeous texture. Adhere this panel to a teal card.

Sunny Studio Stamps: Brilliant Banner Die Focused Winter Themed Card by Isha Gupta (featuring Feeling Frosty, Forest Tree Stencils, Dotted Diamond Dies, Stitched Oval Dies)

Die-cut the banner, and color using Copic markers. Stamp the sentiment from the Holiday Hugs stamp. Stamp the snowmen from the Feeling Frosty stamp, color using Copic markers, and die-cut using the coordinating diesAdhere the banner and the snowmen using 3d foam. 

Thank you for dropping by and have a nice day!

Sunny Studio Supplies Used:

Feeling Frosty Stamps
Shop at:
Sunny Studio
Feeling Frosty Dies
Feeling Frosty Dies
Shop at:
Sunny Studio
Stitched Oval 2 Dies
Shop at:
Sunny Studio
Forest Trees Stencils
Shop at:
Sunny Studio
Brilliant Banner 2 Dies
Shop at:
Sunny Studio
Dotted Diamond Portrait
Shop at:
Sunny Studio
Holiday Hugs Stamps
Holiday Hugs Stamps
Shop at:
Sunny Studio

Wednesday, June 28, 2023

Hawaiian Hibiscus Card with Catherine

Hello Crafty Friends! It’s Catherine here! Today, I am sharing an Aloha card perfect for the summer season created with Hawaiian Hibiscus Stamps and Radiant Plumeria Stamps!

Sunny Studio Stamps: Hawaiian Hibiscus Summer Themed Shaker Card by Catherine Cohen (featuring Frilly Frame Dies, Stitched Oval Dies, Scalloped Oval Mat Dies, Summer Greenery, Tiki Time)

For the back panel, I die cut A2 white cardstock with the largest rectangle from Stitched Rectangle Dies. Next, I die cut the Frilly Frames Stripes Dies out of white cardstock. I adhered the stripes die onto the stitched back panel.

I die cut the hibiscus and leaves using Hawaiian Hibiscus Dies and Radiant Plumera Dies. I placed the negative back into my Misti and began stamping the Hibiscus and leaves with the following inks:

Pinks: Altenew Rose Quartz, Frosty Pink, Pink Diamond, Coral Berry
Yellows: Citrus Burst, Lemon Ice
Greens: Just Green, Green Fields, Sweet Leaf

I added some palm leaves using Summer Greenery Dies ink blended with Mowed Lawn Distress Oxide. I stamped the Macaw bird from Tiki Time Stamps, die cut with Tiki Time Dies, and colored with Copic Markers listed in my blog link below. For the back of the  shaker, I die cut an oval, 3 7/8” x 2 ¾” from Stitched Oval 2 Dies, added some Party Confetti and Crystal Clear Jewels and put it aside.

Sunny Studio Stamps: Hawaiian Hibiscus Summer Themed Shaker Card by Catherine Cohen (featuring Frilly Frame Dies, Stitched Oval Dies, Scalloped Oval Mat Dies, Summer Greenery, Tiki Time)

To make the frame,  I die cut a scalloped oval 3 3/16” x 4 5/16” from Scalloped Oval Mat 1 Dies. I nested the 3 7/8” x 2 ¾” die inside the scalloped oval and ran it through my die cut machine. Using the same die, I die cut one more oval out of acetate. I adhered the frame on top of the acetate oval. I added foam tape around the edges and adhered it onto the back of the shaker.

I adhered the shaker onto the back panel followed by the flowers, leaves, and the parrot. I finished off the card by adding “ALOHA” die cut from Chloe Alphabet Dies ink blended with Spun Sugar Distress Oxide.

Thank you so much for joining me today!  For a list of Copic Markers used, please visit me at Crafti-Cat. Have a wonderful week!

Sunny Studio Supplies Used:

Tiki Time Stamps
Tiki Time Stamps
Shop at:
Sunny Studio
Tiki Time Dies
Tiki Time Dies
Shop at:
Sunny Studio
Chloe Alphabet Dies
Chloe Alphabet Dies
Shop at:
Sunny Studio
Stitched Rectangle Dies
Shop at:
Sunny Studio
Frilly Frames Stripes Die
Shop at:
Sunny Studio
Hawaiian Hibiscus Stamps
Shop at:
Sunny Studio
Hawaiian Hibiscus  Dies
Hawaiian Hibiscus Dies
Shop at:
Sunny Studio
Radiant Plumeria Stamps
Shop at:
Sunny Studio
Radiant Plumeria Dies
Shop at:
Sunny Studio
Scalloped Oval Mat 1 Dies
Shop at:
Sunny Studio
Stitched Oval 2 Dies
Shop at:
Sunny Studio
Summer Greenery Die
Summer Greenery Die
Shop at:
Sunny Studio

Wednesday, April 26, 2023

Birthday Cat Card with Catherine

Hello Crafty Friends! Catherine here, and I am so excited to share my first card for the new summer release! For my first card, I created a birthday card featuring the adorable Birthday Cat Stamps.

Sunny Studio Stamps: Birthday Cat Birthday Card by Catherine Cohen (featuring Ribbon & Lace Border Dies, Quilted Hearts Dies, Fancy Frame Dies)

To start, I die cut the background with A2 white cardstock using Quilted Hearts Portrait Die. I cut diagonal paper strips from paper in Rainbow Bright 6x6 Paper and taped the strips to the back of the background. I adhered the background onto another piece of A2 white cardstock.

Next, I made the colorful heart border using paper from the same set. I added a strip of pink cardstock for contrast.

Sunny Studio Stamps: Birthday Cat Birthday Card by Catherine Cohen (featuring Ribbon & Lace Border Dies, Quilted Hearts Dies, Fancy Frame Dies)

I made the top of the cake stand  by die cutting white cardstock with Ribbon & Lace Border Dies and trimming the border to 3”W x 3/8” H. I ink blended the edges with Mowed Lawn Distress Oxide. For the stand, I used the outer edges of the third smallest oval in Stitched Oval Dies to make the curve shape and I inked blended the edges with the same color. I added a bow from Sweet Treat House Add-On and ink blended the bow with Worn Lipstick and Picked Raspberry Distress Oxide.

I stamped the cuties from Birthday Cat Stamps and die cut the images with the Birthday Cat Dies. I colored the images with Copic Markers listed in my blog link below. I added a white frame from Fancy Frames Rectangle Dies and a White Heat embossed sentiment from Birthday Cat Stamps.

Thanks so much for joining me today! Please feel free to visit me at Crafti-Cat for the list of Copic Markers used. Have a wonderful week!

Sunny Studio Supplies Used:

Fancy Frames- Rectangles
Shop at:
Sunny Studio
Rainbow Bright 6x6 Paper
Shop at:
Sunny Studio
Stitched Oval Dies
Stitched Oval Dies
Shop at:
Sunny Studio
Sweet Treats House Add-on
Shop at:
Sunny Studio
Quilted Hearts Portrait
Shop at:
Sunny Studio
Ribbon & Lace Dies
Ribbon & Lace Dies
Shop at:
Sunny Studio
Birthday Cat Stamps
Birthday Cat Stamps
Shop at:
Sunny Studio
Birthday Cat Dies
Birthday Cat Dies
Shop at:
Sunny Studio

Wednesday, February 22, 2023

Easter Cards with Marie and Catherine

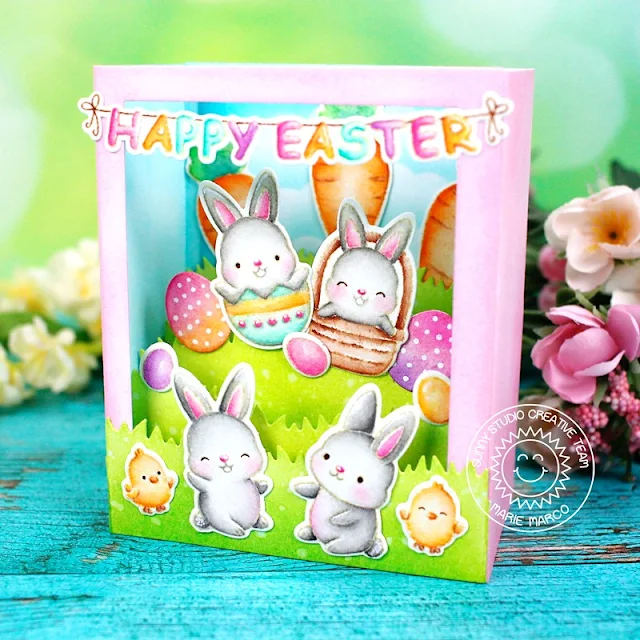
Hey Crafty Friends, Marie here. With Spring fast approaching, I am looking forward to another one of my favorite holidays of the whole entire year and that is Easter Sunday! When I was little, my mom would hide easter eggs all around the house and we would have Sunday mass and have a big family brunch right after. For my family, Easter is just as important as Christmas, and there would always be Easter cards and gifts exchanged! So this year, I will be giving my mom this Easter shadow box card featuring Sunny Studio Stamps' Chubby Bunny Stamps with elements from their Bunnyville Stamps

Sunny Studio Stamps: Chubby Bunny Easter Card by Marie Marco (featuring Bunnyville)

To begin the process of creating this card, I used a shadow box die from Heffy Doodle. I cut out all my shadow box pieces from Bristol Smooth cardstock paper. I then ink blended the outside of my box using Cotton Candy Ink from MFT, and Salvaged Patina Distress Ink for the inside as well as for the cloud stenciled background. For all my grass panels, I used my favorite grass colored ink combination in Twisted Citron and Mowed Lawn Distress Ink. I went over all the grass panels with water droplets for some light texture. After inking my entire box, I put it together using double sided tape adhesive and Bearly Art Precision Craft Glue. 

Sunny Studio Stamps: Chubby Bunny Easter Card by Marie Marco (featuring Bunnyville)

Next, I stamped out all my images from the Chubby Bunny Stamp Set and Bunnyville stamps onto watercolor paper using Antique Linen Distress Ink. I colored all my images using Faber Castell Watercolor pencil. I then cut out all my images using the coordinating Chubby Bunny Dies and I fussy cut the carrot images from Bunnyville. The Bunnyville stamps also come with Bunnyville Dies

Finally, after coloring and die cutting, I played around with placement and adhered all my images inside my shadow box. I really love how this card came together! I love all the bright Spring Colors and how happy, playful,  and festive these adorable bunnies look! I can't wait to hand deliver this one to my mom this year! As always Crafty friends, thanks so much for joining me today on another card inspiration! Until next time, Happy Crafty Cardmaking! 

-------------------------------------------

Hello Crafty Friends! Catherine here, and today I am sharing a fun easter basket card created with Eggs To Dye For Stamps and Layered Basket Stamps.

Sunny Studio Stamps: Eggs To Dye For Easter Card by Catherine Cohen (featuring Fancy Frame Dies, Stitched Rectangle Dies, Layered Basket)

To start, I embossed a piece of white cardstock 3 ¾”W x 5” H with Lots of Dots Embossing folder. I then die cut a lacy frame with white cardstock from Fancy Frames Rectangle Dies. I adhered the frame onto the polka dot embossed background.

I stamped a basket with the Layered Basket Stamps using Pinkfresh Studio Ink Cubes- Urban Raincoat. I used three colors from the set, Misty Coast, Rocky Slope, and Metropolis. I splattered some Metropolis ink mixed with water onto the basket for added texture.

I stamped the eggs with the following Altenew inks and die cut the eggs with the coordinating dies, Eggs To Dye For Dies. For the blue and purple egg, I White Heat embossed the eggs after I stamped them.

Pink – Frosty Pink, Pink Diamond, Pinkalicious
Purple- Soft Lilac, Lavender Fields
Blue- Caribbean Sky

Sunny Studio Stamps: Eggs To Dye For Easter Card by Catherine Cohen (featuring Fancy Frame Dies, Stitched Rectangle Dies, Layered Basket)

Next, I stamped the chick using light brown ink and colored it with Copic Markers listed in my blog link below.

For the sentiments, I White Heat embossed the sentiments onto a banner from Stitched Rectangle Dies and a tag from Stitched Oval 2 Dies. I added white brads to the oval tag on the basket. I adhered the eggs, chick, basket, and sentiment onto the polka dot background. I thought it would be fun to add some pink grass for the basket. I finished the card by adhering it onto a background with paper from Subtle Grey Tones 6x6 Paper.

Thanks so much for stopping by! For more inspiration, please feel free to visit me at Crafti-Cat! Have a great day!

Sunny Studio Supplies Used:

Stitched Rectangle Dies
Shop at:
Sunny Studio
Fancy Frames- Rectangles
Shop at:
Sunny Studio
Chubby Bunny Stamps
Chubby Bunny Stamps
Shop at:
Sunny Studio
Chubby Bunny Dies
Chubby Bunny Dies
Shop at:
Sunny Studio
Lots of Dots Embossing
Shop at:
Sunny Studio
Subtle Grey Tones Paper
Shop at:
Sunny Studio
Eggs To Dye For Stamps
Shop at:
Sunny Studio
Eggs To Dye For Dies
Shop at:
Sunny Studio
Layered Basket Stamps
Shop at:
Sunny Studio
Layered Basket Dies
Layered Basket Dies
Shop at:
Sunny Studio
Stitched Oval 2 Dies
Shop at:
Sunny Studio
Bunnyville Stamps
Bunnyville Stamps
Shop at:
Sunny Studio
Bunnyville Dies
Bunnyville Dies
Shop at:
Sunny Studio

Monday, February 20, 2023

Easter Cards with Bobbi and Cathy

Hello friends, Bobbi here! Today, I’m sharing a card for the Easter holiday. I’m using the Chickie Baby stamps (coordinating dies here) and a few carrot images from the Bunnyville stamps set (coordinating dies here). I’m also using the Slimline Nature Borders Dies for the grassy hills and the Spring Fever paper pad for the grass.

Sunny Studio Stamps: Chickie Baby Easter Card by Bobbi Lemanski

This card measures 6″ wide  X 5″ tall and fits inside a 5″ X 7″ envelope. I used this shorter width so that my 6″ square Spring Fever paper covered the full width at the bottom. This card could also be made into the popular, A2-size card with no seams, too. I just happen to like a bigger card to give.

I started by splattering my card front panel with watercolors. Using the grassy border from the Slimline Nature Borders dies and the grass pattern paper from the Spring Fever paper pad, I cut a couple rolling hills. I used two layers to make a foreground and background in the scene. I blended on some green Mowed Lawn Distress Oxide ink at the bottom for interest.

Sunny Studio Stamps: Chickie Baby Easter Card by Bobbi Lemanski

Next I stamped, colored (see colors below) and cut out my chicks, basket and the carrot images. I turned the large carrot on its side, punched out half of a 5/8″ circle and added two 3/8″ black wheels to make the carrot into a car. Now my chick fits inside perfectly and is ready to travel home for the holidays! Do you see his home?!

Copic Sketch Marker Colors used to color the images:
Carrots: YR07, YR68, YR65, YG67, YG17, YG03, YG01
Chicks: YR19, YR15, YR13, YR08, YR68, Y38, white Gelly Roll Pen for cheek highlights
Eggs: RV55, RV02, RV00, G00, G000, Y13, Y08, BG02, BB00, B000
Basket and bow: B04, B02, B00, RV17, RV55, RV02
Bunny Ears/Door: Bg01, B00, RV55, RV02
Shading: W4, W2, W1

Sunny Studio Stamps: Chickie Baby Easter Card by Bobbi Lemanski


All the cute images were set and glued in place. I added a black string to the carrot balloon. I stamped the “Happy Easter” phrase in the upper left corner to finish the card.

Thanks for stopping by today. If you want to see more ideas and inspiration from me, subscribe to my blog, BobbiHartDesign.com. I’ll send you updates on new posts! You can also find me on Instagram as @BobbiHartDesign and on Facebook as BobbiHartDesign.

-----------------------------------------------

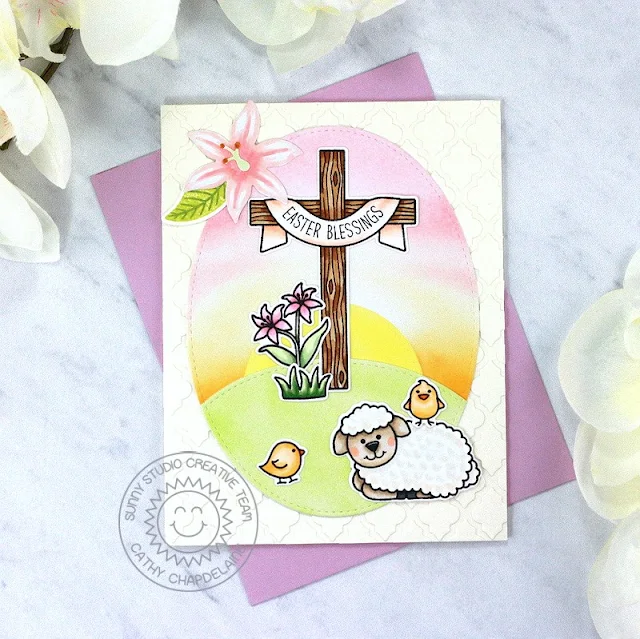
Hey friends! Cathy here today and I’ve got a sweet Easter card to share with you using the beautiful Easter Wishes Stamps.

Sunny Studio Stamps: Easter Wishes Easter Card by Cathy Chapdelaine

I started this card with a soft embossed look to the card front using the Frilly Frames Quatrefoil Dies. This technique takes a little bit of time, but I think the results are worth it. First, I cut an A2 sized piece of ivory cardstock and die-cut a second piece of ivory cardstock twice using the quatrefoil portion of the dies. I placed a die-cut quatrefoil frame over the A2 cardstock piece as a guide and began adhering the inner quatrefoil pieces to the cardstock. I moved the frame as needed until I had completely covered the A2 piece. Where pieces overlapped the edges, I carefully trimmed them along the edges of the A2 piece with scissors. I then adhered the cardstock to an A2 card base.

Next, I worked on a sunrise sky. I die-cut a piece of white cardstock using a Stitched Oval Die and then I die-cut a Stitched Circle Small Die from Eclipse masking tape. I placed the circle towards the bottom of the oval die-cut as a mask for the sun and inked from the bottom working up to the top of the oval with Spiced Marmalade, Fossilized Amber, Scattered Straw, Tattered Rose and Saltwater Taffy Distress inks. I then removed the circle, placed the negative portion of the circle die-cut masking tape over the sky and inked the sun with Squeezed Lemonade Distress ink.

Sunny Studio Stamps: Easter Wishes Easter Card by Cathy Chapdelaine

For the bottom grass portion, I die-cut a second piece of white cardstock with the same Stitched Oval Die and inked the bottom half of the oval with Twisted Citron Distress ink. I placed a smaller Stitched Oval Die across the bottom third of the oval and die-cut the piece. I then adhered it to the bottom of the oval sky piece.


Next, I stamped the images from the Easter Wishes Stamps on Neenah Classic Crest 80lb solar white cardstock, colored them with Copics and die-cut them using the coordinating diesTo finish, I die-cut a flower from the Botanical Backdrop Die from white cardstock, colored it with Copics and added a stamped/die-cut leaf from the Cherry Blossoms Stamps and Dies.


I hope you enjoyed and thanks for stopping by today! For more inspiration, please visit my blog www.inkredibleadventures.com and you can also find me on Instagram as @cathy.chapdelaine.


Sunny Studio Supplies Used:
 

Easter Wishes Dies
Easter Wishes Dies
Shop at:
Sunny Studio
Easter Wishes Stamps
Shop at:
Sunny Studio
Stitched Oval Dies
Stitched Oval Dies
Shop at:
Sunny Studio
Botanical Backdrop Die
Shop at:
Sunny Studio
Chickie Baby Stamps
Chickie Baby Stamps
Shop at:
Sunny Studio
Chickie Baby Dies
Chickie Baby Dies
Shop at:
Sunny Studio
Frilly Frames Quatrefoil
Shop at:
Sunny Studio
Slimline Nature Borders
Shop at:
Sunny Studio
Stitched Circle Small Dies
Shop at:
Sunny Studio
Bunnyville Stamps
Bunnyville Stamps
Shop at:
Sunny Studio
Bunnyville Dies
Bunnyville Dies
Shop at:
Sunny Studio
Cherry Blossoms Stamps
Shop at:
Sunny Studio
Cherry Blossoms Dies
Shop at:
Sunny Studio
Spring Fever Paper
Spring Fever Paper
Shop at:
Sunny Studio