Showing posts with label Cupcake Shape. Show all posts

Thursday, September 9, 2021

Icing Border Die Focused Cards with Anja and Marine

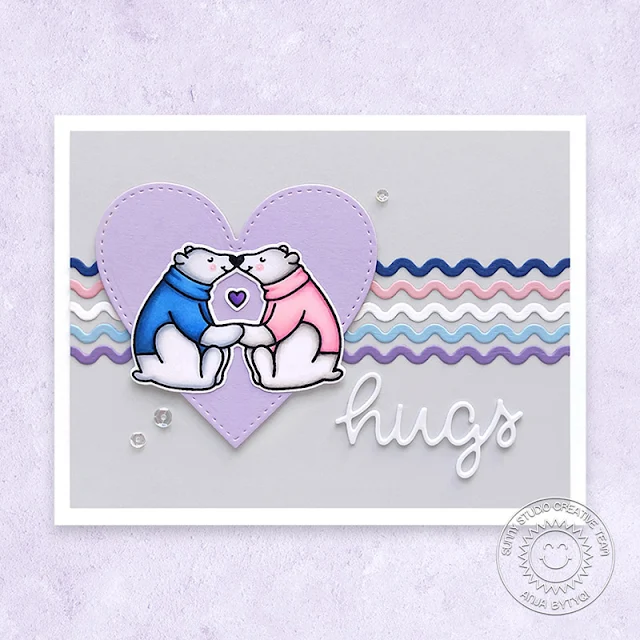
Hello everyone, Anja here and today I have a love and winter themed card for you showing you how you can use the Icicle Border Dies as accents on your project. I die cut the ric-rac border from five colors of cardstock to create a repeating design element in the background.

Sunny Studio Stamps: Icing Border Dies Bear Hugs Stitched Hearts Everyday Card by Anja Bytyqi

I started off with a white A2 card base and trimmed down a light grey cardstock panel to be 3/16 inch smaller on each side. Next, I adhered the ric-rac borders with liquid glue and cut off the excess. I also die cut one of the Stitched Hearts from lavender cardstock. For a bit of dimension, I popped it off with foam tape.

I love the versatile Bear Hugs Stamps and picked the adorable polar bear couple as well as a little heart. I stamped the images in Memento Tuxedo Black Ink and colored them with Copic Markers. I used the coordinating die to cut out the bears. The heart was fussy cut with scissors. I adhered the images in the middle of the heart die-cut.

Sunny Studio Stamps: Icing Border Dies Bear Hugs Stitched Hearts Everyday Card by Anja Bytyqi

The scripty word 'hugs' is included in the Scalloped Oval Mats 3 Dies set and I cut it three times from white cardstock. I stacked the die cuts on top of each other and adhered it to the card. Finally, I added three clear sequins.

Thank you so much for stopping by!

--------------------------------------------

Hey friends, Marine here, I'm so happy to be back on the blog with this shaker card showcasing some brand new products: the Icing Borders die set, the Thank You Words die set, as well as some autumnal pattern papers from the gorgeous Sweater Weather 6x6 paper pack.

Sunny Studio Stamps: Icing Border Dies Cupcake Shaped Dies Thank You Word Dies Everyday Card by Marine Simon

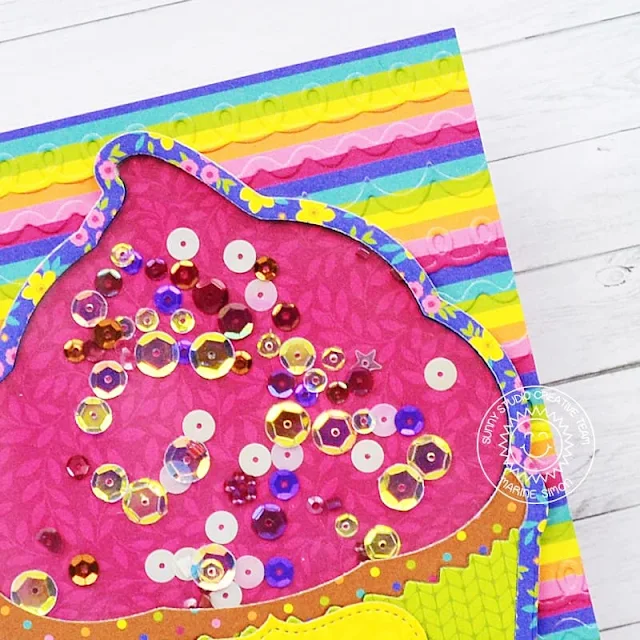
I picked up a floral pattern paper to be the frame of my cupcake, and cut a plain cupcake using the biggest die from the Cupcake Shaped die set. Next I used the second cupcake die to cut my frame: I placed and taped it in the center of the plain cupcake, and sent it to my die cutting machine to get my floral frame.

Next I cut additional elements: three cupcake pieces out of pattern papers: a dark pink icing piece, a brown piece to make the cake and a green piece to make the cupcake liner, as well as a plain cupcake out of acetate to create the window of my shaker, and another one out of navy blue cardstock to be the base of the cupcake.

I temporarily taped the floral frame on top of the navy blue base and I attached the dark pink icing part on the cupcake base by tucking it right up against the frame.

Next I attached the floral frame to the plain acetate cupcake to create the window, and on the front of this window, I attached the two remaining pieces of cupcake: the cake piece and the cupcake liner.

Sunny Studio Stamps: Icing Border Dies Cupcake Shaped Dies Thank You Word Dies Everyday Card by Marine Simon

At the back of the window panel, I applied thin strips of foam tape on the edges. And all along those foam strips I applied powder, this way the sequins won't stick to the foam.

Next I poured a sequin mix on the cupcake base, right on the dark pink icing section, and then stuck my window panel on top of the cupcake base to close the shaker.

I created a custom background using the Icing Border dies. I used those dies and a striped pattern paper from the Sweater Weather 6x6 paper pack to cut lots of icing shapes. I cut a panel out of the same striped pattern paper, and I glued each icing shape on top of the panel in a way that the panel and borders would be coordinated.

I filled the entire panel with icing borders, trimmed off the edges and stuck the panel to a pink card base, and then I attached my giant shaker cupcake on my custom background using liquid glue.

Next I cut two banners: one out of a yellow pattern paper using a die from the Sliding Window die set and one out of a blue pattern paper using a die from the Stitched Rectangles die set. I attached those banners on top of each other on the bottom section of the cupcake, and finally I cut the word 'Thanks' out of gold mirror cardstock and stuck it on top of the banners.

And that's it. this is the final result. I hope this shaker cupcake will inspire you to make your own version, maybe a holiday cupcake with some pretty Christmas themed papers or a birthday cupcake with rainbow papers? Depending on the papers you use, the possibilities are endless. I leave you with the video right below, and wish you an amazing day. See you next time!

Sunny Studio Stamps: Icing Border Dies Cupcake Shaped Dies Thank You Word Dies Everyday Card by Marine Simon

Sunny Studio Supplies Used:

Stitched Heart Dies
Stitched Heart Dies
Shop at:
Sunny Studio
Cupcake Shape Dies
Cupcake Shape Dies
Shop at:
Sunny Studio
Stitched Rectangle Dies
Shop at:
Sunny Studio
Bear Hugs Stamps
Bear Hugs Stamps
Shop at:
Sunny Studio
Bear Hugs Dies
Bear Hugs Dies
Shop at:
Sunny Studio
Thank You Words Die
Thank You Words Die
Shop at:
Sunny Studio
Icing Border DIes
Icing Border DIes
Shop at:
Sunny Studio
Sliding Window Dies
Sliding Window Dies
Shop at:
Sunny Studio
Scalloped Oval Mat 3 Dies
Shop at:
Sunny Studio
Sweater Weather Paper
Shop at:
Sunny Studio

Thursday, August 19, 2021

Designer Choice Cards with Anja and Vanessa

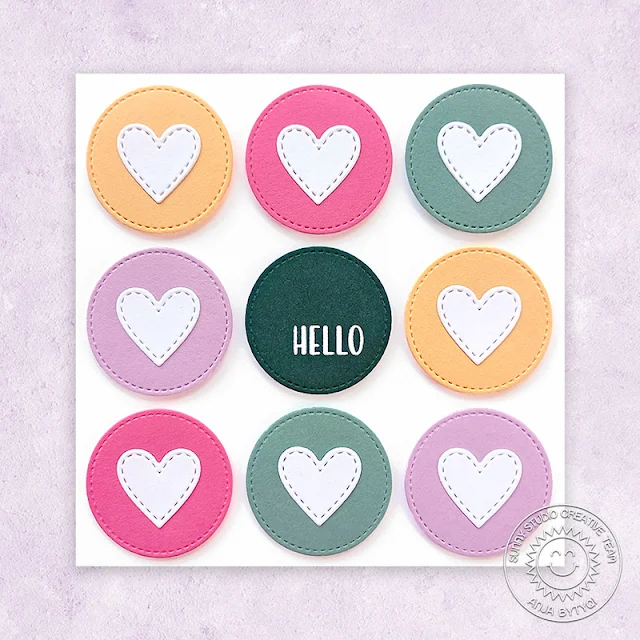
Hello everyone, Anja here with you today. It's Designer's Choice week and I created a geometric CAS card with stitched dies and a pretty color combo.

Sunny Studio Stamps: Window Quad Dies Cupcake Shape Dies Everyday Card by Anja Bytyqi

First, I started off with a white 5" x 5" square card base. I die cut a bunch of stitched circles from five colors of cardstock using the Window Quad Circle Grid Die. The stitched heart is part of the Cupcake Shape Dies set and I cut it 8 times from white cardstock.

Sunny Studio Stamps: Window Quad Dies Cupcake Shape Dies Everyday Card by Anja Bytyqi

I stamped the word 'hello' from the Cheerful Daisies set in VersaMark Ink onto the dark green circle and heat embossed it with white embossing powder. Finally, I glued the hearts to the stitched circles and popped them up with circles cut from white fun foam.

Thank you so much for stopping by! See you soon!

------------------------------------------

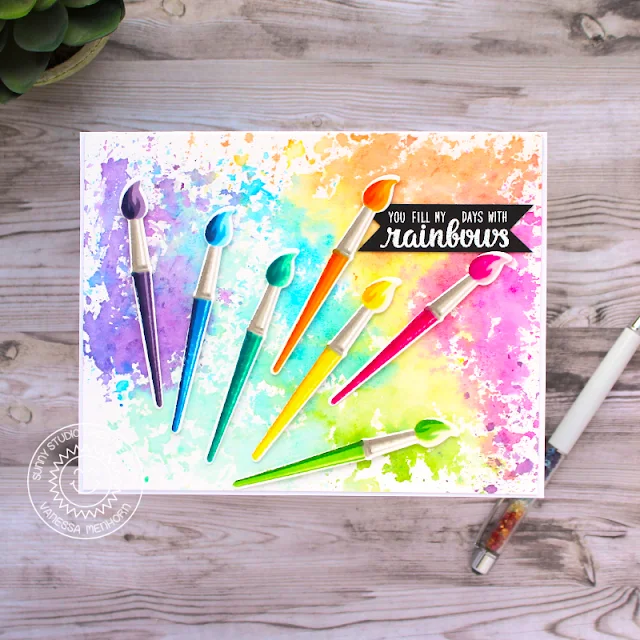
Hello to you! Vanessa here with a rainbow card using the Color My World set. 

Sunny Studio Stamps: Color My World Color Me Happy Everyday Card by Vanessa Menhorn

I created the background using the ink smooching technique with following Distress Ink colors: Squeezed Lemonade, Dried Marigold, Picked Raspberry, Mowed Lawn, Cracked Pistachio, Salty Ocean, Dusty Concord. I then stamped the paint brushes onto the die-cut bases. Here I followed the technique Jennifer McGuire showed in this video, it saved me plenty of time and nerves! Her instructions made me enjoy creating layered images in various colors. Find suggestions for color combos/inks in her video, too.

Sunny Studio Stamps: Color My World Color Me Happy Everyday Card by Vanessa Menhorn

Now I adhered the paint brushes to the card with foam tape and added the sentiment, using the Color Me Happy set, that I had heat-embossed onto a piece of black cardstock.

I hope I have brightened your day with this colorful card! Thank you for stopping by today!

Sunny Studio Supplies Used:

Color Me Happy Stamps
Shop at:
Sunny Studio
Color My World Stamps
Shop at:
Sunny Studio
Color My World Dies
Color My World Dies
Shop at:
Sunny Studio
Cupcake Shape Dies
Cupcake Shape Dies
Shop at:
Sunny Studio
Cheerful Daisies Stamps
Shop at:
Sunny Studio
Window Quad Circle Die
Shop at:
Sunny Studio

Monday, August 9, 2021

Gift Card Pocket Die Focused Cards with Ashley and Mayra

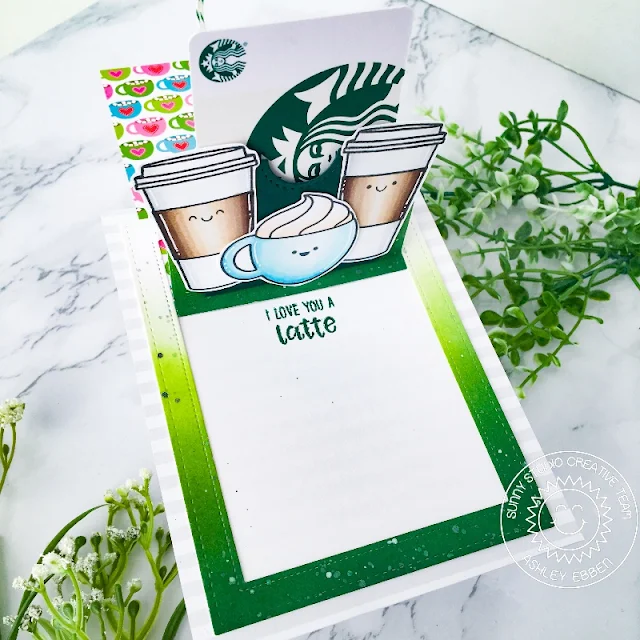
Hi friends! It's Ashley with a fun sliding window card that also incorporates the Gift Card Pocket die! By combining the Sliding Window and Gift Card Pocket dies, you can make the gift card pop up when the slider is pulled! I had a Starbucks gift card on hand, so I decided to use that as my inspiration for the rest of the card.

Sunny Studio Stamps: Gift Card Pocket Dies Sliding Window Dies Mug Hugs Card by Ashley Ebben

I started by blending several Pinkfresh Studio green inks onto white cardstock to create an ombre effect. I splattered some white and black watercolor onto it, then die cut it with the largest Stitched Rectangle die before using it for my slider. I created my slider piece with the Sliding Window die and my ink blended piece, white cardstock, and a piece of mug patterned paper from the Holiday Cheer paper pack. I followed these instructions, making a few modifications as necessary to fit the size of the stitched rectangle I cut out. Make sure to use strong adhesive - I like Scor Tape! Once my slider was assembled, I added it to a piece of striped paper from the Subtle Grey Tones pack to make my base.

Sunny Studio Stamps: Gift Card Pocket Dies Sliding Window Dies Mug Hugs Card by Ashley Ebben

I stamped the coffee images from Mug Hugs and added a few smiley faces to them with the Looking Sharp set. After coloring with Copics, I fussy cut the images but you could also use the matching dies. I die cut the Gift Card Pocket from dark green cardstock and added it right to the edge of the slider where it folds up. I arranged my coffee images on top the pocket, then tied a bit of sparkly green twine to the pull tab. I finished by stamping an image from Breakfast Puns on the inside in dark green ink, making sure to save room to write a personalized message later.

Thank you so much for stopping by! Have a wonderful day!

----------------------------------------------

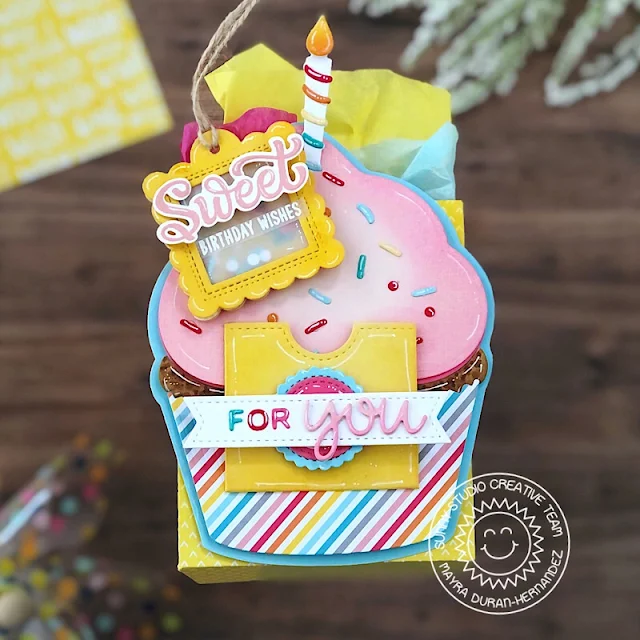
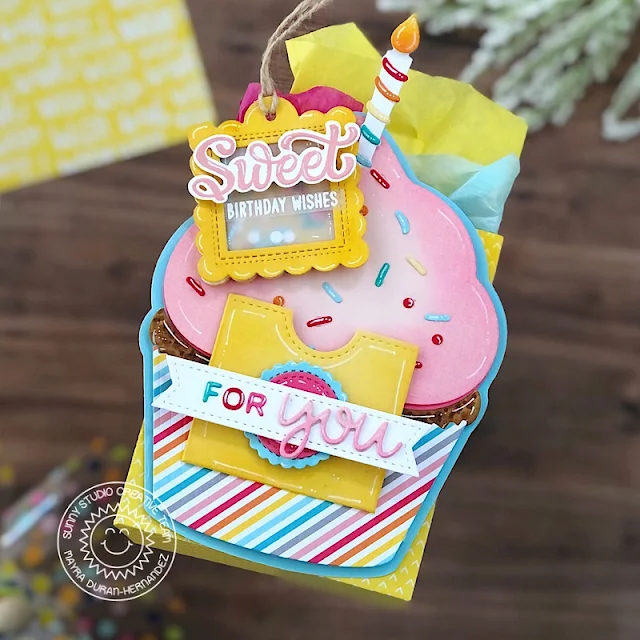
Hello everyone, happy Monday. Mayra here with you today sharing this sweet treat bag with a gift cardholder. I used the super fun Gift Card Pocket die.

Sunny Studio Stamps: Gift Card Pocket Dies Scalloped Tag Dies Cupcake Shaped Dies Card by Mayra Duran-Hernandez

I began by die-cutting the layers to create the cupcake and bag using the Cupcake Shape dies set, and the Sweet Treats Bag die. I also die-cut a couple of extra sprinkle pieces from the Cupcake Shape die set to use for the mini shaker tag. To create the mini shaker tag, I used the smaller of the tags from the Scalloped Tag Square dies set. I then die-cut a smaller square into the center area to create the shaker window. I also used some of the Small White Crystals to the shaker tag.  

Sunny Studio Stamps: Gift Card Pocket Dies Scalloped Tag Dies Cupcake Shaped Dies Card by Mayra Duran-Hernandez

Next, I added the pocket die to the front of the cupcake shape. The sentiment is from the Candy Shoppe stamp set. The banner is from the Stitched Rectangles die set. 

I hope you enjoy the fun treat bag I created to share with you today. Thank you so much for stopping by. I hope you each have a wonderful and blessed day. 

Sunny Studio Supplies Used:

Mug Hugs Dies
Mug Hugs Dies
Shop at:
Sunny Studio
Mug Hugs Stamps
Mug Hugs Stamps
Shop at:
Sunny Studio
Candy Shoppe Stamps
Candy Shoppe Stamps
Shop at:
Sunny Studio
Looking Sharp Stamps
Shop at:
Sunny Studio
Cupcake Shape Dies
Cupcake Shape Dies
Shop at:
Sunny Studio
Gift Card Pocket
Gift Card Pocket
Shop at:
Sunny Studio
Stitched Rectangle Dies
Shop at:
Sunny Studio
Breakfast Puns Stamps
Shop at:
Sunny Studio
Sliding Window Dies
Sliding Window Dies
Shop at:
Sunny Studio
Holiday Cheer 6x6 Paper
Shop at:
Sunny Studio
Subtle Grey Tones Paper
Shop at:
Sunny Studio
Scalloped Tags-Square
Shop at:
Sunny Studio
Sweet Treats Gift Bag
Shop at:
Sunny Studio

Saturday, July 31, 2021

Guest Designer Spotlight: Birthday Cards with Michelle Short

Hello there, Michelle Short here and I am delighted to be back guesting here on the Sunny Studio Blog. When I saw the latest release, I fell in love with everything! What an amazing release! I had to narrow down what I wanted to use, so for today’s cards, I am using the fabulous Cupcake Shaped Die, Chloe Alphabet Dies and Looking Sharp. Perfect for Birthday cards, which is what I am sharing with you today.

Sunny Studio Stamps: Cupcake Shaped Die Chloe Alphabet Dies Birthday Card by Michelle Short

My first card uses the fabulous Cupcake Shaped Die. I love creating shaped cards, but it is not always easy to get the shape correct. With this set of dies all the work is done for you! You simply need to cut the dies from cardstock or patterned paper and you are good to go! I started off my card by die cutting the cupcake base card twice from white cardstock, as well as the frosting, candle and sprinkles. I then cut the cake and the cupcake wrapper from a kraft cardstock. Using Copic Markers, I coloured the elements to add texture, depth and shading. I also added highlights with a white gel pen.

Although you can adhere the elements directly to the cupcake card base (or leave it off, if you want to add the cupcake to a traditional card base), I decided to piece the elements together first and add tape to the back to hold them in place. I then added foam tape and adhered the pieces, as one, to the cupcake card base. I took the back portion of the card base and made a score line a quarter of the way down. I adhered this piece to the back of the front base, so that the card can stand up and open easily.

Sunny Studio Stamps: Cupcake Shaped Die Chloe Alphabet Dies Birthday Card by Michelle Short

I took the sentiment from the Looking Sharp set, masked it off so that only ‘birthday’ would stamp and stamped it on to white cardstock with black ink. I coloured the piece with a matching Copic Marker that I used on the cupcake and cut it in to a strip. It was added to the card with foam tape. I took the Chloe Alphabet Dies and cut them from white cardstock, as well as white glitter cardstock. The letters for ‘wishes’ were layered up so that the glitter letter was adhered to the white cardstock one (for extra dimension) and then added them to the card. This was such a fun card to make and that cupcake is good enough to eat! ;)


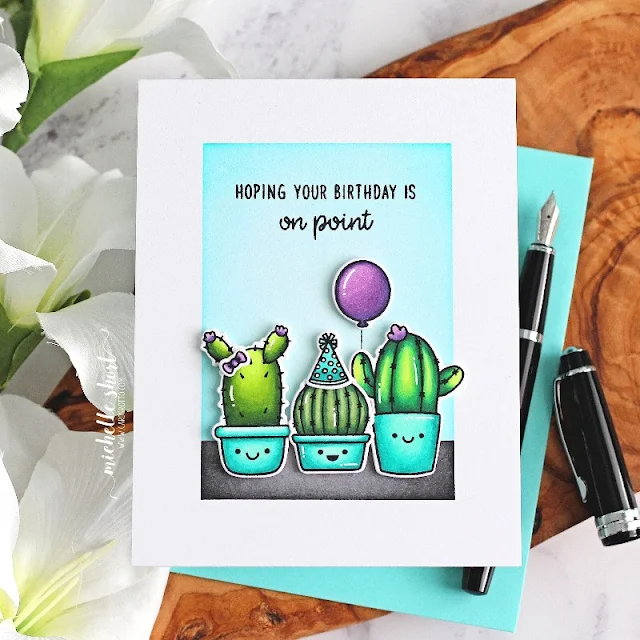
Sunny Studio Stamps: Looking Sharp Birthday Card by Michelle Short
 
My next card uses the Looking Sharp set. This is another really fun set! I love that the set has faces that you can stamp on to the cacti. You can stamp them on the cactus themselves, on to the pots like I have or not at all! So versatile! I started off my card by stamping three of the cacti on to white cardstock with black ink. I also stamped the party hat and bow. They were coloured with Copic Markers and die cut out using the Looking Sharp Dies. I set them aside while I worked on my background.


Sunny Studio Stamps: Looking Sharp Birthday Card by Michelle Short
 
I took an A2 white card base and masked off the edges. Using ink blending brushes, I blended on Black Soot Distress Ink at the bottom and Peacock Feathers at the top. I removed the masks and then stamped the sentiment from the set at the top, using more black ink. The cacti were adhered with foam tape at the bottom. I felt like the scene was missing something, so I took the balloon image from the Oceans of Joy set and stamped, coloured and die cut it. I drew a line from the cactus with a black fine liner and then adhered the balloon on top with foam tape. To finish off, I added white gel pen highlights.


That’s it from me today but I will be back in a couple of weeks with another guest spot as I have more cards to share! Thanks so much for stopping by, have a great day!


Sunny Studio Supplies Used:


Oceans of Joy Dies
Oceans of Joy Dies
Shop at:
Sunny Studio
Oceans of Joy Stamps
Shop at:
Sunny Studio
Looking Sharp Stamps
Shop at:
Sunny Studio
Looking Sharp Dies
Looking Sharp Dies
Shop at:
Sunny Studio
Chloe Alphabet Dies
Chloe Alphabet Dies
Shop at:
Sunny Studio
Cupcake Shape Dies
Cupcake Shape Dies
Shop at:
Sunny Studio