Showing posts with label Autumn Tree. Show all posts

Tuesday, November 29, 2022

Reindeer Games Cards with Kavya and Isha

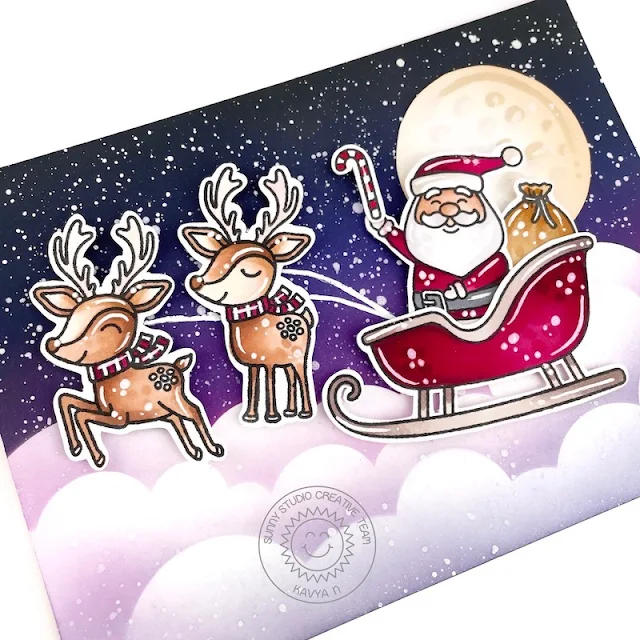
Hi folks. Kavya here with another fun holiday project! Ever since I saw these adorable reindeers from Reindeer Games, I knew I wanted to create a scene with a Santa and his reindeers sleighing across a night sky. 

Sunny Studio Stamps: Reindeer Games Holiday Card by Kavya (featuring Santa Claus Lane)

I started off by creating my backgrounders using shades of blue, black and purple dye ink. I used a generic cloud stencil to create the clouds at the bottom. Then, I splattered some white paint for the stars and snow! It might have been a bit too much in hindsight!

Sunny Studio Stamps: Reindeer Games Holiday Card by Kavya (featuring Santa Claus Lane)

Then, I stamped and colored images from Reindeer Games and Santa Claus Lane stamps. I then adhered all the images and added a moon. I chose to skip the sentiment but you can add one at the bottom if you’d like.

That’s it! I was done! I hope you liked this fun project ;) Happy Crafting!

-----------------------------------------

Hello everyone! Isha today with a cute holiday card featuring the Reindeer Games stamps and dies

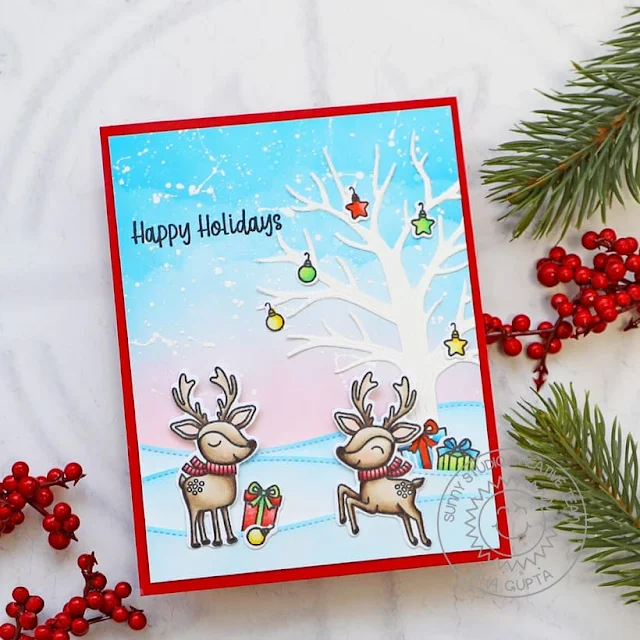
Sunny Studio Stamps: Reindeer Games Holiday Card by Isha Gupta (featuring Autumn Tree Dies, Slimline Dies, Holiday Express)

I started by sponging some inks to create the sky. Flick white paint to create snow. Die-cut the tree from the Autumn Tree die, add some white paint to create the snowy look. Die-cut the snow dunes using the Slimline Nature Border dies. Sponge ink to it.

Sunny Studio Stamps: Reindeer Games Holiday Card by Isha Gupta (featuring Autumn Tree Dies, Slimline Dies, Holiday Express)

Adhere all the pieces to the mat layer. Adhere this panel to a red cardbase. Stamp the images, colour and adhere to the card. Reindeer, ornaments - Reindeer Games stamp set and diesGifts - Holiday Express stamp and die, Penguin Party Stamp and die.

Adhere everything to the card and stamp the sentiment. Thank you for dropping by and have a nice day!

Sunny Studio Supplies Used:

Holiday Express Stamps
Shop at:
Sunny Studio
Holiday Express Dies
Shop at:
Sunny Studio
Santa Claus Lane Stamps
Shop at:
Sunny Studio
Santa Claus Lane Dies
Shop at:
Sunny Studio
Slimline Nature Borders
Shop at:
Sunny Studio
Penguin Party Stamps
Shop at:
Sunny Studio
Penguin Party Dies
Penguin Party Dies
Shop at:
Sunny Studio
Reindeer Games Stamps
Shop at:
Sunny Studio
Reindeer Games Dies
Reindeer Games Dies
Shop at:
Sunny Studio
Autumn Tree Die
Autumn Tree Die
Shop at:
Sunny Studio

Wednesday, October 19, 2022

Joyful Holiday Paper Focused Cards with Marie and Alma

Hello Crafty Friends, Marie here. I'm so glad to be back again to share a new Holiday Card inspiration with you featuring the new Joyful Holiday paper. For my card today, I decided to create some holiday gifts using pink, red, and grey toned papers. I also colored up a sweet penguin from the Penguin Party stamp set that goes perfectly with this fun scene. 

Sunny Studio Stamps: Joyful Holiday Paper Focused Holiday Card by Marie Marco (featuring Frilly Frame Dies, Holiday Greetings, Penguin Party)

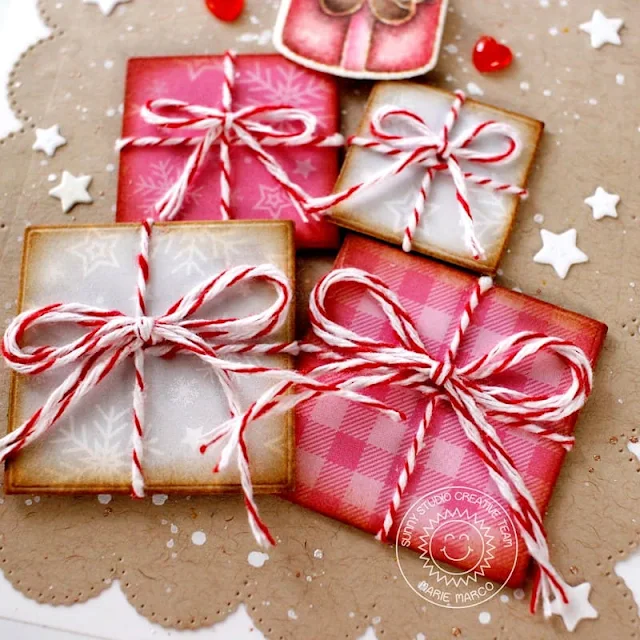
This card was super fun to put together and I especially loved and enjoyed creating the little gifts with Christmas colored twine! To create my gifts, I used different sized square dies. You can use any shape you want, it doesn't even have to be square! You can use rectangles and circles too, whatever small shapes you have on hand! I first cut out my shapes from 110 lb Neenah Solar White Card Stock as a study base for my pattern paper. Then I cut out my shapes from the Joyful Holiday paper and adhered it to the sturdy cardstock base. I wanted to give my presents a vintage look so I used some Distress Ink in Vintage paper and inked around my cut out squares. 

The fun part was adding Christmas twine! I cut strips of twine and attached it to the back of each shape using double sided tape adhesive. I created tiny bows and glued them to the front of each present using Bearly Art Precision Craft Glue. I set my tiny gifts aside and stamped my penguin from the Penguin Party stamps using Distress Ink In Antique Linen for my no-line coloring style. I used Derwent Inktense Pencils to color my penguin image, and cut it out using its corresponding Penguin Party dies

Sunny Studio Stamps: Joyful Holiday Paper Focused Holiday Card by Marie Marco (featuring Frilly Frame Dies, Holiday Greetings, Penguin Party)

For my card front and background, I used the Frilly Frames Eyelet Lace die to die cut a beautiful scalloped panel from kraft paper. I attached this to an A2 sized panel of 110 lb Neenah Solar White Cardstock . For added fun and interest, I used some metallic watercolors and white acrylic paint to create some light splatters to my card. 

After creating my splatter background, I positioned and adhered my pattern paper gifts and penguin using a combination of foam tape and Craft Glue. I added some random white stars and some Mix Red Heart Drops for a pop of red! 

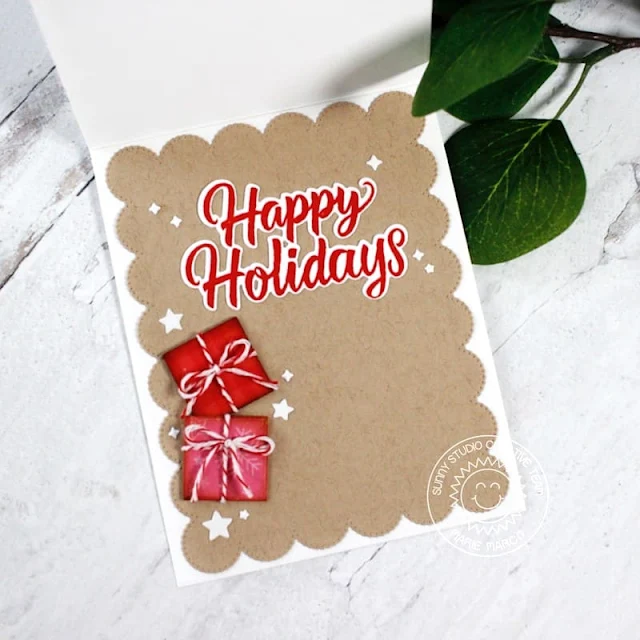
Sunny Studio Stamps: Joyful Holiday Paper Focused Holiday Card by Marie Marco (featuring Frilly Frame Dies, Holiday Greetings, Penguin Party)

Moving onto the inside of my card, I used the beautiful Holiday Greetings stamp set for my big and bold sentiment! I love this stamp set because all the sentiments come with corresponding dies making it super easy to place!!! I LOVE THAT! I used the Holiday Greetings die to cut out my Happy Holidays Sentiment, and along with two little gifts, adhered them to the inside of the card. I really love how this card came together and I already know who I'm planning to give it to! Thank you so much for joining me today! I hope this card inspires you to think of other ways to use your pattern paper! Until next time, Happy crafting and card making friends!  

-----------------------------------------------

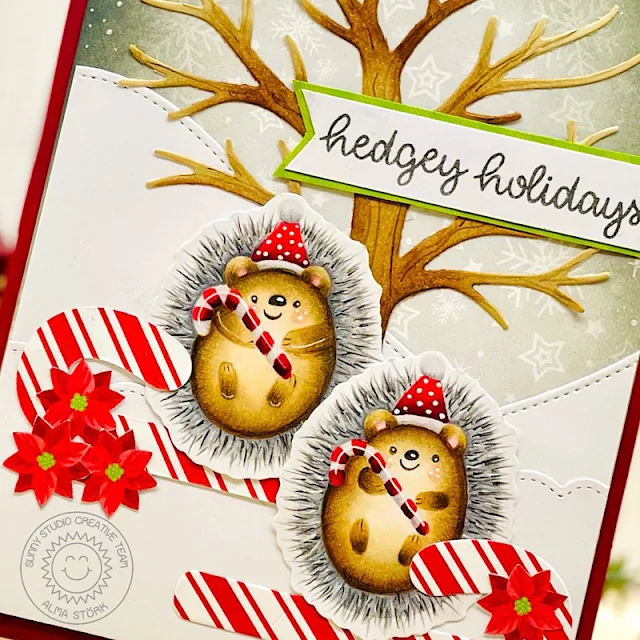
Hi there, it’s Alma here with you. Today I want to show you how versatile you can use the new Joyful Holiday Paper pack! 

Sunny Studio Stamps: Joyful Holiday Paper Focused Holiday Card by Alma Störk (featuring Hedgey Holidays, Autumn Tree Dies)

First of all I coloured the cute hedgehogs from the Hedgey Holiday Stamps with Copics and Pencils. After that I cut the Hedgehogs and add some highlights with the white gel pen. Then I die-cut the tree from the Autumn Tree Dies and the candy cane from the Santa´s Stocking Dies

Sunny Studio Stamps: Joyful Holiday Paper Focused Holiday Card by Alma Störk (featuring Hedgey Holidays, Autumn Tree Dies)

Then I cut a rectangular card and I die-cut the snowy hills with the dies from the Slimline Nature Border Dies and Fluffy Clouds Border Dies.  After that I cut the poinsettia plants out of the mentioned paper pad. Finally I glued everything together and added the text.

Sunny Studio Supplies Used:

Santa's Stocking Dies
Shop at:
Sunny Studio
Fluffy Clouds Border Dies
Shop at:
Sunny Studio
Frilly Frames-Eyelet Lace
Shop at:
Sunny Studio
Slimline Nature Borders
Shop at:
Sunny Studio
Hedgey Holidays Stamps
Shop at:
Sunny Studio
Hedgey Holidays Dies
Shop at:
Sunny Studio
Holiday Greetings Stamps
Shop at:
Sunny Studio
Holiday Greetings Dies
Shop at:
Sunny Studio
Penguin Party Stamps
Shop at:
Sunny Studio
Penguin Party Dies
Penguin Party Dies
Shop at:
Sunny Studio
Autumn Tree Die
Autumn Tree Die
Shop at:
Sunny Studio
Joyful Holiday Paper
Shop at:
Sunny Studio

Monday, October 10, 2022

Cozy Christmas Cards with Bobbi and Cathy

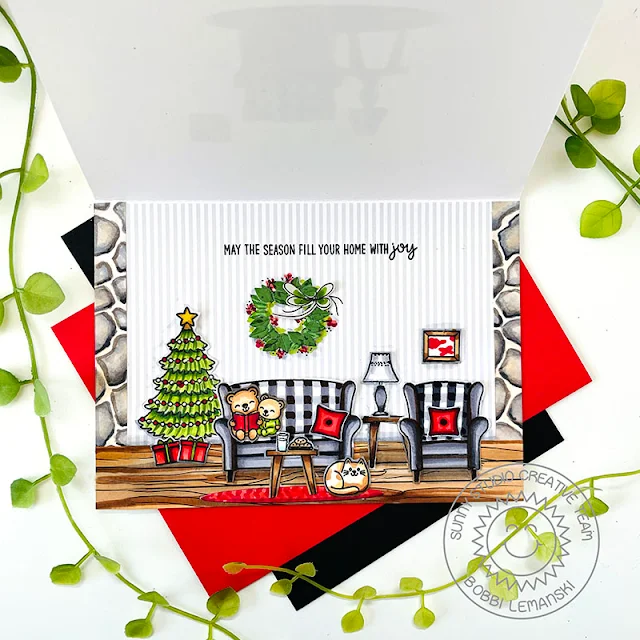
There’s nothing better than decorating our house for the holidays. It’s Bobbi here and my family goes all out for the holidays. We put up four holiday trees and each one has a theme. We fill the couch with festive pillows and add holiday décor everywhere. It should be no surprise that I had fun decorating this card’s 5″ X 7″ interior space, too. Today’s card features the new Cozy Christmas stamps and dies.
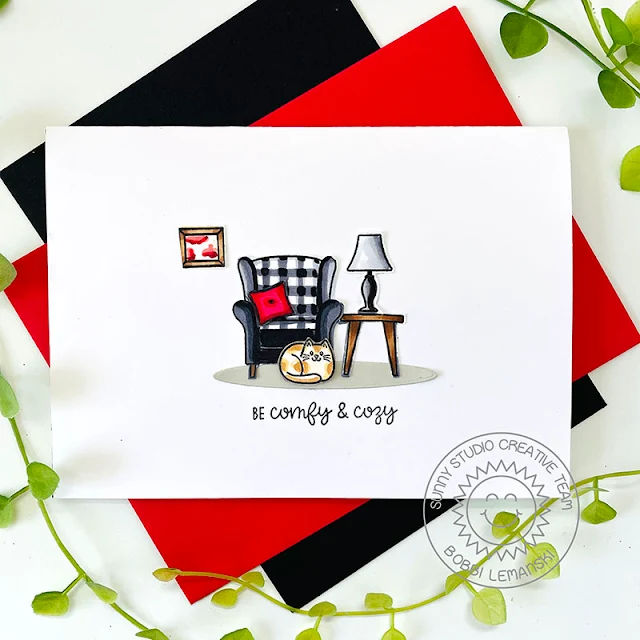
Sunny Studio Stamps: Cozy Christmas Holiday Card by Bobbi Lemanski (featuring Autumn Tree Dies)

My card  is one of those unsuspecting cards where the outside is simple and clean and the inside is full of festive fun. I used the chair, pillow, table, lamp, picture and cat on the front, grounding all the elements with a simple gray, oval shadow at the bottom. I stamped the phrase, “Be comfy and cozy” right below the sweet vignette to finish the front.

Sunny Studio Stamps: Cozy Christmas Holiday Card by Bobbi Lemanski (featuring Autumn Tree Dies)

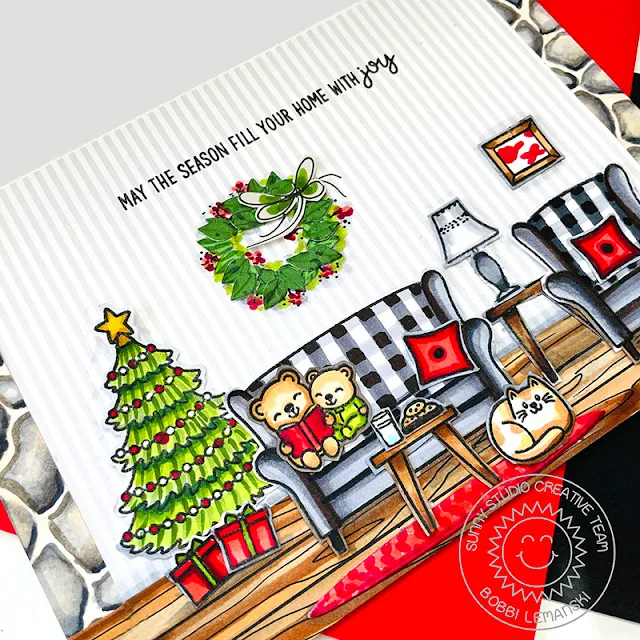
Inside the card, I created a holiday indoor scene using the furniture, holiday tree, presents, and animals from the set. I love the look of buffalo plaid in the wintertime so I colored this rustic plaid design on the couch and chair and added red pillows to dress them up.

To create the interior scene, I used a pattern paper for a wallpapered wall background. It’s a simple stripe from the Subtle Grey Tones 6″ X 6″ paper pack. Because the pattern paper is only 6″ wide, I added a 1/2″ strip on both sides to cover the full 7″ card width. I wanted it to look like a warm and cozy cabin inside so I colored the strips to look like natural stone pillars. I also created a warm-toned wood floor for the scene. 


I used the following Copic Sketch Marker colors:

Wood floor: E57, E55, E43 and E42 Copic Sketch Markers and a black fine-tip marker
Stone pillars: YR30, C7, C5, C3, C1, W7, W5, W3, W1, T3, T1 and 100
Buffalo Plaid furniture and lamp: 100, C7, C5, C3, C1
Wood furniture/picture: E59, E57, E55, R29
Christmas tree: YG67, YG63, YG17, YG0
Kitty and Bears: E55, E53, E50, R89, R29, R14, YG17, YG03


Sunny Studio Stamps: Cozy Christmas Holiday Card by Bobbi Lemanski (featuring Autumn Tree Dies)

To finish the interior space, I added a red rug to ground the furniture and warm up the floor. I also made a wreath for the wall. To make the wreath I used the Autumn Tree dies and cut the tiny leaves from green cardstock and glued them on the wall in a circular shape. I hand colored some red berries and drew a string bow for the wreath, too. The room is now warm, cozy and decorated for Christmas!


Thanks for stopping by today. If you want to see more ideas and inspiration from me, subscribe to my blog, BobbiHartDesign.com. I’ll send you updates on new posts! You can also find me on Instagram as @BobbiHartDesign and on Facebook as BobbiHartDesign.


--------------------------------------------------------


Hey friends! Cathy here today with a little cozy cuteness to share! I just love all the scene building elements in the Cozy Christmas Stamps and this adorable little penguin looks right at home.

Sunny Studio Stamps: Cozy Christmas Holiday Card by Cathy Chapdelaine (featuring Penguin Party, Reindeer Games, Frilly Frame Dies, Winter Greenery)
 

I started by die-cutting the frame portion of the Frilly Frames Lattice Die from gray cardstock and adhering it to a white A2 card base. For a little pop of red around my scene, I die-cut the frame again from red cardstock and adhered the scallop bits inside the gray frame. Next, I cut a piece of white cardstock 3 1/4” x 4 1/2". I cut a piece of patterned paper from the Sweater Weather Paper 1” x 4 1/2", heat embossed the sentiment in white embossing powder and adhered it to the bottom of the white cardstock. I cut a piece of patterned paper 2 1/2” x 4 1/2" from the Subtle Grey Tones Paper and adhered it to the top of the white cardstock slightly overlapping the paper below.


For the window in my scene, I stamped some trees from the Country Scenes Stamps on Neenah 80lb Classic Crest solar white cardstock, colored it with Copics and cut the piece to 1” square. I die-cut the window from the Sweet Treat House Add-on and adhered the 1” square to the back. I also die-cut a bow from the Sweet Treat House Add-on, colored it with Copics and adhered it to the top of the window for a little extra Christmas cheer.


Sunny Studio Stamps: Cozy Christmas Holiday Card by Cathy Chapdelaine (featuring Penguin Party, Reindeer Games, Frilly Frame Dies, Winter Greenery)
 

I stamped all the images on Neenah 80lb Classic Crest solar white cardstock, colored them with Copics and fussy cut them out. I combined stamps from the Cozy Christmas StampsPenguin Party Stamps and the Reindeer Games Stamps. The Santa hat from the Reindeer Games Stamps fits the little kitty just perfect!


To finish it off, I die-cut the holly and berries from the Winter Greenery Dies, colored them with Copics and adhered them to the top of the card.


I hope you enjoyed and thanks for stopping by today! For more inspiration, please visit my blog www.inkredibleadventures.com and you can also find me on Instagram as @cathy.chapdelaine.


Sunny Studio Supplies Used:

Frilly Frames Lattice Dies
Shop at:
Sunny Studio
Subtle Grey Tones Paper
Shop at:
Sunny Studio
Sweet Treats House Add-on
Shop at:
Sunny Studio
Country Scenes Stamps
Shop at:
Sunny Studio
Winter Greenery DIes
Shop at:
Sunny Studio
Sweater Weather Paper
Shop at:
Sunny Studio
Cozy Christmas Stamps
Shop at:
Sunny Studio
Cozy Christmas Dies
Cozy Christmas Dies
Shop at:
Sunny Studio
Penguin Party Stamps
Shop at:
Sunny Studio
Penguin Party Dies
Penguin Party Dies
Shop at:
Sunny Studio
Reindeer Games Stamps
Shop at:
Sunny Studio
Reindeer Games Dies
Reindeer Games Dies
Shop at:
Sunny Studio
Autumn Tree Die
Autumn Tree Die
Shop at:
Sunny Studio

Thursday, October 6, 2022

Autumn Tree Die Focused Cards with Waleska and Marine

Hello Friends, Waleska here with you. I'm back today for more Sunny Studio Stamps inspiration from their most recent release! Today's card features the beautiful Autumn Tree dies.


Sunny Studio Stamps: Autumn Tree Die Focused Card by Waleska Galindo (featuring Fall Friends, Fancy Frame Dies)

For my card today I started with the focal point which is the Autumn Tree die, I die cut the tree with kraft cardstock, I added some shading with Oxide Ink Vintage photo. When you add a little of ink to the edges of your die cut images you create dimension and a better look. I die cut a bunch of leaves and color them with copic markers. I then adhere all the colorful leaves to the tree. I decided to use the cute fox from the Fall Friends Stamps at the bottom of my card and color them I used copic markers YR18 YR09 YR04.


Sunny Studio Stamps: Autumn Tree Die Focused Card by Waleska Galindo (featuring Fall Friends, Fancy Frame Dies)

I finally used a teal colored cardstock for the background on my card, the Fancy Frames Rectangle dies and the Critter Country paper to match the colors of the leaves.

I hope you enjoy it!  Thanks for visiting!

--------------------------------------------

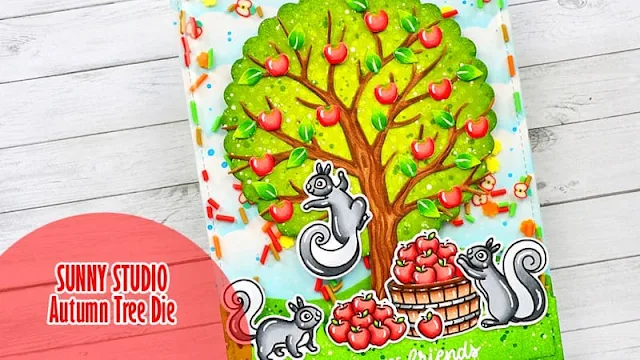
Hello crafty friends, Marine here with you today! I'm thrilled to be back with this new edge to edge or infinity shaker card showcasing the gorgeous Autumn Tree die, and some Squirrel Friends that I turned into skunks.

Sunny Studio Stamps: Autumn Tree Die Focused Card by Marine Simon (featuring Squirrel Friends, Scalloped Circle Mat Dies)

I started off by stamping a few images using an alcohol marker friendly black ink: some apples and the bucket from Fall Friends, as well as three cute Squirrel Friends. I also cut some Autumn Tree pieces: the tree trunk out of kraft cardstock, and some apples & leaves out of the same paper I stamped my images on. And I colored all those elements using my alcohol markers, starting with the squirrels that I colored in black & white to turn them into skunks.

Sunny Studio Stamps: Autumn Tree Die Focused Card by Marine Simon (featuring Squirrel Friends, Scalloped Circle Mat Dies)

Next I created the foliage. I cut a Scalloped Circle Mat 1 out of a Critter Country pattern paper, and added some texture: mowed lawn & rustic wilderness distress inks on the edges, splatters of rustic wilderness distress ink mixed with water, and splatters of copic opaque white ink mixed with water.

I cut a 5,5" x 4,25" bristol panel, and used stencils to create the background of my cute little scene. A hill stencil along with mowed lawn & rustic wilderness distress inks to create a hill border at the bottom, and a cloud stencil along with tumbled glass & salty ocean distress inks to create a simple sky on the upper part. I also cut a grass border using a die from the Picket Fence Border die set and colored it using the same inks as the hill border.

Sunny Studio Stamps: Autumn Tree Die Focused Card by Marine Simon (featuring Squirrel Friends, Scalloped Circle Mat Dies)

Next I created the shaker, and I invite you to watch the process video (linked down below) to see exactly how it was done, it's always easier to understand with images ^^ And once my shaker panel was done, I assembled everything on top of it. I white heat embossed the "So happy we're friends" sentiment from Fall Friends on the grass border, and attached that border at the bottom of the panel, directly on the plastic, using double sided tape. And next I built the tree, with the foliage, the tree trunk, and the apples & leaves, and added the skunks at the bottom of the card.

Sunny Studio Stamps: Autumn Tree Die Focused Card by Marine Simon (featuring Squirrel Friends, Scalloped Circle Mat Dies)

And that's it! I love this beautiful bright apple tree, and those skunks are super cute! Again, feel welcome to check the video for more details and information about this shaker card. Thanks so much for stopping by, and see you next time!

Sunny Studio Supplies Used:

Picket Fence Border Dies
Shop at:
Sunny Studio
Fall Friends Stamps
Fall Friends Stamps
Shop at:
Sunny Studio
Fall Friends Dies
Fall Friends Dies
Shop at:
Sunny Studio
Fancy Frames- Rectangles
Shop at:
Sunny Studio
Scalloped Circle Mat 1 Dies
Shop at:
Sunny Studio
Squirrel Friends Stamps
Shop at:
Sunny Studio
Squirrel Friends Dies
Shop at:
Sunny Studio
Autumn Tree Die
Autumn Tree Die
Shop at:
Sunny Studio
Critter Country Paper
Shop at:
Sunny Studio

Monday, October 3, 2022

Too Cute To Spook Cards with Cathy and Bobbi

Hey friends! Cathy here today with the cutest little trick-or-treaters all set for Halloween!

Sunny Studio Stamps: Too Cute To Spook Halloween Card by Cathy Chapdelaine (featuring Autumn Tree Dies, Fall Scenes, Slimline Dies, Frilly Frame Dies)

To make this card, I started by die-cutting a piece of black cardstock using the frame portion of the Frilly Frames Chevron Dies and adhered it to a lavender A2 card base. For the background of my scene, I cut a piece of Neenah 80lb Classic Crest solar white cardstock 3 1/2“ x 4 3/4". Before inking the sky, I masked a large moon by die-cutting a piece of eclipse masking tape using a Stitched Circle Small Die. Starting with gentle pressure from the masked moon working outwards, I inked with Milled Lavender followed by Dusty Concord, Seedless Preserves, Picked Raspberry and a touch of Hickory Smoke Distress inks on the top half of the cardstock. On the bottom half I inked with Milled Lavender into Saltwater Taffy. I added craters to the moon using a B60 Copic marker. Once the inks were dry, I heat embossed the sentiment using citron embossing powder.

For the ground, I cut a piece of white cardstock 2” x 4 3/4" and die-cut the top edge using a Slimline Nature Borders Die. I inked the piece with Hickory Smoke Distress ink and adhered it to the bottom of my background piece. I stamped a small tree from the Fall Scenes Stamps on the right side of the panel in gray ink to make it appear off in the distance and inked the ground under it with an N4 Copic marker. To add a little more pop of green, I cut a strip of paper from the Critter Country Paper Pack 1/2" x 4 3/4" and adhered it to the bottom of the scene.

Sunny Studio Stamps: Too Cute To Spook Halloween Card by Cathy Chapdelaine (featuring Autumn Tree Dies, Fall Scenes, Slimline Dies, Frilly Frame Dies)

The Autumn Tree Dies make such a great spooky tree cut from black cardstock, so I added that to the left side and used precision tip scissors to carefully cut the excess around the edges of the cardstock panel. I then adhered the panel to the card front. To finish, I stamped all the images from the Too Cute to Spook Stamps on Neenah 80lb Classic Crest solar white cardstock, colored them with Copics and die-cut them using the coordinating dies.

I hope you enjoyed and thanks for stopping by today! For more inspiration, please visit my blog www.inkredibleadventures.com and you can also find me on Instagram as @cathy.chapdelaine.

---------------------------------------------------

Hello friends! It’s Bobbi sharing a fun style card referred to as a zigzag card or stretch card. While this card requires a number of score lines and a few slits, it is really easy to make. I am using the Too Cute to Spook stamp and dies as well as the Autumn Tree dies and the Fall Scene Stamps.


Sunny Studio Stamps: Too Cute To Spook Halloween Card by Bobbi Lemanski (featuring Fall Scenes, Autumn Tree Dies)
 

This card folds flat for mailing (see below), but when removed from the envelope, it can be stretched out to be a free-standing card to enjoy through the holiday. I used one piece of 8-1/2″ X 11″ black cardstock to create the card base. That’s it! I have complete instructions on making the card base below so check it out if you would like to give this card idea a try.


Sunny Studio Stamps: Too Cute To Spook Halloween Card by Bobbi Lemanski (featuring Fall Scenes, Autumn Tree Dies)


Once my black zigzag card base was ready (see the card base instructions below), I stamped, colored and die cut the characters and pumpkins from the Too Cute to Spook stamp and dies as well as two black trees using the Autumn Tree dies and the fencing and smaller pumpkins from the Fall Scene Stamps. I arranged the fencing on the layered edges of the base, gluing each section. Since the fencing images stick up above the card base top edges, I added black cardstock to the backs of each fence strip to cover any color bleeding for a clean finish. 


Sunny Studio Stamps: Too Cute To Spook Halloween Card by Bobbi Lemanski (featuring Fall Scenes, Autumn Tree Dies)

I also added a 1/2″ strip of black cardstock inside the two diamond openings of the card base to center the house and the characters in those areas. This is easy to do. You can either attach the strips to the inside of the base (folding 1/4″ on each end to create glue flaps) or run them through the card base slits and secure them from behind. The images can also be attached directly to the card base avoiding the need to use any strips.


Sunny Studio Stamps: Too Cute To Spook Halloween Card by Bobbi Lemanski (featuring Fall Scenes, Autumn Tree Dies)
 

I added one tree in the back at the top of the hill, behind the house, and felt it needed more branches so I added one more to make the backdrop. Extra large pumpkins and the small tree from the Fall Scene Stamps set were added to the ground area. Next, came fencing from the Fall Scene Stamps and the the haunted house and characters from the Too Cute to Spook stamp and die sets.


Sunny Studio Stamps: Too Cute To Spook Halloween Card by Bobbi Lemanski (featuring Fall Scenes, Autumn Tree Dies)

I finished the front with some larger pumpkins and the “Trick or Treat” stamp from 
Too Cute to Spook stamp and die sets. I hand cut the phrase out and attached it to the front panel. I added some black leaves around it that I had die cut by accident when I cut out the autumn tree.  I added the cute bat in the tree, too.


Sunny Studio Stamps: Too Cute To Spook Halloween Card by Bobbi Lemanski (featuring Fall Scenes, Autumn Tree Dies)


This card folds flat to mail. I may have to trim my trees a bit for this one to fit inside my A7 envelope. 
 I could also fit this inside a longer business-size envelope or create a custom size envelope to fit my tall trees. I hope you give this idea a try.  Directions and measurements for the base are right below.


How to Make the Zig Zag Card Base:

Here’s some measurements and steps I followed to make my card base above. Note: I’m using white cardstock to show how to make the base. For my featured card above, I used a piece of black cardstock.


Sunny Studio Stamps: Too Cute To Spook Halloween Card by Bobbi Lemanski (featuring Fall Scenes, Autumn Tree Dies)

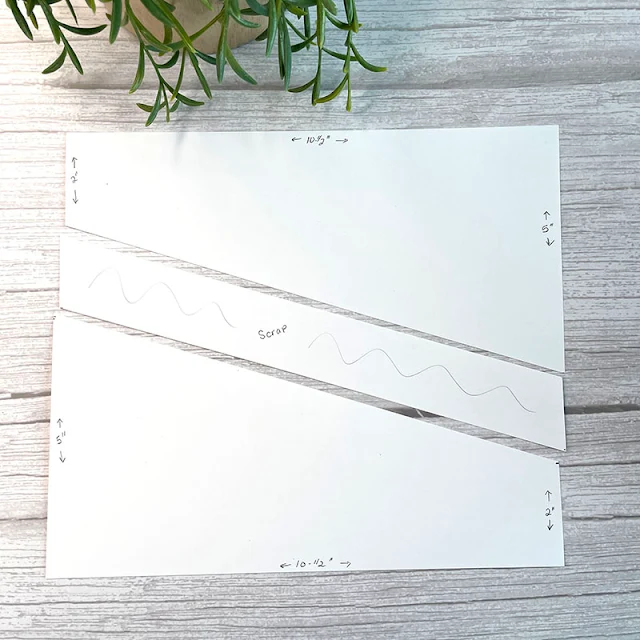
I cut  1/2″ off the 11″ length of a letter-size piece of cardstock, making it 10-1/2″ X 8-1/2″. I marked 5″ and 2″ on opposite sides and cut diagonally. I rotated to the other side of the remaining cardstock and did the same, thereby creating two matching panels. I threw away the odd-shaped scrap piece from the middle.


Sunny Studio Stamps: Too Cute To Spook Halloween Card by Bobbi Lemanski (featuring Fall Scenes, Autumn Tree Dies)


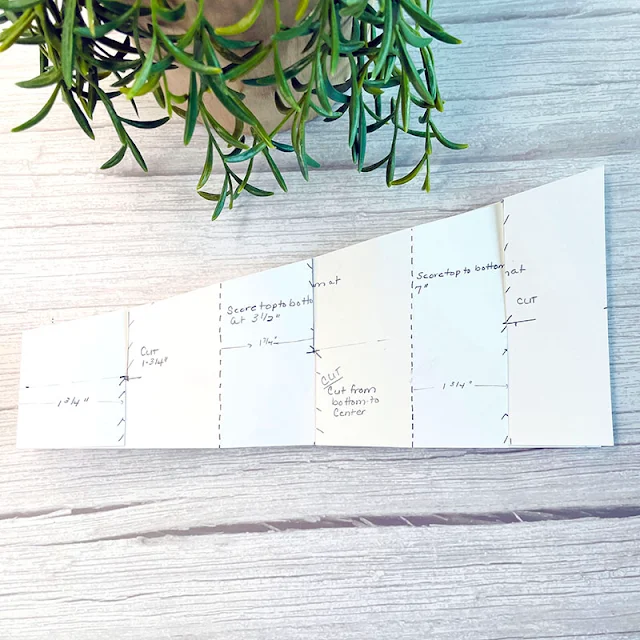
On both pieces, I scored at 3-1/2″ and 7″ from the left side creating three equal sized 3-1/2″ sections on each panel. I scored from the top to the bottom. I also measured and cut slits at 1-3/4″ in from each section (which is the middle of each section). One one panel, I cut from the top to the middle and on the other piece, from the bottom to middle. To determined the middle point, by placing my ruler at 1″ from the 2″ side and 2-1/2′ on the 5″ side (i.e., the center points on each side edge) and made a mark at the middle of each section so I knew where to stop cutting.


Sunny Studio Stamps: Too Cute To Spook Halloween Card by Bobbi Lemanski (featuring Fall Scenes, Autumn Tree Dies)

I placed one panel on top of the other panel and slid it down. When the pieces are intertwined, they should fit perfectly, assuming all the slits line up!


Sunny Studio Stamps: Too Cute To Spook Halloween Card by Bobbi Lemanski (featuring Fall Scenes, Autumn Tree Dies)

After connecting the two pieces at each slit point, this is how the card base looks from the top down. I ended up with two open diamonds in the middle. Now it’s ready to add the fun stuff!

Thanks for stopping by today. If you want to see more ideas and inspiration from me, subscribe to my blog, BobbiHartDesign.com. I’ll send you updates on new posts! You can also find me on Instagram as @BobbiHartDesign and on Facebook as BobbiHartDesign.

Sunny Studio Supplies Used: 

Frilly Frames Chevron Die
Shop at:
Sunny Studio
Slimline Nature Borders
Shop at:
Sunny Studio
Stitched Circle Large Dies
Shop at:
Sunny Studio
Fall Scenes Stamps
Fall Scenes Stamps
Shop at:
Sunny Studio
Fall Scenes Dies
Fall Scenes Dies
Shop at:
Sunny Studio
Too Cute To Spook Stamps
Shop at:
Sunny Studio
Too Cute To Spook Dies
Shop at:
Sunny Studio
Autumn Tree Die
Autumn Tree Die
Shop at:
Sunny Studio
Critter Country Paper
Shop at:
Sunny Studio