Friday, October 16, 2020

Classy Christmas Cards and Video Tutorial by Franci and Candice

Happy Friday crafty friends! It's Franci here with you today with a traditional festive card showcasing the new Classy Christmas set.

Sunny Studio Stamps: Classy Christmas Slimline Dies Inside Greetings Christmas Card by Franci Vignoli

I started by stamping, coloring with Copics and die cutting all the images. Then I created my cardbase out of white cardstock, covered the front with some patterned paper from the Amazing Argyle 6x6 set and I die cut a smaller white panel using the Slimline Basic Borders dies set.

Sunny Studio Stamps: Classy Christmas Slimline Dies Inside Greetings Christmas Card by Franci Vignoli

I stamped my sentiment from the Inside Greetings Holiday set on my white panel and glued it down to my card with foam adhesive. I also adhered all my images with more foam tape and then I added some sparkle gold splatters all over. 

Please enjoy my card video tutorial below:

Thanks a lot for stopping by, have a lovely day! 

-----------------------------------------------------

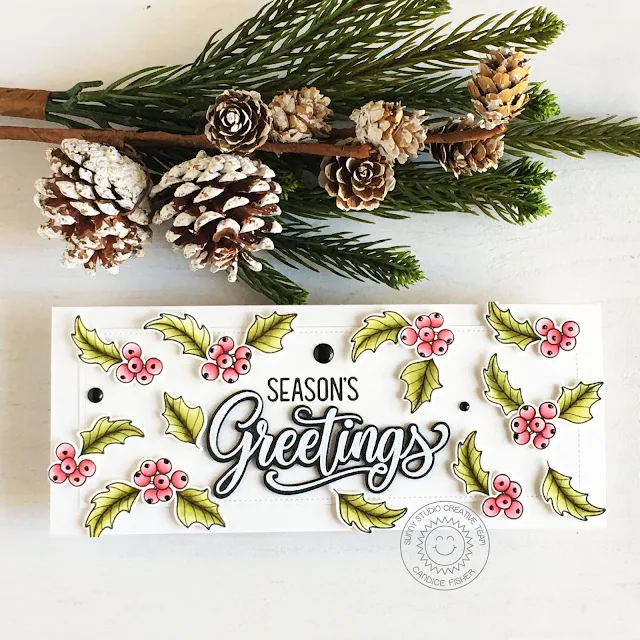
Hello! Candice back with you this Friday sharing a holly filled Christmas card using the new versatile Classy Christmas stamp set!

Sunny Studio Stamps: Classy Christmas Slimline Dies Season's Greetings Christmas Card by Candice Fisher

I used these Sunny Studio products for my card:

I began my slimline with an 8 1/2 x 3 1/2 card base. I went with a very simple background and added a stitched panel for the white on white. This technique is great for grounding your images when they are flowing all over your card.

I then heat embossed the "Greetings" in white on black cardstock and used the new word dies to cut it out. I cut a few more with the black cardstock and layered them to give a great depth to the sentiment. After gluing it to the card front I stamped the "season's" above it in Versafine black ink.

Sunny Studio Stamps: Classy Christmas Slimline Dies Season's Greetings Christmas Card by Candice Fisher

Next, I stamped the holly berries and leaves on watercolor paper, colored them with Zig markers and used the coordinating dies to cut them out. I added them all around the card front with foam tape and finished with black Nuvo drops and enamel dots to give a bit of shine!

Thank you so much for visiting today!

Sunny Studio Supplies Used:

Amazing Argyle 6x6 Paper
Shop at:
Sunny Studio
Season's Greetings Stamps
Shop at:
Sunny Studio
Season's Greetings Dies
Shop at:
Sunny Studio
Slimline Basic Borders
Shop at:
Sunny Studio
Slimline Scalloped Frame
Shop at:
Sunny Studio
Classy Christmas Stamps
Shop at:
Sunny Studio
Classy Christmas Dies
Shop at:
Sunny Studio
Inside Greetings-Holidays
Shop at:
Sunny Studio

Thursday, October 15, 2020

North Pole Cards by Vanessa and Anja

Hello to you! Vanessa here with a winter birthday card using the adorable North Pole set

Sunny Studio Stamps: North Pole Slimline Dies Penguin Pals Winter Birthday Card by Vanessa Menhorn

I first die-cut the rectangle using the Slimline Scalloped Frame dies and inked the bottom part with Tumbled Glass Distress Oxide Ink, the top part with Peacock Feathers Distress Oxide Ink. Now I die-cut a small piece of white cardstock to create the snow ground and adhered it to the panel. I stamped the sentiment onto the top of the panel and adhered it to the card base.

Stamps and dies used:
North Pole stamps dies (elves, balloons, north pole, sentiment)
Penguin Pals stamps + dies (birthday, icy block)
Slimline Scalloped Frame dies (stitched panel)

Sunny Studio Stamps: North Pole Slimline Dies Penguin Pals Winter Birthday Card by Vanessa Menhorn

Then I stamped the images onto white cardstock, colored everything with Copic Markers, die-cut the pieces with the matching dies and adhered the parts to the card, raising some elements with foam-tape. Finally, I drew strings for the balloons with a black marker.

These little elves are the cutest! I hope you like them as much as I do. Thank you for stopping by today, have a wonderful rest of your week!

-------------------------------------------------------

Hello everyone, Anja here and today I have a clean and simple holiday card for you using the North Pole Stamps. Mrs. Claus and Santa are just the cutest!

Sunny Studio Stamps: North Pole Frilly Frame Die Winter Holiday Card by Anja Bytyqi

For the background, I picked a striped paper from the Holiday Cheer Paper pack and trimmed it down with the stitched rectangle die included in the Frilly Frames Quatrefoil Dies set. I also die cut a circle from white cardstock and masked off the upper two thirds. To create the ground, I blended on Tumbled Glass Distress Oxide Ink.

Sunny Studio Stamps: North Pole Frilly Frame Die Winter Holiday Card by Anja Bytyqi

I stamped the images in Memento Tuxedo Black Ink, did some Copic coloring and cut them out with the coordinating dies. The sentiment was stamped in VersaFine Onyx Black Ink below the images which I adhered with liquid glue.

Thank you so much for stopping by! Have an awesome day!

Sunny Studio Supplies Used:

Holiday Cheer 6x6 Paper
Shop at:
Sunny Studio
Frilly Frames Quatrefoil
Shop at:
Sunny Studio
Slimline Scalloped Frame
Shop at:
Sunny Studio
North Pole Stamps
North Pole Stamps
Shop at:
Sunny Studio
North Pole Dies
North Pole Dies
Shop at:
Sunny Studio
Penguin Pals Stamps
Penguin Pals Stamps
Shop at:
Sunny Studio
Penguin Pals Dies
Penguin Pals Dies
Shop at:
Sunny Studio

Wednesday, October 14, 2020

Victorian Christmas Cards by Ana and Christy

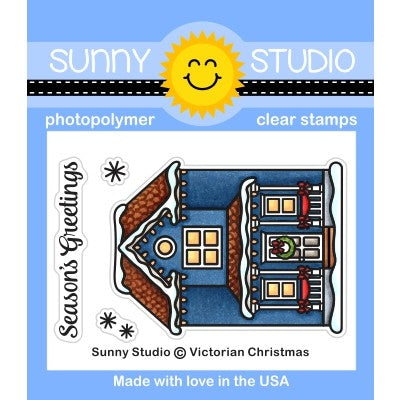
Hello friends! It’s Ana today with a colorful holiday card featuring Victorian Christmas stamps and coordinating dies, as well as Holiday Cheer patterned paper.

Sunny Studio Stamps: Victorian Christmas Frilly Frame Dies Winter Holiday Card by Ana Anderson

I started by choosing colorful snowflake patterned paper from the Holiday Cheer paper pack, die cut it with Frilly Frames Stripes Dies and created a snowflake scalloped mat.

I stamped Victorian Christmas house image 4 times and colored it with Copic markers. I was really inspired by the colors of snowflakes on patterned paper, and chose red, blue, pink and green for my houses.

Once colored, I cut the houses with coordinating die and backed each house with foam tape. I stamped the sentiment repeatedly in a single line across the snowflake background, then adhered the houses.

Sunny Studio Stamps: Victorian Christmas Frilly Frame Dies Winter Holiday Card by Ana Anderson

I backed the finished panel with red/white lattice patterned paper from the same pack, and added highlights with white gel pen.

I really hope you like today’s card and got inspired! Thank you so much for stopping by and I hope you have a wonderful week!

----------------------------------------------------

Hey friends, it's Christy here with a card using our adorable mini set Victorian Christmas. I also stamped the tree from Winter Scenes twice to create a little snowy scene. I colored the images with Copics and trimmed them out with the matching dies.

Sunny Studio Stamps: Victorian Christmas Winter Scenes Fancy Frame Dies Winter Holiday Card by Christy Reuling

For the focal panel, I die cut the smaller Fancy Frames Rectangle out of some white cardstock and popped the center portion out. I cut that across the middle to create a snowy slope and blended on some Faded Jeans and Chipped Sapphire Distress Oxide Ink for the night sky. Then I did some splatter detail with Copic Opaque White for the falling snow. I stamped a sentiment at the bottom of the snowbank in red ink and fit the pieces of the frame back together.

Sunny Studio Stamps: Victorian Christmas Winter Scenes Fancy Frame Dies Winter Holiday Card by Christy Reuling

For the patterned papers, I chose three prints from the Very Merry 6x6 paper to layer on my card base. I cut the largest down with the outer die from Frilly Frames Quatrefoil, and the two scalloped strips with the Slimline Basic Borders. Then I popped up my focal panel to give it some dimension and added a bit of Stickles on the lights and snow.

If you'd like to see how this card came together, you can check out the video tutorial on my YouTube channel, Christy Gets Crafty.

Sunny Studio Supplies Used:

Fancy Frames- Rectangles
Shop at:
Sunny Studio
Holiday Cheer 6x6 Paper
Shop at:
Sunny Studio
Frilly Frames Stripes Die
Shop at:
Sunny Studio
Very Merry 6x6 Paper
Shop at:
Sunny Studio
Frilly Frames Quatrefoil
Shop at:
Sunny Studio
Slimline Basic Borders
Shop at:
Sunny Studio
Victorian Christmas Stamps
Shop at:
Sunny Studio
Victorian Christmas Dies
Shop at:
Sunny Studio
Winter Scenes Stamps
Shop at:
Sunny Studio
Winter Scenes Dies
Winter Scenes Dies
Shop at:
Sunny Studio

Tuesday, October 13, 2020

Window Quad Die Focused Cards by Juliana and Isha

Hello Sunny Studio friends! It's Juliana and today I'm here to share a shaker card I created using the Window Quad Square Dies. I've paired it with the adorable Penguin Pals to create a Christmas card that's perfect for that someone special.

Sunny Studio Stamps: Window Quad Dies Penguin Pals Fancy Frame Dies Winter Holiday Card by Juliana Michaels

I began by stamping and then coloring images from the Penguin Pals stamp set. I then die cut them using the coordinating Penguin Pals Dies.

Sunny Studio Stamps: Window Quad Dies Penguin Pals Fancy Frame Dies Winter Holiday Card by Juliana Michaels

To create the shaker, I die cut a piece of white cardstock using the Window Quad Square Dies. I then framed it with the Fancy Frames Square Dies. I filled the shaker with Blue Snowflake Confetti and Majestic Fusion Sequins.

Sunny Studio Stamps: Window Quad Dies Penguin Pals Fancy Frame Dies Winter Holiday Card by Juliana Michaels

Once the shaker was completed, I arranged the penguins on the card front and adhered them using double sided foam adhesive. The design didn't leave much room for a sentiment, so I added it to the inside of the card using one of the punny sayings from the Penguin Pals stamp set.

I hope you enjoyed today's inspiration featuring the Penguin Pals stamp set. Thanks so much for stopping by today!

---------------------------------------------------

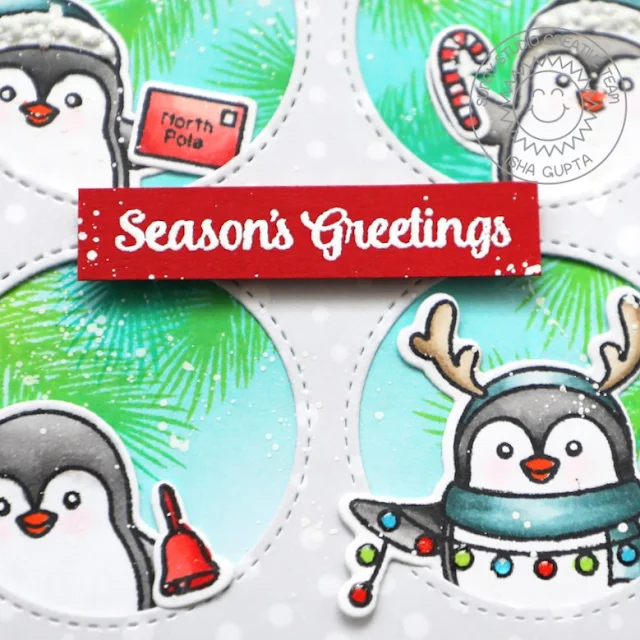
Hello everyone! Isha here today with a fun card featuring the Window Quad Dies. I really like all the small dies it comes with to create beautiful embellishments.

Sunny Studio Stamps: Window Quad Dies Penguin Pals Classy Christmas Winter Holiday Card by Isha Gupta

I started with my card first. I took Window Quad Circle dies and die-cut the mat layer using the Subtle Grey Tones paper pad. I then made a square card and sponged Peacock Feathers Distress ink in an ombre to it. Keeping it the darkest towards the center. I then marked the circle openings and stamped the pine leaves from the Classy Christmas stamp.

Stamp the cute penguins from the Penguin Pals stamp set, color using Copic markers and die-cut using the coordinating dies. I then applied some clear ink using WOW! Embossing pen to the cap fur, sprinkle white puff embossing powder and heat set.

Sunny Studio Stamps: Window Quad Dies Penguin Pals Classy Christmas Winter Holiday Card by Isha Gupta

Adhere the mat layer to the card base. Adhere the penguins. Flick white paint to get the snow effect. Stamp the sentiment from the Victorian Christmas stamp set, emboss it using white embossing powder and heat set. Cut into a stripe and adhere to the card using 3D foam.

I used Window Quad Square dies to create the tags. I die-cut the tags using the Subtle Grey pattern paper. I then die-cut the green part using the paper from the Sleek Stripes paper pack. Adhere to the tags.

Sunny Studio Stamps: Window Quad Dies Penguin Pals Classy Christmas Winter Holiday Card by Isha Gupta

I die-cut poinsettia from the Window Quad Circle dies. I die-cut two flowers using a peach cardstock and two using vellum. Sponge a little abandoned coral distress oxide ink to the center. Adhere the vellum flower onto the coral flower. I then adhered the Iridescent Pearl in the center. To finish, I added a gold and cream string to the tags.

Thank you for stopping by. Have a nice day!

Sunny Studio Supplies Used:

Fancy Frames-Square Dies
Shop at:
Sunny Studio
Subtle Grey Tones Paper
Shop at:
Sunny Studio
Window Quad Circle Die
Shop at:
Sunny Studio
Window Quad Square Die
Shop at:
Sunny Studio
Classy Christmas Stamps
Shop at:
Sunny Studio
Penguin Pals Stamps
Penguin Pals Stamps
Shop at:
Sunny Studio
Penguin Pals Dies
Penguin Pals Dies
Shop at:
Sunny Studio
Victorian Christmas Stamps
Shop at:
Sunny Studio
Sleek Stripes Paper
Sleek Stripes Paper
Shop at:
Sunny Studio