Saturday, April 4, 2020

Guest Designer Spotlight: Cards with Tatiana Trafimovich

Hi everyone, it's Tatiana Trafimovich here and I'm excited to be guest designing for Sunny Studio Stamps.

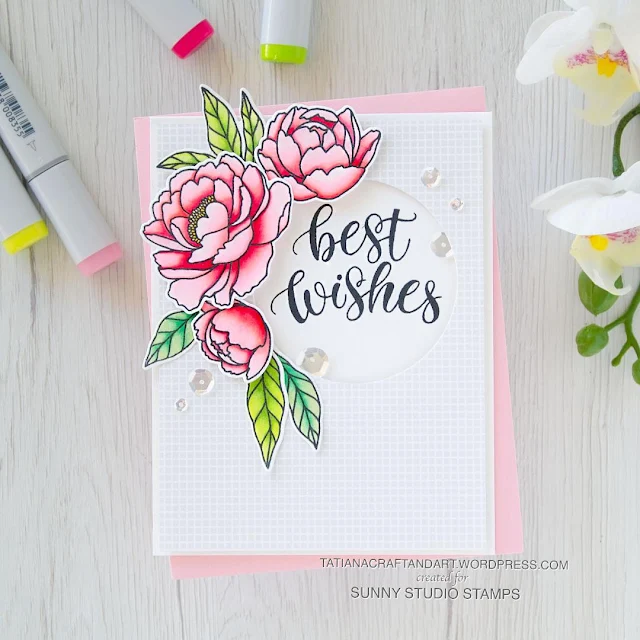
Sunny Studio Stamps: Pink Peonies Best Wishes Cards by Tatiana Trafimovich

My first card features beautiful Pink Peonies stamp and die sets. I decided for a clean and simple design since I wanted to keep the main focus on beautiful flowers and coloring. To start, I die cut three flowers and some leaves from Neenah Solar White paper using the coordinating dies. I saved the negative parts of all the dies and used them into my stamping positioning tool for a perfect alignment while I was stamping the open images from Pink Peonies stamp set with Memento Tuxedo Black ink since it's Copic friendly. 

Next I colored all the elements with Copic markers. In case you're wondering, here's the complete list of all the colors used on this project. Copics: RV0000-RV00-RV21-RV23-RV25-RV29; YG00-YG01-YG23-YG25; G02-G05-G40.

Sunny Studio Stamps: Pink Peonies Best Wishes Cards by Tatiana Trafimovich

Assembling all the elements together, I prepared an extended A2 size white card base (5 1/2" x 4 1/4") and a slightly smaller rectangle of a light grey patterned paper from Subtle Grey Tones paper pad where was cut out a circle window large enough to stamp "Best Wishes" sentiment inside. I popped all the piece on a foam tape for a fun dimensional look and finished with a few clear sparkling sequins and a coat of a clear shimmer pen.

Sunny Studio Stamps: Pink Peonies Best Wishes Cards by Tatiana Trafimovich

Working on my second project, I switched to watercolors. The easiest way to use this color media and achieve a great effect is to pair it with heat embossing. In fact, the heat embossing makes the stamp lines raised above the paper surface and keeps separate every single area avoiding the contamination of colors. This time I picked together all the flowers and leaves from Pink Peonies stamp set on my compact stamp press, inked them with VersaMark clear sticky ink, stamped on a piece of watercolor paper, sprinkled with a fine white embossing powder and zapped with the heat gun. I die cut all the heat embossed shaped using the coordinating dies and proceeded with coloring using some regular watercolors from my stash.

Sunny Studio Stamps: Pink Peonies Best Wishes Cards by Tatiana Trafimovich

Once finished with flowers and leaves, I decided to created a matching watercolor background and a heat embossed sentiment that was fussy with a pair of harp small scissors and then glued directly to the card base. The flowers were popped on a foam tape just for some little extra finish touch along with a few clear drops.

Sunny Studio Stamps: Blooming Frame Dies Best Wishes Cards by Tatiana Trafimovich

Next comes a card featuring die cutting technique and a wonderful Blooming Frame Die. To start, I trimmed and scored an extended A2 size green card base (5 1/2" x 4 1/4"). I die cut and glued on top of the card front the amazing Blooming Frame. Then I made more die cutting, working with a small flower die that comes as a part of Blooming Frame Die set. I grabbed some scraps of the colorful cardstock from my stash and created a bunch of colorful flowers and the same amount of white flower centers. 

Sunny Studio Stamps: Blooming Frame Dies Best Wishes Cards by Tatiana Trafimovich

I arranged all the die cut elements on the card front adhering some of them directly to the card base and popping the others on a foam tape. Finally I added a metallic gold sentiment from Pink Peonies stamp set that was heat embossed on a piece of vellum and fussy cut with scissors. As a final touch I added some tiny shimmer gold spots here and there to tie the sentiment with the rest of the card.

Sunny Studio Supplies Used:

Subtle Grey Tones Paper
Shop at:
Sunny Studio
Pink Peonies Stamps
Pink Peonies Stamps
Shop at:
Sunny Studio
Pink Peonies Dies
Pink Peonies Dies
Shop at:
Sunny Studio
Blooming Frame Die
Blooming Frame Die
Shop at:
Sunny Studio

Friday, April 3, 2020

Eyelet Lace Border Die Focused Cards with Juliana and Candice

Hello Sunny Studio friends! It's Juliana here and today I'm here to share a card I created using the Eyelet Lace Border Dies. I combined it with the Pink Peonies Stamp Set to create a Confirmation Card for my niece.

Sunny Studio Stamps: Eyelet Lace Border Dies Pink Peonies Phoebe Alphabet Stamps Everyday Card by Juliana Michaels

I began by stamping the images from the Pink Peonies Stamp Set with embossing ink onto watercolor paper. I then heat embossed them with white embossing powder. I then colored them Zig Clean Color Real Brush Markers and used a water brush to blend the color. Once all of the coloring was completed, I used the coordinating Pink Peonies Dies to die cut the images.

Next, I stamped the word “blessings” with embossing ink using the Phoebe Alphabet Stamps onto Bristol Cardstock. I heat embossed the letters with white embossing powder. I then began working on the background by ink blending the center of the paper with Peacock Feather Distress Oxide Ink. I then splattered the area with water and dabbed it dry to reveal the splatters. I also wiped over the embossed sentiment to remove the ink.

Sunny Studio Stamps: Eyelet Lace Border Dies Pink Peonies Phoebe Alphabet Stamps Everyday Card by Juliana Michaels

Once the background was finished, I added a border of white cardstock below the sentiment that was die cut using the Eyelet Lace Border Dies. I then adhered the flowers and leaves using double sided foam adhesive. For the final touch, I added some Clear Drops Mix 2.

I love the beautiful detail that the Eyelet Lace Border Die adds to the card. It was the perfect touch to bring this card together. Thanks so much for stopping by today!

------------------------------------------------------------

Hello! Candice with you today and I have a sweet pastel Easter card for you highlighting the gorgeous Eyelet Lace Border dies! I love the delicate cut of these dies and knew they would go perfect with pastel colors!

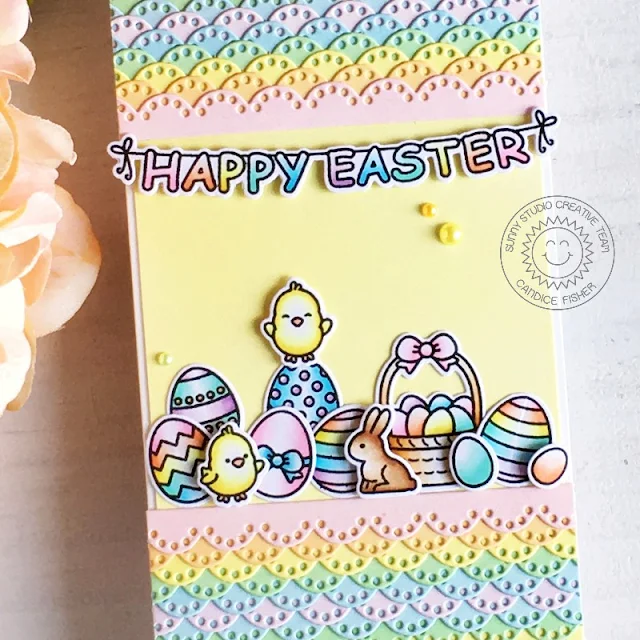
Sunny Studio Stamps: Eyelet Lace Border Dies Chubby Bunnies Chickie Baby Easter Card by Candice Fisher

I used a few Sunny Studio Stamps products for my card:

I began my card by creating an 8 1/2 x 3 1/2 card base which is just the right size for your standard envelopes. For the background, I first trimmed a piece of Bristol smooth to fit a little smaller than my card base and inked with squeezed lemonade.

I then die cut a whole bunch of the eyelet strips, inked 4 of each in spun sugar, dried marigold, squeezed lemonade, cracked pistachio & tumbled glass and just 2 in milled lavender. I layered them in rainbow color and then backwards to create my pattern.

Sunny Studio Stamps: Eyelet Lace Border Dies Chubby Bunnies Chickie Baby Easter Card by Candice Fisher

Next, I stamped the images from the sets listed above, colored them in light Copic markers and cut out using their coordinating dies. I glued the background images and used foam tape on the front to add contrast. For a few embellishments, I added the gorgeous rainbow pearls.

I want to thank you for the time you stopped by!

Sunny Studio Supplies Used:

Chubby Bunny Stamps
Chubby Bunny Stamps
Shop at:
Sunny Studio
Chubby Bunny Dies
Chubby Bunny Dies
Shop at:
Sunny Studio
Chickie Baby Stamps
Chickie Baby Stamps
Shop at:
Sunny Studio
Chickie Baby Dies
Chickie Baby Dies
Shop at:
Sunny Studio
Phoebe Alphabet Stamps
Shop at:
Sunny Studio
Pink Peonies Stamps
Pink Peonies Stamps
Shop at:
Sunny Studio
Pink Peonies Dies
Pink Peonies Dies
Shop at:
Sunny Studio
Eyelet Lace Borders
Eyelet Lace Borders
Shop at:
Sunny Studio