Friday, November 1, 2019

Santa Claus Lane Cards with Rachel and Candice

Hello everyone! It's Rachel here and I am sharing a 3D card with you today that focuses on the new Santa Claus Lane Stamp Set. I love the added depth that a box card brings, and I thought it would be fun to create a cozy little scene with Santa delivering his gifts on Christmas Eve.

Sunny Studio Stamps: Santa Claus Lane Christmas Interactive Card by Rachel Alvarado

To start, I stamped all of my images from the Santa Claus Lane Stamp Set with Memento Tuxedo Black Ink onto some Neenah Solar White 110lb card stock. I love the heavy weight of this card stock, especially for box cards, because my stamped images tend to stay standing upright instead of bending or flopping over as lighter weight card stocks would do. I colored all of my images with Copic Markers and then used the coordinating Santa Claus Lane Dies to cut them out.

Sunny Studio Stamps: Santa Claus Lane Christmas Interactive Card by Rachel Alvarado

I used a paper trimmer, one sheet of white card stock, scissors, adhesive, a scoring board, and some patterned paper to create an A2 sized box for my card base. For my patterned paper, I used some scrap pieces from both the Holiday Cheer 6x6 and Very Merry 6x6 Paper Pads. I adhered all of my images to the inside shelves of my box using some liquid adhesive. Lastly, I heat embossed my sentiment onto some black card stock with Fine Detail White Embossing Powder. I then used my paper trimmer to trim these down to size and attached them to the front flap of my card.

I hope you enjoyed my card today! Once folded, it fits easily into a standard A2 sized envelope. Thank you all so much for stopping by! Have a wonderful day!

------------------------------------------------------------

Welcome back my crafty friends! Candice with you today sharing a film strip of Santa caught on Christmas Eve! I only used the one Santa Claus Lane stamp set to create all the scenes! I love that Sunny Studio Stamps are always packed with lots of accessories.

Sunny Studio Stamps: Santa Claus Lane Fall Flicks Filmstrips Dies Christmas Card by Candice Fisher

For my film magic I used a few Sunny Studio products:
I began my card by creating the 8 1/2 x 3 1/2 card base which fits nicely into the size 9A envelopes. First, I made the film strip by die cutting multiples out of thick black cardstock and layered for a sturdy strip, lining up at the ends to make one large strip. I then trimmed the backgrounds using patterns in the Very Merry pack and glued to the film strips.

Sunny Studio Stamps: Santa Claus Lane Fall Flicks Filmstrips Dies Christmas Card by Candice Fisher

Next, I stamped all the images from the Santa Claus Lane stamp set, colored with Copic markers, and cut out with the coordinating dies. I then adhered them into the film strips, popping up some for dimension. Lastly, I stamped the sentiment and trimmed to fit and pop dotted on the card.

I would love to see what you could create using just one set from Sunny Studio Stamps and share with us on IG by tagging #sunnystudiostamps or sharing on the Sunny Studio Stamps FB page!

Sunny Studio Supplies Used:

Fall Flicks Filmstrip Dies
Shop at:
Sunny Studio
Holiday Cheer 6x6 Paper
Shop at:
Sunny Studio
Very Merry 6x6 Paper
Shop at:
Sunny Studio
Santa Claus Lane Stamps
Shop at:
Sunny Studio
Santa Claus Lane Dies
Shop at:
Sunny Studio

Thursday, October 31, 2019

Layered Poinsettia Cards with Anja and Vanessa

Hi everyone, Anja here today with a new Christmas card highlighting the pretty Layered Poinsettia Die.

Sunny Studio Stamps: Layered Poinsettias Dies Circle Snowflake Frame Dies Season's Greetings Merry Christmas Card by Anja Bytyqi

I started off with a 4.5" x 4.5" white square card base. The striped paper from the Subtle Grey Tones 6x6 Paper pack measures 4.25" x 4.25". Next, I die cut all the poinsettia layers (I did the bottom layer twice) from Bristol cardstock and watercolored them with ZIG Clean Color Real Brushes. Only the top layer of the center was cut from silver glitter cardstock. All the die-cut layers stacked together create such beautiful dimension.

Sunny Studio Stamps: Layered Poinsettias Dies Circle Snowflake Frame Dies Season's Greetings Merry Christmas Card by Anja Bytyqi

I decided to create some kind of wreath design and die cut the circle frame and a couple of snowflakes from white cardstock using the Snowflake Circle Frame Die set. In the center of the circle frame, I stamped the large word 'Merry' (by masking off the word 'Christmas') from the Season's Greetings Stamps set in VersaMark Ink and heat embossed it with WOW! Metallic Platinum Sparkle Embossing Glitter. I also stamped the words ' Little Christmas' from the Merry Mice set and heat embossed them with Ranger Liquid Platinum Embossing Powder. To finish off my card, I adhered some matching crystals.

Thank you so much for stopping by! Hope you're having a wonderful day!

---------------------------------------------

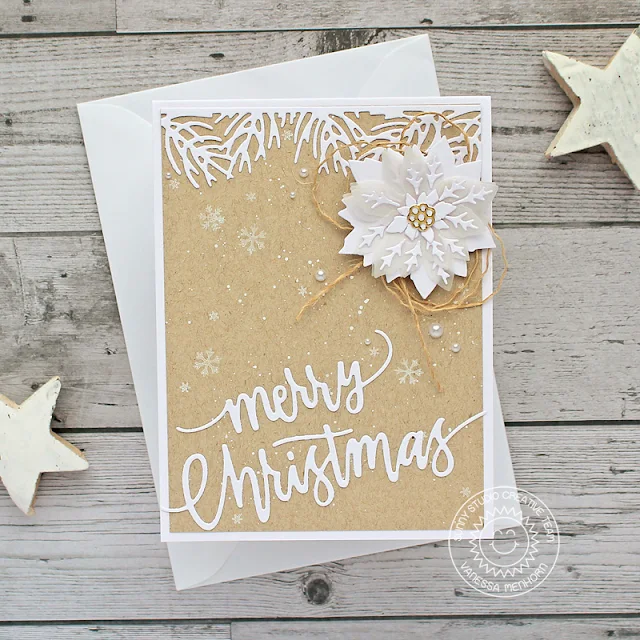
Hello to you! Vanessa here today with an elegant Christmas card using the Layered Poinsettia die. I love the look of Kraft + White.

Sunny Studio Stamps: Layered Poinsettias Dies Christmas Garland Frame Dies Merry Christmas Card by Vanessa Menhorn

First, I stamped the snowflakes from Feeling Frosty onto a panel of Kraft cardstock and added tiny droplets of white ink. Now I die-cut the Christmas Garland Frame die and the sentiment from white cardstock, trimmed the frame, adhered the die-cuts to the panel and adhered the panel to the card.

Sunny Studio Stamps: Layered Poinsettias Dies Christmas Garland Frame Dies Merry Christmas Card by Vanessa Menhorn

Then I die-cut the poinsettia from vellum, white cardstock and gold foil cardstock, assembled the flower, layered it with rustic twine and adhered it to the card. Finally, I added White Pearls.

How about you? Do you like this color combo? Thanks for stopping by today, see you next week!

Sunny Studio Supplies Used:

Subtle Grey Tones Paper
Shop at:
Sunny Studio
Season's Greetings Stamps
Shop at:
Sunny Studio
Feeling Frosty Stamps
Shop at:
Sunny Studio
Merry Mice Stamps
Merry Mice Stamps
Shop at:
Sunny Studio
Layered Poinsettia Dies
Shop at:
Sunny Studio
Snowflake Circle Frame
Shop at:
Sunny Studio
Christmas Garland Frame
Shop at:
Sunny Studio

Wednesday, October 30, 2019

Merry Mice Cards with Ana and Franci

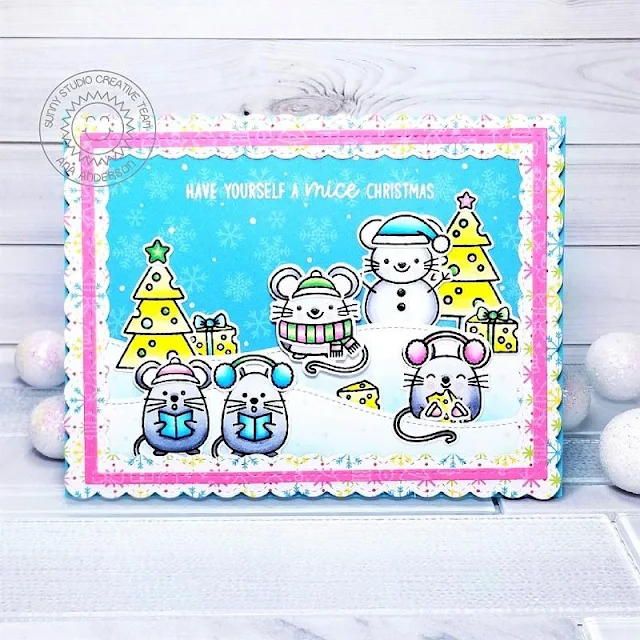
Hello crafty friends! Ana here today with an adorable card featuring the cutest ever Merry Mice stamps and coordinating dies. These mice are just too cute for words and I couldn’t wait to start playing with them!

Sunny Studio Stamps: Merry Mice Woodland Borders Fancy Frame Dies Christmas Card by Ana Anderson

I started with stamping adorable images with Memento Tuxedo black ink, coloring them with Copic markers and cutting them with coordinating dies. The colors I used to color the images were inspired by the multicolored snowflakes pattern paper from Very Merry paper pack, which I used to create the frame for my scene.

I cut the frame with Fancy Frames rectangle dies, added a thin pink frame on top (from the same Very Merry paper pack) then started working on my background. I stamped the sentiment with VersaMark Watermark ink on a piece of blue snowflake patterned paper (from Holiday Cheer paper pack) and white heat embossed it.

Sunny Studio Stamps: Merry Mice Woodland Borders Fancy Frame Dies Christmas Card by Ana Anderson

To create snowy hills, I die cut two pieces of white cardstock using Woodland Borders die, then inked each die cut with ColorBox Dyestress ink in Capri. Finally, I assembled my card and added a few highlights and falling snow with white gel pen.

I had so much fun creating this card – these mice are soo adorable, I am still giggling when I look at their sweet faces! Thank you so much for stopping by today – I will see you next week, and until then I wish you Happy Crafting!

---------------------------------------------

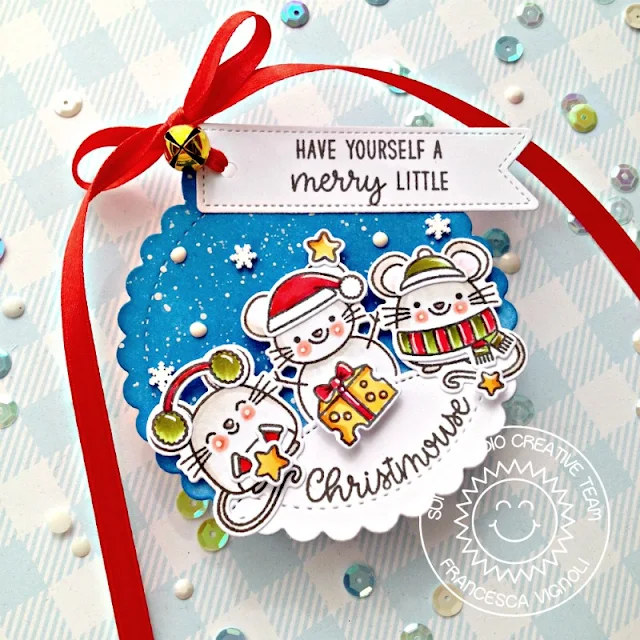
Hi there and happy Wednesday! Franci here with you today with a mice festive little gift tag. Awww it's finally time to show you a project made with my favorite set from the new release, the Merry Mice stamp set! I love all these little mice you can dressed up for Winter/Christmas, they're adorable!!

Sunny Studio Stamps: Merry Mice Woodland Borders Fancy Frame Dies Scalloped Tag Dies Christmas Tag by Franci Vignoli

First of all I die cut the largest Scalloped Circle Tag twice out of white cardstock and I die cut one of them with the Woodland Border, to create a little stitched snowy hill. I colored the other one with Distress inks, let it dry and added some watercolor + white little splatters.

I die cut a little tag using one of the dies included in the Fancy Frames rectangle dies set and stamped part of my sentiment on. Then I stamped, colored and die cut all my little mice and all their Christmas accessorizes. Look at those earmuffs, come on, how can you resist that much cuteness?!?!?

Sunny Studio Stamps: Merry Mice Woodland Borders Fancy Frame Dies Scalloped Tag Dies Christmas Tag by Franci Vignoli

I stamped my "Christmouse" on to the snowy hill and glue it down to the tag with liquid glue, then I added all the images with foam tape. I assembled all the other elements and added some embellishments like the new Blue Snowflake Confetti + some White Nuvo Drops.

Hope I inspired you to create some sweet festive projects today and thank you so much for stopping by!

Sunny Studio Supplies Used:

Fancy Frames- Rectangles
Shop at:
Sunny Studio
Woodland Borders Dies
Shop at:
Sunny Studio
Holiday Cheer 6x6 Paper
Shop at:
Sunny Studio
Very Merry 6x6 Paper
Shop at:
Sunny Studio
Merry Mice Stamps
Merry Mice Stamps
Shop at:
Sunny Studio
Merry Mice Dies
Merry Mice Dies
Shop at:
Sunny Studio
Scalloped Tags-Circle
Shop at:
Sunny Studio

Tuesday, October 29, 2019

Hogs & Kisses Cards with Angelica and Juliana

Hello friends, Angelica here with a festive Hogs & Kisses Christmas card.

Sunny Studio Stamps: Hogs & Kisses Rustic Winter Scenic Route Woodland Borders Fancy Frame Dies Winter Themed Christmas Card by Angelica Conrad

I stamped the hogs using Milk Chocolate Hybrid Ink, and colored them with the following Copic Colors: Hogs- R22, R20, R01, R00, R000, R0000, shading with V93, and V91; Hoofs- E77, E74; Santa hat and scarf- R39, R29, R27, R24, C02, C0; Present- R39, R29, R24, C02, C01, glitter gel pen; Scarf- YG17, YG05, YG03, RV19, RV14, RV13; Antlers: E44, E43, E42. I used the coordinating dies to die-cut them.

I blended Tattered Rose, Victorian Velvet, and Stormy Sky Distress Oxide inks onto white card stock for the background. The trees are die-cuts from Rustic Winter Dies. I backed the trees with chocolate card stock, and used E71 and E77 to add marks to them. I glued them to the background, then added white die-cut hills from the Woodland Borders Die set. 

Sunny Studio Stamps: Hogs & Kisses Rustic Winter Scenic Route Woodland Borders Fancy Frame Dies Winter Themed Christmas Card by Angelica Conrad

I stamped and heat-embossed a sentiment using words from Hogs and Kisses and Santa Claus Lane stamp set onto gray card stock, and used foam squares to add the sentiment to the background. The hogs were added next, then the panel was attached to a card base. My final step was adding a frame, die-cutting Classic Gingham paper with a Fancy Frame Rectangle die.

That's all that I have for today. Thanks for stopping by!

----------------------------------------------------

Hello Sunny Studio Friends! It's Juliana here and today I'm sharing a festive Christmas scene card featuring the Hogs & Kisses Stamp Set. I've combined it with some other fun sets that add the perfect pieces for completing the scene.

Sunny Studio Stamps: Hogs & Kisses Cruising Critters Scenic Route Woodland Borders Winter Themed Christmas Card by Juliana Michaels

From the very beginning I thought it would be so fun to put the cute pigs from the Hogs & Kisses Stamp Set inside the car from the Cruising Critters Stamp Set. I used scissors to trim off the critters that come in the card and a white gel pen to cover up the stamping lines from that part of the stamp.

When it came time to fill the car though, only one pig fit, so I filled the rest of the car with presents and a string of lights from the Santa Claus Lane Stamp Set and the small fir tree from the Seasonal Trees Stamp Set. All of the images were colored with Copic Markers and then die cut using the coordinating dies for each stamped image.

Sunny Studio Stamps: Hogs & Kisses Cruising Critters Scenic Route Woodland Borders Winter Themed Christmas Card by Juliana Michaels

Once I had the car all figured out, I knew I needed some scenery behind it. For this, I used the fir trees with hillside and neighborhood house border stamps from the Scenic Route Stamp Set. I stamped each image across the top of a 5.5 x 4.25 inch piece of paper. After coloring each of the images, I die cut each piece using the coordinating Scenic Route Dies. This left each piece of paper with a large section of white paper below the image. I did some ink blending below the stamped sections with Distress Oxide in Tumbled Glass to give them a more snowy look. I then layered and adhered the pieces together.

To complete the background, I took another piece of cardstock at 5.5 x 4.25 inches and ink blended the sky using Distress Oxide in Faded Jeans and Blueprint Sketch. I splattered the piece with a bit of water to activate the ink and then dabbed it dry to reveal the “snowflakes”. Once this piece was finished I layered the scene on top. I then finished off the card with a sentiment created using a combination of word stamps from the Hogs & Kisses Stamp Set and Santa Claus Lane Stamp Set.

Thanks so much for stopping by today! I hope you enjoyed this festive Christmas scene featuring the Hogs & Kisses Stamp Set

Sunny Studio Supplies Used:

Fancy Frames- Rectangles
Shop at:
Sunny Studio
Classic Gingham 6x6 Paper
Shop at:
Sunny Studio
Woodland Borders Dies
Shop at:
Sunny Studio
Rustic Winter Dies
Rustic Winter Dies
Shop at:
Sunny Studio
Seasonal Trees Stamps
Shop at:
Sunny Studio
Seaonal Trees Dies
Seaonal Trees Dies
Shop at:
Sunny Studio
Cruising Critters Stamps
Shop at:
Sunny Studio
Cruising Critters Dies
Shop at:
Sunny Studio
Santa Claus Lane Stamps
Shop at:
Sunny Studio
Santa Claus Lane Dies
Shop at:
Sunny Studio
Scenic Route Stamps
Scenic Route Stamps
Shop at:
Sunny Studio
Scenic Route Dies
Scenic Route Dies
Shop at:
Sunny Studio
Hogs & Kisses Stamps
Shop at:
Sunny Studio
Hogs & Kisses Dies
Hogs & Kisses Dies
Shop at:
Sunny Studio

Monday, October 28, 2019

Sweet Treat Projects with Leanne and Eloise

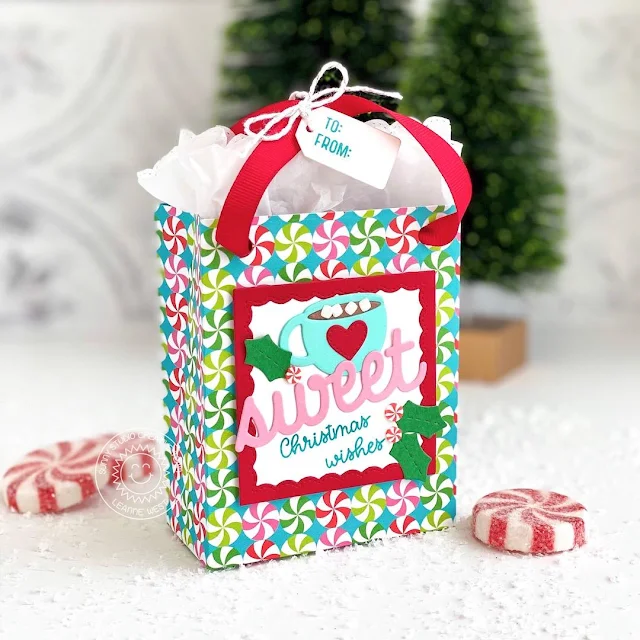
Hi everyone! Leanne here today. It's never too early to start thinking about holiday gift giving so I have a treat bag idea to share with you.

Sunny Studio Stamps: Sweet Treat Gift Bag Sweet Treats House Sweet Word Die Season's Greetings Warm & Cozy Christmas Treat Bag by Leanne West

I've used the new Sweet Treat Bag die to create a festive tote style bag to hold any little gift or some special treats. I've mixed and matched a bunch of different Sunny Studio products to create and decorate the bag. They are all listed and linked below:

Sweet Treat Bag Dies - the bag & tiny tag
Holiday Cheer 6x6 paper pad - peppermint candy patterned paper
Fancy Frames Square Dies - red scalloped frame
Warm & Cozy Dies - hot chocolate mug
Sweet Word Die - die cut "sweet" 
Basic Mini Shapes Dies - holly leaves
Season's Greetings stamp set - to/from stamped on tag
Alpaca Holiday stamp set - Christmas wishes
Peppermint Confetti - used for the holly berries

Sunny Studio Stamps: Sweet Treat Gift Bag Sweet Treats House Sweet Word Die Season's Greetings Warm & Cozy Christmas Treat Bag by Leanne West

Be sure to check out the video here for a tutorial on the assembly of the bag. The bag itself is very quick and easy to assemble. The sky's the limit when it comes to decorating. I chose a candy and cocoa theme for mine. I just love that fun peppermint candy pattern that I used for the body of the bag. Sunny Studio patterned papers are the perfect weight for projects like this. The paper is 65lb. weight which creates a sturdy bag.  It can be filled with candy or would be a fun way to give a gift card.

-------------------------------------------------------

Hi friends, Eloise here and today I’ll be using the Sweet Treat House Add On Set to create my card today.

Sunny Studio Stamps: Sweet Treats House Add On Dies Christmas Card by Eloise Blue

I started off with making a card base from plain white cardstock. I cut it down to 3 3/8” wide by 9” long. I then scored it at 4 ½” inches and also scored ½” strips along the front of the card to look like wood paneling.

I then die cut out all the elements I would be using. I used a dark grey and black cardstock to cut the scallop roofing out. I used some yellow cardstock for behind the windows and door and then used some wood veneer paper for the door and window frames. I also used some green for the wreath and red for the bow.

Sunny Studio Stamps: Sweet Treats House Add On Dies Christmas Card by Eloise Blue

I adhered all my pieces together and adhered them onto my card base to resemble a little Christmas decorated farmhouse. I opted not to use a sentiment, but you could easily add one if you like.

Thanks so much for stopping by today and I’ll see you all next time.

Sunny Studio Supplies Used: 

Sweet Word Die
Sweet Word Die
Shop at:
Sunny Studio
Fancy Frames-Square Dies
Shop at:
Sunny Studio
Mini Basic Shape Dies
Shop at:
Sunny Studio
Holiday Cheer 6x6 Paper
Shop at:
Sunny Studio
Alpaca Holiday Stamps
Shop at:
Sunny Studio
Warm & Cozy Dies
Warm & Cozy Dies
Shop at:
Sunny Studio
Season's Greetings Stamps
Shop at:
Sunny Studio
Sweet Treats Gift Bag
Shop at:
Sunny Studio
Sweet Treats House Add-on
Shop at:
Sunny Studio