Monday, February 25, 2019

Everything's Rosy Cards with Leanne and Eloise

Hello everyone! Leanne here today and I’m happy to be sharing a set of thank you cards I made using the Everything’s Rosy stamp set. I was so anxious to play with this beautiful layering set. I just started by stamping out the largest rose in a few different colors. I honestly couldn’t pick which color I like best to use on one card so I decided to make a set of cards.  

Sunny Studio Stamps: Everything's Rosy Everyday Greetings Floral Thank You Cards by Leanne West

These cards are 4 Bar size. The dimensions are 3 1/2 by 4 7/8 inches. This is such a cute size and perfect for thank you notes! To add a little interest to the background, I embossed panels of white card stock and trimmed slightly smaller than 4 Bar size. I used the Quilted Hearts embossing folder which I think pairs so well with the roses.  

Sunny Studio Stamps: Everything's Rosy Everyday Greetings Floral Thank You Cards by Leanne West

Altenew dye ink cube sets used: Pink rose - Cherry Blossom ink set, Yellow rose - Summer Afternoon ink set, Teal rose - Sea Shore ink set, Leaves - Tropical Forest ink set

Sunny Studio Stamps: Everything's Rosy Everyday Greetings Floral Thank You Cards by Leanne West

After stamping all the roses and leaves, I use the coordinating Everything’s Rosy dies to cut them out. I adhered the roses and leaves with glue dots. The glue dots seemed to stick well to the embossed surface. I white heat embossed “thank you” (from Everyday Greetings) on green card stock and trimmed into strips with a fish tail end. I tucked one end of the sentiment strip underneath a rose and secured with more glue dots.  

-------------------------------------------------------

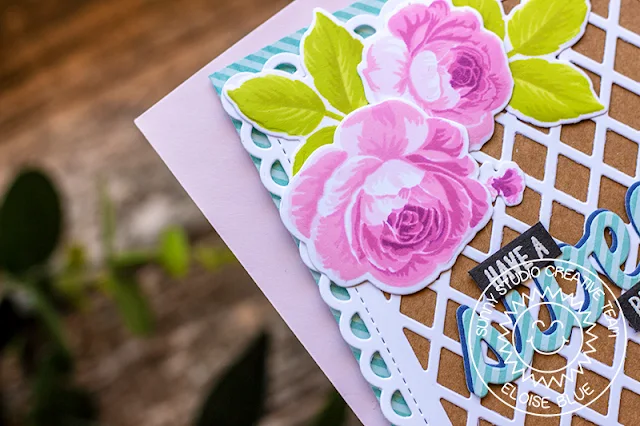
Hi friends, Eloise here and today I’m using the Everything’s Rosy stamp set. I also paired it with the Sweet Word die and Frilly Frames Lattice Dies.

Sunny Studio Stamps: Everything's Rosy Frilly Frames Floral Birthday Card by Eloise Blue

I started off with stamping out my roses and leaves using my MISTI. I used various Altenew Inks to stamp the layers. Once they were all stamped, I cut them out using the coordinating dies.

(Altenew Inks Used: Rose Quartz, Cotton Candy, Puffy Heart, Purple Wine, Cosmic Berry / Bamboo, Parrot, Olive)

Sunny Studio Stamps: Everything's Rosy Frilly Frames Floral Birthday Card by Eloise Blue

Next, I die cut out the Frilly Frames Lattice Dies from white cardstock. I added adhesive onto the back and adhered a piece of Kraft Cardstock. I added foam tape onto the back and adhered it onto a piece of blue striped pattern paper from the Striped Silly 6x6 Paper Pad. I added foam tape onto the roses and leaves and adhered them in each corner as well.

Sunny Studio Stamps: Everything's Rosy Frilly Frames Floral Birthday Card by Eloise Blue

For the sentiment, I die cut the Sweet Word Die from the same striped patterned paper and also from some dark blue. I adhered them together a little offset. I also used the Fruit Cocktail Stamp Set and white heat embossed ‘Have A’ and ‘Birthday’ onto some black cardstock. I cut them down into strips and adhered all the pieces into the centre of the design.

That finished up my card for today, I hope you enjoyed. See you next week! 

Sunny Studio Supplies Used:

Sweet Word Die
Sweet Word Die
Shop at:
Sunny Studio
Striped Silly 6x6 Paper
Shop at:
Sunny Studio
Fruit Cocktail Stamps
Shop at:
Sunny Studio
Quilted Hearts Embossing
Shop at:
Sunny Studio
Everything's Rosy Stamps
Shop at:
Sunny Studio
Everything's Rosy Dies
Shop at:
Sunny Studio
Frilly Frames Lattice Dies
Shop at:
Sunny Studio
Everyday Greetings Stamps
Shop at:
Sunny Studio

Saturday, February 23, 2019

Guest Designer Spotlight: Chubby Bunny Cards with Karin Akesdotter

Hi Everyone! Today it’s me, Karin Ã…kesdotter from Peppermint Patty’s Papercraft and I'm back to share some cards I've made with Sunny’s wonderful Spring Release. Focus today is on the adorable I'm back to share some more cards I've made with Sunny Studio's Spring Release. These Chubby Bunny are just the cutest for all your spring projects!


Sunny Studio Stamps: Chubby Bunny Frilly Frames Stitched Scallop Dies Easter And Spring Cards by Karin Akesdotter

For my first card I started by spattering masking fluid to some off white cardstock before inking it to create a violet sky background. I then die cut grass using the lovely Stitched Scallop dies. I stamped by bunnies and colored them using Copic markers and then die cut them with the coordinating dies. I then cut the Frilly Frames Polka Dots dies from two ways to create a customized frame for the rectangle. The images are adhered with foam adhesive.

Sunny Studio Stamps: Chubby Bunny Frilly Frames Stitched Scallop Dies Easter And Spring Cards by Karin Akesdotter

This lovely CAS Springcard is fast and easy to make. I created the card panel background by embossing it with the fabulous Sunburst embossing folder. I die cut a stitched circle and inked it to create grass and sky. I adhered it to my panel  with foam adhesive before I I stamped Chubby Bunny and colored them using Copic markers and then die cut them with the coordinating diesLastly, I added a banner with a Hello Spring sentiment.  

Sunny Studio Stamps: Chubby Bunny Frilly Frames Stitched Scallop Dies Easter And Spring Cards by Karin Akesdotter

My last card is made by combining 3 favorites from this release: Chubby Bunny, Quilted Hearts embossing folder, and Frilly Frames Lattice dies. I just know that I will be using the Quilted Hearts embossing folder for many many projects in the future - it gives the best background texture!

Sunny Studio Supplies Used:

Stitched Scallop Dies
Shop at:
Sunny Studio
Quilted Hearts Embossing
Shop at:
Sunny Studio
Sunburst Embossing
Sunburst Embossing
Shop at:
Sunny Studio
Chubby Bunny Stamps
Chubby Bunny Stamps
Shop at:
Sunny Studio
Chubby Bunny Dies
Chubby Bunny Dies
Shop at:
Sunny Studio
Frilly Frames Lattice Dies
Shop at:
Sunny Studio
Frilly Frames Polka-Dot
Shop at:
Sunny Studio

Friday, February 22, 2019

Spring Greetings Cards with Lexa and Rachel

Hi everyone! Lexa here to share a card I made that highlighting both Spring Greetings Stamps and the coordinating dies. It's a sweet 2x3 stamp set that has two little bunnies and a tulip. Even though it's a mini stamp set, the possibilities are endless and you can match this stamp with other sets. Either an Easter themed, spring themed or just everyday projects. Let's get started!

Sunny Studio Stamps: Spring Greetings Easter Wishes Frilly Frames Lattice Spring Themed Best Wishes Card by Lexa Levana

I use Frilly Frames Lattice Dies on Gingham Pastels Paper for the card base. For the inside panel, I make it with a 3.25"x4.5" white cardstock then create three grassy hills and a blue sky to create a scene. I blended some Distress Inks (Mowed Lawn, Crushed Olive, Twisted Citron and Tumbled Glass) on every pieces. The images are stamped with Versafine black ink and watercolor them with various brand of markers. 

Sunny Studio Stamps: Spring Greetings Easter Wishes Frilly Frames Lattice Spring Themed Best Wishes Card by Lexa Levana

To match the single tulip from the stamp set, I also use ones from Easter Wishes Stamps to create more variations. "Best wishes" sentiment is from one of the-must-have Everyday Greetings and "for you" come from the stamp set called Over The Rainbow. When two bunnies aren't enough, make them four instead. The more the merrier. Last touch, I use yellow gems from Pretty Pink Posh to create an accent to my card.

That's all for today, I hope you like today's card as much as I do. Have an amazing day to you and your loved ones!

-------------------------------------------------------------

Happy Friday! It's Rachel here and today I am sharing a card featuring the adorable rabbits and tulips from the Spring Greetings Stamp Set.

Sunny Studio Stamps: Spring Greetings Easter Wishes Spring Themed Spring Greetings Card by Rachel Alvarado

I combined this set with a few of the matching tulips from the Easter Wishes Stamp Set and created a tunnel card. To start, I first stamped my images with Copic friendly black ink, colored them with Copic Sketch Markers and used the coordinating dies to cut them out.

Sunny Studio Stamps: Spring Greetings Easter Wishes Spring Themed Spring Greetings Card by Rachel Alvarado

Copic Colors Used: Rabbits: 0, C00, C0, C2, C3; Ears: RV0000, R00, R01; Greens: YG0000, YG01, YG07, YG17, YG67; Teal: BG10, BG11, BG15, BG49; Pinks: RV0000, RV000, RV52, RV55; Purples: V000, V01, V06, V09; Dark Purplish Blue: B63, B66, B69

Sunny Studio Stamps: Spring Greetings Easter Wishes Spring Themed Spring Greetings Card by Rachel Alvarado

To get the tunneling effect, I trimmed 4 pieces of white card stock to 4.25" x 5.5". I then used 3 different circle dies to cut into the first 3 pieces going from the largest circle to the smallest. For the front panel, I added a sheet of beautiful blue patterned paper from the Spring Sunburst Paper Pad. I added some 3D Foam Tape behind each panel so that it was lifted off of the panel behind it, therefore giving it more depth.

Sunny Studio Stamps: Spring Greetings Easter Wishes Spring Themed Spring Greetings Card by Rachel Alvarado

I cut some grass from two different shades of green patterned paper from the Classic Gingham 6x6 Paper Pad using the grass die from the Sunny Sentiments Die Set. I blended some Tumbled Glass Distress Oxide Ink for the sky and added a couple of clouds cut from white card stock using the Comic Strip Every Day Dies. Lastly, I stamped my sentiment onto a strip of white card stock with black ink and adhered it to the front of my card.

Thanks so much for dropping by!  Wishing you all a lovely and relaxing weekend!

Sunny Studio Supplies Used: 

Easter Wishes Dies
Easter Wishes Dies
Shop at:
Sunny Studio
Easter Wishes Stamps
Shop at:
Sunny Studio
Sunny Sentiments Dies
Shop at:
Sunny Studio
Sunny Sentiments Stamps
Shop at:
Sunny Studio
Classic Gingham 6x6 Paper
Shop at:
Sunny Studio
Comic Strip Everyday Dies
Shop at:
Sunny Studio
Gingham Pastels 6x6 Paper
Shop at:
Sunny Studio
Spring Sunburst 6x6 Paper
Shop at:
Sunny Studio
Spring Greetings Stamps
Shop at:
Sunny Studio
Spring Greetings Dies
Shop at:
Sunny Studio
Over The Rainbow Stamps
Shop at:
Sunny Studio
Frilly Frames Lattice Dies
Shop at:
Sunny Studio
Everyday Greetings Stamps
Shop at:
Sunny Studio

Thursday, February 21, 2019

Puppy Parents Cards with Vanessa and Anja

Hello there! Vanessa here today with a card using Puppy Parents with the Build-A-Tag #1 Dies.

Sunny Studio Stamps: Puppy Parents Build A Tag Thank You Parent Card by Vanessa Menhorn

I started with a panel of white cardstock and inked it with green Distress Oxide ink. After I had applied ink droplets, I die-cut the tag from it an adhered the panel to the card. Now I die-cut the tag from vellum and white cardstock, topped the top tag with patterned paper from the Flirty Flowers Paper pad and tied-on baker's twine before adhering the layered tags to the card.

Sunny Studio Stamps: Puppy Parents Build A Tag Thank You Parent Card by Vanessa Menhorn

I stamped the cute dogs onto white cardstock, colored them with Copics, die-cut the images with the matching dies and adhered them with foam tape. Finally, I stamped and heat-embossed the sentiment onto a strip of blue cardstock, trimmed it and adhered it.

I love these cute puppies! Thank you for stopping by today, hope to see you back next week!

----------------------------------------------------------

Happy Thursday everyone, Anja here and today I'm showcasing the sweet Puppy Parents Stamps. I created a masculine card for Father's Day.

Sunny Studio Stamps: Puppy Parents Build A Tag Quilted Hearts Embossing Thank You Parent Card by Anja Bytyqi

I started with an A2 top-folding card base made from teal cardstock. Next, I ran a piece of navy cardstock in the Quilted Hearts Embossing Folder through my die-cutting machine. For a change, I decided to use the debossed side. I cut a strip of yellow patterned paper from the Dots & Stripes Pastels 6x6 Paper pack and adhered it over my embossed panel.

I stamped the cute dogs and fun accessories in Memento Tuxedo Black Ink and colored them with Copic Markers. I used the coordinating dies to cut out the images. I die cut two circles from white and red (as a mat) cardstock. For the background of my little scene, I did some masking and light ink blending with Distress Oxides (Tumbled Glass, Twisted Citron, Mowed Lawn).

Sunny Studio Stamps: Puppy Parents Build A Tag Quilted Hearts Embossing Thank You Parent Card by Anja Bytyqi

I used three of the text stamps which are included in the set to create my custom sentiment. The "thanks daddy" was stamped in Versafine Onyx Black Ink next to the doghouse. I stamped the other sentiment in VersaMark Ink on a small strip of teal cardstock and white heat embossed it. To finish off my card, I adhered two little die-cut hearts.

Thank you so much for stopping by! Have a wonderful day!

Sunny Studio Supplies Used:

Build-A-Tag #1 Dies
Build-A-Tag #1 Dies
Shop at:
Sunny Studio
Flirty Flowers 6x6 Paper
Shop at:
Sunny Studio
Dots & Stripes Pastels 6x6 Paper
Shop at:
Sunny Studio
Quilted Hearts Embossing
Shop at:
Sunny Studio
Puppy Parents Stamps
Shop at:
Sunny Studio
Puppy Parents Dies
Puppy Parents Dies
Shop at:
Sunny Studio