Friday, December 21, 2018

From Our Home To Yours House Theme Christmas Gift Tags

Hello there!  It's Mendi here again today sharing a trio of holiday gift tags perfect for giving baked goodies to your neighbors at the last minute (if you're anything like me).  ;)

To create my tags I cut them from our Holiday Cheer paper using our Build-A-Tag 1 dies.  
Sunny Studio Stamps: With Love From the Kitchen Of Baking House Themed Christmas Gift Tags by Mendi Yoshikawa

For my little houses, I turned to our Comic Strip Everyday dies and cut the homes from our Striped Silly Paper.  The trees were cut using our Woodland border dies which I thought added a bit more of a holiday feel to my everyday houses.
Sunny Studio Stamps: With Love From the Kitchen of Baking House Themed Christmas Gift Tags by Mendi Yoshikawa

To create the little white scalloped border along the top, I simply cut an extra scalloped edge from a thin strip of paper and staggered it below the tag topper--I love how it gives a little extra definition and makes the two colors pop!
Sunny Studio Stamps: With Love From the Kitchen Of Baking House Themed Christmas Gift Tags by Mendi Yoshikawa

For the top of my tag I used a heart reinforcer from the Build-a-Tag 2 dies and tied it with some white cotton twine.  A white heat embossed sentiment with a phrase from our Blissful Baking stamps seemed like the perfect finishing touch.  Now all I need to do is write in my name!
Sunny Studio Stamps: With Love From the Kitchen Of Baking House Themed Christmas Gift Tags by Mendi Yoshikawa

These were a really fun to create and I can't wait to tie them onto some goodie plates!  

Also, just a little reminder before I go that we will be taking off December 25th to the 31st to spend time as a family so orders placed at that time will be held and shipped on January 2nd.  If you would like to have something shipped sooner, we will be fulfilling orders now through December 24th so it's a great time to get your orders in.  ;)

Thanks so much for hanging with me today and I hope you have a very Merry Christmas!


Sunny Studio Supplies Used:
Blissful Baking Stamps
Shop at:
Sunny Studio
Comic Strip Everyday Dies
Shop at:
Sunny Studio
Woodland Borders Dies
Shop at:
Sunny Studio
Holiday Cheer 6x6 Paper
Shop at:
Sunny Studio
Build-A-Tag #1 Dies
Build-A-Tag #1 Dies
Shop at:
Sunny Studio

Thursday, December 20, 2018

Build-A-Tag Holiday Tags: Sending Joy Shaker Tags with Vanessa

Hello there! Vanessa here today with a bunch of shaker tags using the Build-A-Tag #2 Dies. This is what I came up with.

Sunny Studio Stamps: Build-A-Tag Gleeful Sliding Window Alpaca Holiday Sending Joy Holiday Tags by Vanessa Menhorn

First, I die-cut the tags six times from white cardstock, thrice from clear cardstock and thrice from white fun foam. Then I die-cut a square window from three cardstock tags and the fun foam tags. 

Next, I inked the front of the remaining three cardstock tags with blue Distress Oxide ink, filled the windows with decor ice and assembled the tags.

Sunny Studio Stamps: Build-A-Tag Gleeful Sliding Window Alpaca Holiday Sending Joy Holiday Tags by Vanessa Menhorn

Now I stamped and heat-embossed the sentiment from Gleeful Reindeer thrice onto red cardstock, die-cut these with the circle from the Sliding Window Dies and tied one onto each tag with ribbon and twine.

Finally, I stamped the images from Alpaca Holiday, colored them with Copics, die-cut the elements with the matching dies and adhered them to the tags.

I hope to have given you some last-minute inspiration for cute Christmas tags! Merry Christmas everybody and thanks for visiting!

Sunny Studio Supplies Used:

Gleeful Reindeer Stamps
Shop at:
Sunny Studio
Sliding Window Dies
Sliding Window Dies
Shop at:
Sunny Studio
Alpaca Holiday Stamps
Shop at:
Sunny Studio
Alpaca Holiday Dies
Alpaca Holiday Dies
Shop at:
Sunny Studio
Build-A-Tag #2 Dies
Build-A-Tag #2 Dies
Shop at:
Sunny Studio

Wednesday, December 19, 2018

Build-A-Tag Holiday Tags: Little Critter Winter Tags with Franci

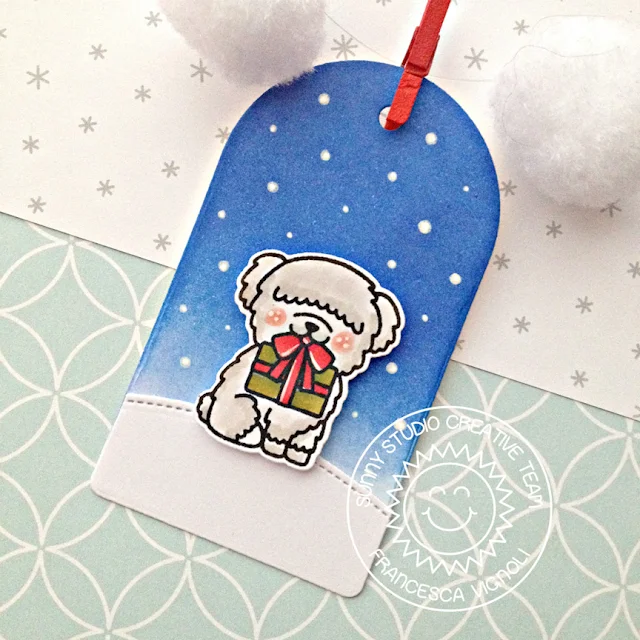
Hi there! Franci here with you today, with a little trio of tags made with all my favorite Sunny Studio cuties!

Sunny Studio Stamps: Build-A-Tag Alpaca Holiday Party Pups Purrfect Birthday Winter Themed Gift Tags by Franci Vignoli

These are super simple, quick and easy to make so, if you have a ton to make for all your Christmas gifts be sure to give this simple design a try! First, I die cut my tags from the Build-A-Tag #1 set out of white cardstock and I also cut out some additional tags to create my snowy hills later on.

Sunny Studio Stamps: Build-A-Tag Alpaca Holiday Party Pups Purrfect Birthday Winter Themed Gift Tags by Franci Vignoli

I stamped all of the critters from different sets - Party Pups, Purrfect Birthday and Alpaca HolidayThe dog and the little cat are my fave. They are from birthday themed sets, but by using different colors on the little presents, they are perfect for Christmas!! 

Sunny Studio Stamps: Build-A-Tag Alpaca Holiday Party Pups Purrfect Birthday Winter Themed Gift Tags by Franci Vignoli

I die cut all of the images with their coordinating dies and I inked all of my tags to create a dark night effect. I die cut all the snowy hills with the Woodland Borders set and composed all my little tags. 

Sunny Studio Stamps: Build-A-Tag Alpaca Holiday Party Pups Purrfect Birthday Winter Themed Gift Tags by Franci Vignoli

Finally, I added some snow to my backgrounds, drawing little dots here and there with a white gel pen and added little red clips at the tops. I also arranged them in a little banner with some white pom poms so I can display them in my craft room before I'll attach them to my gifts! 

Hope you like this festive tags and thank you so much for stopping by today! 

Sunny Studio Supplies Used:

Purrfect Birthday Stamps
Shop at:
Sunny Studio
Purrfect Birthday Dies
Shop at:
Sunny Studio
Party Pups Stamps
Party Pups Stamps
Shop at:
Sunny Studio
Party Pups Dies
Party Pups Dies
Shop at:
Sunny Studio
Woodland Borders Dies
Shop at:
Sunny Studio
Alpaca Holiday Stamps
Shop at:
Sunny Studio
Alpaca Holiday Dies
Alpaca Holiday Dies
Shop at:
Sunny Studio
Build-A-Tag #1 Dies
Build-A-Tag #1 Dies
Shop at:
Sunny Studio

Tuesday, December 18, 2018

Build-A-Tag Holiday Tags: Ugly Christmas Sweater Tags with Juliana

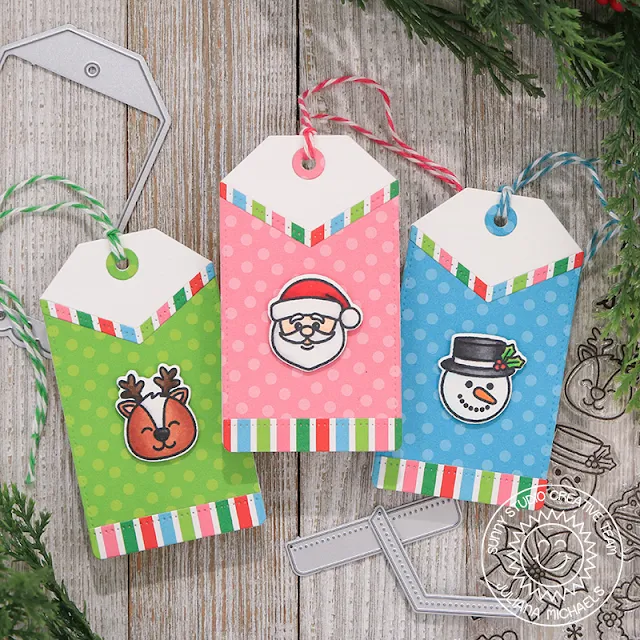
Happy Holidays friends! It's Juliana Michaels and today I'm here to share a set of Ugly Christmas Sweater Tags featuring the Build-A-Tag die sets and Christmas Icons stamp set.

Sunny Studio Stamps: Build-A-Tag Holiday Cheer Paper Christmas Icons Ugly Christmas Sweater Tags by Juliana Michaels

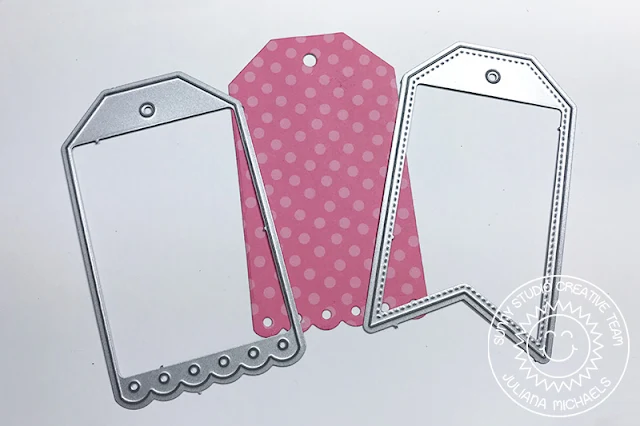
For these tags, begin by creating the tag base. Cut 3 pieces of patterned paper from the Holiday Cheer 6x6" paper pad using the scalloped edged die from Build-A-Tag #2. Use this same die to cut 3 more tags from white cardstock and set them to the side.

Sunny Studio Stamps: Build-A-Tag Holiday Cheer Paper Christmas Icons Ugly Christmas Sweater Tags by Juliana Michaels

Next, take the other tag die in the Build-A-Tag #2 set and position it as shown in the photo on top of the tags you just cut.

Sunny Studio Stamps: Build-A-Tag Holiday Cheer Paper Christmas Icons Ugly Christmas Sweater Tags by Juliana Michaels

Make sure you line the die up so that it doesn't cut off the bottom scalloped edges. You are using this die to cut the “V” in the top of the tag. This will create the top of your sweater.

Sunny Studio Stamps: Build-A-Tag Holiday Cheer Paper Christmas Icons Ugly Christmas Sweater Tags by Juliana Michaels

Take the straight edge and angled dies from the Build-A-Tag #1 set and die cut a piece of the striped patterned paper from the Holiday Cheer 6x6 paper pad. This will become the trim on your sweaters.

Sunny Studio Stamps: Build-A-Tag Holiday Cheer Paper Christmas Icons Ugly Christmas Sweater Tags by Juliana Michaels

Once you have all of the pieces die cut. You can begin to assemble the tags. Adhere the “V” cut piece on top of the solid white die cut tag.

Sunny Studio Stamps: Build-A-Tag Holiday Cheer Paper Christmas Icons Ugly Christmas Sweater Tags by Juliana Michaels

Next, adhere the trim to the bottom of the tag making sure t
o cover the scallops. Then adhere the trim along the “V” edge at the top of the tag.

Sunny Studio Stamps: Build-A-Tag Holiday Cheer Paper Christmas Icons Ugly Christmas Sweater Tags by Juliana Michaels

The final step is to decorate your Ugly Christmas Sweater Tags using some of the fun images from the Christmas Icons stamp set. I probably could have gone a bit uglier, but I stuck with one image for each tag and colored them with Copic markers.

Sunny Studio Stamps: Build-A-Tag Holiday Cheer Paper Christmas Icons Ugly Christmas Sweater Tags by Juliana Michaels

So, how would you decorate your Ugly Christmas Sweater Tags? I hope you enjoyed today's project and thanks so much for joining me today!

Sunny Studio Supplies Used:

Christmas Icons Dies
Shop at:
Sunny Studio
Christmas Icons Stamps
Shop at:
Sunny Studio
Holiday Cheer 6x6 Paper
Shop at:
Sunny Studio
Build-A-Tag #1 Dies
Build-A-Tag #1 Dies
Shop at:
Sunny Studio
Build-A-Tag #2 Dies
Build-A-Tag #2 Dies
Shop at:
Sunny Studio

Monday, December 17, 2018

Build-A-Tag Holiday Tags: Warm Winter Wishes Tags with Eloise

Hi friends, Eloise here and today I have some tags to share with you all using the Build A Tag #1 Dies, Warm and Cozy Dies and also pulling in the Holiday Cheer Patterned Paper Pack for my die cut elements today as well.

Sunny Studio Stamps: Build-A-Tag Warm & Cozy Holiday Cheer Warm Winter Wishes Gift Tags by Eloise Blue

To start off my tags, I cut all my elements out using the Warm and Cozy Die Set from the Holiday Cheer Patterned Paper Pack. I then used some the Build A Tag #1 Die Set and cut some rounded tags from white cardstock and also the circle tags from some Kraft cardstock. I then cut the topper piece and bottom piece from patterned paper, too. 

Sunny Studio Stamps: Build-A-Tag Warm & Cozy Holiday Cheer Warm Winter Wishes Gift Tags by Eloise Blue

Next I adhered all the elements together using liquid glue and then added foam tape onto the backs and also onto the backs of the topper and bottom pieces. I then adhered them onto the white tags all into place. 

Sunny Studio Stamps: Build-A-Tag Warm & Cozy Holiday Cheer Warm Winter Wishes Gift Tags by Eloise Blue

Lastly, I white heat embossed the 'Warm Winter Wishes' sentiment from Alpaca Holiday onto the Kraft tags and then tied some hemp cord and twine through the tops of the tags, threading through the sentiment tags at the same time. 

Thanks so much for stopping by today, I hope you enjoyed my tags and I'll see you next week. 

Sunny Studio Supplies Used: 

Holiday Cheer 6x6 Paper
Shop at:
Sunny Studio
Alpaca Holiday Stamps
Shop at:
Sunny Studio
Build-A-Tag #1 Dies
Build-A-Tag #1 Dies
Shop at:
Sunny Studio
Warm & Cozy Dies
Warm & Cozy Dies
Shop at:
Sunny Studio

Saturday, December 15, 2018

Guest Designer Spotlight: Christmas Cards with Anika Lerche

Hey stampers, Anni here. I am back again as a guest designer and so happy that Mendi is such a kind person to let me come back for a few cards.

Today I have a set of cards for you that I created using the die set Warm & Cozy, sentiments from the stamp set Alpaca Holiday and patterned paper from Holiday Cheer. The die set Warm & Cozy is full of possibilities. I really liked it when I first saw it. But when I crafted with it, it totally blew my mind because it is so well thought through. I think, that is typical for Mendi's work. 

You got so many options with this set to decorate the hat, the gloves and the mugs. I really love it.

Sunny Studio Stamps: Warm & Cozy Alpaca Holiday Holiday Cheer Kraft Background Christmas Cards by Anika Lerche

I started by die cutting all the images I needed from patterned paper and from cardstock. Then I assembled the hats, the gloves and the mugs and added some shading with grey alcohol marker.

Sunny Studio Stamps: Warm & Cozy Alpaca Holiday Holiday Cheer Kraft Background Christmas Cards by Anika Lerche

To create the backgrounds I added some ink blending with a white pigment ink on kraft cardstock. To add some interest I also stamped some stars with the same ink on the background and splattered some watered down white acrylic paint on the card.

Sunny Studio Stamps: Warm & Cozy Alpaca Holiday Holiday Cheer Kraft Background Christmas Cards by Anika Lerche

For the sentiment I stamped "Warm Christmas Wishes" on a stripe of dark brown cardstock. I really love that there are so many possibilities to choose from in this set. Not only so many words to combine but also different fonts - so awesome!

Sunny Studio Stamps: Warm & Cozy Alpaca Holiday Holiday Cheer Kraft Background Christmas Cards by Anika Lerche


Sunny Studio Stamps: Warm & Cozy Alpaca Holiday Holiday Cheer Kraft Background Christmas Cards by Anika Lerche

I had so much fun playing with these goodies and it was a pleasure to be a guest designer for Sunny Studio!

Thanks for stopping by and have a crafty weekend.

Sunny Studio Supplies: 

Holiday Cheer 6x6 Paper
Shop at:
Sunny Studio
Alpaca Holiday Stamps
Shop at:
Sunny Studio


Warm & Cozy Dies
Warm & Cozy Dies
Shop at:
Sunny Studio