Showing posts with label Window Quad Dies. Show all posts

Saturday, July 22, 2023

Guest Designer Spotlight: Cards with Kristie Marcotte

Sunny Studio Stamps: Birthday Card by Kristie Marcotte

Hey everyone, Kristie Marcotte here. I'm so excited to be sharing several cards with you today that focus on the Surprise Party paper pack. Let's get right to it!

Sunny Studio Stamps: Birthday Card by Kristie Marcotte (featuring Ric Rac Border Dies, Bright Balloons Dies, Big Bold Greetings)

I made a fun patriotic birthday card featuring red and blue tone on tone patterned papers. I added a couple balloons above the sentiment and included the Ric Rac Border across the card. I used the Bright Balloons, Ric Rac Border,and Big Bold Greetings.

Sunny Studio Stamps: Birthday Card by Kristie Marcotte (featuring Perfect Gift Boxes, Crepe Paper Streamers, Big Bold Greetings)

This card features the Subtle Grey Tones paper for the background. I used some of the tone-on-tone patterns from the Surprise Party paper pad for all the presents and filled the background with lots of gifts. I used Perfect Gift Boxes, Crepe Paper Streamers and Big Bold Greetings.

Sunny Studio Stamps: Birthday Card by Kristie Marcotte (featuring Bright Balloons, Big Bold Greetings)

The background features the colorful party hat paper. I added a couple tone on tone strips. I included 3 balloons on an oval die cut. I used Bright Balloons and Big Bold Greetings.

Sunny Studio Stamps: Birthday Card by Kristie Marcotte (featuring Bright Balloons, Perfect Gift Boxes, Big Bold Greetings)

I used some white shimmer cardstock for the background and added several narrow strips of patterned paper in pink and teal. I added a couple of present images on a vellum circle, plus a few balloons above the sentiment. I used Bright Balloons, Perfect Gift Boxes, and Big Bold Greetings.

Sunny Studio Stamps: Christmas Card by Kristie Marcotte (featuring Wonky Windows, Window Quad Circle Dies, Inside Greetings Holiday)

 
It's still July, so I couldn't resist making a fun Christmas card. I used the green star tone on tone paper for the background and cut out some wonky windows. I added a tiny poinsettia inside each window. I used Wonky Windows, Window Quad Circle, and Inside Greetings Holiday.

Thank you Mendi for the opportunity to guest design! You can find me on my blog, my Instagram, or my YouTube channel.


Sunny Studio Supplies Used:


Ric Rac Border Dies
Ric Rac Border Dies
Shop at:
Sunny Studio
Surprise Party 6x6 Paper
Shop at:
Sunny Studio
Window Quad Circle Die
Shop at:
Sunny Studio
Inside Greetings-Holidays
Shop at:
Sunny Studio
Wonky Windows Die
Wonky Windows Die
Shop at:
Sunny Studio
Big Bold Greetings Stamps
Shop at:
Sunny Studio
Big Bold Greetings Dies
Shop at:
Sunny Studio
Bright Balloons Dies
Shop at:
Sunny Studio
Crepe Paper Streamers Dies
Shop at:
Sunny Studio
Perfect Gift Boxes Dies
Shop at:
Sunny Studio

Wednesday, April 5, 2023

Tranquil Tulips Cards with Marie and Catherine

Hello Everyone, Marie here! Spring is one of my most favorite times of the year because everything is beautiful and flowers are blooming left and right. If I could think of a flower that is the quintessential Spring flower, tulips definitely come to mind first! That being said, I am excited to share my latest inspiration card that features Sunny Studio Stamps' Tranquil Tulips Stamps. This layering stamp set allows you to quickly create gorgeous tulips during their different stages of bloom. This set is perfect for mass producing cards! 
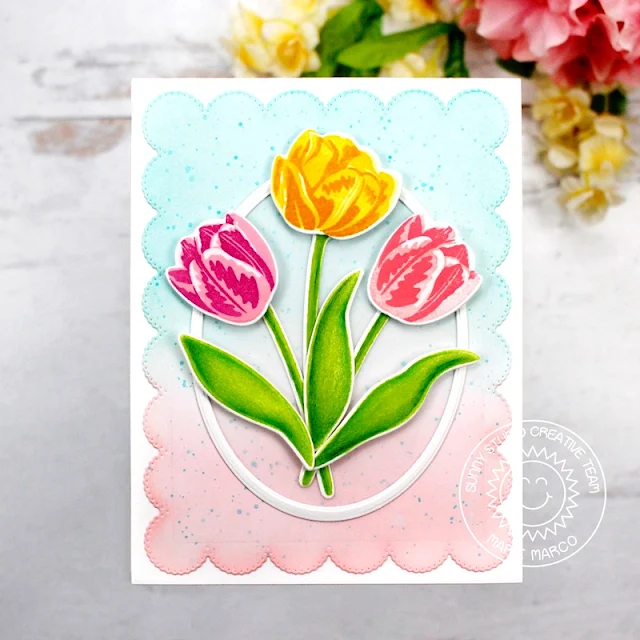
Sunny Studio Stamps: Tranquil Tulips Card by Marie Marco (featuring Loopy Letters Dies, Frilly Frame Dies)

My card today has a very simple design. To start,  I die cut an A2 sized base panel from 110 lb. Neenah Solar White Cardstock. For my background panel I used the Frilly Frames Eyelet Lace Die. I love the scalloped border this die creates! Then taking some Salvaged Patina Distress Oxide Ink, I lightly inked a little more than half the panel, and finished distress inking the rest with Saltwater Taffy Distress Oxide Ink. I also splattered some Salvaged Patina throughout the panel for a little texture. I then  adhered the background panel to the base panel using double sided tape adhesive. 

Next step was to stamp out all my lovely tulips onto Neenah Solar White Cardstock. Each layering flower stamp is individually labeled so it's easy to follow which order they go in. For each tulip bloom, I used three different colors with 3 different ink tones. For the purple tulip, I used a very light Princess Pink Dye Ink for the base, and then a slightly darker Pink in the shade Cotton Candy Dye ink  for the mid tone.These two inks are from MFTstamps. The darkest shade I used is Seedless Preserves Distress Oxide which is a purple that compliments the pink layers very well. For my full bloom yellow tulip, I used Lemon Chiffon Dye Ink, followed by a darker Lemon Drop Dye ink from MftStamps, and the darkest Ink is Fossilized Amber Distress Oxide Ink. 

Sunny Studio Stamps: Tranquil Tulips Card by Marie Marco (featuring Loopy Letters Dies, Frilly Frame Dies)

To make the base of the flower a little darker giving it a more defined gradient, I added a touch of Wild Honey Distress Oxide Ink only to the base. For the pink tulip, I used Spun Sugar Distress Ink, Saltwater Taffy Distress Ink, and finally Worn Lipstick Distress Oxide as the darkest shade. For all the stems and leaves, I used a bright green Twisted Citron Distress Ink, and then Polychromos Color pencils to add some shading. I cut out all the images using the corresponding Tranquil Tulips Dies.

To highlight their beauty, I kept my design very simple by placing all three tulips inside a white oval frame that I created using two oval nesting dies. I gave the flowers dimension by adhering each one with foam tape. I also used foam tape on all the leaves. For the inside of my card, I lightly inked the center of an oval with Salvaged Patina and added a single stemmed tulip, placed off to the side, to create room for my "You're the Best" sentiment. My sentiment was created using the Loopy Letter Dies which I cut from a gold metallic cardstock. 

That concludes this week's card inspiration using the awesome Tranquil Tulips Layering stamps! I had a lot of fun experimenting with various different inks to create the perfect tulip colors! I hope this inspires you to create more Spring projects especially for the upcoming Easter holiday! Thanks so much for joining me today and until next time, Happy Cardmaking! 

-----------------------------------------

Hello Crafty Friends! Catherine here, and today I am sharing some floral gift tags created with Tranquil Tulips Stamps and Vintage Jar Stamps.

Sunny Studio Stamps: Tranquil Tulips Gift Tags by Catherine Cohen (featuring Vintage Jar)

To start, I die-cut the tulips, leaves, and stems, with white cardstock using the coordinating Tranquil Tulips Dies. I placed the die cut images back into the negative spaces. I stamped the images layer by layer with the following Altenew inks:

Yellows: Citrus Burst, Fresh Lemon, Maple Yellow
Pinks: Frosty Pink, Cotton Candy, Coral Berry
Purples: Soft Lilac, Wisteria, Lavendar Fields
Greens: Firefly, Grass Field

I added some highlights onto the tulips and leaves with a white gel pen.

Sunny Studio Stamps: Tranquil Tulips Gift Tags by Catherine Cohen (featuring Vintage Jar)

For the jar, I die cut 6 jars (3 for the front and 3 for the back) out of white cardstock using Vintage Jar Dies. I placed 3 of the jars back into the negative space and stamped the jar using Vintage Jar Stamps with Lawn Fawn Kiddie Pool Ink. I set the 3 jars aside for the back of the tags.  For the front of the jars, I placed the remaining 3 white cardstock jars back into the negative space and stamped the stem images. Next, I stamped the jar on top of the stems using Vintage Jar Stamps and Lawn Fawn Kiddie Pool Ink.

I adhered the tulips, stems, and leaves onto the back of the jar fronts and then glued on the back of the jars. I tied some brown string around the top of the jars. I added tags from Window Quad Square Dies using paper from Gingham Pastels Paper. I added a “thanks” sentiment in the Tranquil Tulips Stamps set using the pennant from Fancy Frames Rectangle Dies.

Thank you so much for joining me today! I would love for you to visit me at Crafti-Cat! Have a lovely day!

Sunny Studio Supplies Used:

Vintage Jar Dies
Vintage Jar Dies
Shop at:
Sunny Studio
Vintage Jar Stamps
Vintage Jar Stamps
Shop at:
Sunny Studio
Fancy Frames- Rectangles
Shop at:
Sunny Studio
Loopy Letters Dies
Loopy Letters Dies
Shop at:
Sunny Studio
Gingham Pastels 6x6 Paper
Shop at:
Sunny Studio
Frilly Frames-Eyelet Lace
Shop at:
Sunny Studio
Window Quad Square Die
Shop at:
Sunny Studio
Tranquil Tulips Stamps
Shop at:
Sunny Studio
Tranquil Tulips Dies
Shop at:
Sunny Studio

Wednesday, January 11, 2023

Sneak Peek: Build-A-Birdhouse, Rainy Days and Ribbon & Lace Borders

Hello and welcome to day 3 of our Spring Peek Week!  All this week I am sharing cards showcasing our newest collection which will be available for purchase this Friday! Today I am sharing ideas with three new standalone die sets.

Card No. 1: Up first is a card showcasing our new Build-A-Birdhouse Dies. This die set comes with two birdhouse base images, three roof options, three different openings, other small accessories to customize your birdhouses and all the pieces you need to create two small birds.

For my first card I used our Out On A Limb Dies, cutting the tree branch portions from a woodgrain print from our Amazing Argyle Paper pack. For the leaves, they come with an embossed vein print which I emphasized by tracing them with my Copic Marker. I did the same by shading the embossing slats on my birdhouses to make them standout a bit more. For my background, I used a cloud print paper from our new Spring Fever Paper pack. A similar print can also be found in our Spring Fling Paper pack--It was one of my favorites so I knew I needed to make sure to have it live on in the new set as well. Lastly, I heat embossed a birthday greeting from our A Bird's Life Stamps onto a pendant strip from our Stitched Rectangle Dies.
Sunny Studio Blog: Birdhouses Hanging From A Tree Branch with Birds Card (using Build-A-Birdhouse & Out on A Limb Dies and Spring Fever Paper)
Card No. 2: For my next Build-A-Birdhouse card, rather than having my birdhouses hanging, I added them to posts which I created by cutting small strips of woodgrain embossed cardstock by Ranger (although Lawn Fawn and Simon Says Stamps both offer something similar as well). For my birdhouses I cut them from lavender, pink and yellow polka-dot tone-on-tone prints from our new Spring Fever Paper pack. I feel everything is cuter in polka-dots and I wish I had these birdhouses in real life! To keep things interested I mixed and matched the different styles to make them each unique.

I created my background by first inking up a white cardstock panel with Twisted Citron Distress ink and then cut grassy borders from masking material using our Slimline Nature Border Dies. I then used the mask with Mowed Lawn Distress Ink to add several grassy slopes to give the appearance my birdhouses are at the bottom of a small hill, cutting one grassy hill from actual cardstock to tuck my birdhouse posts behind. I then layered a white Picket Fence over the top, added a couple of blue jay birds from the die set and a "miss you" sentiment stamped in pink ink from our new Big Bold Greetings Stamps. I finished off my card by heat embossing the words "my friend" from our Super Duper Stamps onto a piece of dark grey cardstock to coordinate with the openings for my birdhouses. 
Sunny Studio Miss You My Friend Birds with Birdhouse, Grass & Fence (using Big Bold Greetings Stamps, Build-a-Birdhouse, Picket Fence & Slimline Nature Border Dies)

Card No. 3: For this Build-a-Birdhouse card I once again pulled out the tree branch from our Out On A Limb Dies, but this time rather than using my Copic markers to accentuate the veining detail in the leaves, I used a small finger sized foam dauber to accentuate one side of my leaf with Rustic Wilderness Distress Ink. For my landscape oriented card, I started by inking my white cardstock panel lightly with Broken China Distress Ink and then repeatedly ran the 2 stitched clouds from our Fluffy Cloud Dies through my die-cutting machine to create a full subtle background of clouds. I then assembled another trio of birdhouses, but this time I kept them all yellow with brown roofs and alternated the patterns for each using small patterned paper scraps I had on hand from our Spring Fling, Sleek Stripes and Dots & Stripes Pastels Paper packs. 

Rather than using the birds that come with the die set, this time I added small birds from our Little Birdie Stamps which I colored to look like canaries. When I was creating my cloud background the washi tape I was using to hold my dies in place caught the edge of my panel and tore the surface of my cardstock off, revealing the white core. However, I was determined to find a way to hide the boo-boo rather than start all over again since I was nearly done at that point. With this in mind, I stamped a sentiment from that same Little Birdie stamp set onto a thin stitched strip from our new Ribbon & Lace Border Dies using Versafine Clair Acorn Ink and adhered it along the bottom edge my the card to cover the mistake. It just goes to show almost every mistake can be covered with a little creativity.
Sunny Studio Bird Themed Birthday Card (using Build-A-Birdhouse, Out on A Limb, Ribbon & Lace, Fluffy Cloud Dies & Little Birdies Stamps)

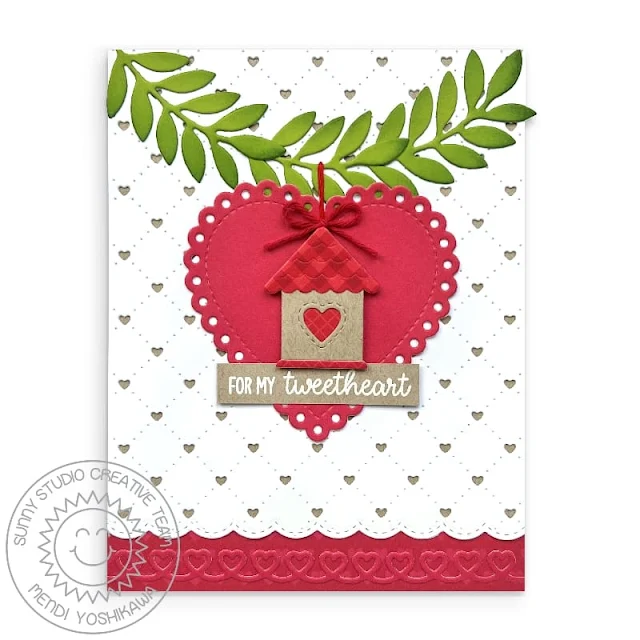
Card No. 4: I created a Valentine's Day themed card for my last idea today using the new Build-A-Birdhouse Dies. For my background I layered the Quilted Hearts Portrait Dies cut from white cardstock over the top of a kraft cardstock panel. I also added a stitched scalloped edge to both using our new slimline style Ribbon & Lace Border Dies. For the bottom of my card, I added a strip of red heart print patterned paper from our Rainbow Bright Paper pack and layered a loopy heart border also in red over the top from our Heartstrings Border Dies. I love the little extra detail and texture the heart border adds without competing visually with my birdhouse as the focal point.

For my birdhouse, I cut the body of the house from kraft cardstock, adding a stitched heart opening and using small scraps of red gingham paper from our Classic Gingham Paper pack to embellish my house. As a way to hang my birdhouse, I added a garland of leaves from our Spring Greenery Dies, cutting three and layering them to form a swag across the top of my card. I then cut a red Scalloped Heart to center behind my birdhouse, added a simple red twine bow and stamped "For My Tweetheart" greeting, heat embossed on a small strip of kraft cardstock from our Little Birdie Stamps.Sunny Studio Tweetheart Punny Valentine's Day Card (using Build-a-Birdhouse, Hayley Alphabet, Quilted Hearts, Heartstring Borders, Ribbon & Lace Borders, Spring Greenery & Scalloped Heart Dies)

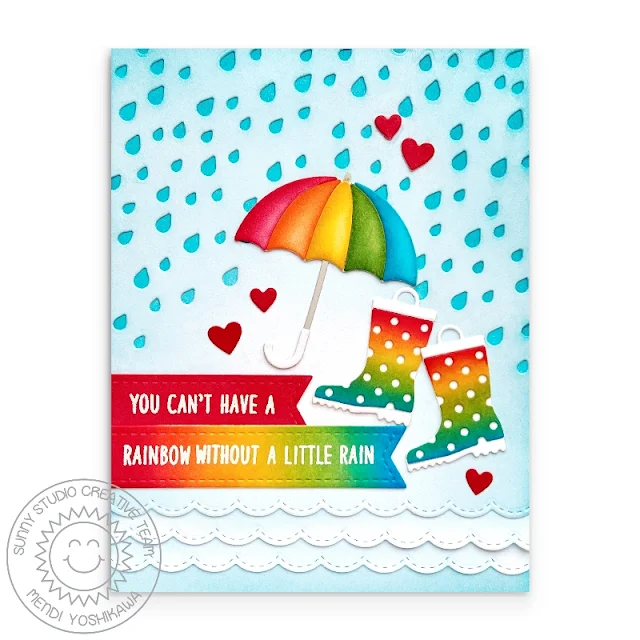
Card No. 5: Switching gears, I now have a series of cards to share featuring our new Rainy Days Dies which include all the pieces you need to create a layered umbrella, rain boots and several small groupings of raindrops. For this card I took all the small raindrops from the set and ran them through my die-cutting machine over and over again to create a custom background. If this is sounds too fussy or involved for you, I completely understand and I have shared an easier take on this look for card no. 8.

I started by cutting out all the pieces for my rain boots and umbrella from white cardstock and then inked them up piece by piece in the colors I wanted using distress ink with finger daubers, blending the colors of the rainbow for my polka-dot rain boots. While I had all my inks out and handy I also colored a small strip of paper for my stitched pennant which I cut out using our Stitched Rectangle Dies and heat embossed with a sentiment from our Over The Rainbow Stamps (heating it really well with a heat gun beforehand so my embossing powder wouldn't stick where I didn't want it). For the bottom of my card, I added three alternating layers of stitched scallops from our slimline length Ribbon & Lace Border Dies which I think almost look like ruffles. I needed something to visually balance the raindrops on the top of my card without being too distracting and I thought they fit the bill. Lastly I scattered some small red hearts from our Basic Mini Shape 2 Dies.

Sunny Studio Blog: Umbrella & Rain Boots Scalloped Cards (using Rainy Days Dies, Ribbon & Lace Dies and Over The Rainbow Stamps)

Card No. 6: If you're not feeling like having every pair of rain boots you make be polka-dot it's very easy to just eliminate the polka-dot layer from our new Rainy Days Dies and use the base of the boot die to determine the color of your boot which I did here using small scraps of patterned paper from our new Spring Fever Paper pack. Ironically I still gravitated towards polka-dot boots, but it opens up so many possibilities. This is yet another time I wish I could have these in real life! I think the rainbow gingham pair is my favorite! To frame my rain boots I used our Window Quad Square Dies which I cut from a tone-on-tone stripe from our Subtle Grey Tones Paper pack and added a lacy scalloped edge with our new Ribbon & Lace Border Dies. To back my square grid openings, I didn't want to add a color to compete with my colorful rain boots and white was feeling too washed out so I chose a soft grey cardstock (by Heffy Doodle) which I love!  I definitely must be better at incorporating grey in more of my projects. It's such a great neutral! I finished my card with the phrase "When it rains, look for a rainbow" from our Over The Rainbow Stamps
Sunny Studio Blog: Rain Boots Scalloped Cards (using Rainy Days Dies, Ribbon & Lace Dies, Over The Rainbow Stamps, Spring Fever & Subtle Grey Tones Paper)

Card No. 7: Next up is a fun card where I coordinated my paper pieced rain boots and umbrella from the Rainy Days Dies to my background. For my background I cut various pink and blue tone-on-tone strips of patterned paper from a number of different paper packs using the thin stitched ribbon die from our new Ribbon & Lace Border Dies. Almost all of these were using leftover pieces of paper I had after trimming down a 6x6 piece of paper for an A2 card front. I always keep a small Ziploc bag of these on hand and hoard my paper scraps for instances like this. I then alternated and adhered these strips on the diagonal in a repetitive pattern like a patchwork quilt, trimming off the excess as I went. To give your eye a tiny bit of rest (just a tiny bit) I layered a Stitched Circle Small Die with our Scalloped Circle Mat 3 Die, both cut from white cardstock. I then arranged my coordinating umbrella and rain boots in the center and stamped the sentiment "You Brighten My Day" from our Spring Showers Stamps, adding another small pink heart from our Basic Mini Shape 2 Dies.
Sunny Studio Umbrella & Rain Boots Diagonal Stripes Card (using Rainy Days, Ribbon & Lace Borders, Scalloped Circle Mat 3, Stitched Circle Small Dies & Various 6x6 Papers)

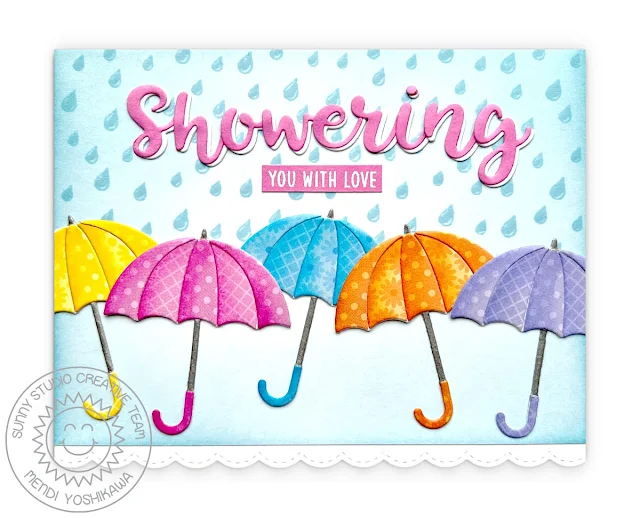
Card No. 8: My last card of the day focuses on the umbrella from our new Rainy Days Dies, creating a card that would be perfect for a bridal or baby shower. I cut five umbrellas from white cardstock and used a metallic silver Sharpie to color the metal portions of my umbrellas before layering the colorful portions over the top. I kept each individual umbrella a bright and happy monochromatic shade, alternating every other section with a different subtle tone-on-tone print from our Spring Fever, Gingham Pastels and Spring Fling Paper Packs. Before adhering my umbrellas to my card front, I stamped the background with raindrops using our Rain Showers Stamps. It's a mini 3x2 stamp set offering an excellent value! It has been designed to perfectly line up side to side and top to bottom on your card front in a repetitive pattern. I masked off the bottom portion of my card so that the raindrops would not fall below where I planned to add my row of umbrellas. Using our new Hayley Uppercase Alphabet Dies and Hayley Lowercase Alphabet Dies I created a custom greeting by spelling out the word "showering" and paired it with the words "You With Love" from our Spring Showers Stamps. Lastly I added a white scalloped border to the bottom of my card using our Ribbon & Lace Border Dies.
Sunny Studio Showering You With Love Baby or Bridal Shower Umbrella Card (using Rainy Days, Hayley Alphabet, Ribbon & Lace Border Dies and Spring Fever, Gingham Pastel & Spring Fling Paper)

That wraps up today's sneak peek. I'm so happy you joined me today! I'd love to give a $50 gift code to one lucky winner using the rafflecopter below. Our daily sneak peek contests run through Saturday, January 14th at Midnight PST with the winners announced here on Sunday, January 15th. :)

a Rafflecopter giveaway

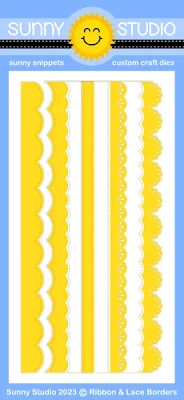
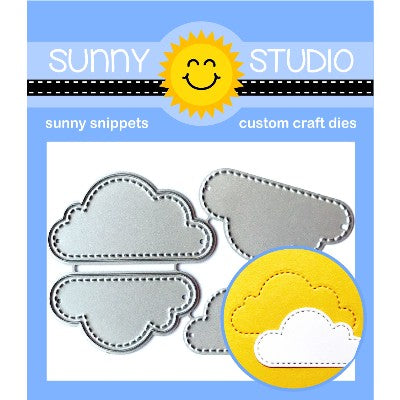
Here's a closer look at the our new Ribbon & Lace Dies, Build-A-Birdhouse Dies and Rainy Days Dies used today and available for purchase on Friday, January 13th.


Other Sunny Studio Supplies Used (some items are not available until January 13):

A Bird's Life Stamps
Shop at:
Sunny Studio
A Bird's Life Dies
A Bird's Life Dies
Shop at:
Sunny Studio
Picket Fence Border Dies
Shop at:
Sunny Studio
Stitched Rectangle Dies
Shop at:
Sunny Studio

Rain Showers Stamps
Rain Showers Stamps
Shop at:
Sunny Studio
Classic Gingham 6x6 Paper
Shop at:
Sunny Studio
Rainbow Bright 6x6 Paper
Shop at:
Sunny Studio
Gingham Pastels 6x6 Paper
Shop at:
Sunny Studio
Dots & Stripes Pastels 6x6 Paper
Shop at:
Sunny Studio
Mini Basic Shape Dies 2
Shop at:
Sunny Studio
Fluffy Clouds Dies
Fluffy Clouds Dies
Shop at:
Sunny Studio
Super Duper Stamps
Super Duper Stamps
Shop at:
Sunny Studio
Subtle Grey Tones Paper
Shop at:
Sunny Studio
Spring Showers Stamps
Shop at:
Sunny Studio
Spring Showers Dies
Spring Showers Dies
Shop at:
Sunny Studio
Heartstrings Border Dies
Shop at:
Sunny Studio
Spring Fling Paper
Spring Fling Paper
Shop at:
Sunny Studio
Slimline Nature Borders
Shop at:
Sunny Studio
Window Quad Square Die
Shop at:
Sunny Studio
Classic Sunburst Paper
Shop at:
Sunny Studio
Sleek Stripes Paper
Sleek Stripes Paper
Shop at:
Sunny Studio
Little Birdie Stamps
Shop at:
Sunny Studio
Little Birdie Dies
Little Birdie Dies
Shop at:
Sunny Studio
Out on A Limb Dies
Out on A Limb Dies
Shop at:
Sunny Studio
Quilted Hearts Portrait
Shop at:
Sunny Studio
Scalloped Heart Dies
Shop at:
Sunny Studio
Spring Greenery Dies
Shop at:
Sunny Studio
Big Bold Greetings Stamps
Shop at:
Sunny Studio
Big Bold Greetings Dies
Shop at:
Sunny Studio
Hayley Lowercase Alphabet Dies
Shop at:
Sunny Studio
Hayley Uppercase Alphabet Dies
Shop at:
Sunny Studio
Spring Fever Paper
Spring Fever Paper
Shop at:
Sunny Studio
Versafine Onyx Black Ink
Shop at:
Sunny Studio
Versafine Clair Ink- Acorn
Shop at:
Sunny Studio
Hero Arts White Detail
Shop at:
Sunny Studio
VersaMark Watermark Ink
Shop at:
Sunny Studio
Striped Silly 6x6 Paper
Shop at:
Sunny Studio
Polka-dot Parade 6x6 Paper
Shop at:
Sunny Studio
Scalloped Circle Mat 3 Dies
Shop at:
Sunny Studio
Stitched Circle Small Dies
Shop at:
Sunny Studio