Showing posts with label Holiday Greetings. Show all posts

Friday, December 16, 2022

Snow One Like You Cards with Tina and Vanessa

Hello crafty friends, it’s Tina with a new Christmas card for you featuring the adorable Snow One Like You stamp and die set. Each year during the holiday season we always receive a few cards with photos of families and friends. So, I thought it would be fun if the sweet girl was pictured together with some of her frosty besties!

Sunny Studio Stamps: Snow One Like You Holiday Card by Tina (featuring Feeling Frosty, Snowman Kisses)

I love to mix and match my stamps and dies and in the Sunny Studio shop you’ll find several cute snowmen sets. Today, I am also using the Feeling Frosty set and Snowman KissesAfter stamping and die cutting all my images I colored them with Copic markers in bright happy colors.

The background panel consists of a rectangle of Neenah Solar White card stock inked up with Distress Oxides  Salvaged Patina and Uncharted Mariner, sprinkled with some water droplets and white paint for extra interest. I added two white snowbanks to this panel. The frame of the card was made out of a piece of pretty gray snowflake paper from Joyful Holiday Paper cut with two rectangle dies. For my sentiment, I combined text blocks from Reindeer Games and stamped them directly to a narrow white strip.

Sunny Studio Stamps: Snow One Like You Holiday Card by Tina (featuring Feeling Frosty, Snowman Kisses)

And then I was ready to assemble the card, I mounted the snowflake border to the background panel with foam tape for dimension. Next, I placed the largest three snowmen in the second row and attached them with glue dots. I like using glue dots when I am not completely sure of my placement. I can easily remove images and shift them in place. The images in the front row were added with foam tape, as well as the sentiment banner. I glued the entire panel to a teal card base and used my white gel pen for some final touches of snow and detail.

My pile of Christmas cards is growing, and I am almost done with my stash for 2022. I hope you are enjoying making your holiday cards too! Thank you for visiting the blog and I’ll see you soon!

-------------------------------------------

Hello to you! Vanessa here with a new Christmas card using the super adorable Snow One Like You set.

Sunny Studio Stamps: Snow One Like You Holiday Card by Vanessa Menhorn (featuring Holiday Greetings, Winter Greenery Dies, Snowflake Circle Frame Dies)

I first trimmed a panel of Kraft cardstock slightly smaller than my white card base, applied white ink droplets and adhered it to the card. Now I stamped the cute image, colored it with Copics, die-cut it with the matching die and adhered the piece with foam tape. I stamped the large sentiment with two pink tones, die-cut it and adhered it. Then I die-cut the leaves and the snowflakes, colored the holly with Copics and adhered the die-cuts. 

These sets were used:
Snow One Like You stamps + dies
Penguin Party stamps
Holiday Greetings stamps + dies
Winter Greenery Dies
Snowflake Circle Frame Die

Iridescent Pearls

Sunny Studio Stamps: Snow One Like You Holiday Card by Vanessa Menhorn (featuring Holiday Greetings, Winter Greenery Dies, Snowflake Circle Frame Dies)

After I had stamped the small sentiment with Versamark ink onto black cardstock, I heat-embossed it with white embossing powder, trimmed the strips from it and adhered these, too. Finally, I added highlights with a white gel pen and adhered the pearls for the berries.

Enjoy your weekend, everybody!

Sunny Studio Supplies Used:


Feeling Frosty Stamps
Shop at:
Sunny Studio
Feeling Frosty Dies
Feeling Frosty Dies
Shop at:
Sunny Studio
Snowflake Circle Frame
Shop at:
Sunny Studio
Winter Greenery DIes
Shop at:
Sunny Studio
Holiday Greetings Stamps
Shop at:
Sunny Studio
Holiday Greetings Dies
Shop at:
Sunny Studio
Penguin Party Stamps
Shop at:
Sunny Studio
Reindeer Games Stamps
Shop at:
Sunny Studio
Snowman Kisses Stamps
Shop at:
Sunny Studio
Snowman Kisses Dies
Snowman Kisses Dies
Shop at:
Sunny Studio
Snow One Like You Stamps
Shop at:
Sunny Studio
Snow One Like You Dies
Shop at:
Sunny Studio


Tuesday, December 13, 2022

Holiday Greetings Cards with Kavya and Isha

Hi folks. Kavya here with another fun holiday project! If you are looking for some fun and quick cards, this one is for you. I have a bunch of washi tape lying around so I decided to create a card using mostly tape. You can also use strips of paper if you don’t have washi tape.  

Sunny Studio Stamps: Holiday Greetings & Classy Christmas Holiday Card by Kavya

I simply layered the tape on a card base diagonally. I used shades of green, pink, red and mint for the background. 

Sunny Studio Stamps: Holiday Greetings & Classy Christmas Holiday Card by Kavya

Then, I stamped and colored images from Classy Christmas Stamp. Added a sentiment from Holiday Greetings Stamp and I was done!

That’s it! I was done! I hope you liked this fun project ;) Happy Crafting!

-------------------------------------

Hello everyone! Isha here with a Christmas card featuring our Holiday Greetings Stamp and coordinating dies. I went for a faux watercolor background.

Sunny Studio Stamps: Holiday Greetings & Classy Christmas Holiday Card by Isha Gupta

To start, I stamped the flowers and pine leaves from the Classy Christmas stamps. I inked them using distress ink, spritz with water twice and stamp onto watercolor paper. Once dry, flick gold and white paint.

Stamp the flower and leaves onto vellum using versamark ink, sprinkle WOW! opaque white embossing powder, heat set and color using copic markers onto the back side. Die-cut using the coordinating dies. Adhere this to a red card base.

Sunny Studio Stamps: Holiday Greetings & Classy Christmas Holiday Card by Isha Gupta

Stamp the sentiment from the Holiday Greetings stamp. Die-cut using the coordinating dies. Die-cut 3 more times and stack these together. Tie a gold floss and adhere the sentiment to the card. Adhere the vellum flower and leaves. 

Thank you for dropping by and have a nice day!

Sunny Studio Supplies Used:

Classy Christmas Stamps
Shop at:
Sunny Studio
Classy Christmas Dies
Shop at:
Sunny Studio
Holiday Greetings Stamps
Shop at:
Sunny Studio
Holiday Greetings Dies
Shop at:
Sunny Studio

Thursday, December 8, 2022

Winter Wreaths with Marine and Waleska

Hello crafty friends, Marine here, super happy to be back with this new shaker card showcasing the beautiful Winter Wreaths stamp set. As very often I went for non-traditional colors, and I started off by stamping the wreath using blue ink. I used blue shades to stamp the poinsettias, and a light grey ink to stamp the bow. And I added embossed details in silver on those elements to bring some shine.

Sunny Studio Stamps: Winter Wreaths Holiday Card by Marine Simon (featuring Comic Strip Speech Bubble Dies, Holiday Greetings)

Next I created the window. I cut a white Comic Strip Speech Bubble panel, a second one out of scrap paper, and an acetate panel. I temporarily taped the second frame to the acetate panel, and used white ink along with a sponge dauber to create a frosty look on the acetate. And I also added splatters of that same white ink all over the acetate.

Sunny Studio Stamps: Winter Wreaths Holiday Card by Marine Simon (featuring Comic Strip Speech Bubble Dies, Holiday Greetings)

Next I worked on the shaker panel. I first attached the white frame to the acetate using double sided tape. At the back of the panel, I added foam strips on the four edges and on the slim strips as well. I made the inside foam edges non sticky using my powder tool, added White Snowflake Confetti and iridescent confetti inside each small window, and closed the shaker panel using a pattern paper from the Very Merry paper pack.

I heat embossed my "Happy Holidays" greeting from Holiday Greetings in silver on black cardstock, cut it using the coordinating die and attached it below the wreath using foam squares. And finally I added a few clear droplets here and there to bring more shine to the card.

Sunny Studio Stamps: Winter Wreaths Holiday Card by Marine Simon (featuring Comic Strip Speech Bubble Dies, Holiday Greetings)

And that's it, this is the final result and I hope you like it. As always, you are welcome to check the process video for more details (click on the image above). Thank you so much for stopping by, and see you next time.

-------------------------------------------------

Hello there, Waleska here. Today I have card inspiration for you with two of my favorite elements, rainbow colors and inks! This colorful card is just so happy and bright I hope you like it!


Sunny Studio Stamps: Winter Wreaths Holiday Card by Waleska Galindo (featuring Gingerbread House Dies, Fancy Frame Dies)


For this card I started by creating the inky background I used some of my favorite Oxide Ink colors on Nina Solar White cardstock. The colors I used are Festive Berries, Mustard Seed, Spiced Marmalade, Mowed Lawn, Peacock Feathers and Wilted Violet. I added water splashes to this panel to add interest and for some shine I added glitter watercolor too. I then stamped the wreath from 
Winter Wreaths, I used the pine bough with white embossing powder and I inked it with the same colors I used for the background panel, I cut the wreath with the coordinating die and I adhere it to the center of my front panel.

I stamped the beautiful layered bow that comes in the stamp set trying to match the colors I previously used. I used Spectrum Noir Inks in tones: Red: bordeaux, orange and Chinese red; Yellow: honey pot, lemon tonic and straw bale; Purple: damson wine, crushed velvet and pale fig; Aqua: Lagoon, parakeet and Oasis. I love the 3D look of this bow.  

Sunny Studio Stamps: Winter Wreaths Holiday Card by Waleska Galindo (featuring Gingerbread House Dies, Fancy Frame Dies)

I cut some peppermint candies from the Gingerbread House dies and I started decorating the wreath with all this elements. Finally I added a frame from the Fancy Frame Rectangle dies with white cardstock and stamped the sentiment from the Jolly Gingerbread stamp set. Super fun and colorful card, thank you so much for stopping by, have a wonderful rest of your day!

Sunny Studio Supplies Used:

Gingerbread House Dies
Shop at:
Sunny Studio
Jolly Gingerbread Stamps
Shop at:
Sunny Studio
Fancy Frames- Rectangles
Shop at:
Sunny Studio
Comic Strip Speech Bubble Dies
Shop at:
Sunny Studio
Very Merry 6x6 Paper
Shop at:
Sunny Studio
Holiday Greetings Stamps
Shop at:
Sunny Studio
Holiday Greetings Dies
Shop at:
Sunny Studio
Winter Wreaths Stamps
Shop at:
Sunny Studio
Winter Wreaths Dies
Winter Wreaths Dies
Shop at:
Sunny Studio

Wednesday, December 7, 2022

Penguin Party Cards with Alma and Marie

Hello my dears. It's Alma here and today I want to show you a card with the super sweet Penguin Party Stamps I chose a rectangle format for the card and I die-cut three windows with the Wonky Windows Dies.

Sunny Studio Stamps Penguin Party, Wonky Windows & Winter Greenery Handmade Holiday Christmas Card with Alma Stork

Then I stamped the three penguins with the gifts from the Penguin Party Stamps and die-cut them with the Penguin Party Dies. After that I coloured them with Copics. Then I glued the cardstock with the windows on the red striped paper from the Joyful Holiday Paper . Then I added snowflakes with the white gel pen. Then I die-cutted green leaves with the Winter Greenery Dies and glued them together with the penguins on the cardstock.

Sunny Studio Stamps Penguin Party, Wonky Windows & Winter Greenery Handmade Holiday Christmas Card with Alma Stork

-----------------------------------------

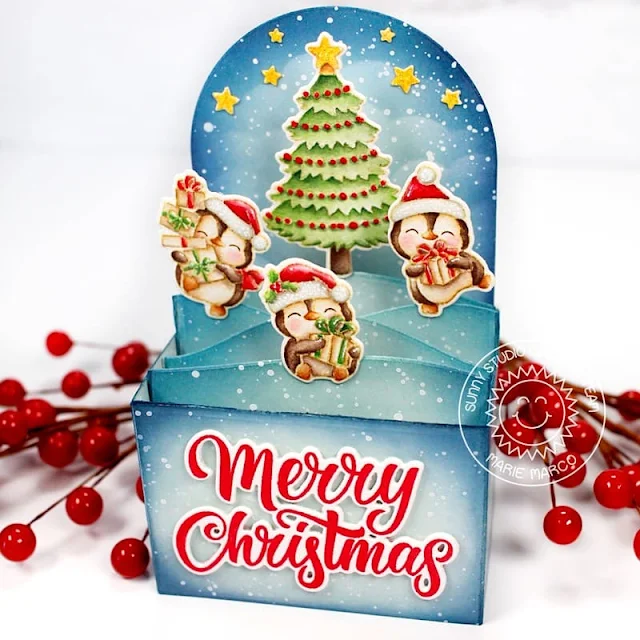
Hi Crafty Friends! Marie here. Happy December! Christmas is finally in the air! I'm sure we are all busier now more than ever trying to create as many cards as possible before the Holiday deadline. I know I am! So for this  week's card inspiration,  I am sharing a super simple and festive box card featuring Sunny Studio's Penguin Party Stamps and the Holiday Greetings Stamps. This happy little box card is sure to bring smiles to your friends and loved ones  and will make such a cute display piece this Christmas! 

Sunny Studio Stamps Penguin Party Pop-up Box Holiday Christmas Card with Marie Marco

To start off,  I die cut all the elements of my interactive box card using the Lawn Fawn scalloped box card- pop up die. For this, I used Bristol smooth cardstock paper for easy ink blending. Once I had all my box card panels, I cut off all the box flaps so that the only thing left is a box. I then took an arched dome shaped nesting die to create my background panel. I used bristol smooth cardstock for this also. I then ink blended the outside of my box, and all four snow drift panels using Speckled Egg Distress Oxide ink followed by Uncharted Mariner Distress Ink. For the Domed Background panel, I used a cloud stencil to create some soft clouds using Speckled Egg Distress oxide Ink and Uncharted Mariner Distress ink for all the edges.  Before putting together the box, I used a watered down acrylic paint to splatter on some snow texture to the outside of the box, the snowdrift panels, and the background panel. 

Sunny Studio Stamps Penguin Party Pop-up Box Holiday Christmas Card with Marie Marco

After putting together the box, using double sided adhesive tape and Bearly Art Craft Glue, I stamped out all my images from the Penguin Party Stamp and Christmas Tree from the Cozy Christmas Stamp onto watercolor paper using Distress Ink in Antique Linen. I then used the Penguin Party Dies and Cozy Christmas Dies to cut out all the images. 

I stamped out the beautiful "Merry Christmas" sentiment from the Holiday Greetings Stamps using Candied Apple Distress Oxide Ink. I cut out the sentiment using the corresponding Holiday Greetings Dies. To add a little bit of dimension to the Merry Christmas greeting, I die cut the greeting 2 more times and layered the pieces together so I could create height without using foam tape.  I  played around with my image placement but before adhering my images I  reinforced all of them using a thin strip of 110 lb cardstock which I glued to the back of each image and then adhered them to the snow drifts. Doing this ensures that they will be strong enough to stand on their own.  For my finishing touch, I added a few die cut stars to the background and made them sparkle with Ranger Stickles Glitter Glue. 

Sunny Studio Stamps Penguin Party Pop-up Box Holiday Christmas Card with Marie Marco

And that does it for this week's Holiday Card Inspiration! Thank you so much for joining me today!! I wish you all a very Happy Card-crafting Week!!! 

Monday, December 5, 2022

Snow One Like You Cards with Bobbi and Cathy

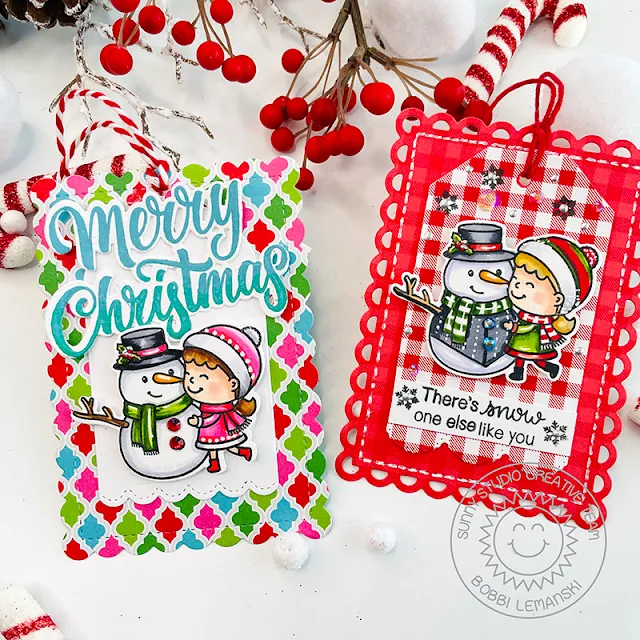
Hello Sunny friends. It’s Bobbi here with a couple of festive tags featuring the new Snow One Like You stamps and dies

Sunny Studio Stamps: Snow One Like You Winter Themed Holiday Tags by Bobbi Lemanski (featuring Holiday Greetings, Mini Mat & Tag Dies)

This sweet snowman and girl duo are adorably cute and the perfect size to use with the Mini Mat & Tag die sets.

Sunny Studio Stamps: Snow One Like You Winter Themed Holiday Tags by Bobbi Lemanski (featuring Holiday Greetings, Mini Mat & Tag Dies)

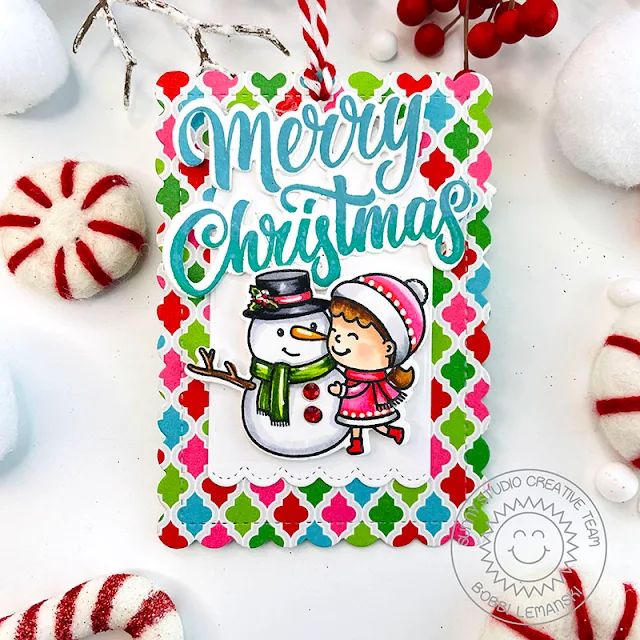
For my first tag, I used the Mini Mat & Tag 1 dies for the mat and Mini Mat & Tag 2 dies for the tag. I cut the mat from a pattern paper from the Joyful Holiday Paper Pack and the tag from white cardstock.  I stamped and colored the snowman and girl using Copic markers in BV000, YG67, YG03, R29, R14, RV09, RV55, C100, C07, C05 and C03.

Sunny Studio Stamps: Snow One Like You Winter Themed Holiday Tags by Bobbi Lemanski (featuring Holiday Greetings, Mini Mat & Tag Dies)

I attached the tag to the mat and used foam tabs to attach the snowman/girl image. The foam tabs make it stand out a bit from the background. This is such a quick tag to make. I just added a bold sentiment at the top using the Holiday Greetings Sentiments stamps and dies and a baker’s twine string to finish the tag. I will write my to/from on the back of the pattern paper before attaching the tag.

Sunny Studio Stamps: Snow One Like You Winter Themed Holiday Tags by Bobbi Lemanski (featuring Holiday Greetings, Mini Mat & Tag Dies)

My second tag is similar to the first. I used the mat from the Mini Mat & Tag 2 die set and the tag from Mini Mat &Tag 4 die set. I used the sentiment from the Snow One Like You stamp set. The pattern paper is also from the Joyful Holiday Paper Pack.

Sunny Studio Stamps: Snow One Like You Winter Themed Holiday Tags by Bobbi Lemanski (featuring Holiday Greetings, Mini Mat & Tag Dies)

I colored the image in red/green/white colors for a more traditional look. I added some faux white stitching around the mini mat using my Gelly Roll white pen. A few snowflakes and iridescent gems finish off this bright, red tag.

Thanks for stopping by today. If you want to see more ideas and inspiration from me, subscribe to my blog, BobbiHartDesign.com. I’ll send you updates on new posts! You can also follow me on Instagram as @BobbiHartDesign and on Facebook as BobbiHartDesign.

--------------------------------------------------

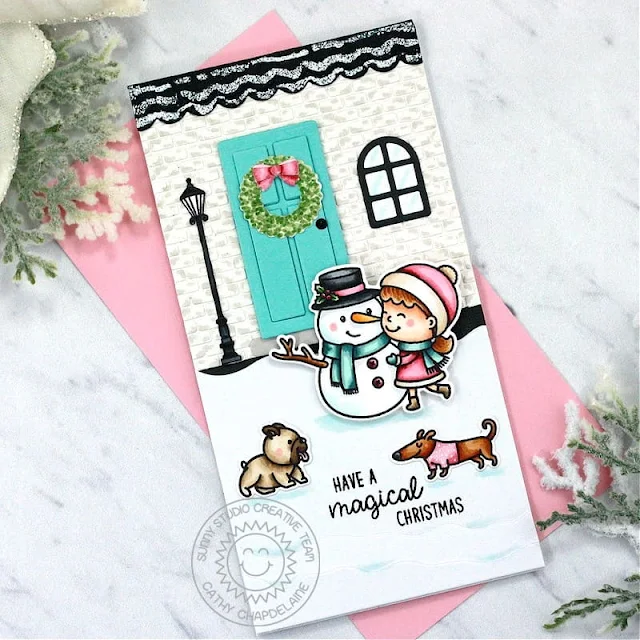
Hey friends! Cathy here today with a fun card featuring the Snow One Like You Stamps. This adorable stamp reminds me of Frosty the Snowman! The cute little girl and her pups are welcoming him to their home for Christmas!


Sunny Studio Stamps: Snow One Like You Winter Themed Holiday Card by Cathy Chapdelaine (featuring Gingerbread House Dies, Sweet Treats House Add-On Dies)

I started this mini slimline card by creating the front of the house. This took a little bit of time, but it was a fun process! First, I cut a piece of off-white cardstock 3 1/4" x 3 1/4". To create the brickwork, I die-cut a small rectangle die from the Gingerbread House Dies from off-white cardstock numerous times and adhered them in staggered rows to the cardstock piece. I trimmed off any “bricks” that overlapped the edges. I also added random areas of gray with a Copic marker. For the roof, I die-cut 2 scalloped edge dies from the Sweet Treat House Add-On from black cardstock and used a Versamark pen with white embossing powder for snow. I adhered them to the top of the cardstock piece and trimmed the edges on both sides with scissors. I cut a piece of black cardstock 1” x 3 1/4" and adhered it tucked slightly under the bottom edge of the 3 1/4" x 3 1/4" cardstock piece. I then adhered this combined piece to the top of a 3 1/4” x 6 1/4" card front.


For the snowdrifts, I die-cut the Tropical Trees Backdrop Die from white cardstock and cut the “sky” portion of the die-cut to 2 3/4" x 3 1/4". I heat embossed a sentiment from the Santa Claus Lane Stamps and adhered this piece to the bottom of the card front. I repeated this process for the small snowdrifts at the very bottom of the card. I cut a “sky” portion to 1” x 3 1/4" and adhered it to the bottom and then adhered a “sand” portion on top and trimmed the edges with scissors.


Sunny Studio Stamps: Snow One Like You Winter Themed Holiday Card by Cathy Chapdelaine (featuring Gingerbread House Dies, Sweet Treats House Add-On Dies)

I die-cut the door, wreath and bow from the Sweet Treat House Add-on. For extra dimension on the door, I die-cut the center panels 3 times and layered them and colored the wreath with Copics. I die-cut the window from the Gingerbread House Dies and stamped, colored and fussy cut the lamppost from the Paris Afternoon Stamps.


I stamped the images on Neenah Classic Crest 80lb solar white cardstock, colored them with Copics and die-cut them using the coordinating dies. I used the following stamps and dies:
Snow One Like You Stamps and Dies

Critters on the Go Stamps and Dies


To finish, I used a BG000 Copic under the images and around the bottom snowdrifts to help them stand out more and add a bit of color to the white snow.


I hope you enjoyed my frosty scene and thanks for stopping by today! For more inspiration, please visit my blog www.inkredibleadventures.com and you can also find me on Instagram as @cathy.chapdelaine.


Sunny Studio Supplies Used:

Gingerbread House Dies
Shop at:
Sunny Studio
Santa Claus Lane Stamps
Shop at:
Sunny Studio
Sweet Treats House Add-on
Shop at:
Sunny Studio
Critters on the Go Stamps
Shop at:
Sunny Studio
Critters on the Go Dies
Shop at:
Sunny Studio
Paris Afternoon Stamps
Shop at:
Sunny Studio
Tropical Trees Backdrop
Shop at:
Sunny Studio
Holiday Greetings Stamps
Shop at:
Sunny Studio
Holiday Greetings Dies
Shop at:
Sunny Studio
Snow One Like You Stamps
Shop at:
Sunny Studio
Snow One Like You Dies
Shop at:
Sunny Studio
Mini Mat & Tag 1 Dies
Shop at:
Sunny Studio
Mini Mat & Tag 2 Dies
Shop at:
Sunny Studio
Joyful Holiday Paper
Shop at:
Sunny Studio